Strategy Game Camera: Unity's New Input System
/I was working on a prototype for a potential new project and I needed a camera controller. I was also using Unity’s “new” input system. And I thought, hey, that could be a good tutorial…
There’s also a written post on the New Input System. Check the navigation to the right.
The goal here is to build a camera controller that could be used in a wide variety of strategy games. And to do it using Unity’s “New” Input System.
The camera controller will include:
Horizontal motion
Rotation
Zoom/elevate mechanic
Dragging the world with the mouse
Moving when the mouse is near the screen edge
Since I’ll be using the New Input System, you’ll want to be familiar with that before diving too deep into this camera controller. Check either the video or the written blog post.
If you’re just here for the code or want to copy and paste, you can get the code along with the Input Action Asset on GitHub.
Build the Rig

Camera rig Hierarchy
The first step to getting the camera working is to build the camera rig. For my purposes, I choose to keep it simple with an empty base object that will translate and rotate in the horizontal plane plus a child camera object that will move vertically while also zooming in and out.
I’d also recommend adding in something like a sphere or cube (remove its collider) at the same position as the empty base object. This gives us an idea of what the camera can see and how and where to position the camera object. It’s just easy debugging and once you’re happy with the camera you can delete the extra object.

Camera object transform settings
For my setup, my base object is positioned on the origin with no rotation or scaling. I’ve placed the camera object at (0, 8.3, -8.8) with no rotation (we’ll have the camera “look at” the target in the code).
For your project, you’ll want to play with the location to help tune the feel of your camera.
Input Settings

Input Action Asset for the Camera Controller
For the camera controller, I used a mix of events and directly polling inputs. Sometimes one is easier to use than another. For many of these inputs, I defined them in an Input Action Asset. For some mouse events, I simply polled the buttons directly. If that doesn’t make sense hopefully it will.
In the Input Action Asset, I created an action map for the camera and three actions - movement, rotate, and elevate. For the movement action I created two bindings to allow the WASD keys and arrows keys to be used. It’s easy, so why not? Also important, both rotate and elevate have their action type set to Vector2.

Importantly the rotate action is using the delta of the mouse position not the actual position. This allows for smooth movement and avoids the camera snapping around in a weird way.
We’ll be making use of the C# events. So make sure to save or have auto-save enabled. We also need to generate the C# code. To do this select the Input Action Asset in your project folders and then in the inspector click the “generate C# class” toggle and press apply.

Variables and More Variables!
Next, we need to create a camera controller script and attach it to the base object of our camera rig. Then inside of a camera controller class we need to create our variables. And there’s a poop ton of them.
The first two variables will be used to cache references for use with the input system.
The camera transform variable will cache a reference to the transform with the camera object - as opposed to the empty object that this class will be attached to.
All of the variables with the BoxGroup attribute will be used to tune the motion of the camera. Rather than going through them one by one… I’m hoping the name of the group and the name of the variable clarifies their approximate purpose.

The camera settings I’m using
The last four variables are all used to track various values between functions. Meaning one function might change a value and a second function will make use of that value. None of these need to have their value set outside of the class.
A couple of other bits: Notice that I’ve also added the UnityEngine.InputSystem namespace. Also, I’m using Odin Inspector to make my inspector a bit prettier and keep it organized. If you don’t have Odin, you should, but you can just delete or ignore the BoxGroup attributes.
Horizontal Motion
I’m going to try and build the controller in chunks with each chunk adding a new mechanic or piece of functionality. This also (roughly) means you can add or not add any of the chunks and the camera controller won’t break.
The first chunk is horizontal motion. It’s also the piece that takes the most setup… So bear with me.
First, we need to set up our Awake, OnEnable, and OnDisable functions.
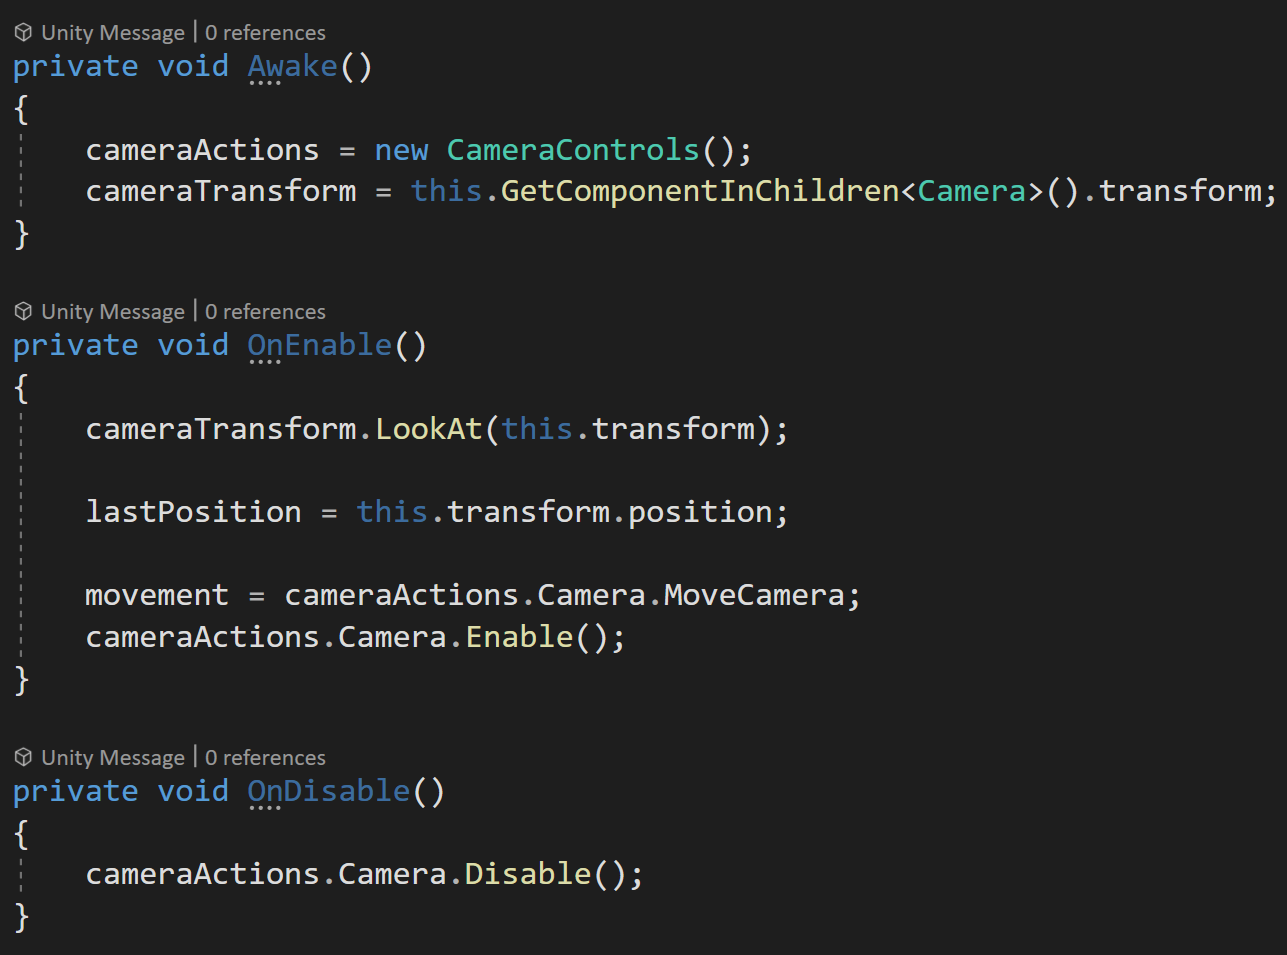
In the Awake function, we need to create an instance of our CameraControls input action asset. While we’re at it we can also grab a reference to the transform of our camera object.
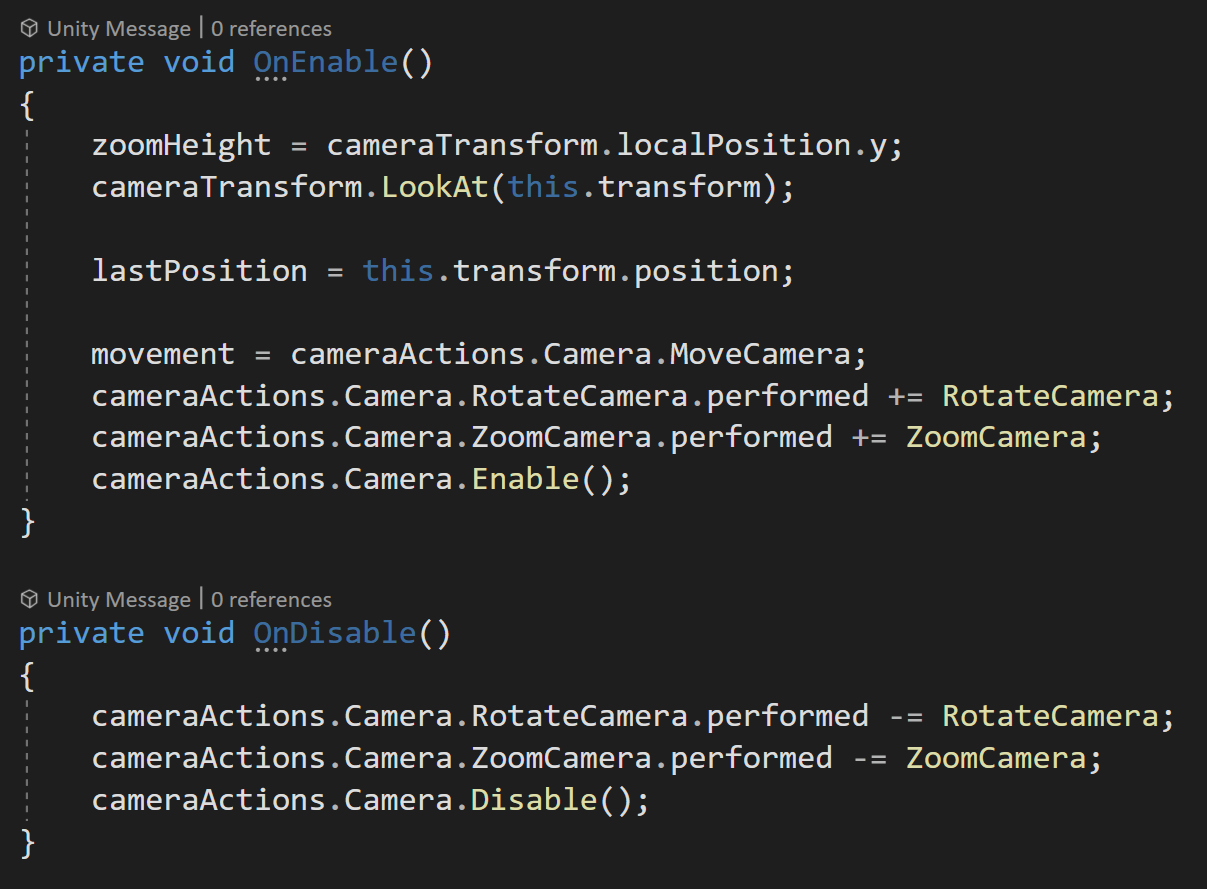
In the OnEnable function, we first need to make sure our camera is looking in the correct direction - we can do this with the LookAt function directed towards the camera rig base object (the same object the code is attached to).
Then we can save the current position to our last position variable - this value will get used to help create smooth motion.
Next, we’ll cache a reference to our MoveCamera action - we’ll be directly polling the values for movement. We also need to call Enable on the Camera action map.
In OnDisable we’ll call Disable on the camera action map to avoid issues and errors in case this object or component gets turned off.

Helper functions to get camera relative directions
Next, we need to create two helper functions. These will return camera relative directions. In particular, we’ll be getting the forward and right directions. These are all we’ll need since the camera rig base will only move in the horizontal plane, we’ll also squash the y value of these vectors to zero for the same reason.

Kind of yucky. But gets the job done.
Admittedly I don’t love the next function. It feels a bit clumsy, but since I’m not using a rigidbody and I want the camera to smoothly speed up and slow down I need a way to calculate and track the velocity (in the horizontal plane). So thus the Update Velocity function.
Nothing too special in the function other than once again squashing the y dimension of the velocity to zero. After calculating the velocity we update the value of the last position for the next frame. This ensures we are calculating the velocity for the frame and not from the start.
The next function is the poorly named Get Keyboard Movement function. This function polls the Camera Movement action to then set the target position.
In order to translate the input into the motion we want we need to be a bit careful. We’ll take the x component of the input and multiply it by the Camera Right function and add that to the y component of the input multiplied by the Camera Forward function. This ensures that the movement is in the horizontal plane and relative to the camera.
We then normalize the resulting vector to keep a uniform length so that the speed will be constant even if multiple keys are pressed (up and right for example).

The last step is to check if the input value’s square magnitude is above a threshold, if it is we add our input value to our target position.
Note that we are NOT moving the object here since eventually there will be multiple ways to move the camera base, we are instead adding the input to a target position vector and our NEXT function will use this target position to actually move the camera base.
If we were okay with herky-jerky movement the next function would be much simpler. If we were using the physics engine (rigidbody) to move the camera it would also be simpler. But I want smooth motion AND I don’t want to tune a rigidbody. So to create smooth ramping up and down of speed we need to do some work. This work will all happen in the Update Base Position function.
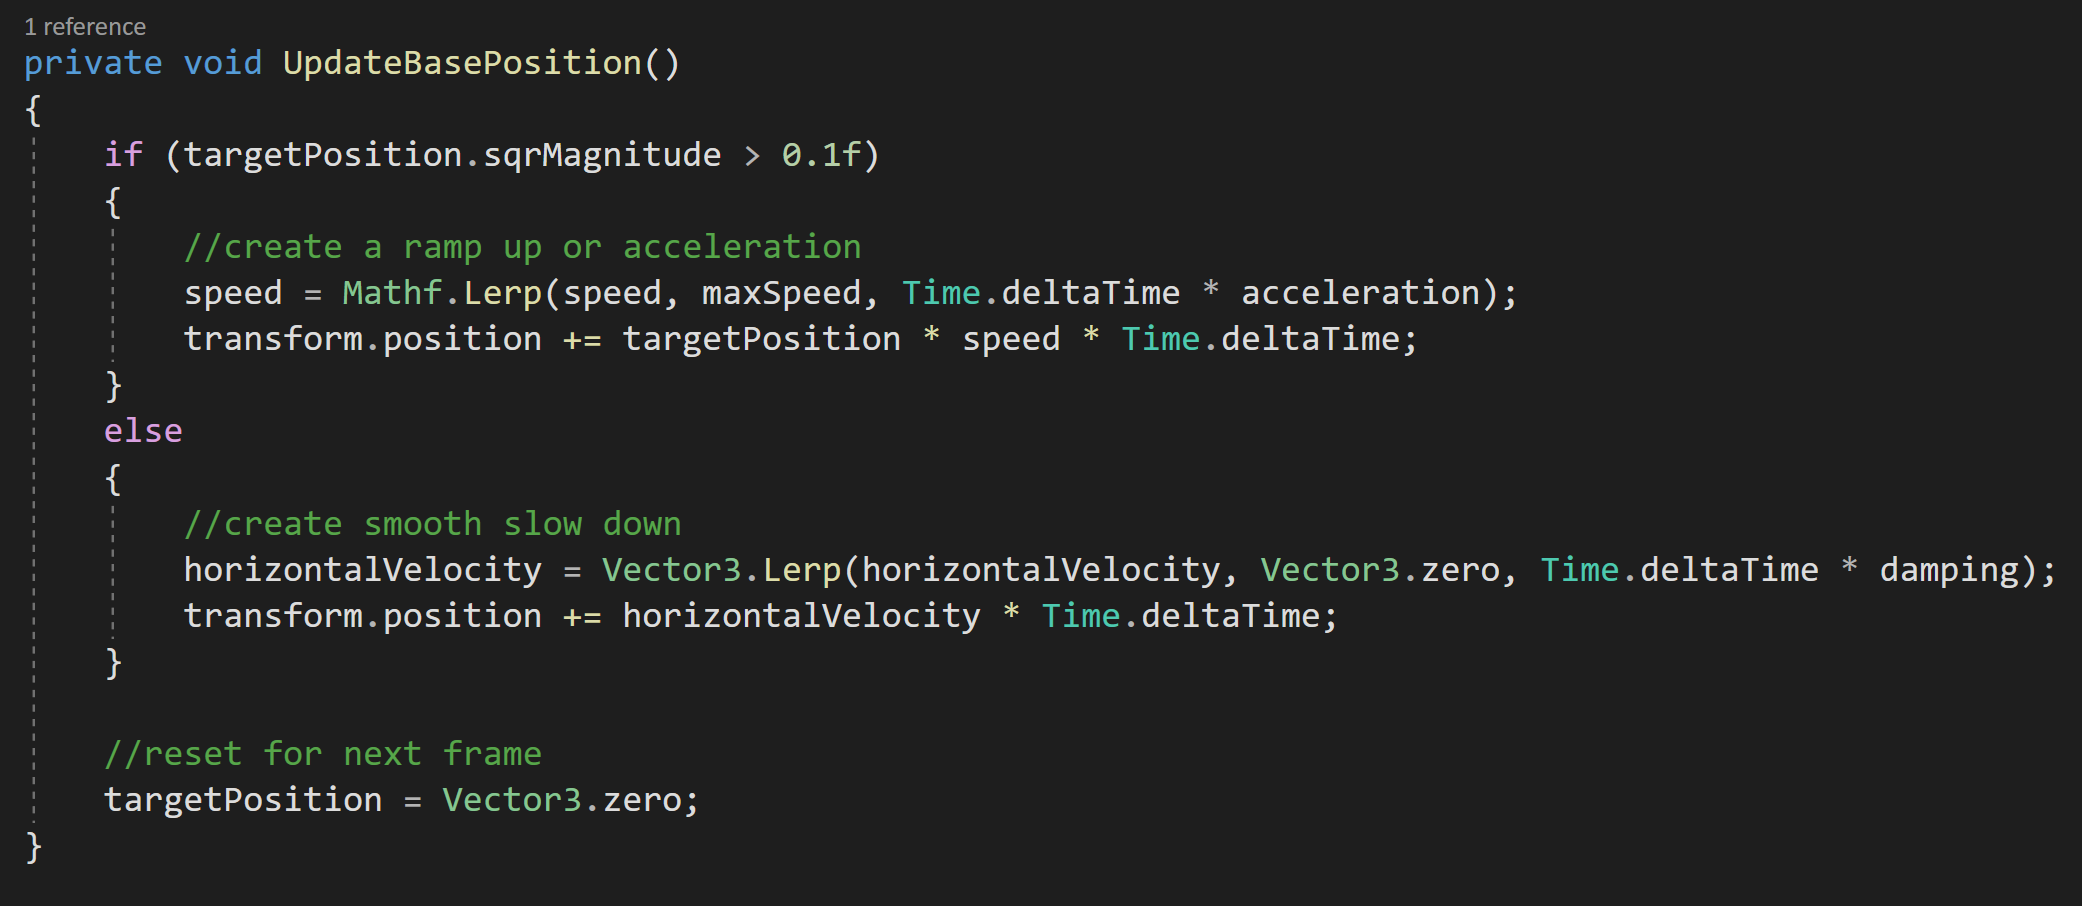
First, we’ll check if the square magnitude of the target position is greater than a threshold value. If it is this means the player is trying to get the camera to move. If that’s the case we’ll lerp our current speed up to the max speed. Note that we’re also multiplying Time Delta Time by our acceleration. The acceleration allows us to tune how quickly our camera gets up to speed.
The use of the threshold value is for two reasons. One so we aren’t comparing a float to zero, i.e. asking if a float equals zero can be problematic. Two, if we were using a game controller joystick even if it’s at rest the input value may not be zero.
Testing the Code so far - Smooth Horizontal Motion

We then add to the transform’s position an amount equal to the target position multiplied by the current camera speed and time delta time.
While they might look different these two lines of code are closely related to the Kinematic equations you may have learned in high school physics.
If the player is not trying to get the camera to move we want the camera to smoothly come to a stop. To do this we want to lerp our horizontal velocity (calculated constantly by the previous function) down to zero. Note rather than using our acceleration to control the rate of the slow down, I’ve used a different variable (damping) to allow separate control.
With the horizontal velocity lerping it’s way towards zero, we then add to the transform’s position a value equal to the horizontal velocity multiplied by time delta time.
The final step is to set the target position to zero to reset for the next frame’s input.
Our last step before we can test our code is to add our last three functions into the update function.
Camera Rotation

Okay. The hardest parts are over. Now we can add functionality reasonably quickly!
So let’s add the ability to rotate the camera. The rotation will be based on the delta or change in the mouse position and will only occur when the middle mouse button is pressed.
We’ll be using an event to trigger our rotation, so our first addition to our code is in our OnEnable and OnDisable functions. Here we’ll subscribe and unsubscribe the (soon to be created) Rotate Camera function to the performed event for the rotate camera action.

If you’re new to the input system, you’ll notice that the Rotate Camera function takes in a Callback Context object. This contains all the information about the action.
Rotating the camera should now be a thing!
Inside the function, we’ll first check if the middle mouse button is pressed. This ensures that the rotation doesn’t occur constantly but only when the button is pressed. For readability more than functionality, we’ll store the x value of the mouse delta and use it in the next line of code.
The last piece is to set the rotation of the transform (base object) and only on the y-axis. This is done using the x value of the mouse delta multiplied by the max rotation speed all added to the current y rotation.
And that’s it. With the event getting invoked there’s no need to add the function to our update function. Nice and easy.
Vertical Camera Motion
With horizontal and rotational motion working it would be nice to move the camera up and down to let the player see more or less of the world. For controlling the “zooming” we’ll be using the mouse scroll wheel.
This motion, I found to be one of the more complicated as there were several bits I wanted to include. I wanted there to be a min and max height for the camera - this keeps the player from zooming too far out or zooming down to nothingness - also while going up and down it feels a bit more natural if the camera gets closer or farther away from what it’s looking at.
This zoom motion is another good use of events so we need need to make a couple of additions to the OnEnable and OnDisable. Just like we did with the rotation we need to subscribe and unsubscribe to the performed event for the zoom camera action. We also need to set the value of zoom height equal to the local y position of the camera - this gives an initial value and prevents the camera from doing wacky things.
Then inside the Zoom Camera function, we’ll cache a reference to the y component of the scroll wheel input and divide by 100 - this scales the value to something more useful (in my opinion).
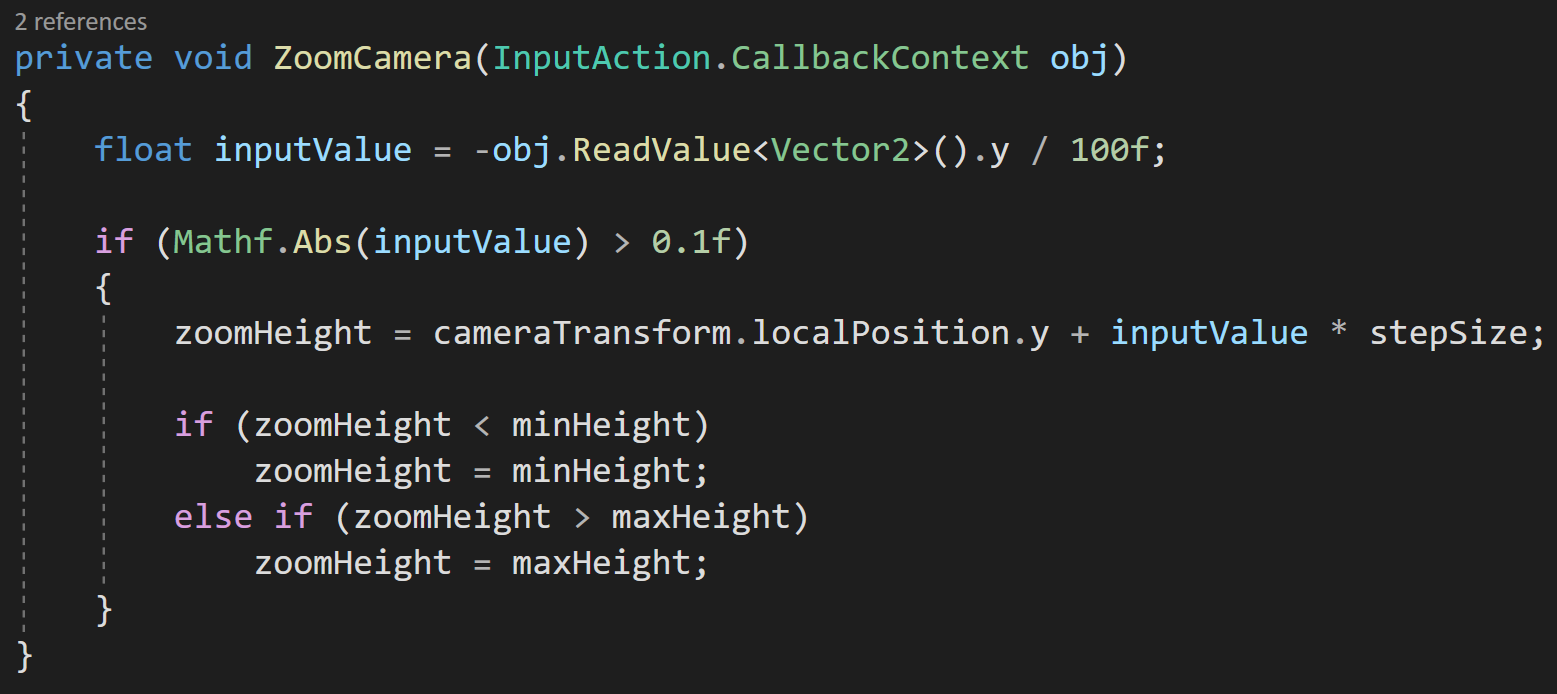
If the absolute value of the input value is greater than a threshold, meaning the player has moved the scroll wheel, we’ll set the zoom height to the local y position plus the input value multiplied by the step size. We then compare the predicted height to the min and max height. If the target height is outside of the allowed limits we set our height to the min or max height respectively.
Once again this function isn’t doing the actual moving it’s just setting a target of sorts. The Update Camera Position function will do the actual moving of the camera.
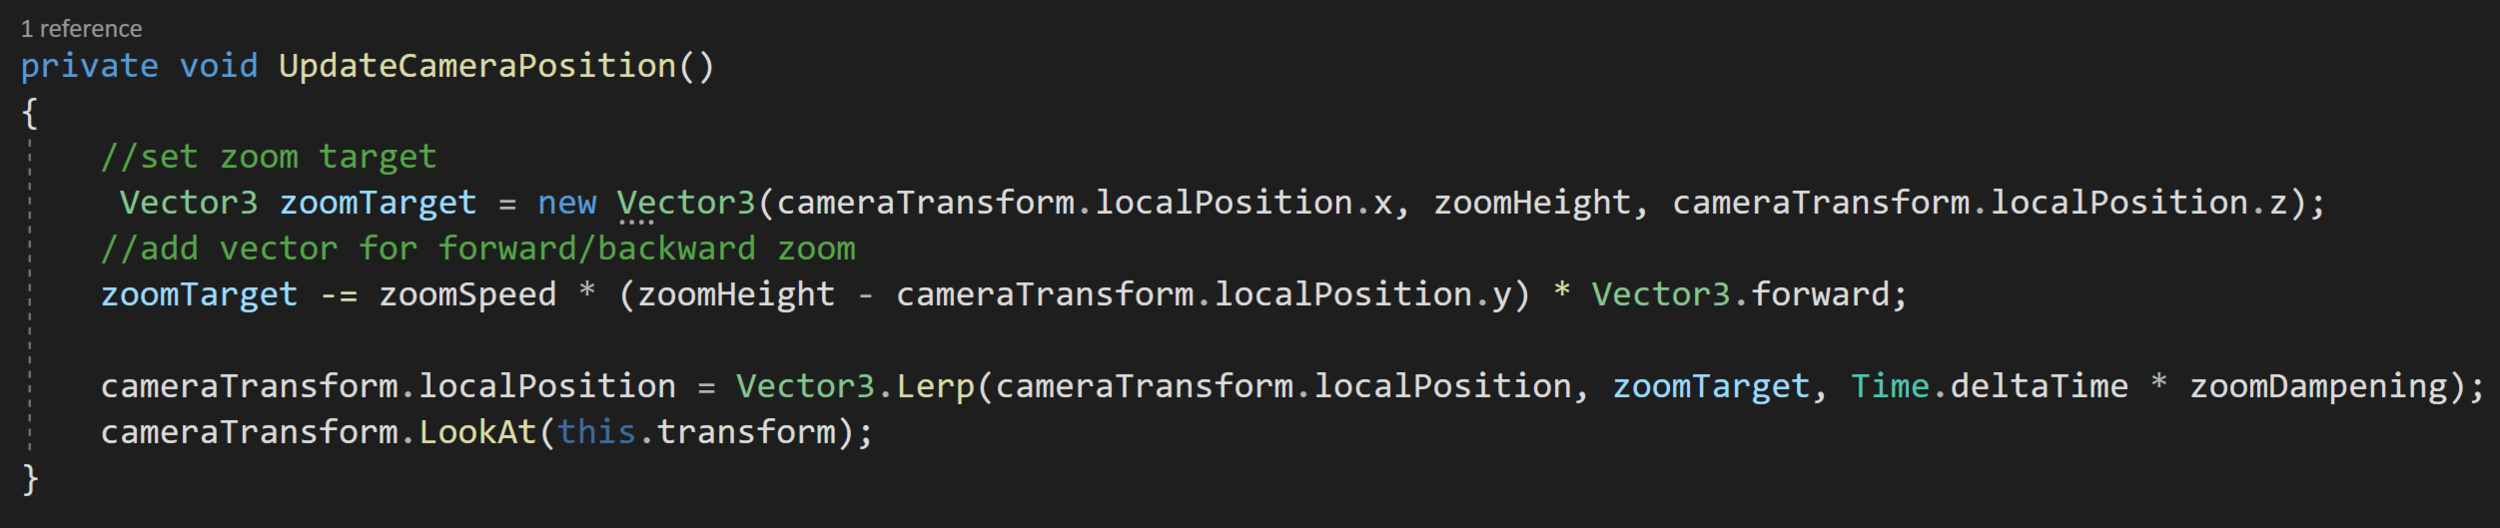
The first step to move the camera is to use the value of the zoom height variable to create a Vector3 target for the camera to move towards.

Zooming in action
The next line is admittedly a bit confusing and is my attempt to create a zoom forward/backward motion while going up and down. Here we subtract a vector from our target location. The subtracted vector is a product of our zoom speed and the difference between the current height and the target height All of which is multiplied by the vector (0, 0, 1). This creates a vector proportional to how much we are moving vertically, but in the camera’s local forward/backward direction.

Our last steps are to lerp the camera’s position from its current position to the target location. We use our zoom damping variable to control the speed of the lerp.
Finally, we also have the camera look at the base to ensure we are still looking in the correct direction.
Before our zoom will work we need to add both functions to our update function.
If you are having weird zooming behavior it’s worth double-checking the initial position of the camera object. My values are shown at the top of the page. In my testing if the x position is not zero, some odd twisting motion occurs.
Mouse at Screen Edges

At this point, we have a pretty functional camera, but there’s still a bit more polish we can add. Many games allow the player to move the camera when the mouse is near the edges of the screen. Personally, I like this when playing games, but I do find it frustrating when working in Unity as the “screen edges” are defined by the game view…

To create this motion with the mouse all we need to do is check if the mouse is near the edge of the screen.
We do this by using Mouse.current.position.ReadValue(). This is very similar to the “old” input system where we could just call Input.MousePosition.
We also need a vector to track the motion that should occur - this allows the mouse to be in the corner and have the camera move in a diagonal direction.

Screen edge motion
Next, we simply check if the mouse x and y positions are less than or great than threshold values. The edge tolerance variable allows fine tuning of how close to the edge the cursor needs to be - in my case I’m using 0.05.
The mouse position is given to us in pixels not in screenspace coordinates so it’s important that we multiply by the screen width and height respectively. Notice that we are again making use of the GetCameraRight and GetCameraForward functions.
The last step inside the function is to add our move direction vector to the target position.
Since we are not using events this function also needs to get added to our update function.
Dragging the World
I stole and adapted the drag functionality from Game Dev Guide.
The last piece of polish I’m adding is the ability to click and drag the world. This makes for very fast motion and generally feels good. However, a note of caution when implementing this. Since we are using a mouse button to drag this can quickly interfere with other player actions such as placing units or buildings. For this reason, I’ve chosen to use the right mouse button for dragging. If you want to use the left mouse button you’ll need to check if you CAN or SHOULD drag - i.e. are you placing an object or doing something else with your left mouse button. In the past I have used a drag handler… so maybe that’s a better route, but it’s not the direction I choose to go at this point.
I should also admit that I stole and adapted much of the dragging code from a Game Dev Guide video which used the old input system.

Since dragging is an every frame type of thing, I’m once again going to directly poll to determine whether the right mouse button is down and to get the current position of the mouse…
This could probably be down with events, but that seems contrived and I’m not sure I really see the benefit. Maybe I’m wrong.
Inside the Drag Camera function, we can first check if the right button is pressed. If it’s not we don’t want to go any further.

If the button is pressed, we’re going to create a plane (I learned about this in the Game Dev Guide video) and a ray from the camera to the mouse cursor. The plane is aligned with the world XZ plane and is facing upward. When creating the plane the first parameter defines the normal and the second defines a point on the plane - which for the non-math nerds is all you need.
Next, we’ll raycast to the plane. So cool. I totally didn’t know this was a thing!
The out variable of distance tells us how far the ray went before it hit the plane, assuming it hit the plane. If it did hit the plane we’re going to do two different things - depending on whether we just started dragging or if we are continuing to drag.

Dragging the world
If the right mouse button was pressed this frame (learned about this thanks to a YouTube comment) we’ll cache the point on the plane that we hit. And we get that point, by using the Get Point function on our ray.
If the right mouse button wasn’t pressed this frame, meaning we are actively dragging, we can update the target position variable with the vector from where dragging started to where it currently is.
The final step is to add the drag function to our update function.
That’s It!
There you go. The basics of a strategy camera for Unity using the New Input System. Hopefully, this gives you a jumping off point to refine and maybe add features to your own camera controller.
