Dev Log

Unity Input Event Handlers - Or Adding Juice the Easy Way
Need to add a little juice to your UI? Maybe your player needs to interact with scene objects? Or maybe you want to create a dynamic or customizable UI? This can feel hard or just plain confusing to add to your project. Not to mention a lot of the solutions out there are more complex than they need to be!
Using Unity’s Event Handlers can simplify and clean up your code while offering better functionality than other solutions. I’ve seen a lot of solutions out there to move scene objects, create inventory UI, or make draggable UI. Many or maybe most of those solutions are overly complicated because they don’t make full use of Unity’s event handlers (or the Pointer Event Data class).
Did I mention these handlers work with both the “new” and the “old” input systems. So learn them once and use them with either system.So let’s take a look at what they can do!
If you just want to see the example code, you can find it here on GitHub.
Input Event Handlers
Event handlers are added by including using UnityEngine.EventSystems and then implementing one or more of the interfaces. For example, IPointerEnterHandler will require an OnPointerEnter function to be added. No surprise - this function will then get called when the point enters (the rect transform of) the UI element.
The interfaces and corresponding functions work on scene objects. But! The scene will need a camera with a physics raycaster and more on that as we move along.
Below are the supported events (out of the box) from Unity:
IPointerEnterHandler - OnPointerEnter - Called when a pointer enters the object
IPointerExitHandler - OnPointerExit - Called when a pointer exits the object
IPointerDownHandler - OnPointerDown - Called when a pointer is pressed on the object
IPointerUpHandler- OnPointerUp - Called when a pointer is released (called on the GameObject that the pointer is clicking)
IPointerClickHandler - OnPointerClick - Called when a pointer is pressed and released on the same object
IInitializePotentialDragHandler - OnInitializePotentialDrag - Called when a drag target is found, can be used to initialize values
IBeginDragHandler - OnBeginDrag - Called on the drag object when dragging is about to begin
IDragHandler - OnDrag - Called on the drag object when a drag is happening
IEndDragHandler - OnEndDrag - Called on the drag object when a drag finishes
IDropHandler - OnDrop - Called on the object where a drag finishes
IScrollHandler - OnScroll - Called when a mouse wheel scrolls
IUpdateSelectedHandler - OnUpdateSelected - Called on the selected object each tick
ISelectHandler - OnSelect - Called when the object becomes the selected object
IDeselectHandler - OnDeselect - Called on the selected object becomes deselected
IMoveHandler - OnMove - Called when a move event occurs (left, right, up, down)
ISubmitHandler - OnSubmit - Called when the submit button is pressed
ICancelHandler - OnCancel - Called when the cancel button is pressed
Example Disclaimer
The examples below are intended to be simple and show what CAN be done. There will be edge cases and extra logic needed for most implementations. My hope is that these examples show you a different way to do some of these things - a simpler and cleaner way. The examples also make use of DoTween to add a little juice to the examples. If you’re not using it, I’d recommend it, but it’s optional all the same.
Also in the examples, each of the functions being used corresponds to an interface that needs to be implemented. If you have the function, but it’s not getting called double check that you have implemented the interface in the class.
UI Popup

A simple use case of the event handlers is a UI popup to show the player information about an object that the pointer is hovering over. This can be accomplished by using the IPointerEnter and IPointerExit interfaces. For my example, I choose to invoke a static event when the pointer enters the object (to open a popup) and when the pointer exits (to close the popup). Using events has the added benefit that other systems beyond the popup menu can also be aware of the event/action - which is huge and can allow more polish and juice to be added. It also means that information about the event and the object can be passed with the event.
In my particular case, the popup UI element is listening to these events and since the PointerEventData is being passed with the event, the popup UI element can appear on-screen near the object. In my case rather than place the popup window at the same location as the pointer I’m using a small offset.

This code is placed on objects - to enable popup
Physics Raycaster
If you want or need the Event Handlers to work on scene objects (like the example above) you will need to add a Physics Raycaster to your camera.
This is pretty straight forward, with the possible exception of the layer mask. You will need to do some sorting of layers in your scene and edit the layer mask accordingly if you are getting unwanted interactions.
For example in my project game units have a “Unit Detection” object on them which includes a large sphere collider. This is used to detect opposing units when they get close. The “Unit Detection” object is on a different layer to avoid unwanted interactions between scene objects. In my case, I also wanted to turn off this layer in the physics raycaster layer mask - as the extra colliders were blocking the detection of the pointer on the small collider surrounding the actual unit.

This code is placed on the popup window itself
Drag and Drop
This came up in my Grub Gaunlet game from a tester. Originally I had buttons at the top that when you clicked them a new game element appeared in the middle of the screen. This worked and was fine for the game jam, but being able to drag and drop the object is more intuitive and feels a whole lot better. So how do you do that with a button (or image)? Three event handlers make this really easy.

This goes on the UI element and needs to have the prefab variable set in the inspector
First, when the pointer is down on the UI element a new prefab instance is created and the “objectBeingPlaced” variable is set. Setting this variable allows us to track and manipulate the object that is being placed.
Then when the pointer comes up objectBeingPlaced is set to null to effectively place the object.
But the real magic here is in the OnUpdateSelected function. This is called “every tick” - effectively working as an update function. To my understanding, this is only called while the object is selected - so this is no longer called once the pointer is up or at the very least when the next object is selected. I haven’t done any testing, but I’d guess there are slight performance gains using this approach vs. an update function on each button. Not to mention this just feels a whole lot cleaner.
Inside the OnUpdateSelected function, we check if objectBeingPlaced is null, if it’s not then we want to move the object. To move it we’re going to do some raycasting. To keep things simple, I’ll create a plane and raycast against it. This limits the movement to the plane, but I think that’ll cover most use cases.
This is SO much simpler and cleaner than what I’ve done in the past.
If you haven’t seen the Plane class, I just discovered it a few weeks back, the plane is defined by a normal vector and a point on the plane. It also has a built in raycast function which is much simpler to use than the physics raycaster - albeit also more limited in functionality.
Double Click

How about a double click? There are a LOT of solutions out there that are way more complex than what appears to be needed. All kinds of coroutines, updates, variables…. You just don’t need it. Unity gives us a built-in way to register click count. So let’s make use of it.
The real star of the show in the code is the OnPointerClick function and the PointerEventData that is passed into the function. here all we need to do is check if eventData.clickCount is equal to 2. If it is then there was a double click.
Could it be much easier?
In addition, this should work with UI and scene objects (need a physics raycaster) equally well.
The rest of the code presented just adds a bit of juice and some player feedback. We cache the scale of the object in the Start function. Then when the pointer enters the object we tween the scale up and likewise when the pointer exits we tween the scale back down to its original size.
As a side note registering the double click did not work for me with the new input system version 1.0.2. An update to 1.3 fixed the issue. There was no issue with the “old input system.”
Moving Scene Objects

Okay, so what if you want to move an object around in the scene, but that object is already in the scene? This is very similar to the example above, however (in my experience) we need an extra step.
We need to set the selected gameObject - without doing this the OnUpdateSelected function will not get called as the event system doesn’t seem to automatically set a scene object as selected.
Setting the selected object needs to happen in the OnPointerDown function. Then in the OnPointerUp function, the selected object gets set to null - this prevents any unwanted interactions from the object still being the “selected” object.
The other bit that I’ve added is the OnCancel function (and interface). This gets invoked when the player presses the cancel button - which by default is set as the escape key. If this is pressed I return the gameObject to its starting location and again set the selected object to null. This is a “nice to have” and really easy to add.
Dragging UI Objects
Who doesn’t like a draggable window? Once again these are easy to create using a handful of event handlers.

hierarchyLet’s get right to the star of the show, which is the OnBeginDrag and OnDrag functions. When the drag begins we want to calculate an offset between the pointer and the location of the object. This prevents the object from “snapping onto the pointer” which doesn’t feel great doubly so if the object is large.
Next, we need to set the object to be the last sibling. Since UI objects are drawn in the order that they are in the hierarchy this helps to ensure the object being dragged is on top. If you have a more complex UI structure you may need to get more clever with this and change the parent transform as well (we do this a bit in the next example).
Then!
In the OnDrag function, we simply we simply set the position (excuse the typo - no need for the double transform call) to the position of the pointer minus the offset. And that’s all it takes to drag a UI object.
But! I did add a bit more juice. The OnPointEnter and OnPointer Exit functions tween the scale of the object to give a little extra feedback. Then in OnEndDrag I play a simple SFX to give yet a bit more polish.
Drag and Drop “Inventory”
There is a Unity package with this prefab in the Github repo (link at the top)
Creating a full inventory system is much more complicated than this example. BUT! This example should be a good foundation for the UI part of an inventory system or a similar system that allows players to move UI objects. That said this is definitely the most complex of all the examples and it requires two classes. One is on the moveable object and the other is on the slot itself.
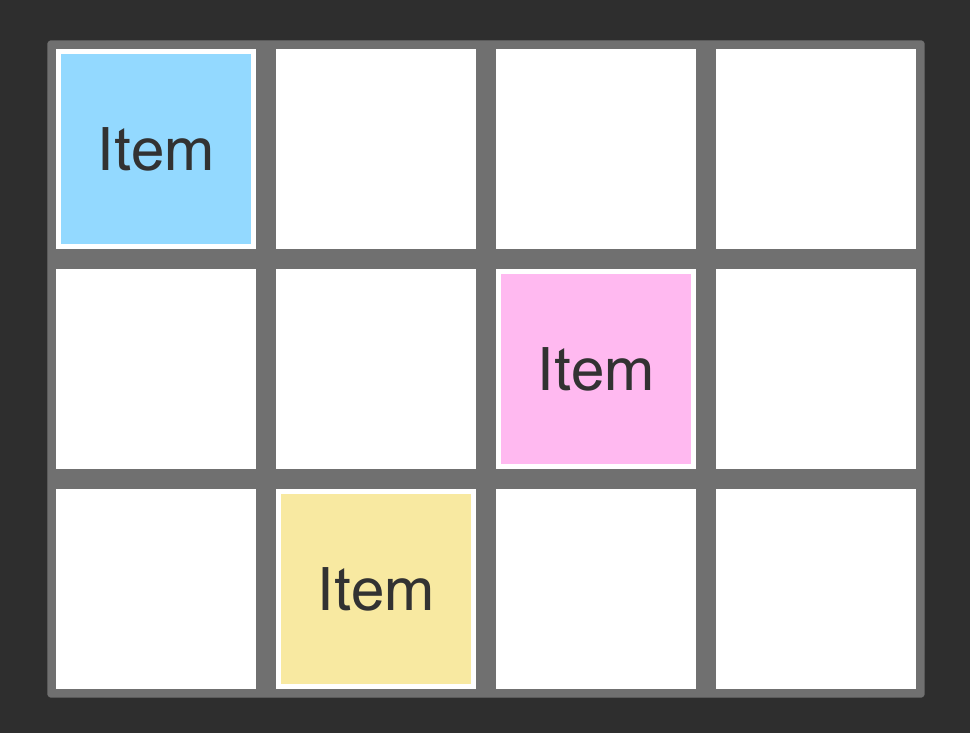
The UI structure also requires a bit of setup to work. In my case, I’ve used a grid (over there —>) with white slots (image) to drop in an item. The slots themselves have a vertical layout group - this helps snap the item into place and makes sure that it fills the slot.

Basic Setup of the Inventory Slot Object

Inventory Slot Component
The slots also have the “Inventory Slot” component attached. This is the simpler of the two bits of code so let’s start there.
The inventory slot makes use of the IDropHandler interface. This requires the OnDrop function - which gets called when another object gets dropped on it. In this case, all we want to do is set the parent of the object being dragged to the slot it was dropped on. And thankfully our event data has a reference to the object being dropped - once again keeping things clean and simple.
There are a ton of edge cases that aren’t addressed with this solution and are beyond the scope of this tutorial. For example: Checking if the slot is full. Limiting slots to certain types of objects. Stacking objects…

Okay. Now the more complicated bit. The inventory tile itself. The big idea here is we want to drag the tile around, keep it visible (last sibling) and we need to toggle off the raycast target while dragging so that the inventory slot can register the OnDrop event. Also, if the player stops dragging the item and it’s not on top of an inventory slot then we’re going to send the item back to its starting slot.
At the top, there are two variables. The first tracks the offset between the item and the pointer, just like in the previous example. The second will track which slot (parent) the item started in.
Then OnBeginDrag, we set the starting slot variable, set the parent to the root object (canvas) and set this object to the last sibling. These last two steps help to keep the item visible and dragging above other UI objects. We then cache the offset and set the raycast target to false. This needs to be set to false to ensure that OnDrop is called consistently on the inventory slot - i.e. it only gets called if the raycast can hit the slot and isn’t blocked by the object being dragged.
An important note on the raycast target: RaycastTarget needs to be set to false for all child objects too. In my case, I turned this off manually in the text object - but if you have a more complex object a Canvas Group component can be used to toggle this property for all child objects.
Moving on to the OnDrag function, this looks just like the example above, where we set the position of the object to the pointer position minus the offset.
Finally, the OnEndDrag function is where we need to toggle the raycastTarget back on so that we can move it again later. Also now that the dragging has ended we want to see if the current parent of the item is an inventory slot. If it is - it’s all good - if not we want to set the parent back to the starting slot. Because of the vertical layout group setting the parent will snap the position of the item back to it’s starting position. It’s worth noting that OnEndDrag (item) gets called after OnDrop (slot) which is why this works.
Note: I also added a SFX to the OnEndDrag. This is optional and can be done in a lot of different ways.
Pointer Event Data
I had hoped to go into a bit more detail on the Pointer Event Data class, but this post is already feeling a bit long. That said there is a ton of functionality in that class that can make adding functionality to Event Handlers so much easier. I’d also argue that a lot of the properties are mostly self explanatory. So I’ll cut and paste the basic documentation with a link to the page here.
Properties
button The InputButton for this event.
clickCount Number of clicks in a row.
clickTime The last time a click event was sent.
delta Pointer delta since last update.
dragging Determines whether the user is dragging the mouse or trackpad.
enterEventCamera The camera associated with the last OnPointerEnter event.
hovered List of objects in the hover stack.
lastPress The GameObject for the last press event.
pointerCurrentRaycast RaycastResult associated with the current event.
pointerDrag The object that is receiving OnDrag.
ointerEnter The object that received 'OnPointerEnter'.
pointerId Identification of the pointer.
pointerPress The GameObject that received the OnPointerDown.
pointerPressRaycast Returns the RaycastResult associated with a mouse click, gamepad button press or screen touch.
position Current pointer position.
pressEventCamera The camera associated with the last OnPointerPress event.
pressPosition The screen space coordinates of the last pointer click.
rawPointerPress The object that the press happened on even if it can not handle the press event.
scrollDelta The amount of scroll since the last update.u
seDragThreshold Should a drag threshold be used?
Public Methods
IsPointerMovingIs the pointer moving.
IsScrollingIs scroll being used on the input device.
Inherited Members
Properties
used Is the event used?
currentInputModule A reference to the BaseInputModule that sent this event.
selectedObject The object currently considered selected by the EventSystem.
Public Methods
Reset Reset the event.
Use Use the event.
*Quitting a Job I Love
This has nothing to do with game development or the OWS YouTube channel. I’m writing this to get my thoughts out. Nothing more. Nothing less.
Here’s how it all turned out
I’m one of those lucky people. I have a job that I love. I really do. It’s an amazing job. I’ve taught just about every level of math from Algebra to Differential Equations. I’ve taught physics, robotics, game design, and an art class using Blender. I’ve spent countless hours each fall riding with and coaching the competitive mountain bike team. I’ve spent many winter days on the ski hill trying to convince students that carving a turn on skis is more fun than just “pointing it.” I’ve helped to build up the robotics team from nothing to a team that is competitive at the state level. Every spring and fall, I’ve packed up a bus full of mountain bikers and headed out on week-long trips to the Colorado and Utah desert or to the beautiful mountains of Crested Butte. It’s an amazing job. I have poured my heart and soul into this school.
I don’t want to quit. But the job has taken a toll. I am tired. I am exhausted. I am burned out.
My school has a policy of not counting hours. There is no year-end evaluation or mechanism for feedback. This means no one knows how hard we actually work. This means there is no limit to how much we work. This means we can be asked to do more at any time with little or no compensation.
The school board is painted a rosy picture by the administration. Most teachers have been here for over a decade and many for over 2 decades. But things are changing. We grumble in private. When we do approach the administration we are told we are doing a good job and this is just what it takes to work at a boarding school (and there is truth to that). But our concerns are wiped away with excessive positivity or seemingly ignored. It doesn’t feel good. At a school that is about community and relationships, there is little to none of that sense of community between the administration and teaching staff.
As a school, we pride ourselves, and justifiably so, on the strong relationships with our students, but after two years of a pandemic, no administrator has truly taken the time to see how I’m doing personally or professionally. They are stressed and overworked too. I think the presumption is if I haven’t quit I’m doing okay.
We are a “family” when the school needs something from us and when we need something from the school we are told we are being “transactional.” We sign a contract in February that binds us to the school until the next June. There is no meaningful negotiation. No way to earn more (beyond our annual 3% raise). No promotions. No way to adjust our workload. No way to move off-campus. The only lever we have to pull to change our situation is to quit. If we do quit, we lose a paycheck, housing, utilities, food, and health insurance. It is terrifying to make a change and few of us do.
During my time here I have seen kids who barely knew how to mountain bike become state champion racers. I’ve seen aimless students discover computer science or physics or art and find a reason to go to college. I’ve seen kids that have been bullied in previous schools find friends and community. I’ve watched countless students discover a sport that has given them confidence and a sense of belonging.
We do amazing things for students and I love being a small part of this school. But like so many schools this work is done on the backs of the teachers.
In many ways, we are a rudderless ship. I can’t tell you the last time I saw an administrator in the classroom building to observe let alone when I last had any meaningful feedback. I couldn’t tell you what the mission and vision of the school are. I can’t tell you the school’s goals - other than to provide for students in any way possible and to fundraise for new buildings. We seem increasingly driven by budget and money. While I’m sure that is not 100% fair or even true, that is what it feels like, and what things feel like can be just as important or even more so than what is actually true.
While there is so much good at our school, there also feels like there is willful blindness to what is not working or feeling good. Throwing spouses off insurance, cancelation of sabbatical, no published pay scale, poor maternity leave, worse paternity leave, ever-increasing expectations and workloads, and most of all the lack of voice. As teachers, as professionals, as members of the community, we want to be heard. We want to have some agency.
Again I love my job. I do. It pisses me off. It makes me angry. But I love it. Like any relationship, it’s flawed. That’s okay. I would love to find a way forward, a way to make the job sustainable and not feel emotionally drained and burned out. But relationships that only go one way are dysfunctional.
I believe there are many at the school who do truly care about staff, but they are overworked and hamstrung by policies that make sense on paper but that forget that we are people, not cogs in a machine.
I have slowly come to peace with the situation. I am not entitled to having the school change. I can’t make the school change. All I can do is control how I react and what I do.
With a tear in my eye and a lump in my throat, I am pulling the only lever I have to pull. I am quitting.

Split Screen: New Input System & Cinemachine
Some Background Knowledge ;)
While networked multiplayer is a nightmare that can easily double your development time local split-screen is much much easier to implement. And Unity has made it even easier to do thanks in big part to Unity’s New Input System and some of the tools that it ships with.
So in this tutorial, we’re going to look at a few things:
Using the built-in systems (new input system) to create local multiplayer.
Adding optional split-screen functionality
Modifying controller code for local multiplayer
Responding when players added through C# events
Spawning players at different points on the map.
Toggling objects
Using Cinemachince with split-screen.
We are NOT going to look at creating a player selection screen or menu. But! That is very possible with the system and could be a topic of a future tutorial. There is also a bit of crudeness to how Unity splits the screen. It initially splits left/right not up/down. Also if the split-screen sizes don’t fill the screen which means, for example, 3 player screens will not cover the entire screen. To fix these issues would require some customization that’s beyond the scope of this tutorial.
I’ll be using the character controller from my “Third Person Controller” video for this tutorial. Although any character controller (even just a jumping cube) using the new input system should work equally well. You can find the code for the Third Person Controller here and the code for this tutorial here.

Split Screen in Action
So What is ACTUALLY Happening?
There is a lot going on behind the scenes to create split-screen functionality most of which is handled by two components - Player Input Manager and Player Input. Both of these components ship with the New Input System. While these classes are not simple - 700 and 2000 (!!) lines respectively - the end result is pretty straightforward and relatively easy to use.
The Player Input Manager detects when a button on a new device (keyboard, gamepad, etc) is pressed. When that happens an object with a Player Input component is instantiated. The Player Input creates an instance of an Input Action Asset and assigns the device to that instance.
The object that is instantiated could be the player object but in reality, it’s just holding a reference to the Input Action Asset (via the Player Input component) for a given player and device. So if you do want to allow players to select their character, or perform some other action before jumping into the game, you could connect the character selection UI elements to the Input Action Asset and then when the player object is finally created you connect it to the Input Action Asset. This becomes easier if you create additional action maps - one for selection and one for in-game action.
The Basics

To get things started you’ll need to add in the New Input System through the Unity Package Manager. If you haven’t played with the New Input System, definitely check out the earlier post and video covering the basics.
Here’s what needs to happen:
Add the New Input System to your project
Create an Input Action Asset. (Saved it and generate C# class)
Add the Player Input Manager component to a scene object.
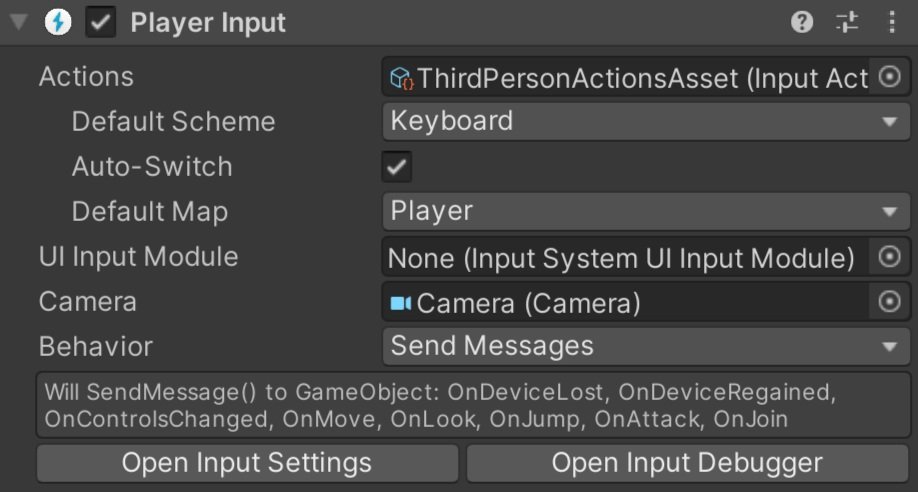
Create a “player” prefab and add the Player Input component.
Assign the Input Action Asset to the Player Input component.
Assign the player prefab to the Player Input Manager component.
With that done, kick Unity into play mode and press a button on your keyboard or mouse. You should see a character prefab get instantiated. If you have a controller press a button on it and another prefab should be created.
In some cases, I have seen Unity treat multiple devices all as one. This occurred when I connected the devices before setting up the Player Input Manager. For me, a quick restart of Unity resolved this issue.
A Little Refinement
I have had some issues with Unity detecting the mouse and keyboard as separate devices. One way to resolve this is by defining control schemes, but I haven’t found the secret sauce to make that work smoothly and consistently. Another way around this is in the Player Input Manager is to set “Join Behavior” to “Join Players When Join Action Is Triggered" and to create a Join action in the Input Action Asset. I set the join action to “any key” on the keyboard and the “start” button on a gamepad.
If you want your players to all play with the same camera, i.e. all have the same view for a co-op style game, then much of the next section can be skipped.
Adding Split Screen
If you want each player to have their own camera for example, in an FPS, the next step is to make sure that the player prefab has a camera component - this is important so that when each player object is instantiated it has it’s own camera object.

The structure of my Player PRefab
In my case, the camera and the player object need to be separate objects and I’d guess this is true for many games. To make this work, simply create an empty object and make the camera and player objects children of the empty. Then create a new prefab from the empty object (with attached children) and reassign this prefab to the Player Input Manager. The Player Input component (in my experience) can go on any object on the prefab - so put it where it makes the most sense to you - I kept mine on the player object itself rather than on the empty parent.
You may have noticed that the Player Input component has a camera object. So on the prefab, assign the camera to the slot. This is needed so the split-screen can be set up correctly.
The last step before testing is to click the “split screen” toggle on the Player Input Manager. If you are using Cinemachine for your camera control, you should still get split-screen functionality, but all the views are likely looking through the same camera. We’ll fix that in a bit.
Connection to the Input Action Asset

Old code is commented out. New code is directly below.
If you’ve been playing around with a player object that has a controller component you may have noticed that all the players are still being controlled by a single device - even if you have split-screen working.
To fix this we need that controller component to reference the Input Action Asset on the Player Input component. To do that we need to change the type of our Input Action Asset from whatever specific type you’ve created, in my case “Third Person Action Asset,” to the more general “Input Action Asset.” We can then get a reference to the Player Input component with GetComponent or GetComponentInChildren depending on the structure and location of your components. To access the actual Input Action Asset we need to add a “dot Actions” to the end.
Now for the messy bit. Since there is no way to know what type of Input Action Asset we’ve created we need to find the Action Maps and individual actions using strings. Yuck. But it works.
We can get references to action maps using FindActionsMaps and references to actions using FindActions. Take care to spell the names correctly and with the correct capitalization. And this is all we need to do. Update the references to the Input Action Asset, Action Maps, and Actions and the rest of your controller code can stay the same.
Give it a quick test and each player object should now be controlled by a unique device.
Reacting to Players Joining

If you want to control where players spawn or maybe turn off a scene overview camera once the first player spawns we’re going to need to add in a bit more functionality. Unity gives us an OnPlayerJoin (and OnPlayerLeft) action that we can subscribe to and allows us to do stuff when a player joins. In addition, the OnPlayerJoin Action sends a reference to the PlayerInput component - which turns out to be very useful.
To make use of this action, we need to change the “Notification Behavior” on the Player Input Manager to “Invoke C Sharp Events.” Unity won’t throw errors if this isn’t set correctly, but the actions won’t get invoked.
Spawn Locations

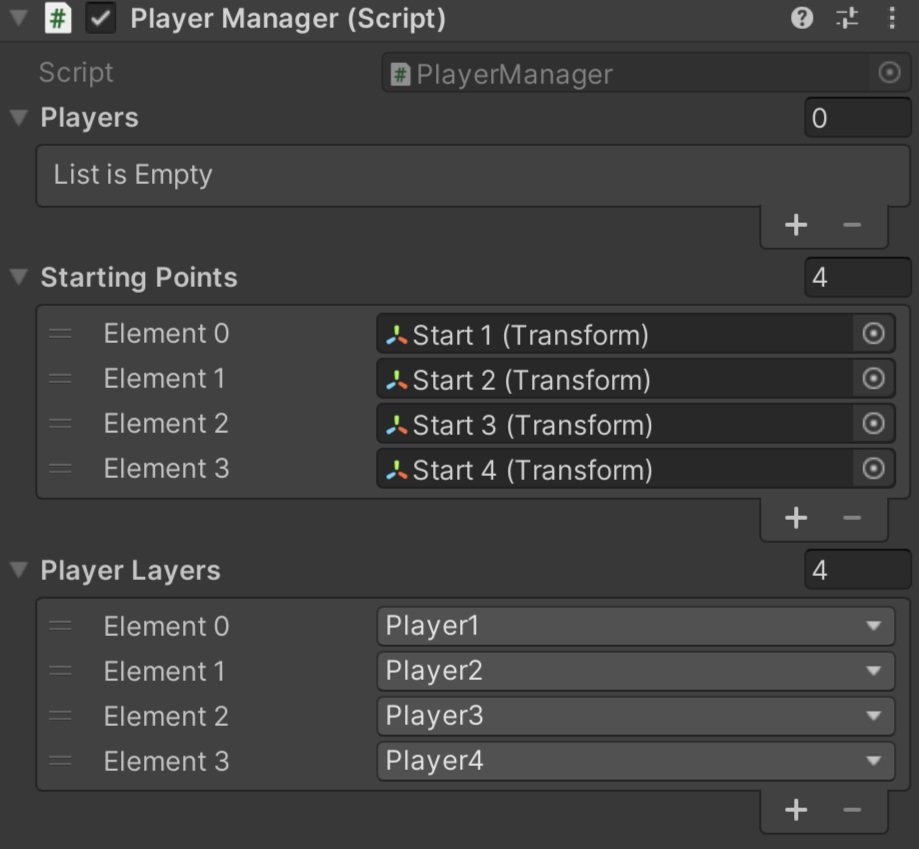
To demonstrate how to control where players spawn, let’s create a new PlayerManager class. This class will need access to UnityEngine.InputSystem so make sure to add that using statement to the top. The first task is to get a reference to the PlayerInputManager component and I’ve done that with FindObjectOfType. We can then subscribe and unsubscribe from the OnPlayerJoin action. In my case, I’ve subscribed an “AddPlayer” function that takes in the PlayerInput component.
There are several ways to make this work, but I choose to create a list of the PlayerInput components - effectively keeping a reference to all the spawned players - as well as a list of transforms that will function as in-game spawn points. These spawn points can be anything, but I used empty gameObjects.
When a player joins, I add the PlayerInput component to the list and then set the position of the player object to the corresponding transform’s position in the spawn list. I’ve kept it simple, so that player 1 always spawns in the first location, player 2 in the second location, and so on.
Because of the structure of my player prefab, I am setting the position of the parent not the character object. My player input component is also not on the prefab root object. So your code may look a bit different if your prefab is structured differently.
Toggling Objects on Player Join

If the only camera objects in your scene are part of the player objects that means that players see a black screen until the first player joins. Which is fine for testing, but isn’t exactly polished.
A quick way to fix this is to add a camera to the scene and attach a component that will toggle the camera off when a player joins. You could leave the camera on, but this would make the computer work harder than it needs to as it’s having to do an additional and unseen rendering.
So just like above when controlling the spawn location, we need a new component that has access to the Input System and will subscribe to the OnPlayerJoin action. Then we just need a simple function, subscribed to the action, that will toggle the gameObject off. Couldn’t be simpler.
This of course can be extended and used in as many systems as you need. Play a sound effect, update UI, whatever.
Cinemachine!
If you are using more than one camera with Cinemachine it’s going to take a bit more work. We need to get each virtual camera working with the corresponding Cinemachine Brain. This is done by putting the virtual camera on a specific layer and then setting the camera’s culling mask accordingly.
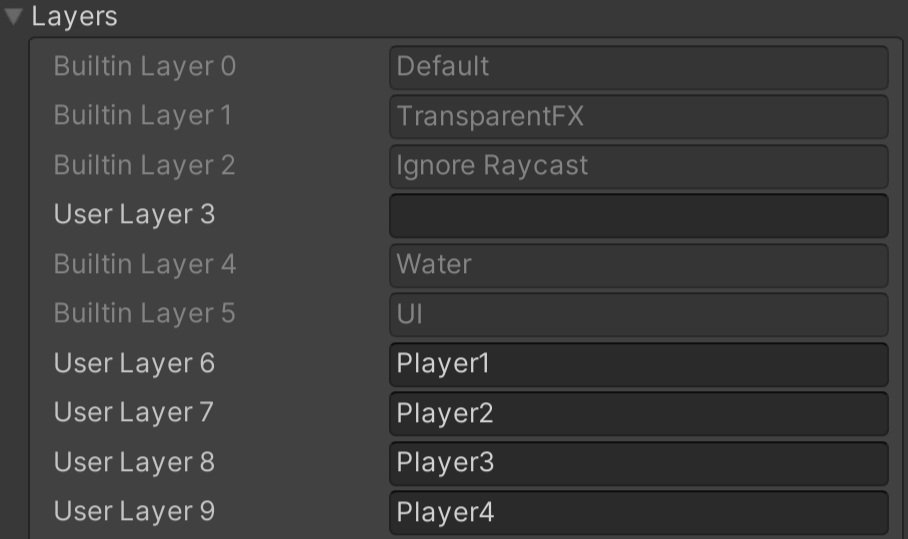
The first step is to create new layers - one for each possible player. In my case, I’ve set the player limit in the Player Input Manager component to 4 and I’ve created four layers called Player1 through Player4.
To make this easier, or really just a bit less error-prone once set up, I‘ve added a list of layer masks to the Player Manager component. One layer mask for each player that can be added. The value for the layer masks can then be set in the inspector - nice and easy.

Same Add Player Function from above
Then comes the ugly part. Layer masks are bit masks and layers are integers. Ugh. I’m sure there are other ways to do this but our first step is to convert our player layer mask (bitmask) to a layer (integer). So in our Player Manager component and in the Add Player function, we do the conversion with a base 2 logarithm - think powers of 2 and binary.
Next, we need to get references to the camera and virtual camera. In my case the Player Input component (which is what we get a reference to from the OnPlayerJoin action) is not on the parent object, so I first need to get a reference to the parent transform and then search for the CinemachineFreeLook and Camera components in the children. If you are using a different virtual camera you’ll need to search for the type you are using.
Once we have reference to the Cinemachine Virtual Camera component we can set the gameObject layer to the layer integer value we created above.
Go to 9:00 on the video for bitwise operations.
For the camera’s culling mask it’s a bit more work as we don’t want to just set the layer mask we need to add our player layer to the mask. This gets done with the black magic that is bitwise operations. Code Monkey has a pretty decent video explaining some of how this works (go to the 9:00 mark) albeit in a slightly different context.
If everything is set up correctly, we should be able to test our code and have each Cinemachine camera looking at the correct player.
But! You might still see an issue - depending on your camera and how it’s being controlled.
Cinemachine Input Handler
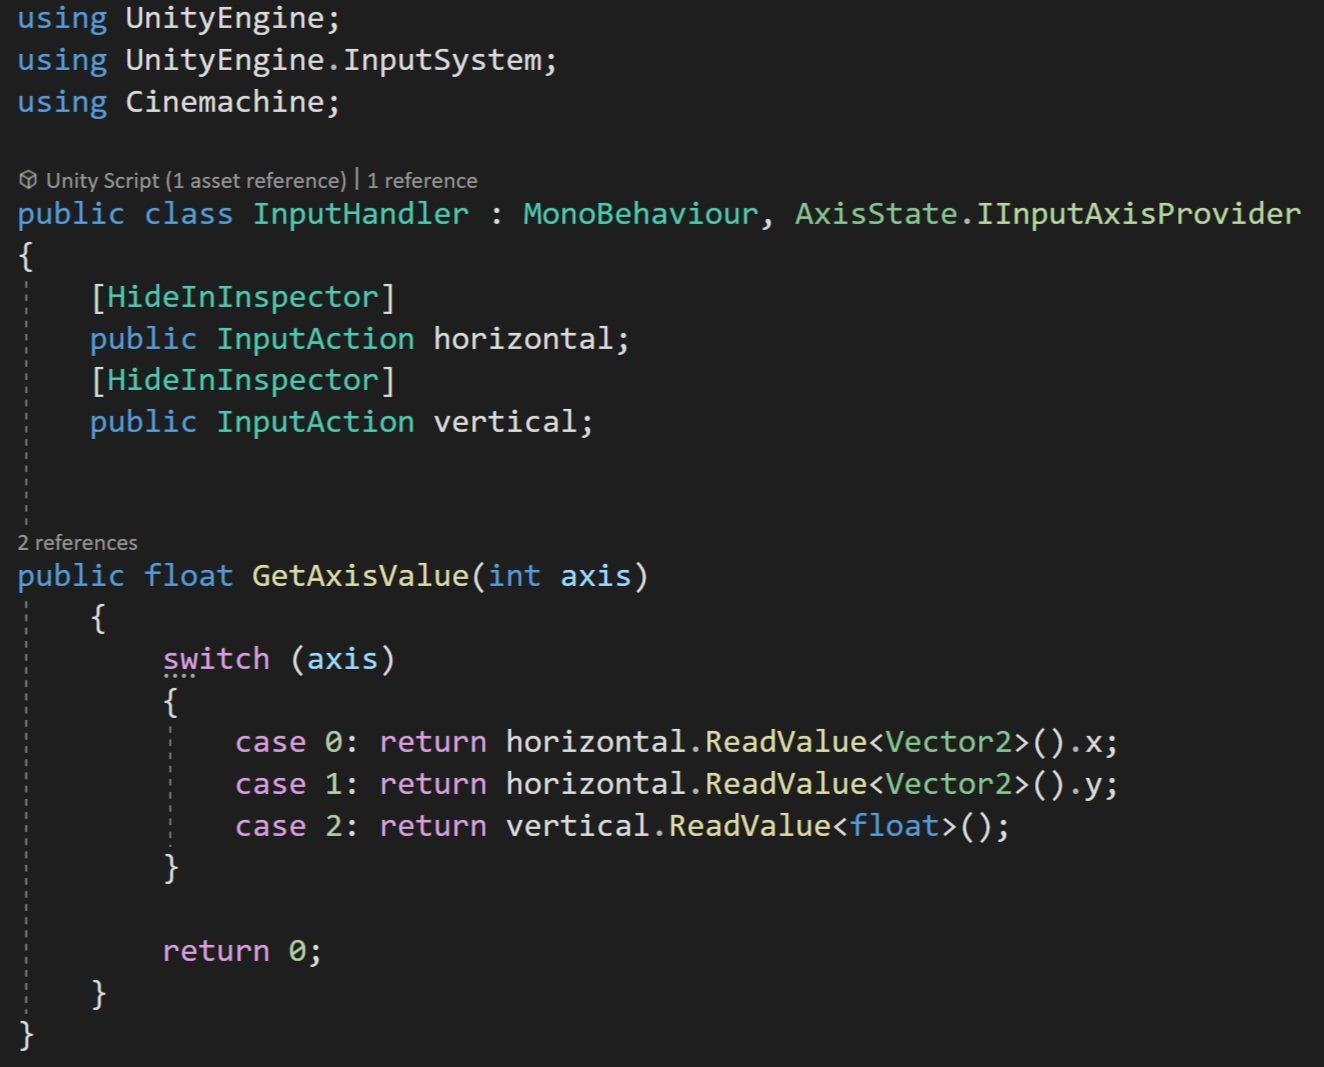
If you are using a Cinemachine Input Handler to control your camera you are likely still seeing all the cameras controlled by one device. This is because the Cinemachine Input Handler is using an Input Action Reference which connects to the Input Action Asset - the scriptable object version - not the instance of the Input Action Asset in the Player Input component. (You’ve got to love the naming…)
To fix this we are going to create our own Input Handler - so we’ll copy and modify the “Get Axis Value” function from the original Cinemachine Input Handler. This function takes in an integer related to an axis and returns a float value from the corresponding action.
Note that this component implements the IInputAxisProvider interface. This is what the Cinemachine virtual camera looks for to get the input.
Replace the Cinemachine Input Handler with this new component and you should be good to go.
Older Posts
-
January 2026
- Jan 27, 2026 Save and Load Framework Jan 27, 2026
-
April 2024
- Apr 10, 2024 Ready for Steam Next Fest? - Polishing a Steam Page Apr 10, 2024
- Apr 1, 2024 Splitting Vertices - Hard Edges for Low Poly Procedural Generation Apr 1, 2024
-
November 2023
- Nov 18, 2023 Minute 5 to Minute 10 - Completing the Game Loop Nov 18, 2023
-
September 2023
- Sep 13, 2023 Visual Debugging with Gizmos Sep 13, 2023
-
July 2023
- Jul 4, 2023 Easy Mode - Unity's New Input System Jul 4, 2023
-
May 2023
- May 19, 2023 Level Builder - From Pixels to Playable Level May 19, 2023
-
April 2023
- Apr 11, 2023 Input Action in the Inspector - New Input System Apr 11, 2023
-
February 2023
- Feb 26, 2023 Tutorial Hell - Why You're There. How to Get Out. Feb 26, 2023
-
December 2022
- Dec 31, 2022 Upgrade System (Stats Part 2) Dec 31, 2022
-
November 2022
- Nov 10, 2022 Stats in Unity - The Way I Do it Nov 10, 2022
- Nov 5, 2022 State of UI in Unity - UI Toolkit Nov 5, 2022
-
August 2022
- Aug 17, 2022 Knowing When A Coroutine Finishes Aug 17, 2022
-
April 2022
- Apr 23, 2022 Unity Input Event Handlers - Or Adding Juice the Easy Way Apr 23, 2022
-
March 2022
- Mar 15, 2022 *Quitting a Job I Love Mar 15, 2022
-
February 2022
- Feb 8, 2022 Split Screen: New Input System & Cinemachine Feb 8, 2022
-
January 2022
- Jan 24, 2022 (Better) Object Pooling Jan 24, 2022
- Jan 19, 2022 Designing a New Game - My Process Jan 19, 2022
- Jan 16, 2022 Strategy Game Camera: Unity's New Input System Jan 16, 2022
-
December 2021
- Dec 16, 2021 Raycasting - It's mighty useful Dec 16, 2021
-
November 2021
- Nov 22, 2021 Cinemachine. If you’re not. You should. Nov 22, 2021
-
August 2021
- Aug 3, 2021 C# Extension Methods Aug 3, 2021
-
June 2021
- Jun 27, 2021 Changing Action Maps with Unity's "New" Input System Jun 27, 2021
-
May 2021
- May 28, 2021 Unity's New Input System May 28, 2021
- May 8, 2021 Bolt vs. C# - Thoughts with a dash of rant May 8, 2021
-
March 2021
- Mar 10, 2021 Coroutines - Unity & C# Mar 10, 2021
-
January 2021
- Jan 14, 2021 Where's My Lunch? - January Devlog Update Jan 14, 2021
-
December 2020
- Dec 27, 2020 C# Generics and Unity Dec 27, 2020
- Dec 7, 2020 Steam Workshop with Unity and Facepunch Steamworks Dec 7, 2020
-
November 2020
- Nov 27, 2020 Simple Level Save and Load System (Unity Editor) Nov 27, 2020
- Nov 9, 2020 Command Pattern - Encapsulation, Undo and Redo Nov 9, 2020
-
October 2020
- Oct 28, 2020 GJTS - Adding Steamworks API and Uploading Oct 28, 2020
- Oct 9, 2020 Game Jam... Now What? Oct 9, 2020
-
August 2020
- Aug 16, 2020 Strategy Pattern - Composition over Inheritance Aug 16, 2020
-
July 2020
- Jul 24, 2020 Observer Pattern - C# Events Jul 24, 2020
- Jul 15, 2020 Object Pooling Jul 15, 2020
- Jul 3, 2020 Cheat Codes with Unity and C# Jul 3, 2020
-
June 2020
- Jun 16, 2020 The State Pattern Jun 16, 2020
-
August 2019
- Aug 12, 2019 Easy UI Styles for Unity Aug 12, 2019
-
July 2019
- Jul 3, 2019 9th Grade Math to the Rescue Jul 3, 2019
-
June 2019
- Jun 12, 2019 Introducing My Next Game (Video DevLog) Jun 12, 2019
-
May 2019
- May 29, 2019 Programming Challenges May 29, 2019
-
March 2019
- Mar 2, 2019 Something New - Asking "What Can I Learn?" Mar 2, 2019
-
November 2018
- Nov 30, 2018 A Growing Channel and a New Tutorial Series Nov 30, 2018
-
October 2018
- Oct 11, 2018 Procedural Spaceship Generator Oct 11, 2018
-
July 2018
- Jul 11, 2018 Implementing SFX in Unity Jul 11, 2018
-
May 2018
- May 31, 2018 Prototyping Something New May 31, 2018
-
April 2018
- Apr 17, 2018 When to Shelve a Game Project? Apr 17, 2018
-
February 2018
- Feb 9, 2018 State of the Game - Episode 3 Feb 9, 2018
-
December 2017
- Dec 16, 2017 State of the Game - Episode 2 Dec 16, 2017
-
November 2017
- Nov 7, 2017 The Bump From A "Viral" Post Nov 7, 2017
-
October 2017
- Oct 30, 2017 NPC Job System Oct 30, 2017
-
September 2017
- Sep 1, 2017 Resources and Resource Systems Sep 1, 2017
-
August 2017
- Aug 3, 2017 State of the Game - Episode 1 Aug 3, 2017
-
June 2017
- Jun 20, 2017 Resources: Processing, Consumption and Inventory Jun 20, 2017
- Jun 15, 2017 Energy is Everything Jun 15, 2017
-
May 2017
- May 16, 2017 Graphing Script - It's not exciting, but it needed to be made May 16, 2017
- May 2, 2017 Tutorials: Low Poly Snow Shader May 2, 2017
-
April 2017
- Apr 28, 2017 Low Poly Snow Shader Apr 28, 2017
- Apr 21, 2017 Environmental Simulation Part 2 Apr 21, 2017
- Apr 11, 2017 Environmental Simulation Part 1 Apr 11, 2017
-
March 2017
- Mar 24, 2017 Building a Farming Game Loop and Troubles with Ground Water Mar 24, 2017
-
February 2017
- Feb 25, 2017 The Inevitable : FTF PostMortem Feb 25, 2017
-
December 2016
- Dec 7, 2016 Leaving Early Access Dec 7, 2016
-
November 2016
- Nov 28, 2016 Low Poly Renders Nov 28, 2016
- Nov 1, 2016 FTF: Testing New Features Nov 1, 2016
-
October 2016
- Oct 27, 2016 Watchtowers - Predictive Targeting Oct 27, 2016
- Oct 21, 2016 Click to Color Oct 21, 2016
- Oct 19, 2016 Unity Object Swapper Oct 19, 2016
-
September 2016
- Sep 18, 2016 Testing Single Player Combat Sep 18, 2016
-
May 2016
- May 25, 2016 Release Date and First Video Review May 25, 2016
-
March 2016
- Mar 26, 2016 Getting Greenlit on Steam Mar 26, 2016