Level Builder - From Pixels to Playable Level
A while back for a game jam I made a tool that would import a PNG file and use the color data to quickly generate a level. It wasn’t perfect, but it meant I could quickly iterate on a level by erasing a few pixels and adding a few others. It made my game reasonable to build in 48 hours.
Then a few weeks ago a local game developer asked a question that reminded me of that old tool. So I dug it out. Polished it a bit and after sharing the tool, I realized it might make for an interesting video. So here we are…
It looks like Brackeys made a tool like this too. My game jam was 6 months before his video and I think this version might be a bit more general;)
Creating the Image
To get started, you’re going to need any image creation tool that can paint individual pixels. Photoshop, GIMP, even MS Paint can make this happen. I personally use Affinity Photo. Like a lot of these tools Affinity Photo has a grid and a pixel painting tool. It can also be really helpful if you can paint to multiple layers. The extra layers can be used to add props or details to a level.
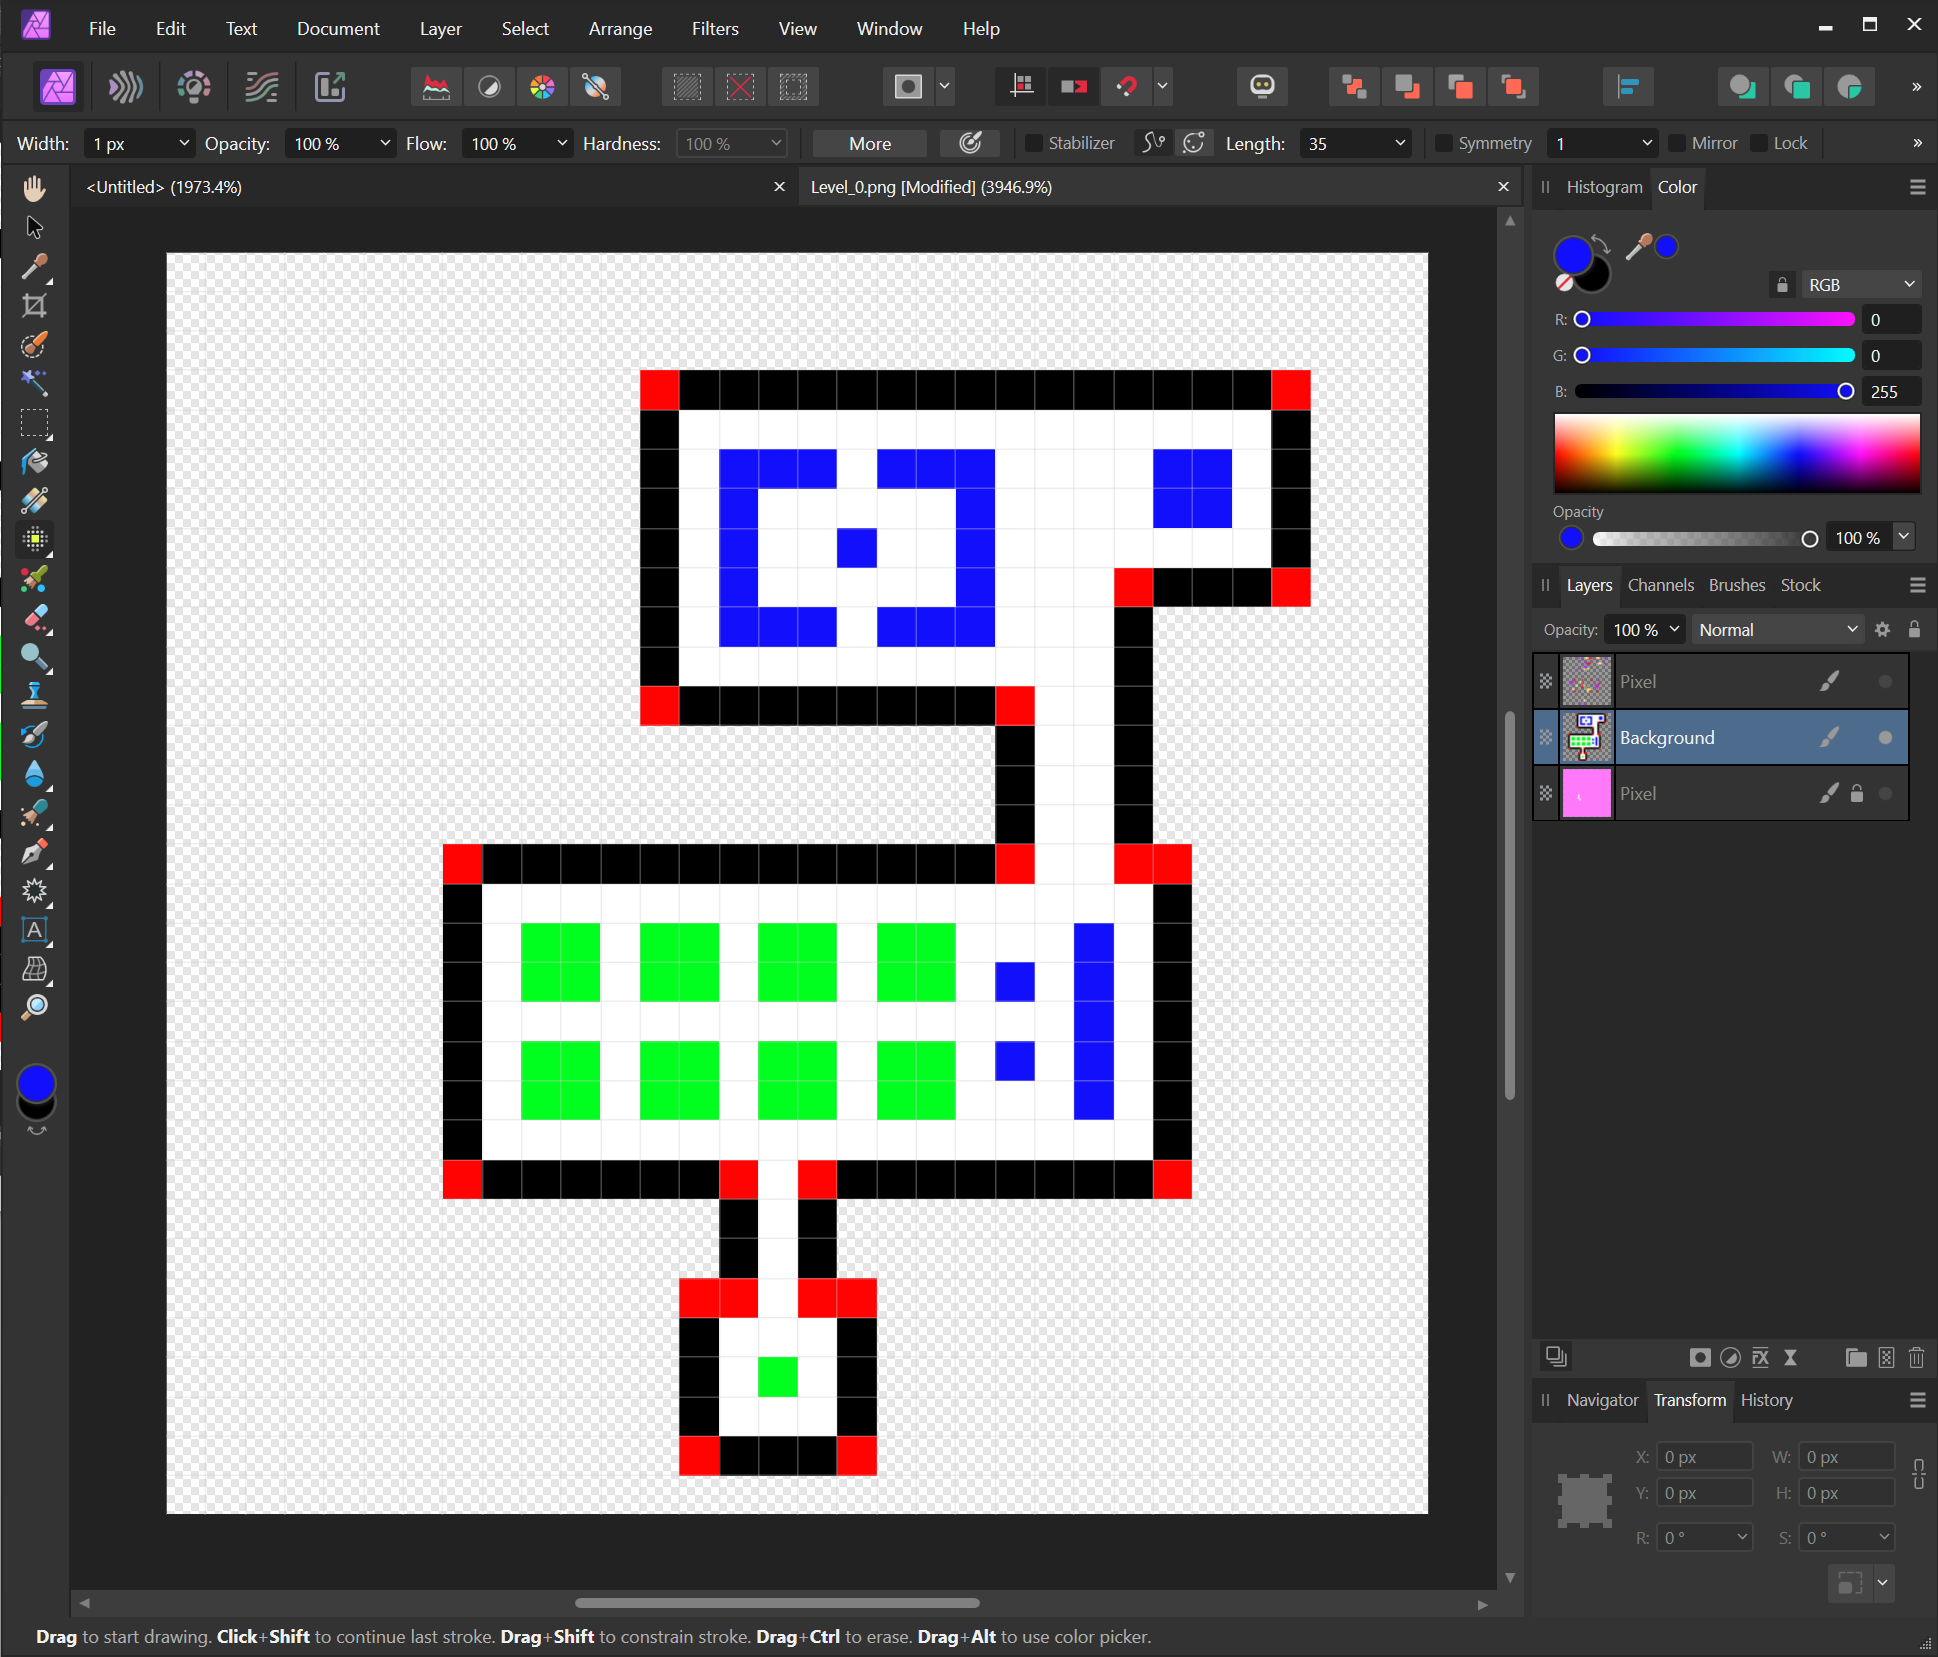
For my system, fully transparent is going to represent an empty location on the level. You can do it with white or black, but transparent seems like a natural choice. Beyond that, you can use any colors you want.
I choose to draw my dungeon walls in black, the floor in white and to keep the code simpler I’ve given the corners a unique color too (red). By giving the corners a color, I don’t have to try to detect them, but that could be done too.
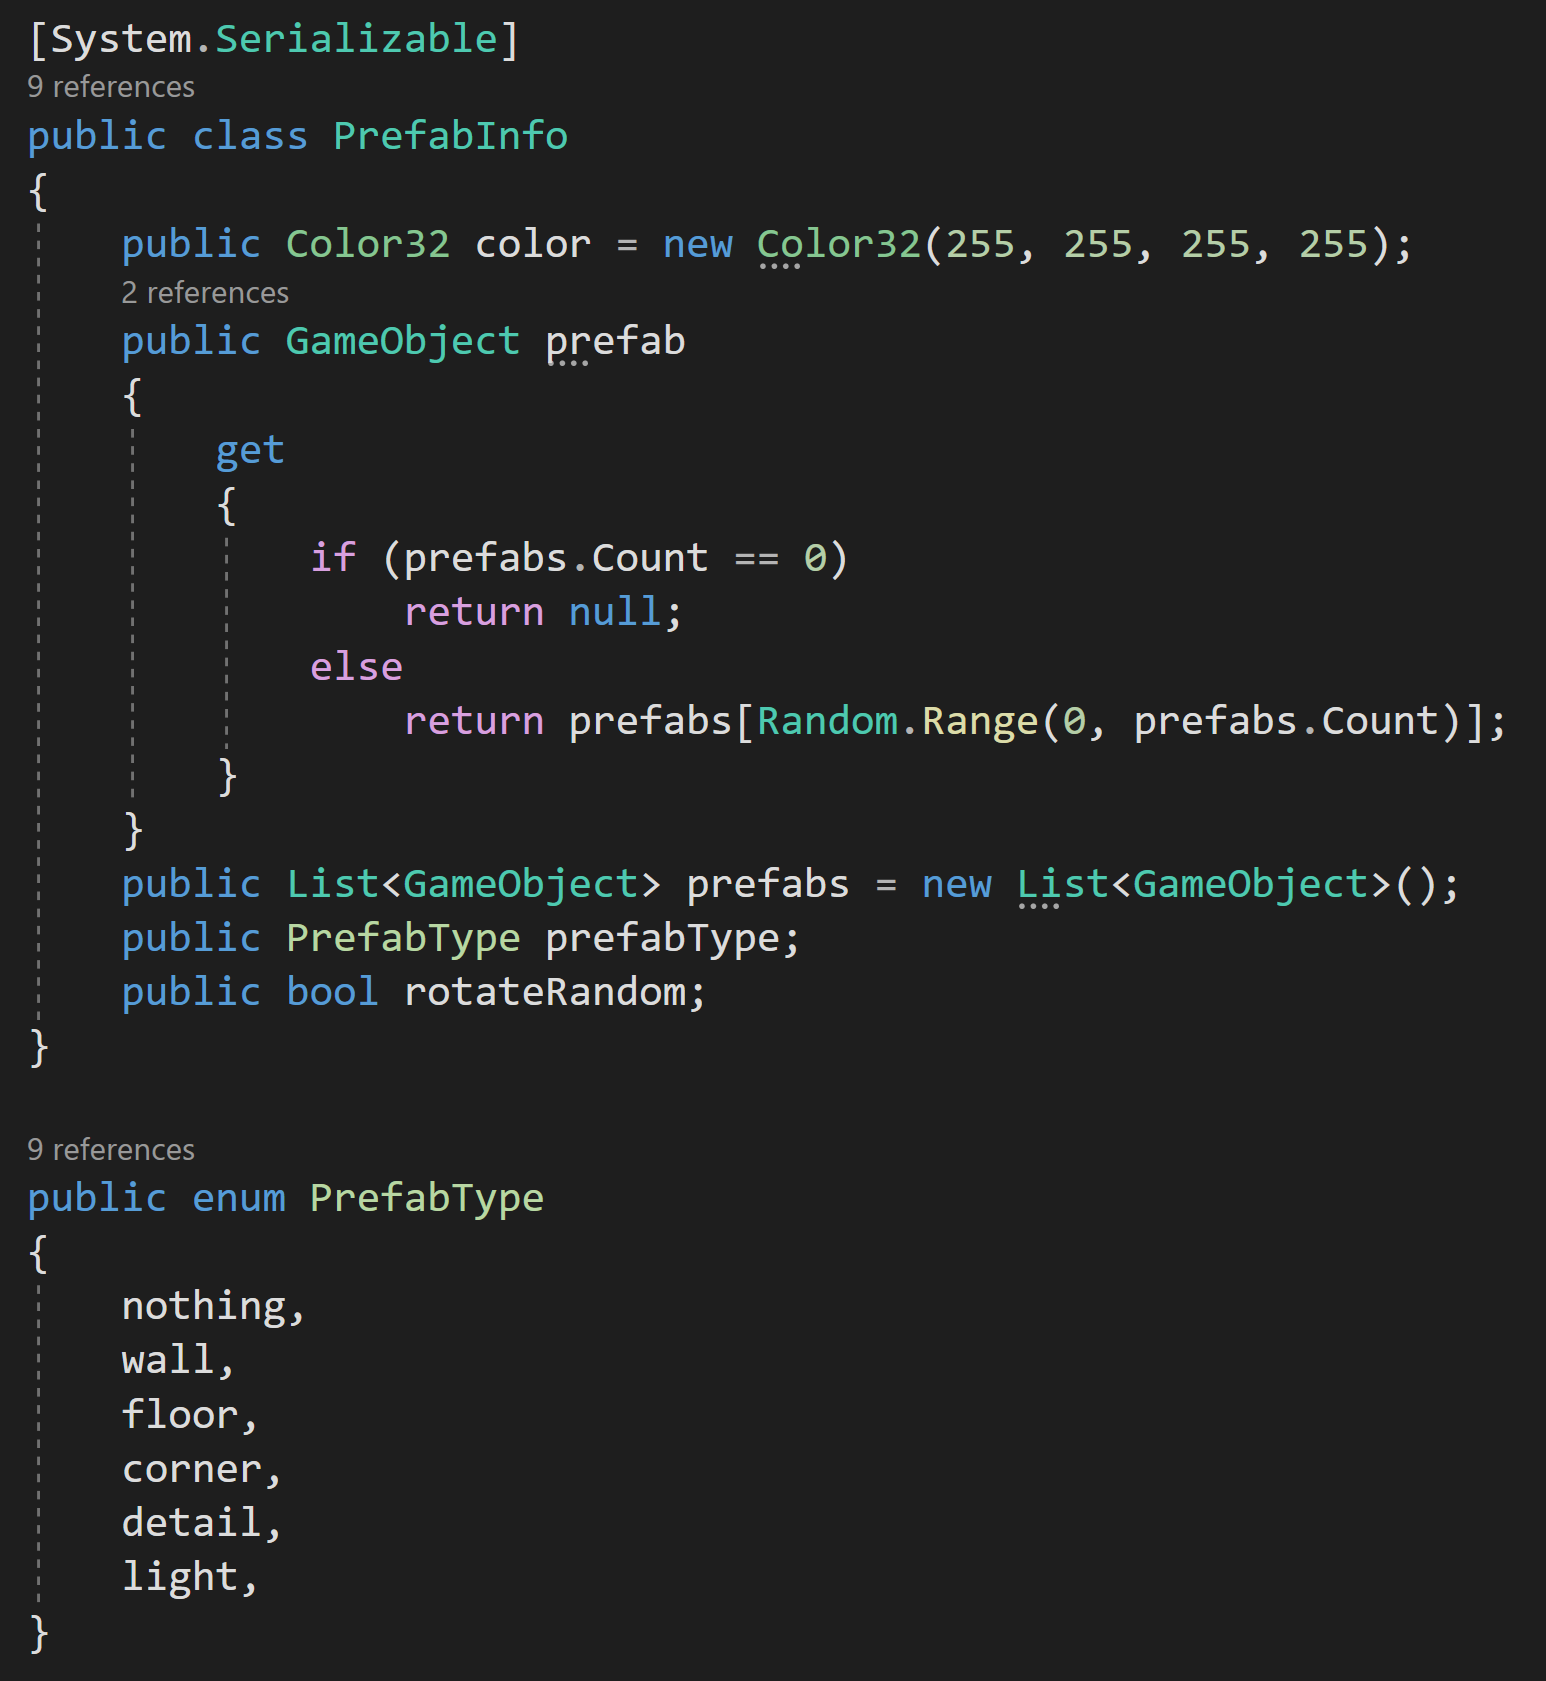
Prefab Info data structure
While that’s enough to build the basic structure, we can handle as many colors as we want, so I’ve gone ahead and added blue and green which we can use to add variation to the dungeon floor with slightly different prefabs.
Basic Data Structure
Each of the colors on our image will represent a different prefab or a prefab randomly chosen from a list. To make that work we need a data structure that holds a reference to the color as well as the prefab or list of prefabs.
Optionally, I’ve added a Prefab type which will allow special handling of the instantiated objects such as rotating to match neighboring tiles. Additionally, a boolean will allow random rotation which is useful for decorative objects.
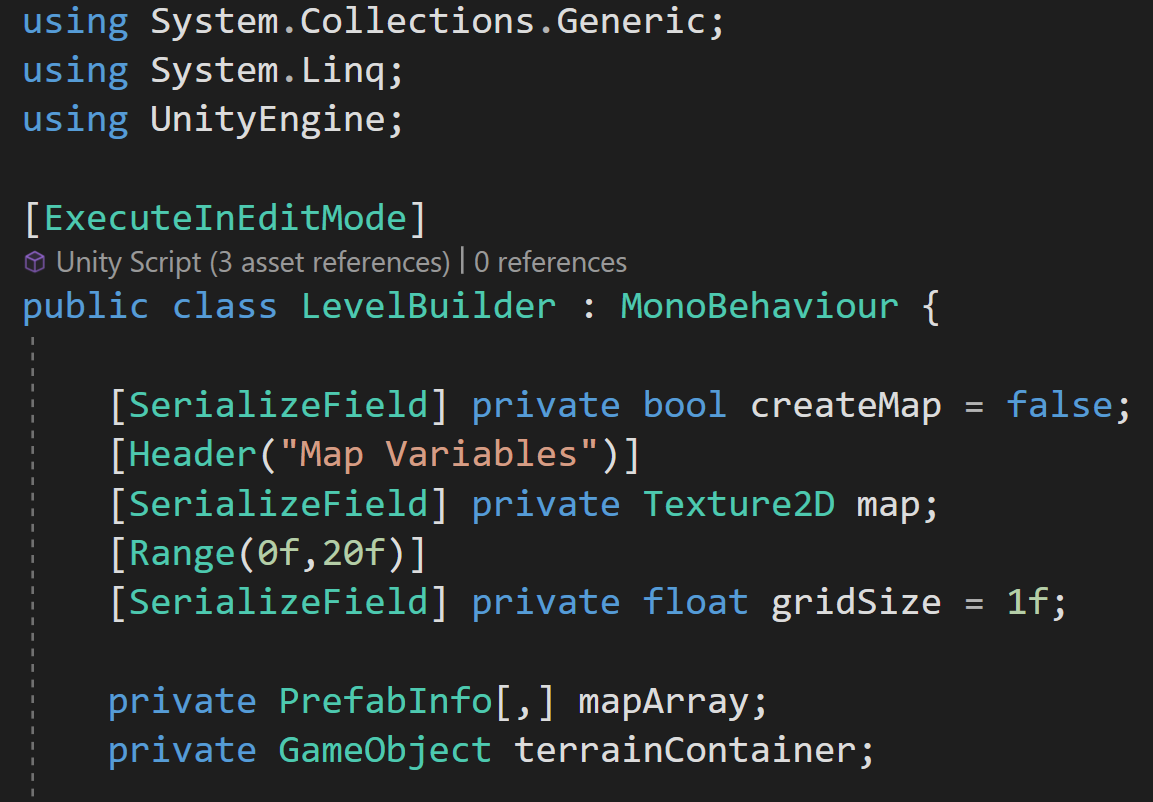
Level Builder Component
With our data structure built, we need our level builder component that will make use of the data.
In the Level Builder class, we’ll need a few variables. The first is a bool that will act as a button (if you have Odin Inspector just use the button attribute). Then we’ve got a Texture2D slot for our image and a float for the grid size. The value of your grid size will depend on the size of your prefab and may take a little fine-tuning. If your objects have gaps between them decrease the grid size or if they overlap then increase the size.
I’d definitely recommend doing your best to use a nice integer-sized prefab! It may be helpful to remember the default Unity cube is 1 unit wide.
Then we have a 2D array of our new data type. This will store all the info to create our level. And finally, we have a gameObject that will be the root object for our instantiated level objects. This will keep things organized and make our lives easier down the road when we want to regenerate a level.
Finding All the Colors

On Validate Function - in the Level Builder class
Next, we can create a list of our new data type. Since we are going to want to add prefabs in the inspector per color, it would be nice if the list would automatically populate when the texture was added or changed. This way we don’t miss a color or have to manually enter all the colors. We can do this in an OnValidate function which gets called by Unity whenever a value in the level builder inspector changes.
Inside the OnValidate function, we check if the map is null, if not we’ll read through all the pixels using map.GetPixels32 - this returns an array of all the pixel colors in the map.

Level Builder Inspector -auto Populated colors
I’m using Color32 instead of Color, to let color comparison be done a bit more easily as we’ll be dealing with integers (bytes) instead of floats for the RGBA channels.
If we see a color whose alpha channel is zero, meaning it’s transparent we’ll continue and go to the next pixel. This allows us to use transparency as a way of leaving a blank space in our level.
After that, we’ll use a LINQ statement to check if any of the PrefabInfos in the list have the same color as our current pixel. If there’s no PrefabInfo that has this color, we’ll create a new instance, assign the color and add it to the list.
The result is a nice tidy list with each of the colors in the image listed in the inspector.
This is a massive improvement over my earlier versions of the tool where you’d have put in the colors manually, which was a huge pain and bottleneck in the workflow. Now, you can put any colors you want and you don’t have to worry about copying the color codes from your image editor or vice versa. This should work with any and every 32-bit color. So go nuts.
Reading the Image File
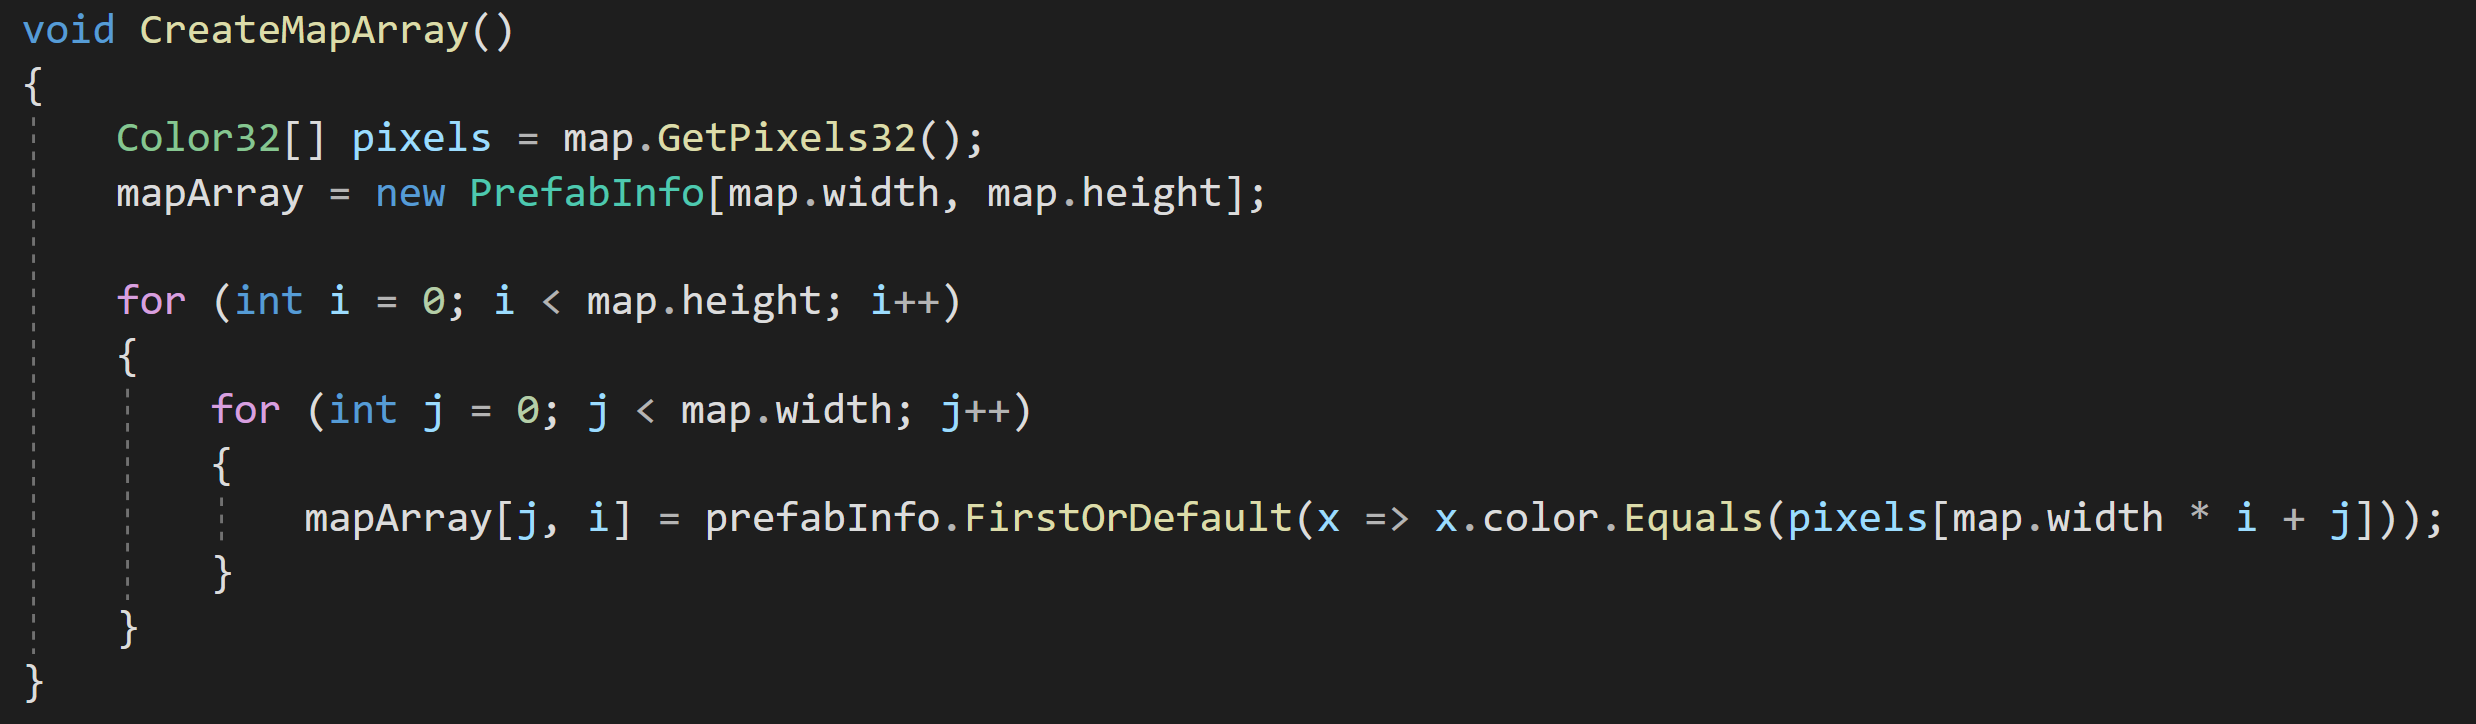
Our next step is to read the pixel data (again) but this time we’re going to generate a more easily used 2D array of PrefabInfos. After getting all the color data, again from GetPixels32, we can initialize our new 2D array to match the image's size - using the image's width and height.
How to get the pixel index from the For Loops
After that, we can use nested for loops to iterate through each location in our 2D array.
For each location, given by the integers i and j, we can get the color in the pixels array at a given location. If that color can be found in our list of PrefabInfo we assign a reference to that PrefabInfo in the 2D array.
There’s a lot going on in that one line of code!
The diagram to the right shows how the pixel index, is calculated from the i and j variables. The “4” in the equation comes from the width of the example. Also worth noting, Unity’s GetPixel function starts with pixel zero in the bottom left corner.
You could do this in the OnValidate function, but that would mean every time you add or remove a prefab to a list or toggle a bool you’d recalculate this array… Instead, I choose to use a little trick to create a button out of a bool.
Creating the Map

With our array of PrefabInfo populated, we can now instantiate our prefabs with a CreateMap function. Here we’ll check if the terrain container is not null and destroy the object if it’s not null. This has the effect of removing the previously generated level. This allows for quicker and easier iteration as the old level objects get cleaned up.
With the terrain container destroyed, we’ll create a new one, give it a name, and set its position. Since I’m doing this in the editor I’m not worried about the performance of creating and destroying objects. If you want to do this at runtime using an Object Pooling solution would be advisable and maybe also using a co-routine to spread the creation out over multiple frames.

Then we get to iterate through are 2D array again. We’ll check to make sure the array isn’t null at the location and if the prefab for the prefab info that location isn’t null. If either is null, we’ll skip to the next element in the array.
If we’re good to go, we grab the prefab from the PrefabInfo to instantiate it. We can use the i and j coordinates along with the grid size to place the prefab at the correct location in the scene.
The next line is one that’s optional, but I’d highly recommend it. That is to name the new object based on its coordinates. This really helps with debugging later on!
After that, we set the parent to our terrain container and if we’ve set the prefab to rotate we can randomly rotate the new instance.
Making It Go
At this point, I’d strongly recommend you do some basic testing. Are there errors? Are the prefabs getting placed correctly? Is the grid size correct? Your level won’t look perfect, but it should be good enough to test and debug.
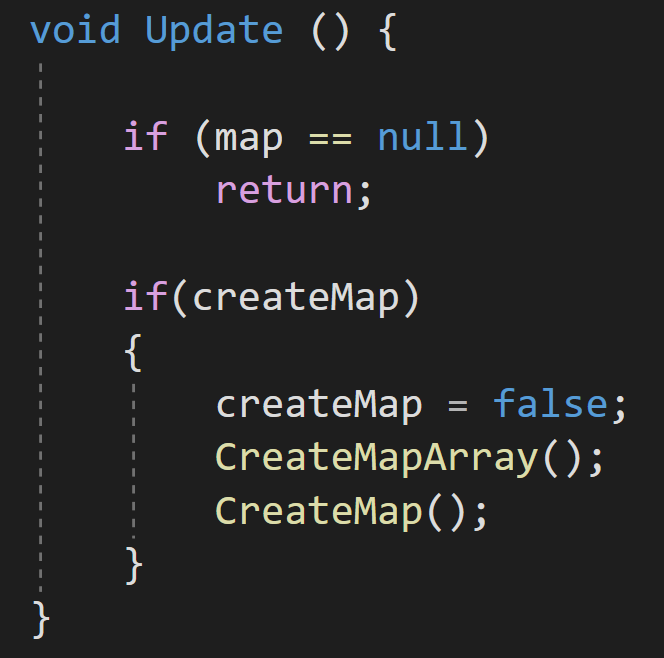
But to do that you need to be able to call on the functions. If you’re using Odin Inspector you can use a button attribute, but for those who aren’t here’s a little trick that you may or may not know.
On top of our class definition, we can add the attribute ExcuteInEditMode. Check the third image on this post. This will have the effect of the update function getting called every frame (the editor still has “frames” in edit mode).
Then we can create an update function that checks if the map texture is null if it’s not we’ll check if our boolean toggle is true. If it is then we’ll call our functions and create our level. Really important! We also want to make sure to flip the value of our boolean so we don’t keep creating a map every frame - which would be a pretty good way to make Unity run really slow.
Prefab Examples - Dungeon
Depending on your prefabs and what you’re building all the work above may be all you need, but if you’re building something like a dungeon you’re liking finding that the corners don’t line up or the walls are facing the wrong direction. And that’s where the function TileSpecialHandling comes in. EVERYTHING that goes into that function will depend on your prefabs. So before I show some examples of what you can do with that function let me show you what my prefabs look like.
I’m using the “Low Poly Dungeons” asset by Just Create. There is a free version as well that I think has all you need to follow along. Just Create has kindly given me a lot of their assets to use in various videos.
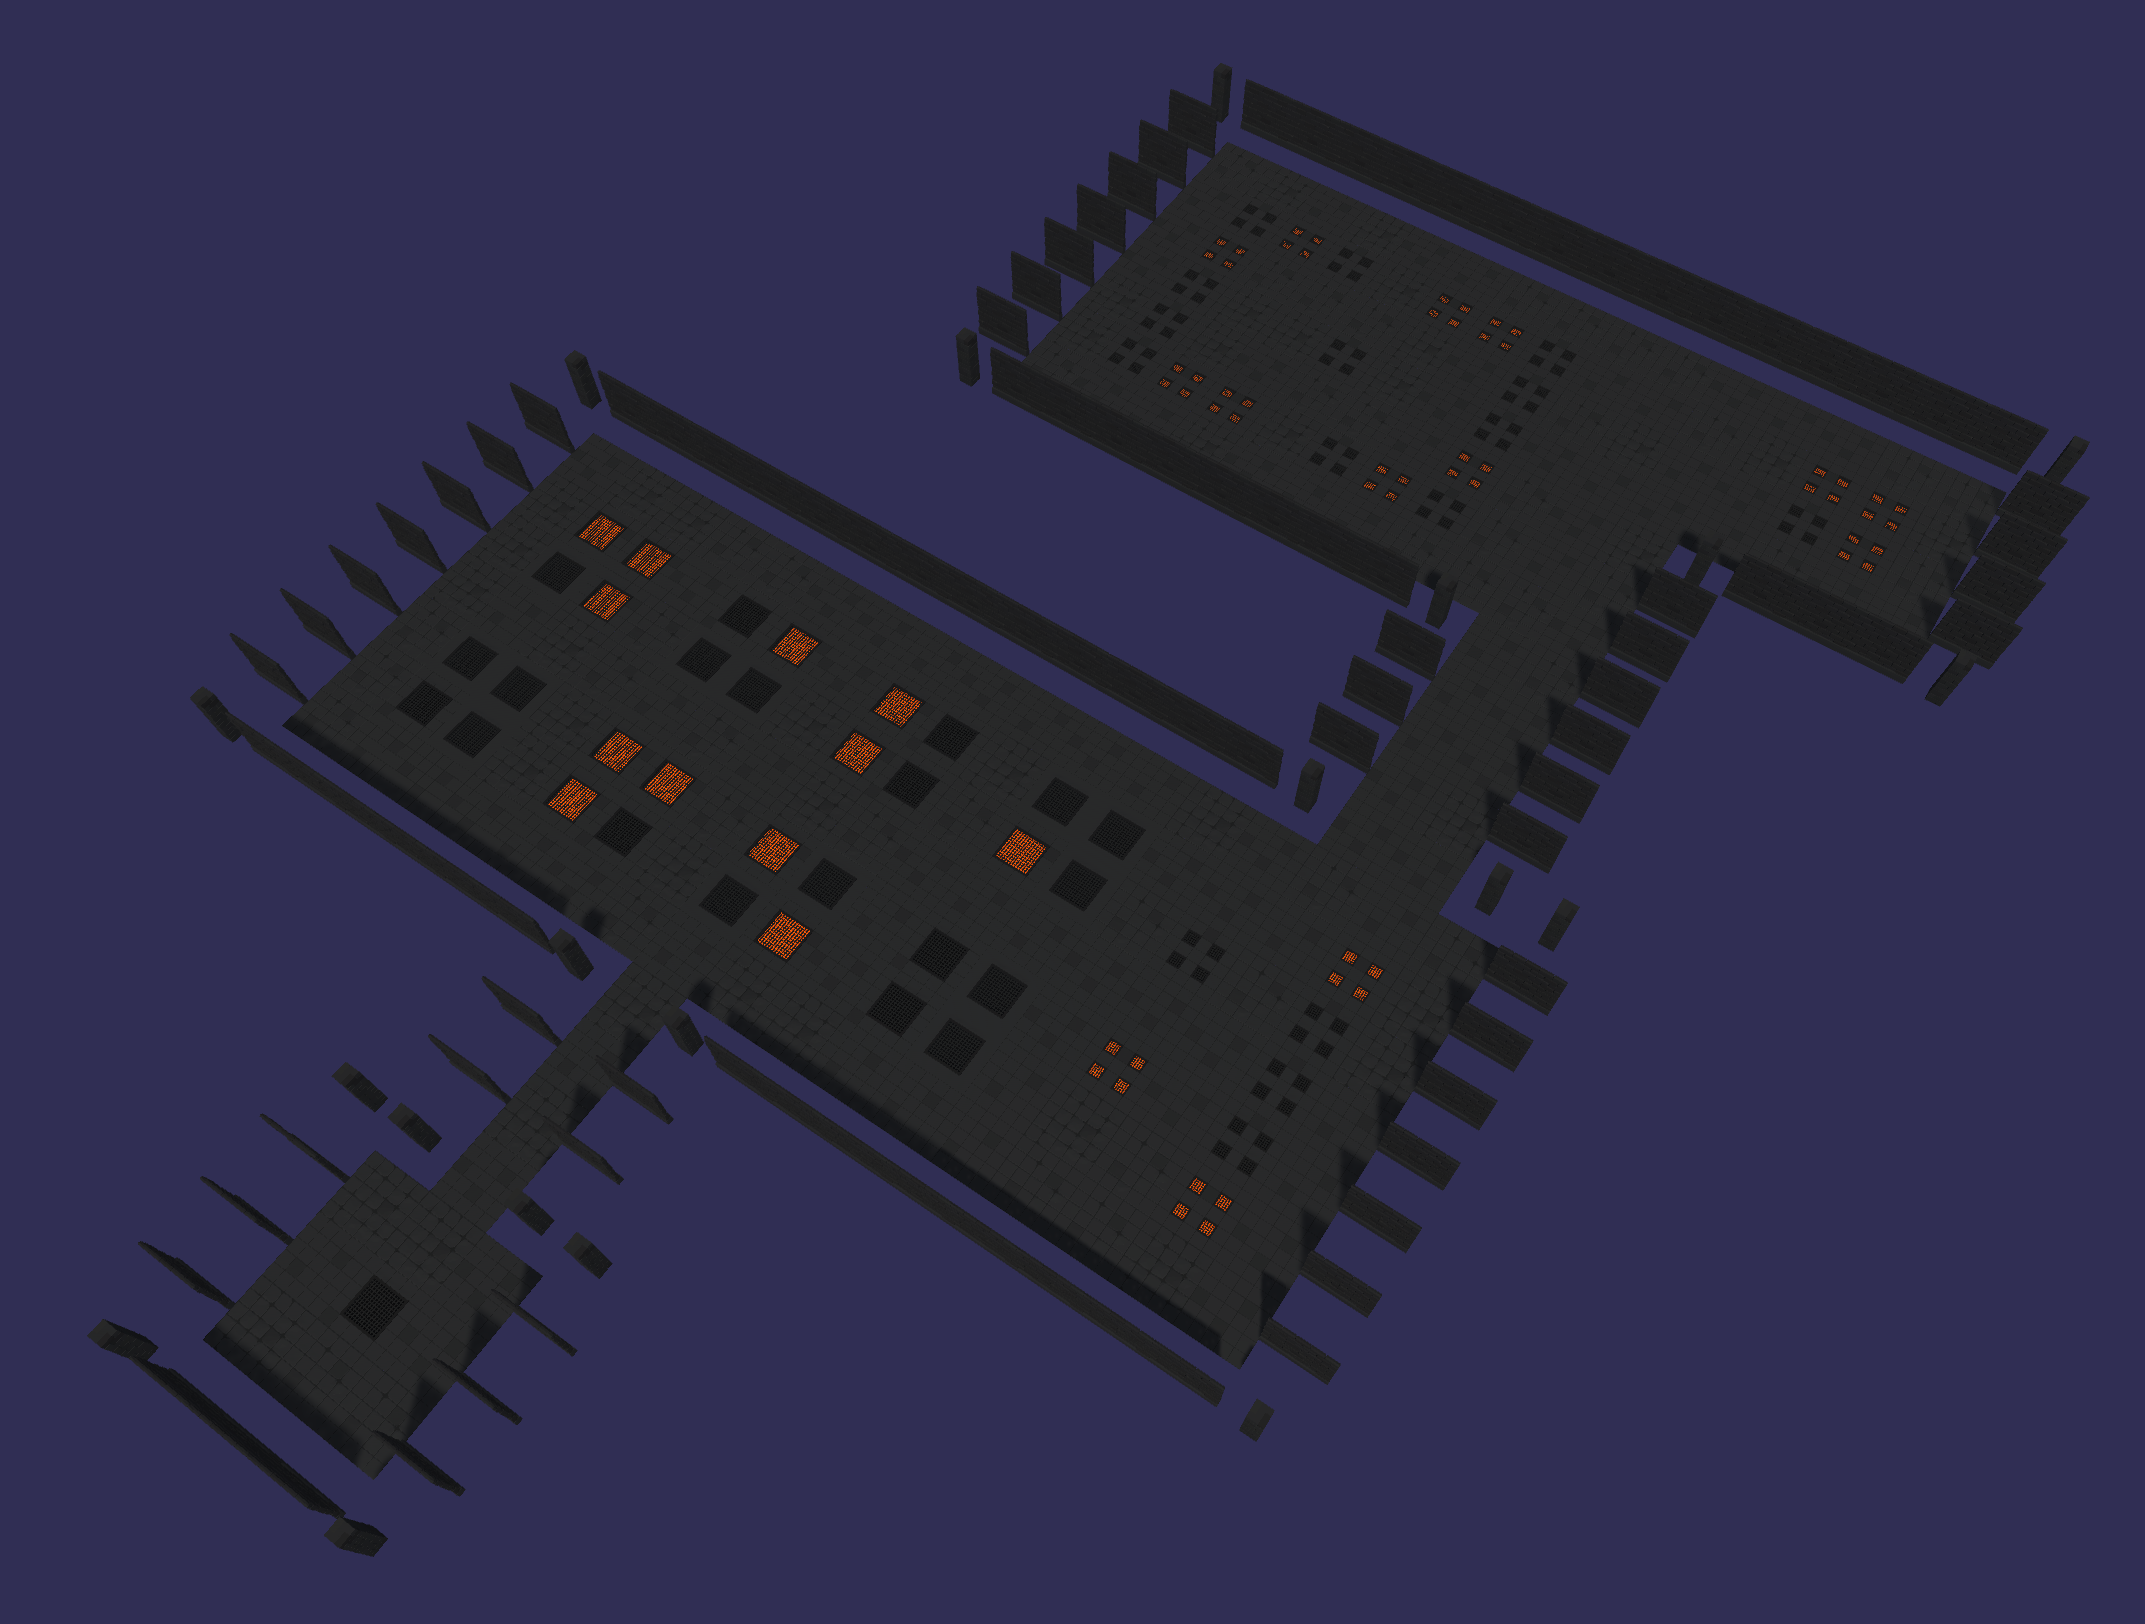
The assets in this pack are great but don’t necessarily fit a grid out of the box. If I use them as is, I get a result like the image to the right. There are gaps between the floor and the walls and the pillars that are placed in the corners don’t touch the walls. Not to mention that some of the walls aren’t rotated in the correct direction.
We’ll fix the rotation in a bit. For now, the gaps are an easy fix.
Instead of using the built-in prefabs, I created an empty object and then set the walls (and pillars) as children of the empty. Then I could add a floor to both the walls and the pillars. In addition, the pillars also got two half walls to complete a “corner”.

Wall prefab with floor
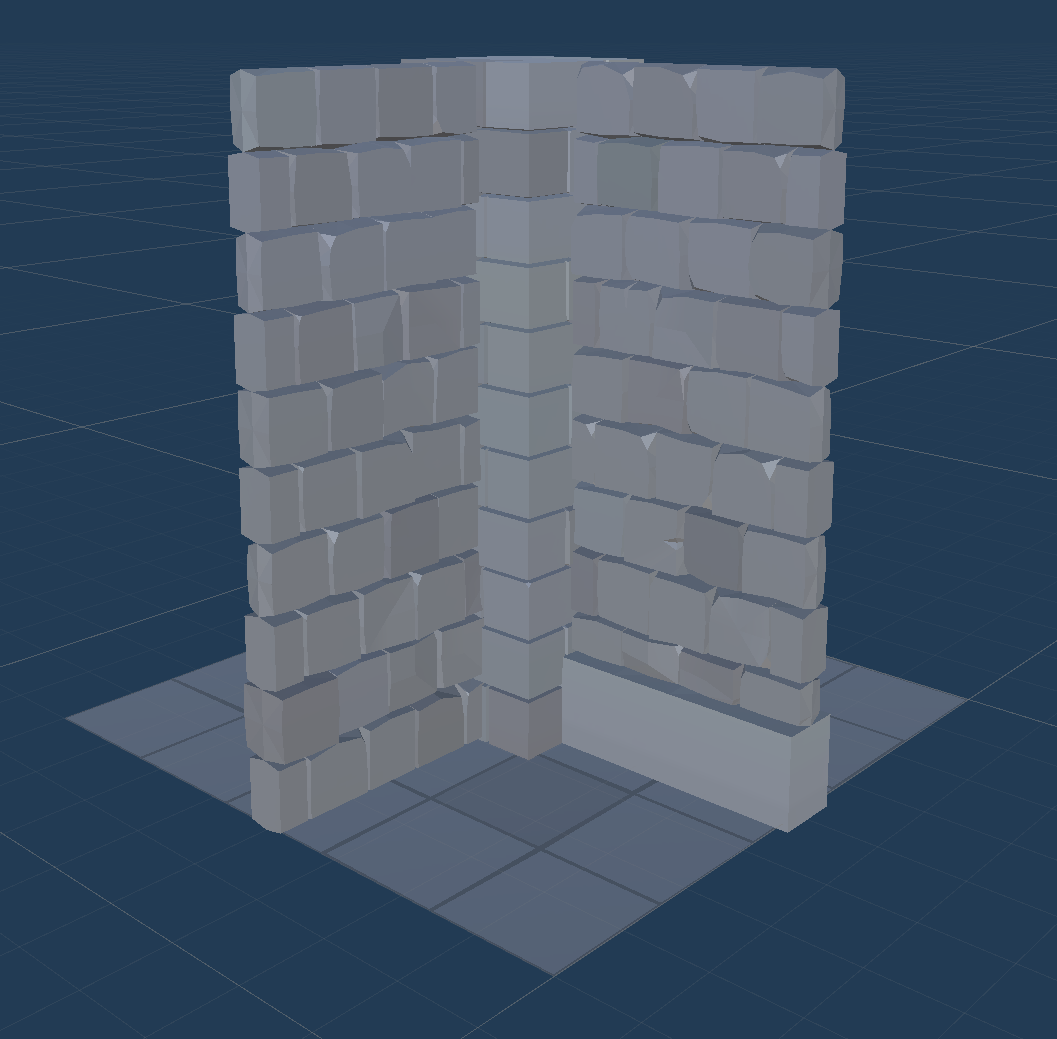
Pillar with floor and two half walls.
When creating prefabs, it’s important to make sure the children are centered around the origin of the parent and still fit your grid size.
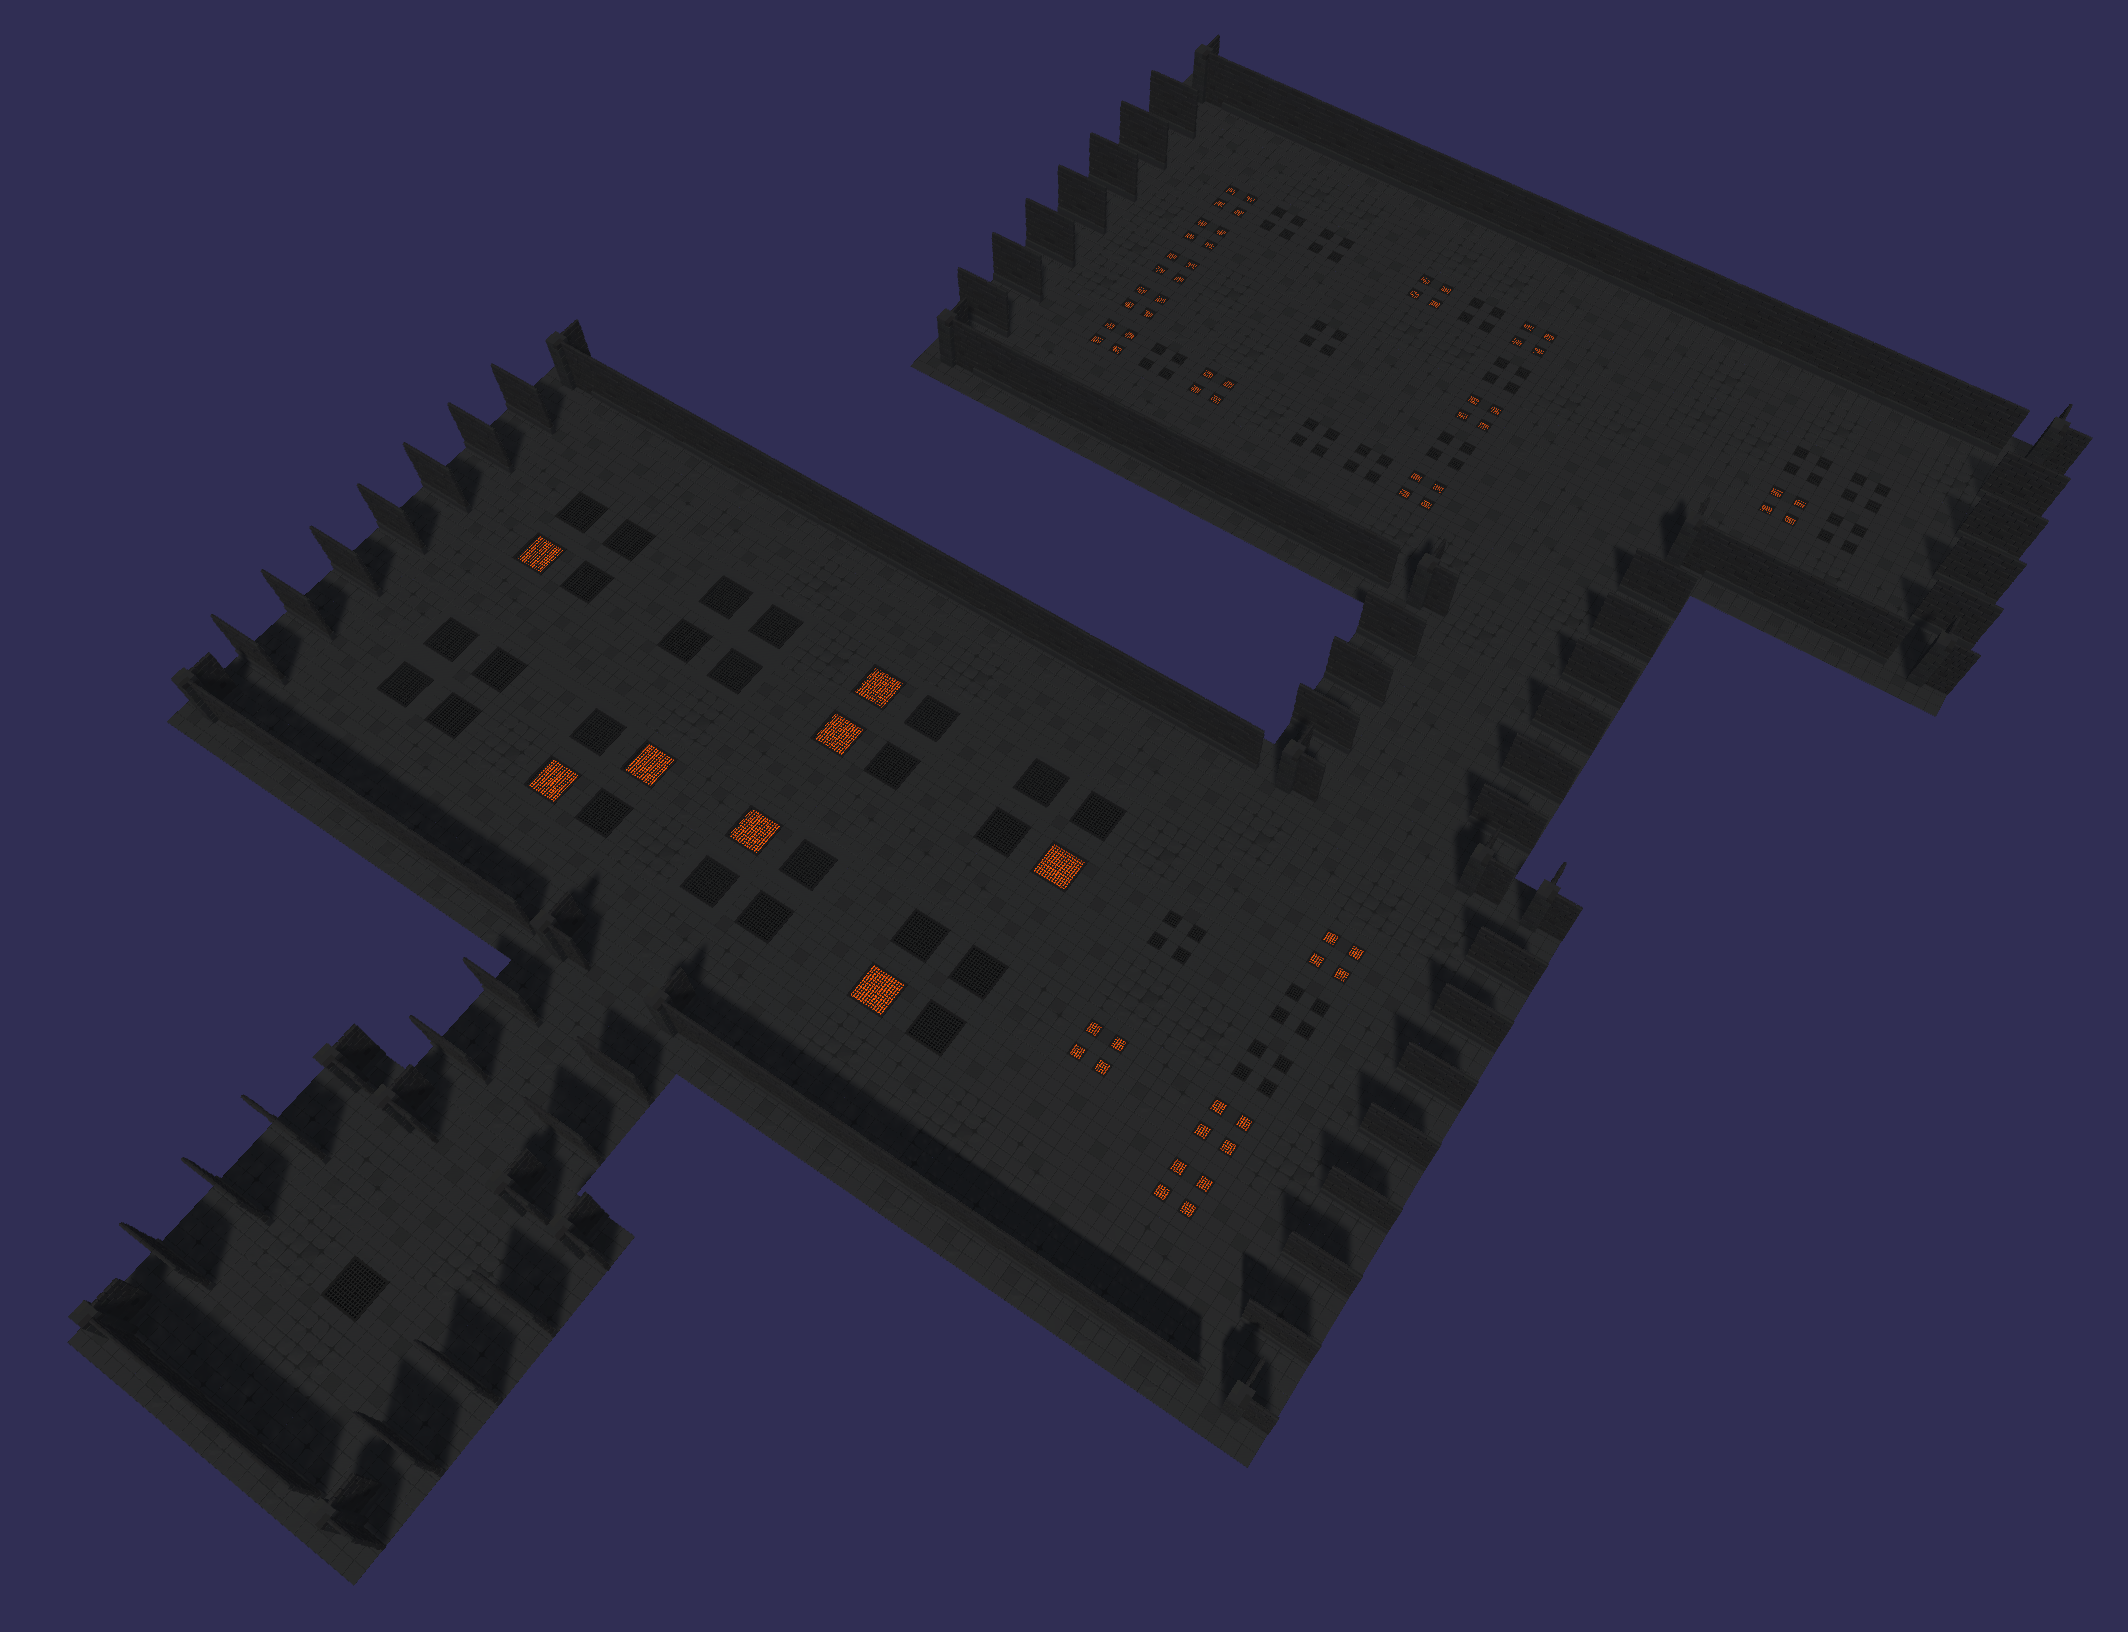
With these changes, my dungeon is starting to look a bit better.
Special Handling

The TileSpecialHandling function does exactly what it says. It will let us deal with each type, as defined by the enum, in a unique way. This can allow us to rotate walls and corners or any other number of things you might need for your specific project.
The function takes in the coordinates of the tiles, the prefab info as well as a reference to the gameObject itself.
A switch statement then calls unique functions for each type of tile. I’ll show my examples, but this is definitely where your code is going to diverge from mine as your project, your prefabs, and your goals are different.
Rotating Walls

Getting the walls facing the right direction depends on what’s around the walls. So while not too tricky, it is easy to get lost in the details and all the indices.
The big picture idea is we are trying to determine where the floor tile is and rotate the wall to face that direction. We look to the neighboring tiles by adding or subtracting one to a coordinate in the map array and check the enum at that position. If we find a floor we rotate accordingly. Again depending on your prefabs or exact setup, this may take some guessing and checking.
In this case, we only need to check 3 of our 4 neighbors, since if the unchecked neighbor is a floor then the wall is already facing the correct direction.
I’ve also thrown in a null check in the case that a prefabInfo was not assigned to that location. In my example I never got to the edges of the map, if you might, you will need to put in some additional checks to make sure that the coordinates are valid for the map array. Or just leave a ring of transparent pixels around the outside.
Rotating Corners


This is a bit trickier. With a corner, we need to find two nearby walls or corners. Depending on the orientation of those walls and corners we rotate the object. So a bit more complex but not too bad.
When debugging this type of function I’ve found the naming of the tile objects particularly valuable. More than a few times I thought I was checking one object and was in fact checking another.
To make this a bit easier and keep the code looking clean, I’ve added an extension function to determine if a neighbor is either a wall or a corner. Nothing too fancy, just keeps the if statements a lot simpler and easier to read.
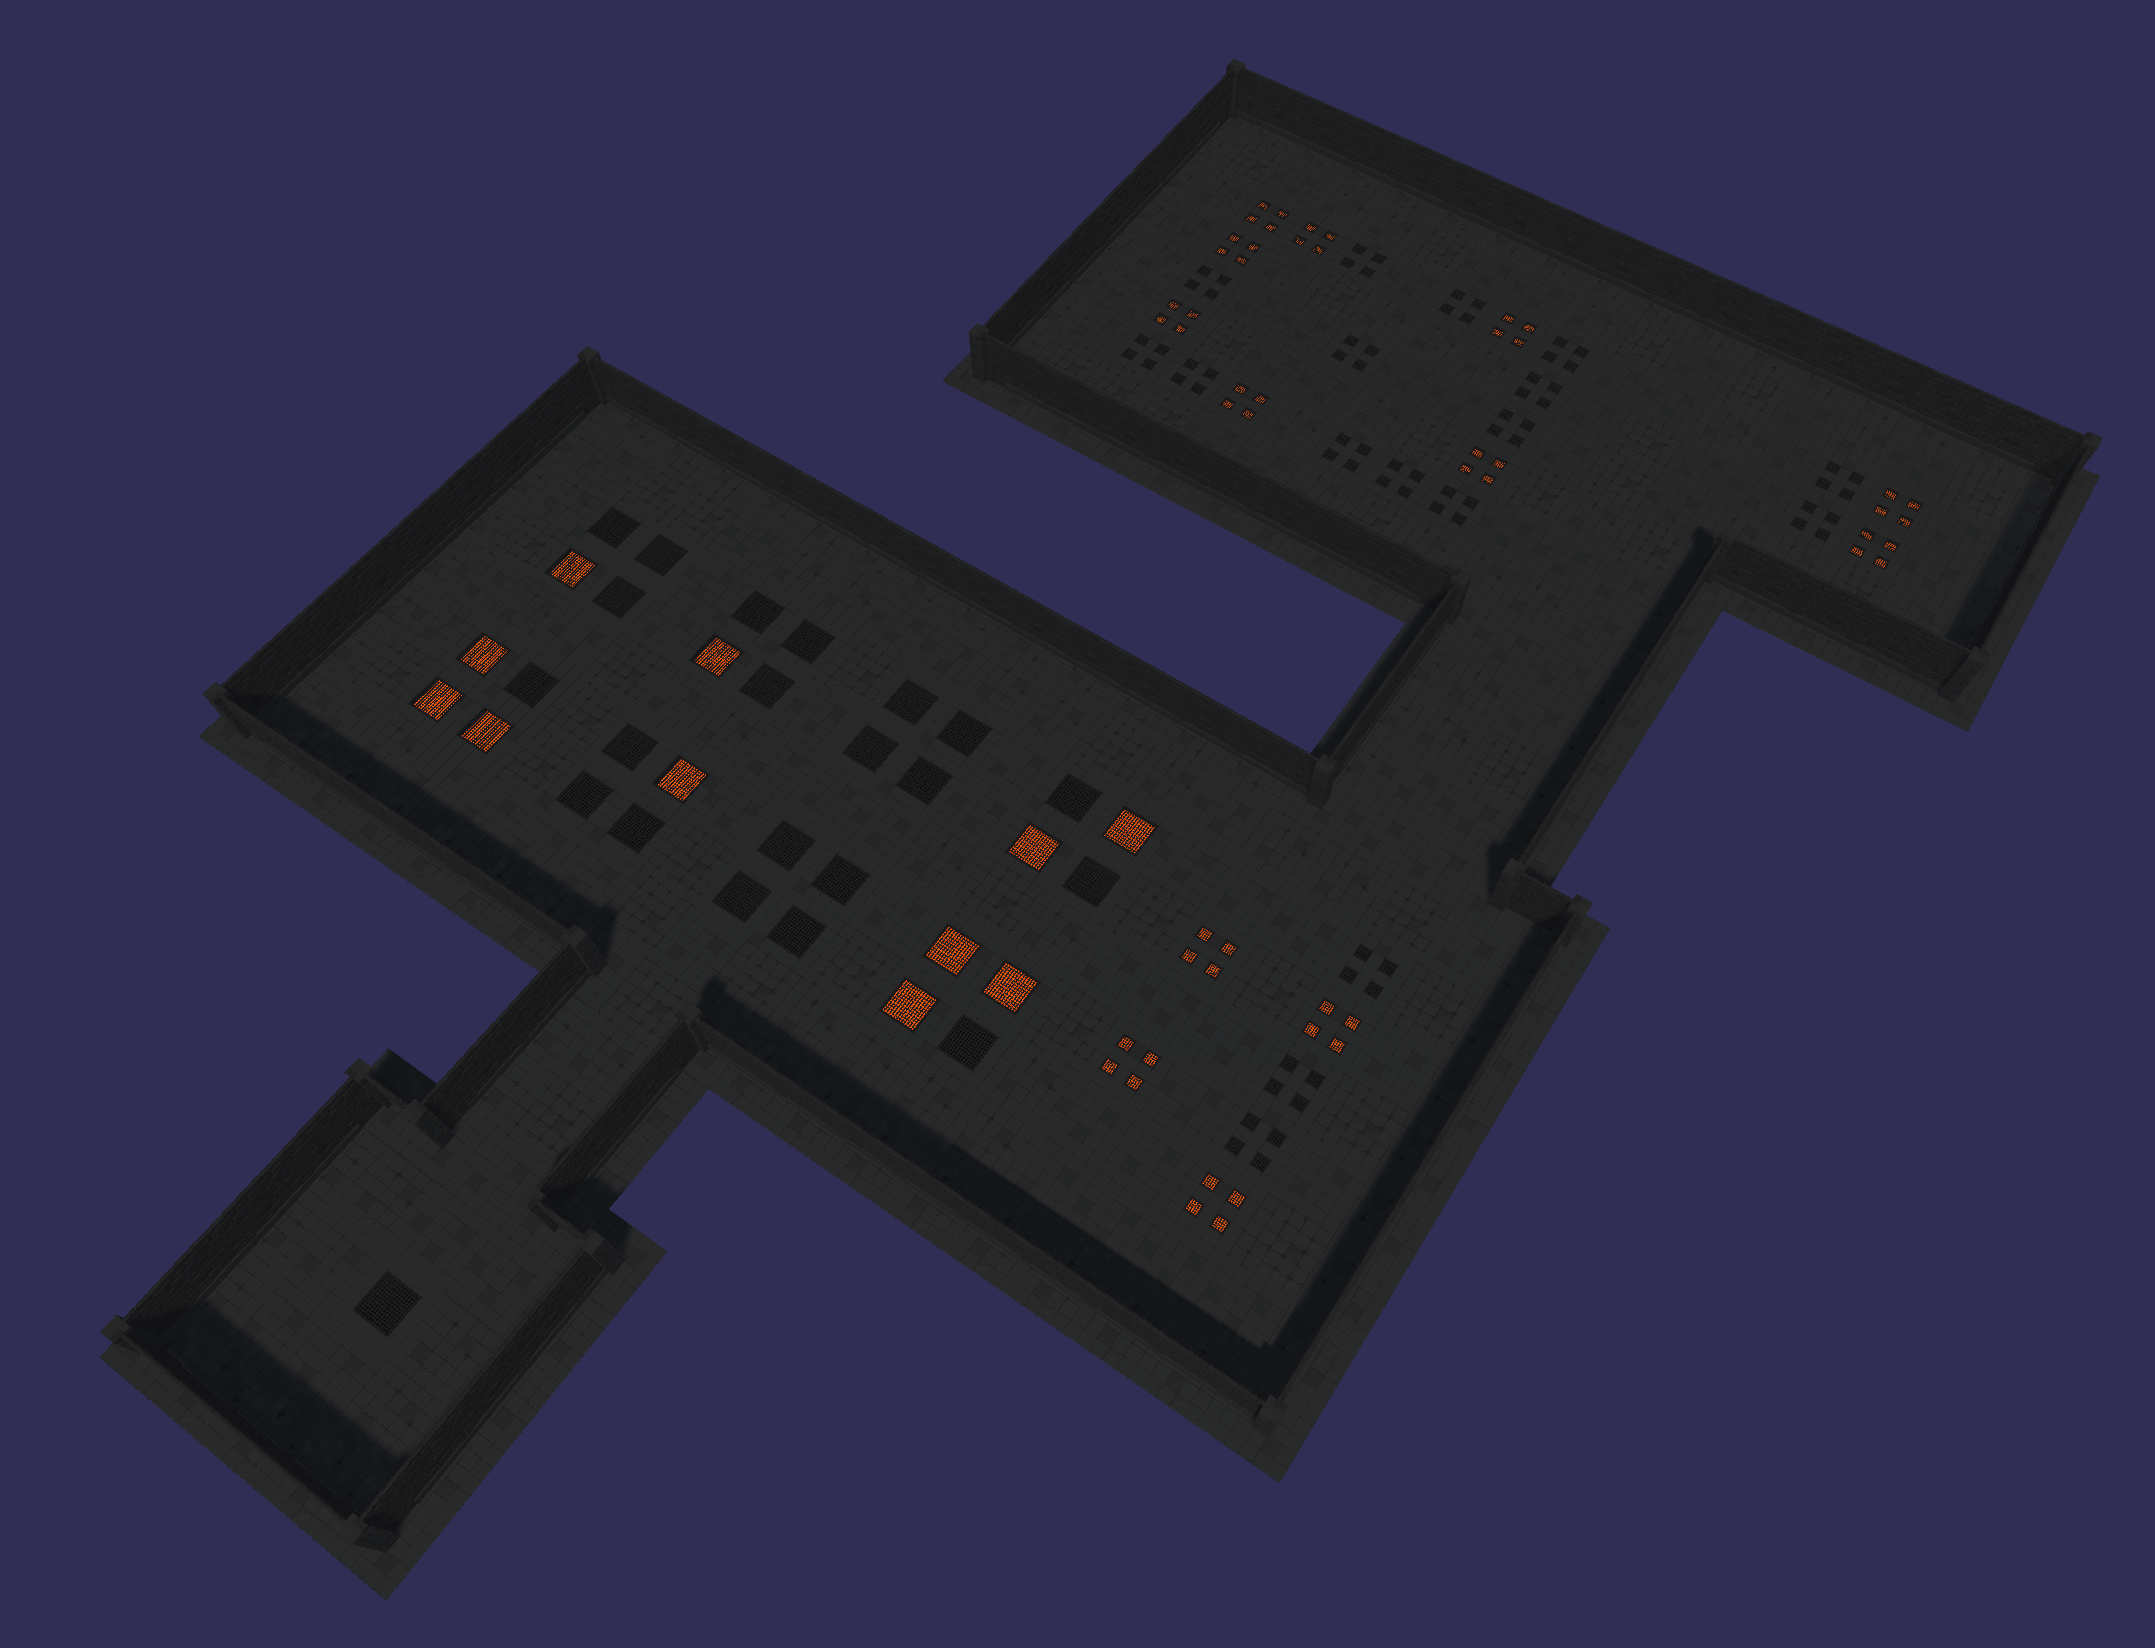
With the walls and corners rotated our dungeon is looking much better.

Rotating Lights
I figured lights would make for better video eye candy and it’s something that most developers are going to want to put in their game.
So, I made a light prefab that when located and rotated to match a wall tile at the same location it would sit on the wall correctly.
You could place and rotate lights with the same pixel map for the walls and floors, but I think there’s a good argument for having details like lights and other props on a second map. I did this by adding a second (transparent) layer on my map. This allowed me to easily line up the lights (and other details) with the walls and floor. I then export just the new layer as an additional PNG file. I also then added a second instance of the level builder to the scene. This second instance will manage the lights and props.
Second layer to align details with the floor

Addition level builder for details
Since I’ve used a second level builder I don’t (easily) have access to the the map array from the other level builder. This means I can’t use wall and floor data to align my lights. Instead, assuming the walls have already been added, we can make use of Physics.OverLapSphere to detect nearby objects. Then for the sake of ease, although I hate to do it, we can check the names of the objects found, and if there’s a wall we can align the rotation of the light to that of the wall. Or in this case the parent of the wall.

Final Thoughts and Improvements
The goal of this tool is rapid prototyping. It’s really quick to build a pixel map and drop it into the inspector. Even the amount of code you have to write is relatively small. For a game jam or even a commercial game, this tool can save hours and hours of work manually lining up prefabs to create individual levels.
Runtime Use
That said this tool, as is, is designed for use in the editor. It roughs out the level and you’re likely going to want to tweak things manually. But! With some more sophistication and refining of the “special handling” of tiles, this could be used to allow players to create and implement their own levels! A relatively simple in-game editor could allow the player to load a PNG and then assign prefabs to the colors found in the image. A pretty slick way for players to create content for your game!
Make It Better
If I was to use this tool (again) in a project to create levels I would likely modify the code to handle multiple maps within the same instance of the level builder. For example a structural map, a details map, a lighting map, and an enemy map. By using multiple maps within one instance it would mean that your lights could be aware of the floor or walls without having to raycast. Enemies could rotate to not face the walls. Or whatever. It would add more functionality if every map was aware of the other maps and would make the tool that much more powerful. But that kind of customization is highly dependent on the specific project so doesn’t really fit in a tutorial.
2D and Tilemaps
As is, the tool is designed for 3D, but it would work perfectly well with placing 2D sprites. If you are using a tilemap, Unity provides Tilemap.SetTile() which would allow easy addition to an existing tilemap. If you’d be interested in seeing a modification of the tool to use a tilemap let me know - leave a comment or reach out on Discord or YouTube. I might challenge the YT community to get the video 1000 likes or something similar before creating a follow-up video. Who knows.