Upgrade System (Stats Part 2)

Upgrades! Who doesn’t like a good upgrade when enemies are getting tough and you need a little boost?

Implementing a system can be easy if it’s small. An upgrade system is no different. Need to boost the speed of a spaceship? No problem make a variable a bit bigger. But when the number of stats, the number of units, and the number of possible upgrades grows the need for a system becomes more and more obvious.

With 20, 50, or 100 different upgrades you can’t write a new class for each upgrade and have any realistic hope of maintaining that code base let alone debugging each and every upgrade.

So just like I did with my stats system I wanted to share how I created my upgrade system (which is closely tied to my stats system) in hopes that it might spark ideas for you to create your own upgrade system that matches the needs for your project.

Important Details

Just like my Stats system, I wanted my upgrade system to be based on scriptable objects - they provide asset-level data packages that allow for an easy workflow, and frankly I just like them. Just like with my stats system, I’ve continued to make use of Odin Inspector to allow the serialization of dictionaries and access to those dictionaries in the inspector. If you don’t have Odin Inspector, you can use the same workarounds from the stats system to use lists instead of dictionaries.

Base Class

I don’t always love using inheritance, but in this case, I’m using it as I have several varieties of upgrades in my project - including leader upgrades, global upgrades, and building unlock upgrades.

For this post, I’ll show the inheritance, but stay focused on implementing basic upgrades for altering unit stats. If you don’t need different types of upgrades, then I’d suggest you use a single non-abstract Upgrade class.

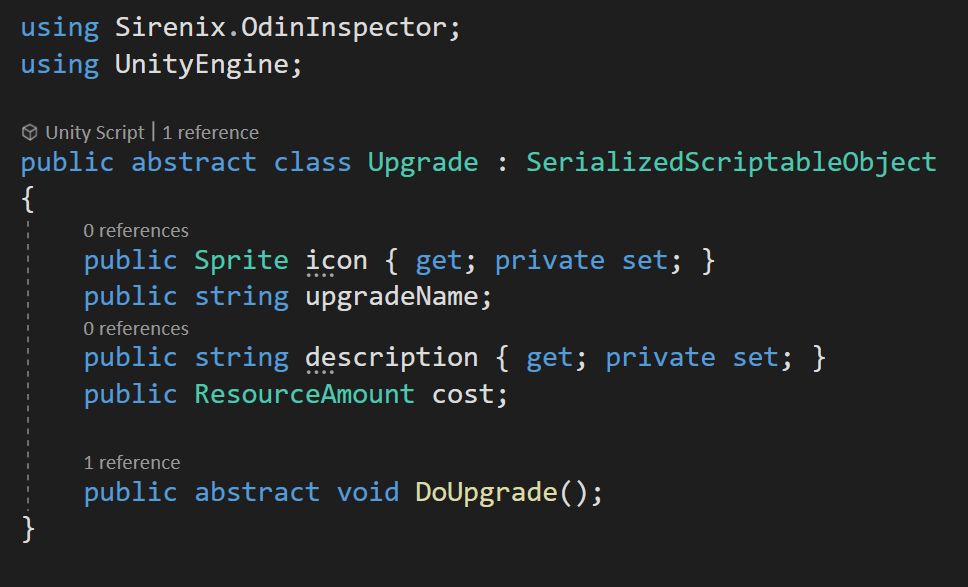
The base upgrade class is an abstract class because (for me) each type of upgrade will need to implement DoUpgrade slightly differently and I don’t want any instances of the base Upgrade class in the project. The class defines some basic properties such as a name, a description, cost, and an icon for the UI.

Stats Upgrade

All the real functionality comes in the StatsUpgrade subclass. Here I define two important collections.

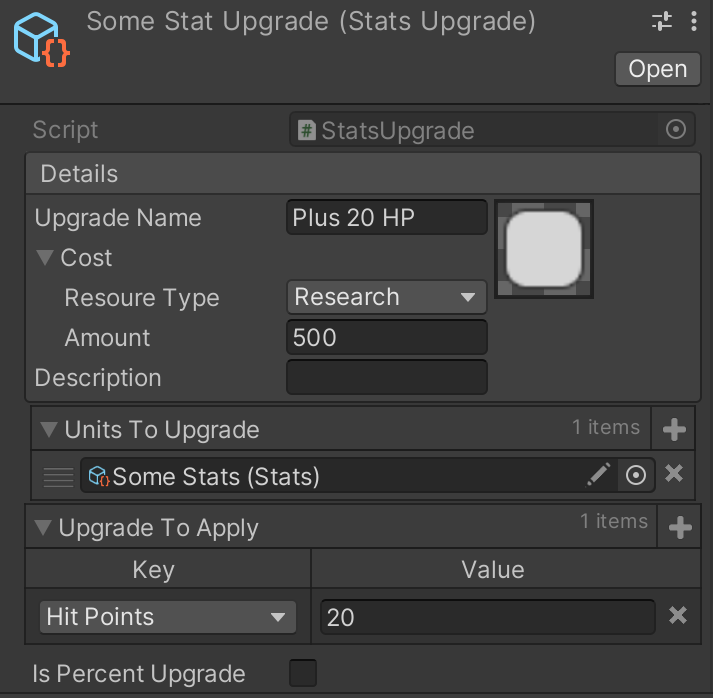
The first is a list of the units that this upgrade is to be applied to. Notice that it’s actually a list of stats objects (which are themselves scriptable objects) and not the prefabs of the unit objects. I simply drag in the stats scriptable object for any unit that I want to apply this upgrade to.

The second collection is a dictionary, but could easily be a list, of the individual stats that are affected by this upgrade and the amount that the stat is altered. Again, I’m manually adding items to define the upgrade.

Then the real functionality comes from the DoUgprade function, but even that is pretty simple. All that happens is we iterate through all the stats to upgrade and call UnlockUpgrade and pass in the upgrade itself.

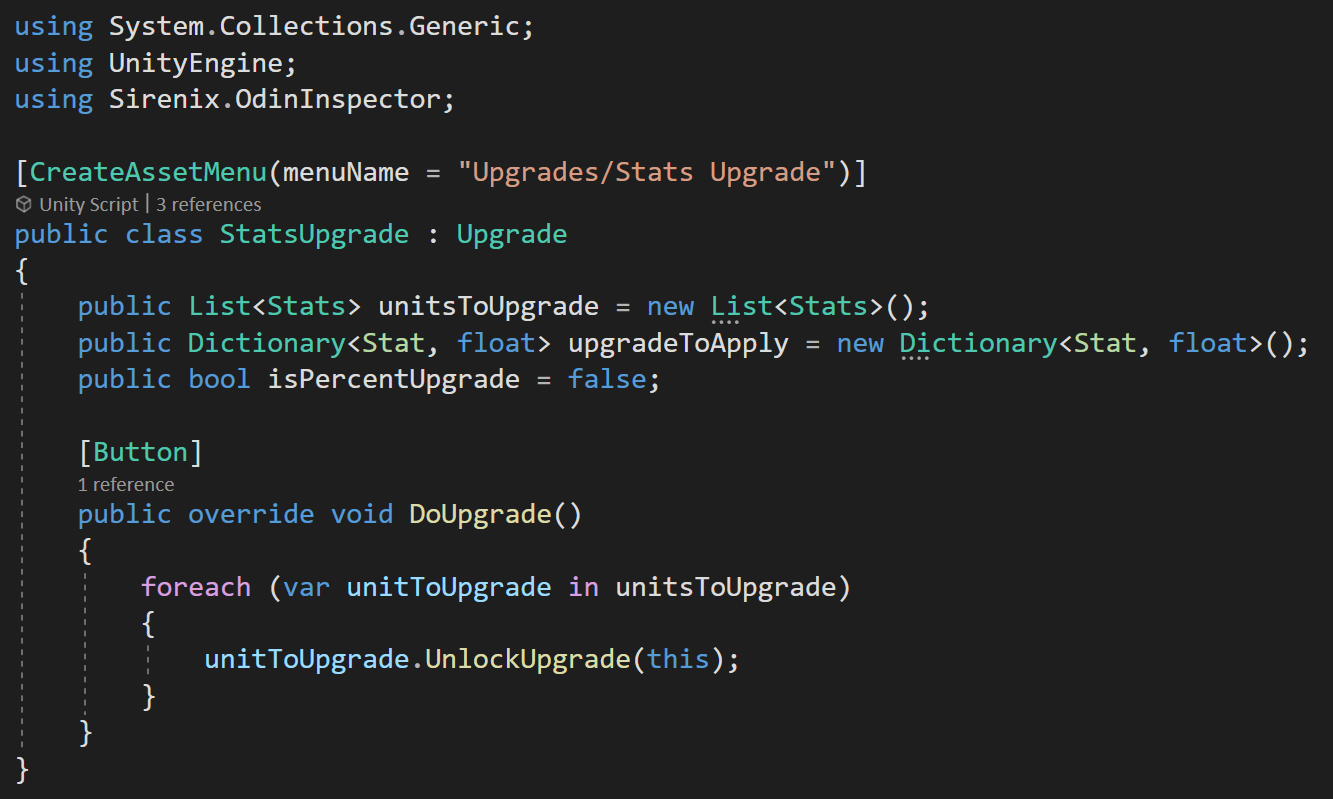
That’s it. That’s all the stats upgrade does.

To make this useful, we need to make some modifications to the stats class that we built in the last post (or video) to handle the upgrades.


Modifying the Stats Class

If you read the post or watched the video on my stats system you may also notice that I’ve implemented my suggestion of an “instance stats” dictionary to separate stats like “health” or “hit points” that will belong not to the type of object but to the instance of an object.

To work with the upgrade system the stats class needs a new list to track the upgrades and it’ll need a handful of new functions as well.

First, we need to define the UnlockUpgrade function that was called in the StatsUpgrade class. This function simply needs to check if the upgrade is already contained in the applied upgrade list and if not add it to the list.

Next, we need to modify our GetStats function to take into account any potential upgrades. To do this we first check if the desired stat is in either the instance stats dictionary or in the stats dictionary. If we find it in either dictionary we get the base value for that stat and pass it into the GetUpgradedValue function.

Inside this new function, we loop through all the applied stat upgrades and check if any of those stat upgrades apply to the current stat type - by looking for that stat type in the dictionary of upgrades to apply.

If we find an upgrade, we apply the value to the stat. If the upgrade was a percent upgrade the math is a bit different but the idea is the same. When we’re done looping through all the possible upgrades we return the value to the GetStats function.

I like this approach as the entire upgrade path is dealt with by the StatsUpgrade and Stats classes. Nothing outside these classes needs to know or even cares what’s going on - keeping things nice and tidy.

Fixing Loose Ends

#1 There is one problem in the current system which comes from using scriptable objects and modifying them in the Unity editor. When applying an upgrade by adding it to a list during play mode that upgrade will still be part of the list when you leave play mode. Meaning you could accidentally ship your game with an upgrade pre-applied which is less than awesome. This is the same reason, I choose to recalculate the upgraded stat value each time the value is requested rather than simply setting the value.

The solution to this is pretty simple. We just need to clear the list of applied upgrades when we enter or exit play mode.

There are no “lifetime” functions like OnEnable or OnDisable for scriptable objects so where and how this function gets called is really up to you. I haven’t come up with a particularly clever solution, if I do I’ll post it here, but for now, my implementation is to simply have a Stats manager that will call the reset function on each stat object when going into play mode. This same stats manager could also tie into a future save system so that applied upgrades can be saved and restored in standalone builds.

If you come up with a more clever solution I’d love to hear about it in the comments below or on the OWS discord.

Reminder: Scriptable objects are not suitable for a save system. So don’t try and turn this “problem” into a janky-ass save system. It just won’t work.

#2 There is an edge case where an upgrade may be applied to one of the “instance stats.” For example, let’s say we get an upgrade that adds 20 hit points to our tanks. With no further modification, any tank that is added AFTER the upgrade is applied should see the extra 20 hit points, but tanks that are already in the scene won’t. Maybe that’s okay or even desired, but in my game not so much.

So here is my suggested fix. It’s not the tidiest, but it works. I’m going to add a public non-static event to the Stats class that will get invoked when an upgrade is applied. Any class that might care about an upgrade can then be notified - which could be useful for functionality such as SFX or VFX or other player feedback to let them know an upgrade has been applied to a particular unit.

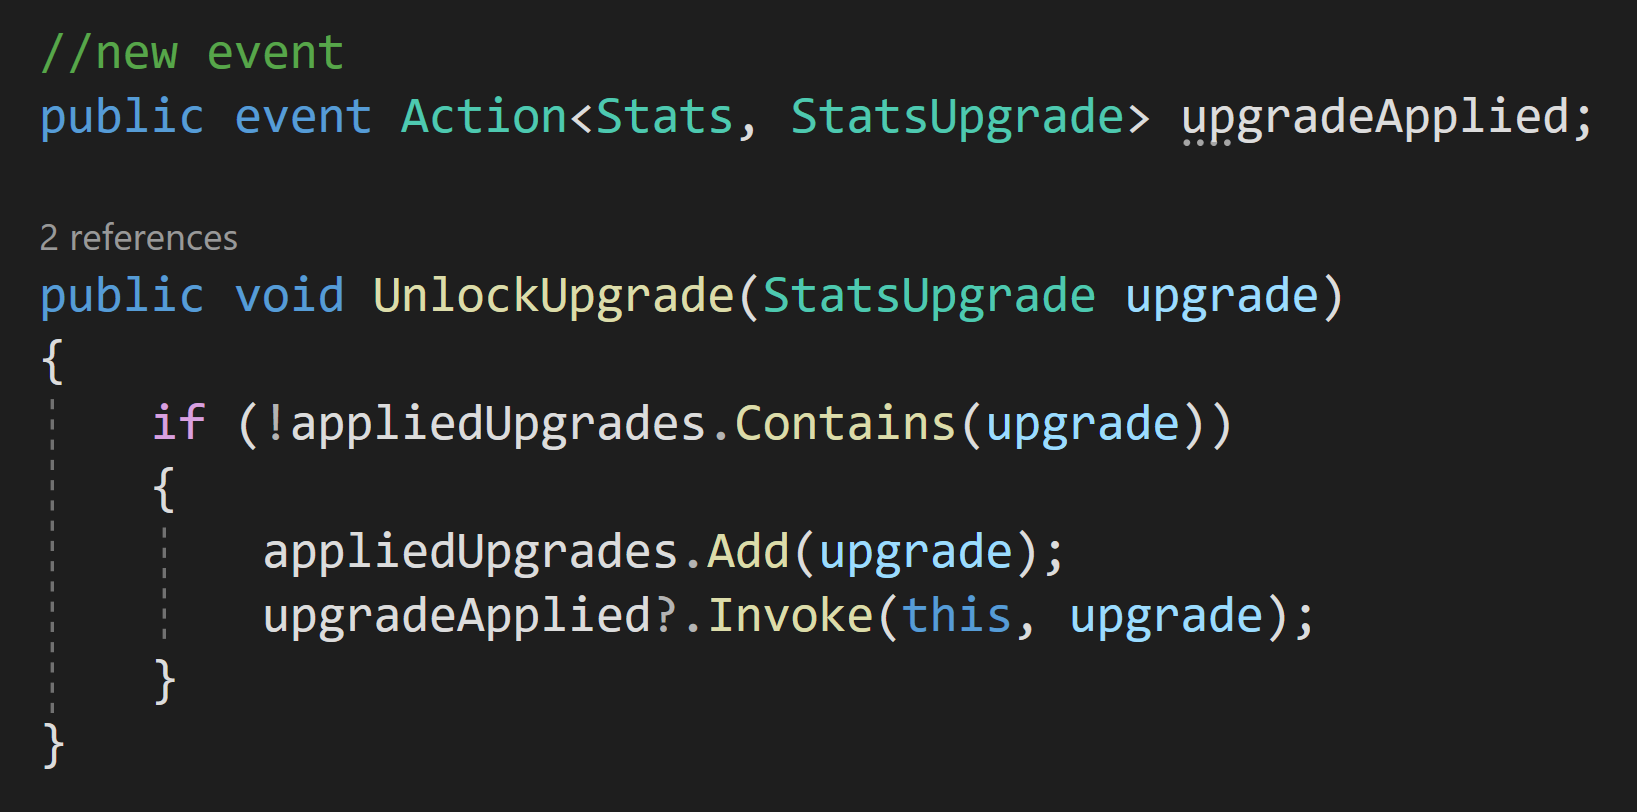
Changes to the Stats class

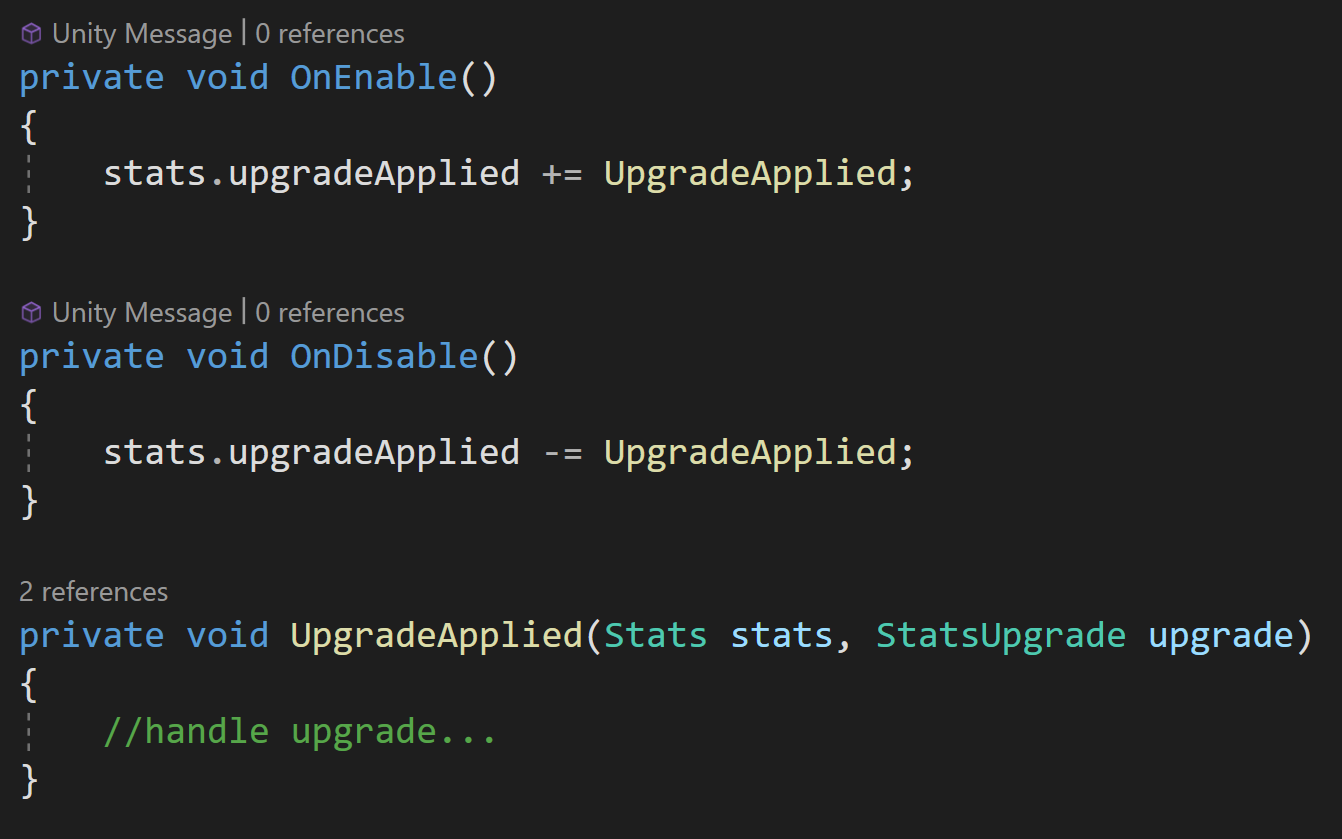
A class subscribing to the new event to process the upgrade


Stats in Unity - The Way I Do it

The goal of this post is to show how I did stats and hopefully give you ideas or at least a starting point to build your own system - your needs are probably different than mine.

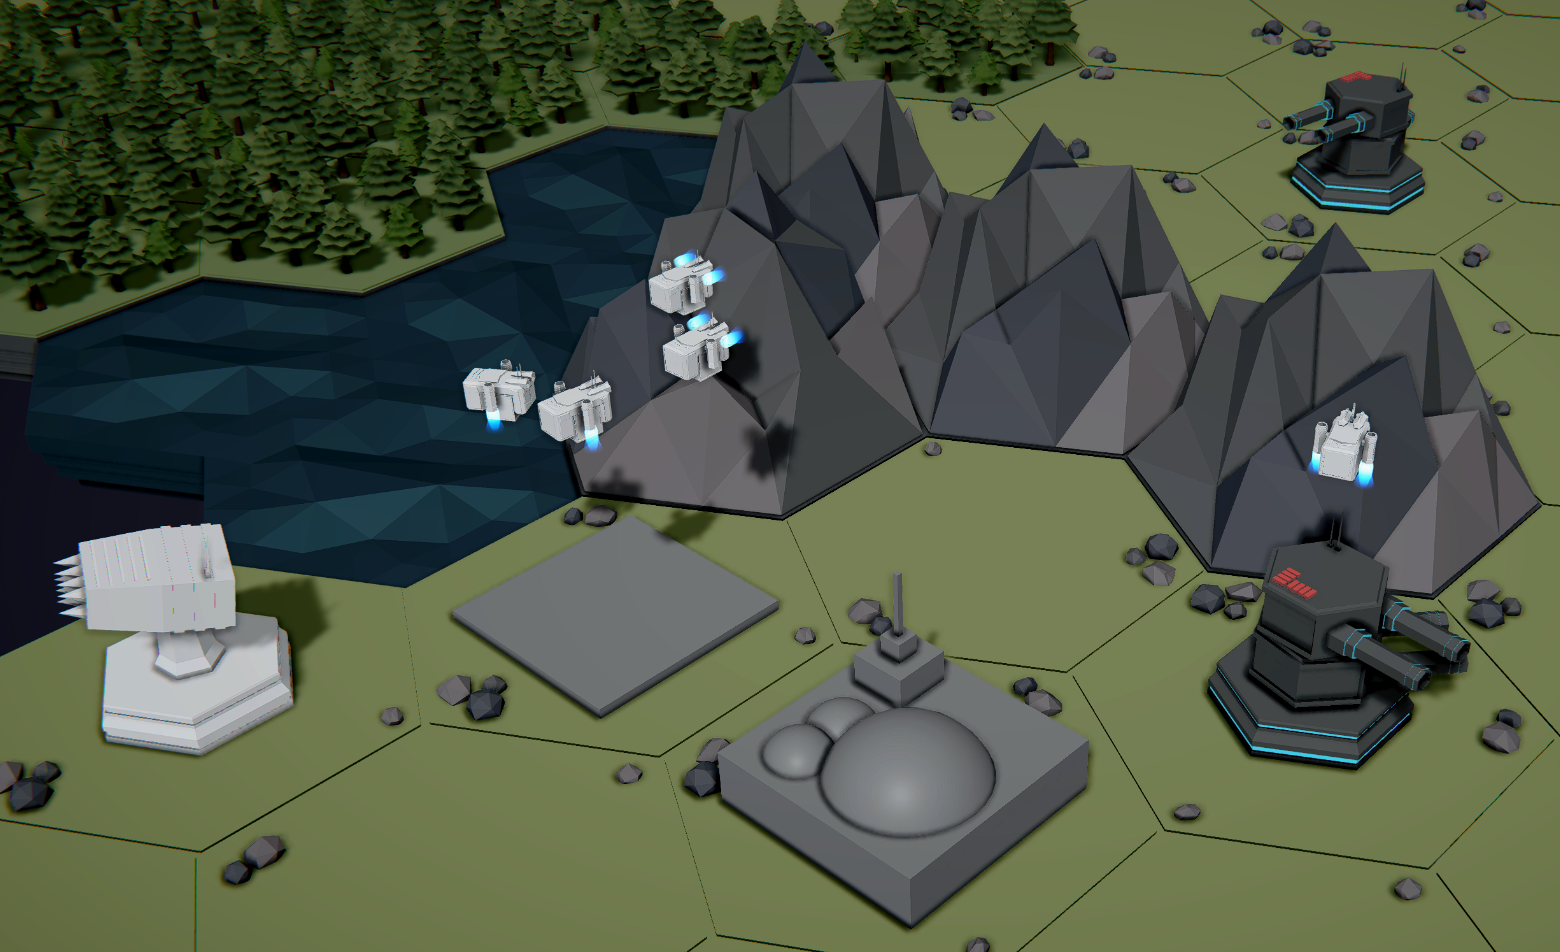
A WIP, but the buildings need stats

All games need stats in some shape or form. Maybe it’s just the speed of the player or maybe it’s full-blown RPG levels stats for players, enemies, NPCs, weapons, and armor.

For my current personal project, I knew I was going to need stats on the buildings as well as the enemy units.

A good way to do this is to create a non-monobehaviour stats class that has a public field for every stat. Then all classes that need stats can have a public stats field and you’re good to go. For a lot of uses, this might be more than enough.

Making the stats class a non-monobehavior class it can help enforce some good composition over inheritance type of structure.

While this is good, I wanted something more. The goal of this post is to show how I did stats and hopefully give you ideas or at least a starting point to build your own system - it’s likely that your needs are a bit different than mine.

I wanted something generic. I wanted different units to have different types of stats. I wanted a quick and easy way to get values of stats - without creating all kinds of functions or properties to access individual stats. And lastly, I wanted a stat system that could work with an upgrade system with similar ease and adaptability.

My implementation of an upgrade system will get shared in a follow-up post.

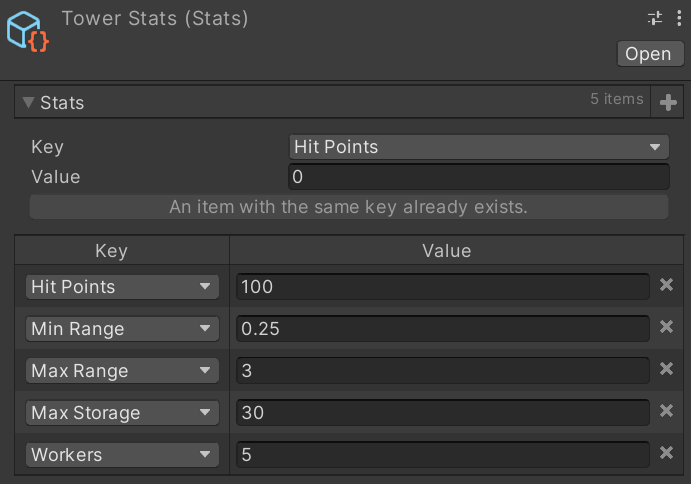
My stats. Easy to use. Easy to Create

Stats in a Collection

Having my stats in a collection (a dictionary in my case, but lists also work) means I can easily add stat types and adjust stat values for a given type of unit. While I very much have a love-hate relationship with assigning values in the inspector - this is a win in my book all day every day.

This was a crucial piece of the puzzle given that not all units will have the same types of stats - farmer and defensive towers have very different functions and so they need different stats!

Using Scriptable Objects

I choose to use a scriptable object (SO) as the container for my stats. This keeps my data separate from the logic that uses the data. Which I like.

It also means that each stats container is an asset and can be shared with any object that needs access to it. It works project-wide.

For example, every “tower” has access to the same stats object. If the UI needs to display stats - they access the same SO. This reduces the need to duplicate information and more importantly reduces possible errors or needs to keep “everything up to date” - the UI and units always have the same values.

Upgrades can also be easy. Apply an upgrade to the stats object and every tower gets it. No need to hunt through the scene for objects of a certain type to apply the upgrade. Additionally, if I apply an upgrade in Level 1, that upgrade can easily transfer over to Level 2 as it can be applied to the SO. Pretty handy.

Important Note: Scriptable objects can be used to transfer data from one scene to another. BUT! They are not a save system and changes in an SO will not persist when leaving play mode - just like changes to a monobehaviour.

As a slight tangent, I also like that the SO, at some level defines the characteristics of the object. For example, in my project I want players to be able to choose a leader at the start of a new game or even at the start of a new level - the leaders effectively act as a global upgrade. By having each leader’s stats on a SO, I can simply drop the leader’s SO into whatever script is handling the leader’s logic and the effect is a change in leadership - a strategy pattern-like effect. The same effect can be had with stats - depending on your exact implementation.
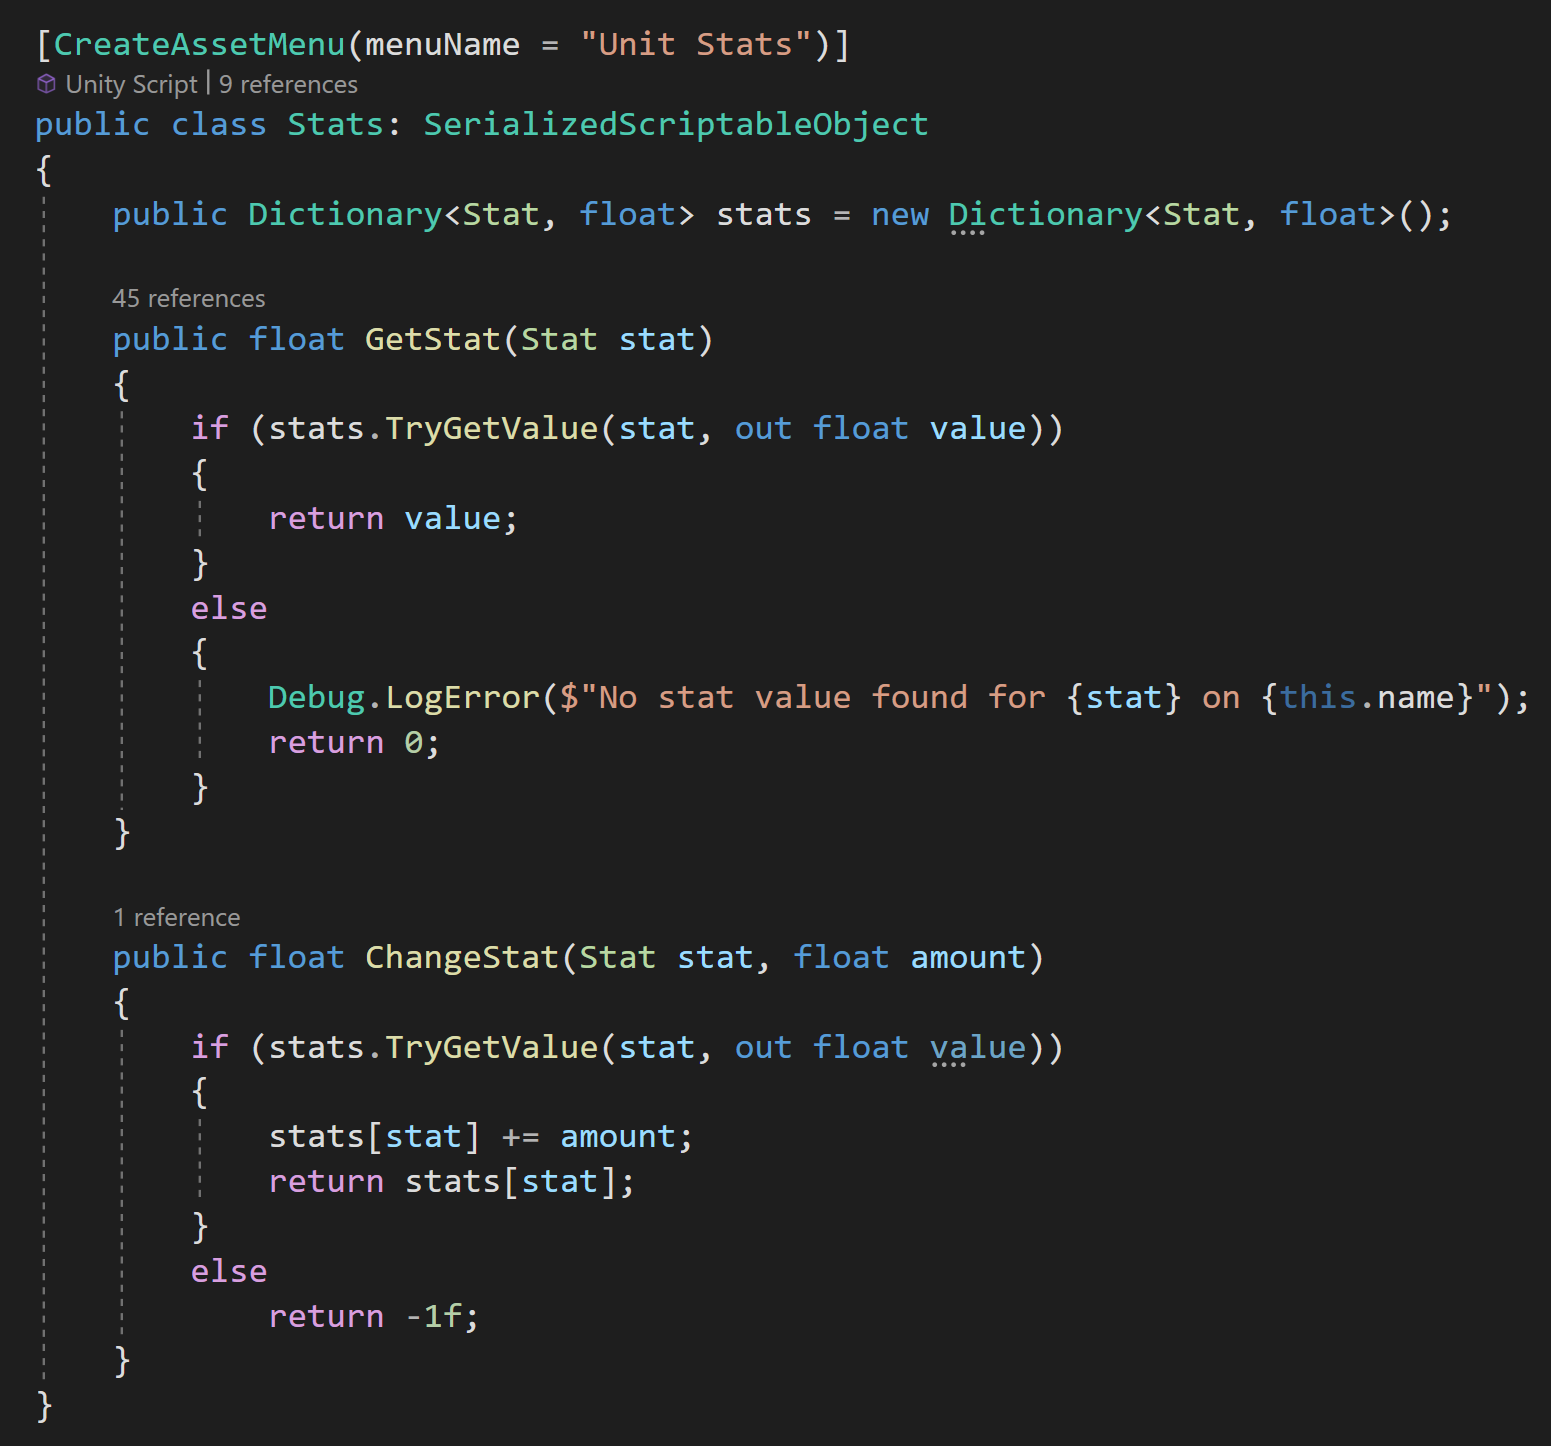
Quick Stat Look-Up

Putting my stats in a dictionary with an enum for the key and the value holding the stat value makes for a quick and easy method to access a given stat. No need to create properties. All I need is one public function that takes in the stat type and returns the value. This continues to work if I add or remove a stat type making my system a little less brittle.

This approach does mean that a stat could be requested and that it isn’t in the dictionary. If this is the case, I return zero and send an error to the console. Ideally, this isn’t happening, but with this implementation, nothing breaks, and as the developer, I get a message letting me know that I either asked for the wrong stat or I haven’t created a stat type for a given unit. Again, nice and clean.

Changing Stat Values

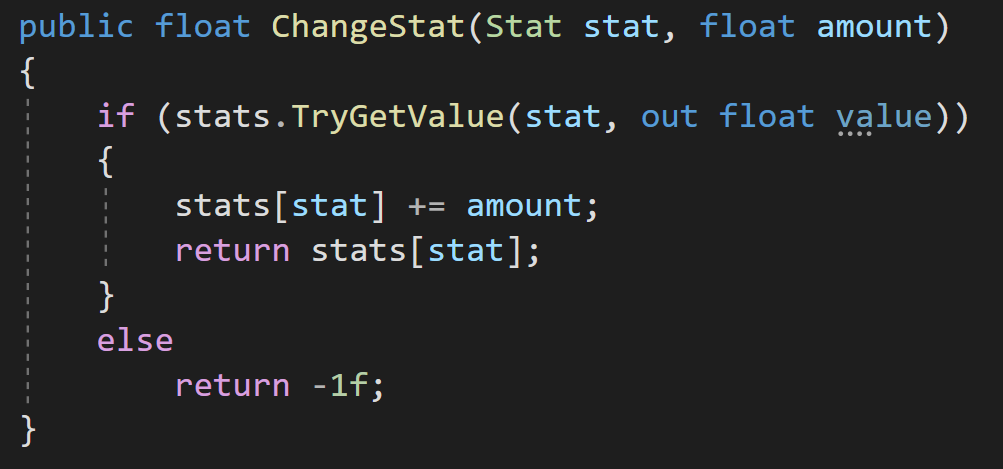
Similarly, if you need to change a stat on the fly - a potential path for an upgrade system - a single public function can again be used. Once again remembering that changes to the SO won’t persist out of play mode.

In this case, I chose to return a negative value if the stat couldn’t be found… Would zero have been better? Maybe. Depends on your use case. I chose negative as things like hit points can be zero without something being wrong.

Potential Issues

For those who are paying attention, there are at least two potential issues with this system.

The Dictionary

You may have noticed that my scriptable object is actually a “SerializedScriptableObject” which isn’t a class built into Unity. Instead, it’s part of Odin Inspector and it allows the serialization and display of dictionaries in the Unity inspector. Without this class, you can’t see the dictionary in the inspector and you can’t add stats in the inspector… It’s a potential problem. There are at least two workarounds - short of buying Odin.

Fix #1

Use a list instead of a dictionary. You would need to create a custom class that has fields for the stat type and the stat value. Then you would need to alter the GetStat() and ChangeStat() functions to iterate through the list and find the result.

A bit messier, but not too bad. If you are concerned about the performance of the list vs a dictionary, while there is definitely a difference, the extra time to iterate through a list of 5, 10, or 20 stat types is marginal at best for most use cases.

Fix #2

But if you insist on using a dictionary, the second fix would be to use your list to populate a dictionary at runtime and then use that dictionary during play mode. This could be done in an initialized function or the first time that a stat is requested. A bit messier, but definitely doable.

The Scriptable Object

Having every unit of a type share stats is a good thing. Unless of course, a stat needs to be for the individual instance. Something like hit points or health. In those cases, we have a problem and need to work around it. So let me propose a couple of solutions.

Fix #1

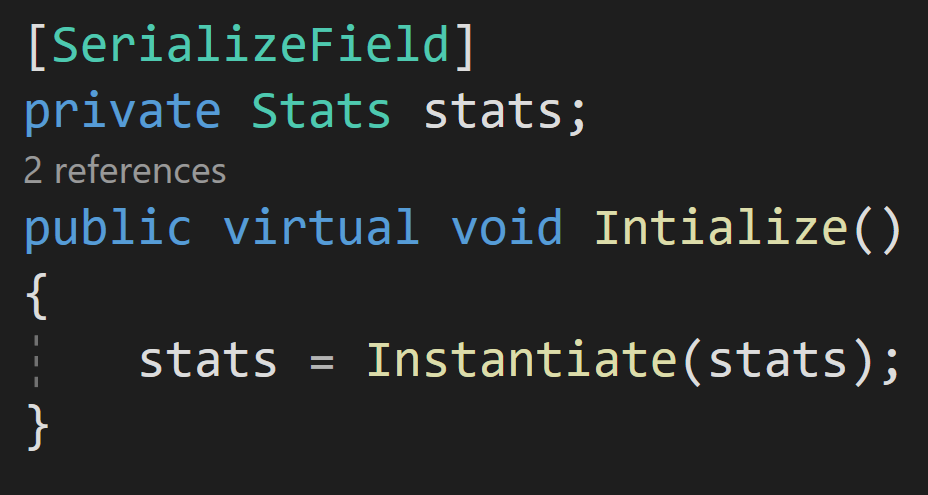
Have each unit instantiate a copy of the SO when the unit is created. This makes the original SO just a template and each object will have its own copy. This breaks the “every unit of a type shares the same stats” idea, but it means that every unit of a type starts with the same stats.

This effectively means that the SO tracks max values or starting values while the object itself tracks the current value of the stat.

This is the method I have used in my project to prevent all units of a type from sharing health, but unfortunately, it will likely break my upgrade system moving forward. So….

Fix #2

Or you could create an additional dictionary (or list) of stats on the SO that should be copied onto the instance. Then functions such as a DoDamage() that change the value of a local or instance stat simply change the local value instead of changing the value on the SO.

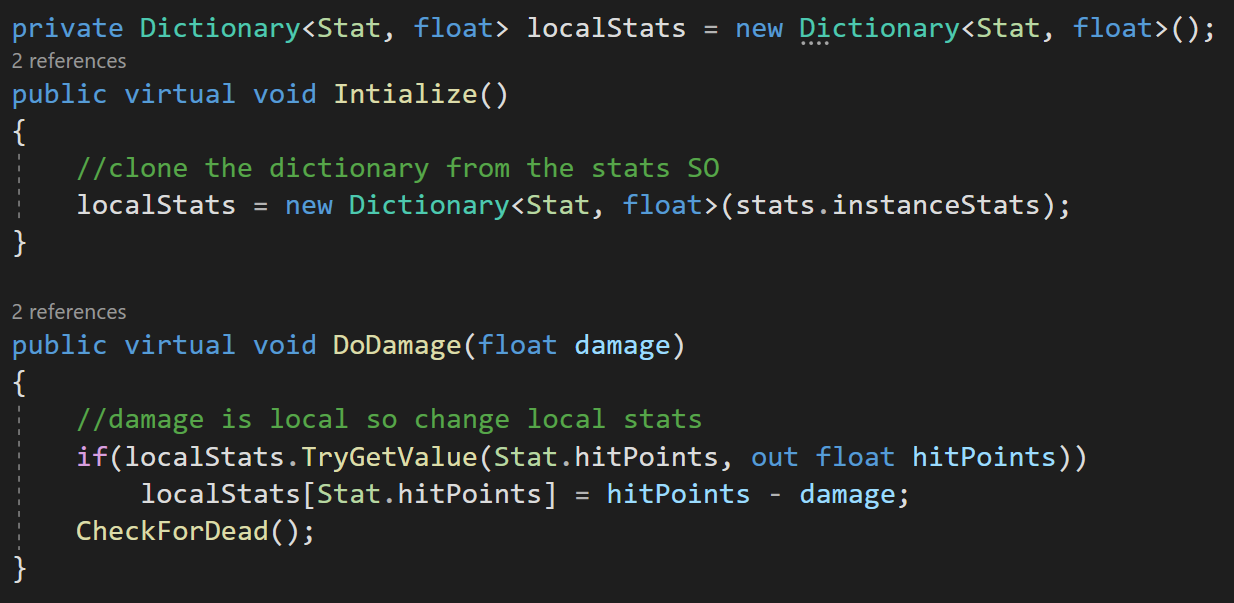
This is likely my preferred solution moving forward as the SO still defines all stats for the object while individual objects have control of their instanced stats.

State of UI in Unity - UI Toolkit

UI Toolkit. It’s free. It’s built into the Unity game engine. It promises way more functionality than UGUI. Sounds perfect, right?

Well. Maybe. Turns out it just isn’t that simple.

So let’s talk about UI Toolkit.

A Bit of History

There is a huge elephant in the room when it comes to UI Toolkit. That being the development timeline.

UI Toolkit, or rather UI elements, was announced sometime in 2017 (I believe) with a roadmap released early in 2018 and the first release with some functionality came in Unity 2019.1. This was all leading to the goal of having parity with UGUI with the release of Unity 2020.3.

While UI Toolkit has come a long way - it’s still not able to fully replace UGUI. The latest official release from Unity says UI Toolkit is in maintenance mode through the Unity 2022 cycle and no new features will be added until the release of Unity 2023.

Based on the recent Unity release pattern, this means we likely won’t be seeing a feature-complete UI Toolkit until sometime in the calendar year 2024. That’s 6-7 years from announcement to being feature complete. 7 years ago I was still pretty fast on a mountain bike…

The Pro’s

UI Toolkit offers far better control of UI layout than UGUI. Many of the layout features that I find so attractive about Nova UI are either built into UI Toolkit or are on the roadmap. On top of that, UI Toolkit can be used to create custom editor windows, which neither UGUI nor Nova UI can or will ever do.

Plus! And this is no small thing, UI Toolkit allows styles or themes to be defined and reused. It’s no secret if you’ve watched any of my recent streams, I find color choice and visual design really really hard. With UGUI if you want to tweak the color of a button background, you either make prefabs, which can work sometimes, or you have to change each and every button manually. I hated this workflow so much that I built a janky - but effective - asset to let me define UGUI styles. While Nova is working on themes, they aren’t ready or available for developers just yet.

UI Toolkit also promises far better performance than UGUI - much of it is done behind the scenes with little effort from the developer. With UGUI if you change an element of a canvas the entire canvas has to be redrawn - which isn’t an issue with simple UI but can become a significant issue with more complex designs when you are trying to eke out every little bit of performance.

Despite big significant differences in how to create the UI, to Unity’s credit, much of the programming with UI Toolkit should feel familiar to folks comfortable working with C# and UGUI. While there will certainly be some nuance and naming differences, programming the interactivity of UI Toolkit should not be a major hurdle.

And of course the last big win for UI Toolkit? It’s free! For a lot of folks that right there is all the reason to ignore Nova UI and give Unity’s newest solution a serious go.

Stolen from a Unity Video On UI Toolkit

The Con’s

The biggest question about UI Toolkit is will it ever be done? Will it be feature complete? Will it truly have parity with UGUI? How much will change in the process? Will those changes break your project?

There are two big and commonly used UI features that UI Toolkit doesn’t have (yet). First is world space UI. If you don’t need it. Not a big deal. The second incomplete feature is UI animation. Some is supported but not all. Is this a problem? Maybe? Depends on your project.

Data binding with UI Toolkit, is less than awesome. Finding objects by name? Using strings? This doesn’t feel sustainable or scalable or at the very least it’s just not a pleasant way to work. Even the devs have commented about it and are planning to revamp it with a more generic solution. What exactly that means? We’ll have to see.

With any choice of system, you need to look carefully at what it can do, and what it can’t do, and compare that to what you need to do.

The Toss Up’s

The workflow and design of UI Toolkit largely reflect web design and workflow. Is that a pro? Is that a con? That depends on your experience and maybe your willingness to learn a new approach. For me and I suspect many others this is the deciding factor. UI Toolkit feels TOTALLY different than the UGUI or Nova workflow. The pattern of gameObjects, components, and prefabs is replaced with USS, UXML, and UI documents.

Also, the UI is also no longer really part of the scene - in the sense that you can’t see it in the scene view and it’s really in its own container. The UI elements are NOT scene objects. Again, it’s different which isn’t good or bad but it is really different.

For some, these are the exact reasons to go with UI Toolkit. For others, they’re the perfect reasons to stay with UGUI or Nova UI.

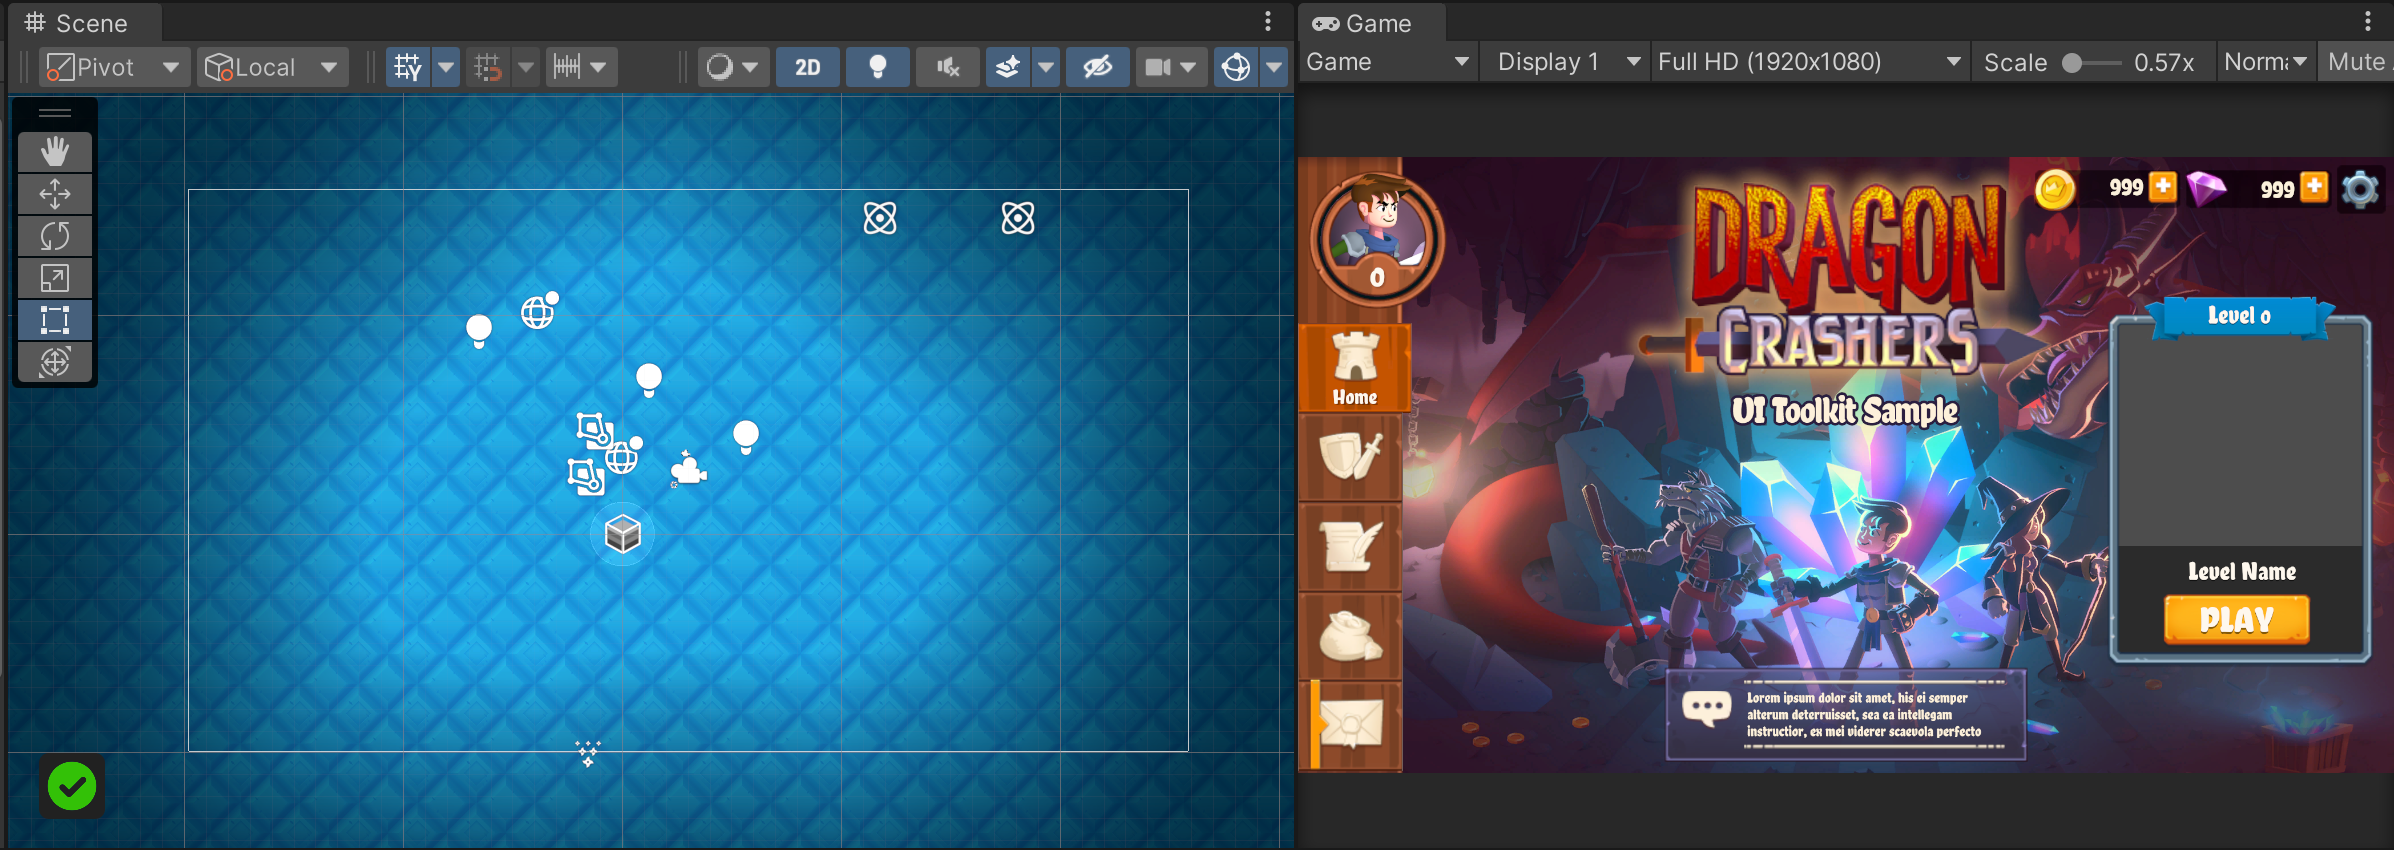
The sceneview (left) vs the GameView (right)

An Experiment

The results. Can you which result came from which UI tool?

I felt like if I was going to make a second video talking about UI options in Unity I really needed to have SOME comparison of the tools. So I set out to make the “same” ui with UGUI, UI Toolkit, and Nova UI. I wanted to create a slider that changed the alpha of an image and buttons that would collapse text. Nothing too fancy, but functions or similar to functions used in a lot of projects.

I spend about a bit longer with UGUI (18:02) than with Nova UI (17:39) and as expected, due to my lack of knowledge and experience, far longer with UI Toolkit (56:16). Those times are based on recording the process with each tool. You can see the final results in the video to the right.

In all cases, default or included assets were used. No formatting of colors, textures, or fonts was intentionally done.

I KNOW that it is possible to make this UI with all three components. The point was not to say one tool is better than another. The point was just to experience each tool and the process of using each tool. That said, for me, with my experience, my brain, and my understanding it was clear that one tool, in particular, is easily the best choice in terms of the workflow and the quality of the final result.

Let me explain more…

My Thoughts on UI Toolkit

I have zero experience with modern web development or design. I’d like to think I can learn and adapt to a new system, but I can’t explain just how foreign UI Toolkit felt to me. Sure I could drag and drop things into the UI Builder and mess around with values in the inspector, but after spending a few hours (more than just the testing above) with it I had way more questions than answers. I was playing and experimenting with Unity’s Dragon Crashers project - I had examples in front of me but I still very much struggled to see how it all worked and connected.

For example, there is a nice-looking slider in the library. It works. There are lots of great options and adjustments in the inspector. But for the life of me, I could not figure out how to scale it on the vertical axis. The horizontal axis, no problem, but make it thicker? Nope.

Video of a UI Toolkit slider at 30 fps…

I did some googling and found the same question online with no posted answer. Now clearly there is an answer. There is a way to do it. But it’s a way that I couldn’t figure out.

And then there’s the UI builder window. There’s no way to sugarcoat it, the performance of UI builder was horrible. I don’t know how else to say it. With just a few elements it’s a non-issue. But load up the main menu of Dragon Crashers and slide a few values around and the editor becomes nearly unusable. You can see the lag in the video to the right. I saw similar results in my simple “experiment” use case too.

Just to make sure I wasn’t crazy or being overly critical I opened up the profiler to do some testing. Sure enough, there’s a HUGE lag spike while dragging a value in the UI Builder inspector. This isn’t a deal breaker, but it sure makes the tool harder to use.

UI Builder lag

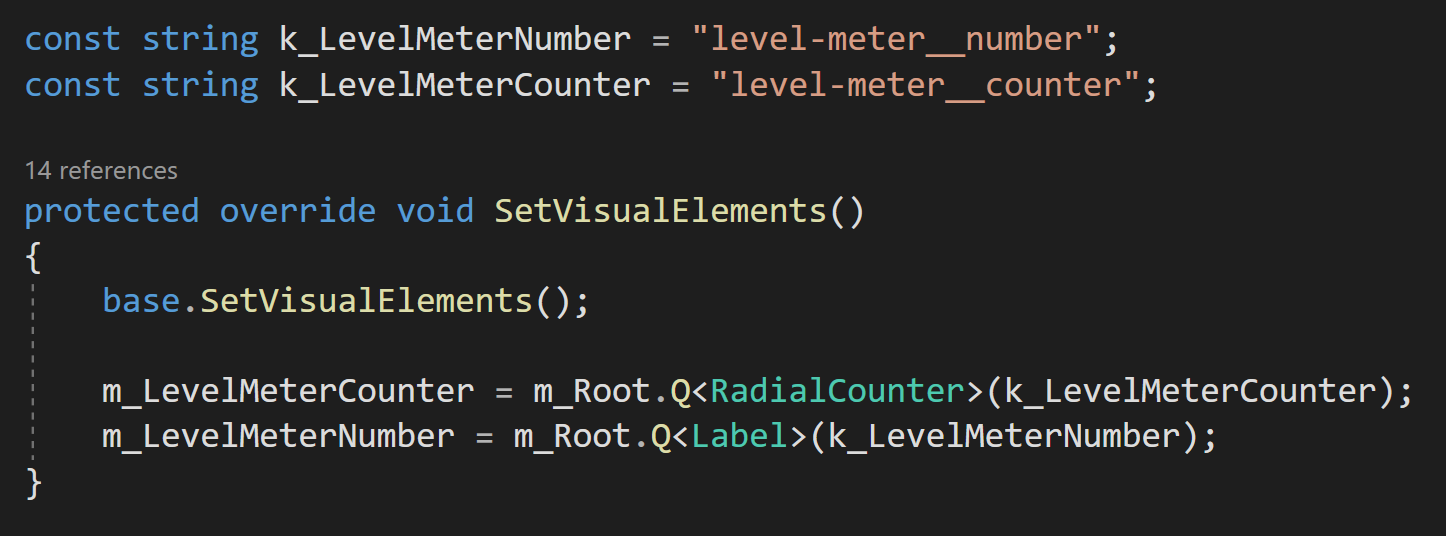
Strings? Really? Why?

Then I ran into my active disdain for strings. I will freely admit that when I saw that strings were being used to get references to UI elements I was really put off.

Why? Why do it that way? Why lose strongly typed references? Maybe this is how web development is done and folks are used to it. But this feels like a step backward.

The dev team agrees or at least sees it as an area to improve, so they are looking into “more generic” solutions, but right now those solutions don’t exist and who knows when or if they will materialize.

So Should You Use It?

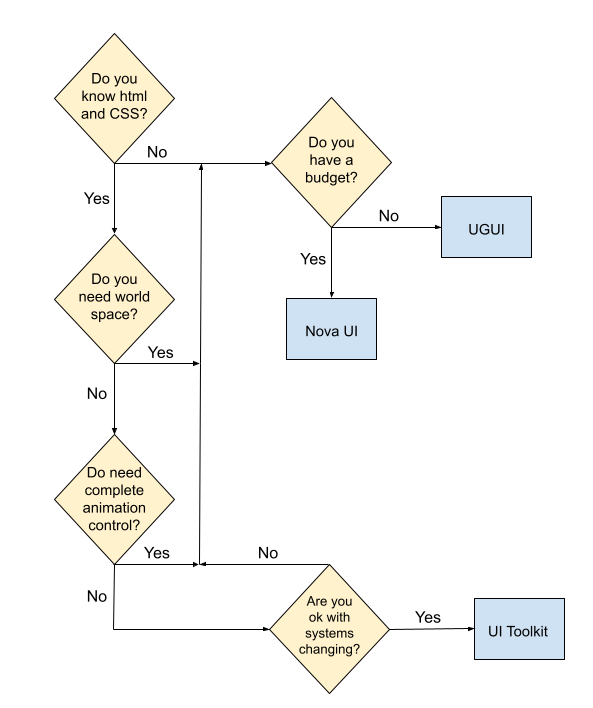
In my mind, trying to decide if UI Toolkit is the right solution comes down to a handful of questions (and a lovely flow chart).

  1. Do you know and like web design workflows?

  2. Do you need world space UI?

  3. Do you need complete control of UI animations?

  4. Are you okay with the UI system changing?

Final Thoughts

Options are good to have. I see UGUI, UI Toolkit, and Nova UI each as viable UI solutions depending on the needs of the project and the skill set of the developers. Each has shortcomings. None of them are perfect.

UI Toolkit is in this weird alpha/beta mode where it’s been released, but not feature-complete and has potential breaking changes coming in the future. Which means much of the tutorial information out there is outdated. It also doesn’t give content creators a good incentive to make more than just introductory content. This makes it harder for the average user to get up to speed. Unity keeps doing this and feels so counterproductive!

But here’s the best part of the situation. All three of these solutions can be tried for free. Nova has a free version while UGUI and UI Toolkit are shipping with recent versions of Unity. So my advice? Try them. Play with them. Do an experiment like I did. Find the right tool for you and your project. I have my UI solution. I love it. But that doesn’t mean it’s the right solution for everyone.

Knowing When A Coroutine Finishes

Did you know that a coroutine can yield until another coroutine finishes? I didn’t. Let’s talk about it and why it’s useful.

Backstory

A few weeks back, I was working with some 3rd party code that heavily used coroutines. In one place it had a “chain” of coroutines that each called another coroutine sometimes multiple coroutines and this went 5-6 coroutines deep.

First. Yuck.

Second. Holy cow.

For what I was working on, I needed to know when the process (all the coroutines) had finished. The “usual” and often suggested method on the interwebs is to add a class-wide boolean to track when the coroutine is complete - you set it to true when you start and set it to false when you finish.

I’ve never liked this approach, but sometimes it’s good enough.

In the case that I was working with, the boolean approach just wasn’t practical or at least was going to be extra icky. And I definitely wasn’t going to add a boolean parameter to each coroutine and try to pass it through… No chance.

So I got to wondering if there was a better way. It turns out there is. And somehow I’d missed it up until now.

Ironically, if I’d looked closer at the coroutines in the 3rd party code I would have seen the solution in action. Oops… You win some you lose some.

A Better Way

So this may sound like just passing the buck. BUT! You can have a coroutine yield until another coroutine is finished.

(Seriously, how did I not know about this?)

This means in my case, a cluster of sequential coroutines, I can create yet another coroutine and have it yield until the cluster finishes it’s business. So if the coroutines exit early and DON’T make it to the end of the chain - for some reason. I’ll still know that the coroutines are done. I may not know why, but I know it’s done. And that’s a hugely useful thing!

Plus!

We can throw in a function to call when the coroutines have done their business. Frankly, this is often what we really want to do - wait until the coroutine is done and then run some other code.

In my opinion, this works and it works well. But I think it also opens the doors to better code structure (assuming it’s your code and you can change it).

Better Still!

A chain of coroutines makes it hard to debug and in my opinion and makes harder it than necessary to follow the flow of the code. So with what we know now, or at least with what I know now, we could restructure the code and make it easier to read.

So instead of one coroutine calling the next coroutine, I can call them all, sequentially, from within a single wrapping or master coroutine. This avoids the hard to follow “chain” AND it avoids a huge monolithic coroutine (i.e. just making it all one coroutine).

In fact, I used this exact approach in my current personal project where I had several actions that needed to happen sequentially, but also over a controlled period of time. Launching a missile requires a lot of moving pieces - it is actually rocket science!

Launching an ICBM from a missile SILO


Next Level

Coroutine with callback

But we can go one step further!

If you’ve spent any time on my channel or discord you know I love actions and events. I rarely pass up a chance to use them and this is no different!

Rather than have a set function called when the coroutines finish, we can pass in an action that will act as a callback.

Meaning the same coroutine can run, but with a different reaction when it’s finished. This can be super useful if the coroutine is public (yes, coroutines can be started from other classes) or if it is somehow getting invoked by different objects or for different reasons.

I generally don’t love making coroutines public, not sure why, just don’t. But it’s easy enough to add a public function.

Passing in a callback function

Either way, passing in an action (i.e. function) is easy and makes for very useful code and potentially reusable code.

Unity Input Event Handlers - Or Adding Juice the Easy Way

Need to add a little juice to your UI? Maybe your player needs to interact with scene objects? Or maybe you want to create a dynamic or customizable UI? This can feel hard or just plain confusing to add to your project. Not to mention a lot of the solutions out there are more complex than they need to be!

Using Unity’s Event Handlers can simplify and clean up your code while offering better functionality than other solutions. I’ve seen a lot of solutions out there to move scene objects, create inventory UI, or make draggable UI. Many or maybe most of those solutions are overly complicated because they don’t make full use of Unity’s event handlers (or the Pointer Event Data class).

Did I mention these handlers work with both the “new” and the “old” input systems. So learn them once and use them with either system.So let’s take a look at what they can do!

If you just want to see the example code, you can find it here on GitHub.

Input Event Handlers

Event handlers are added by including using UnityEngine.EventSystems and then implementing one or more of the interfaces. For example, IPointerEnterHandler will require an OnPointerEnter function to be added. No surprise - this function will then get called when the point enters (the rect transform of) the UI element.

The interfaces and corresponding functions work on scene objects. But! The scene will need a camera with a physics raycaster and more on that as we move along.

Below are the supported events (out of the box) from Unity:


Example Disclaimer

The examples below are intended to be simple and show what CAN be done. There will be edge cases and extra logic needed for most implementations. My hope is that these examples show you a different way to do some of these things - a simpler and cleaner way. The examples also make use of DoTween to add a little juice to the examples. If you’re not using it, I’d recommend it, but it’s optional all the same.

Also in the examples, each of the functions being used corresponds to an interface that needs to be implemented. If you have the function, but it’s not getting called double check that you have implemented the interface in the class.


UI Popup

A simple use case of the event handlers is a UI popup to show the player information about an object that the pointer is hovering over. This can be accomplished by using the IPointerEnter and IPointerExit interfaces. For my example, I choose to invoke a static event when the pointer enters the object (to open a popup) and when the pointer exits (to close the popup). Using events has the added benefit that other systems beyond the popup menu can also be aware of the event/action - which is huge and can allow more polish and juice to be added. It also means that information about the event and the object can be passed with the event.

In my particular case, the popup UI element is listening to these events and since the PointerEventData is being passed with the event, the popup UI element can appear on-screen near the object. In my case rather than place the popup window at the same location as the pointer I’m using a small offset.

This code is placed on objects - to enable popup

Physics Raycaster

If you want or need the Event Handlers to work on scene objects (like the example above) you will need to add a Physics Raycaster to your camera.

This is pretty straight forward, with the possible exception of the layer mask. You will need to do some sorting of layers in your scene and edit the layer mask accordingly if you are getting unwanted interactions.

For example in my project game units have a “Unit Detection” object on them which includes a large sphere collider. This is used to detect opposing units when they get close. The “Unit Detection” object is on a different layer to avoid unwanted interactions between scene objects. In my case, I also wanted to turn off this layer in the physics raycaster layer mask - as the extra colliders were blocking the detection of the pointer on the small collider surrounding the actual unit.

This code is placed on the popup window itself


Drag and Drop

This came up in my Grub Gaunlet game from a tester. Originally I had buttons at the top that when you clicked them a new game element appeared in the middle of the screen. This worked and was fine for the game jam, but being able to drag and drop the object is more intuitive and feels a whole lot better. So how do you do that with a button (or image)? Three event handlers make this really easy.

This goes on the UI element and needs to have the prefab variable set in the inspector

First, when the pointer is down on the UI element a new prefab instance is created and the “objectBeingPlaced” variable is set. Setting this variable allows us to track and manipulate the object that is being placed.

Then when the pointer comes up objectBeingPlaced is set to null to effectively place the object.

But the real magic here is in the OnUpdateSelected function. This is called “every tick” - effectively working as an update function. To my understanding, this is only called while the object is selected - so this is no longer called once the pointer is up or at the very least when the next object is selected. I haven’t done any testing, but I’d guess there are slight performance gains using this approach vs. an update function on each button. Not to mention this just feels a whole lot cleaner.

Inside the OnUpdateSelected function, we check if objectBeingPlaced is null, if it’s not then we want to move the object. To move it we’re going to do some raycasting. To keep things simple, I’ll create a plane and raycast against it. This limits the movement to the plane, but I think that’ll cover most use cases.

This is SO much simpler and cleaner than what I’ve done in the past.

If you haven’t seen the Plane class, I just discovered it a few weeks back, the plane is defined by a normal vector and a point on the plane. It also has a built in raycast function which is much simpler to use than the physics raycaster - albeit also more limited in functionality.


Double Click

How about a double click? There are a LOT of solutions out there that are way more complex than what appears to be needed. All kinds of coroutines, updates, variables…. You just don’t need it. Unity gives us a built-in way to register click count. So let’s make use of it.

The real star of the show in the code is the OnPointerClick function and the PointerEventData that is passed into the function. here all we need to do is check if eventData.clickCount is equal to 2. If it is then there was a double click.

Could it be much easier?

In addition, this should work with UI and scene objects (need a physics raycaster) equally well.

The rest of the code presented just adds a bit of juice and some player feedback. We cache the scale of the object in the Start function. Then when the pointer enters the object we tween the scale up and likewise when the pointer exits we tween the scale back down to its original size.

As a side note registering the double click did not work for me with the new input system version 1.0.2. An update to 1.3 fixed the issue. There was no issue with the “old input system.”


Moving Scene Objects

Okay, so what if you want to move an object around in the scene, but that object is already in the scene? This is very similar to the example above, however (in my experience) we need an extra step.

We need to set the selected gameObject - without doing this the OnUpdateSelected function will not get called as the event system doesn’t seem to automatically set a scene object as selected.

Setting the selected object needs to happen in the OnPointerDown function. Then in the OnPointerUp function, the selected object gets set to null - this prevents any unwanted interactions from the object still being the “selected” object.

The other bit that I’ve added is the OnCancel function (and interface). This gets invoked when the player presses the cancel button - which by default is set as the escape key. If this is pressed I return the gameObject to its starting location and again set the selected object to null. This is a “nice to have” and really easy to add.

Dragging UI Objects

Who doesn’t like a draggable window? Once again these are easy to create using a handful of event handlers.

hierarchyLet’s get right to the star of the show, which is the OnBeginDrag and OnDrag functions. When the drag begins we want to calculate an offset between the pointer and the location of the object. This prevents the object from “snapping onto the pointer” which doesn’t feel great doubly so if the object is large.

Next, we need to set the object to be the last sibling. Since UI objects are drawn in the order that they are in the hierarchy this helps to ensure the object being dragged is on top. If you have a more complex UI structure you may need to get more clever with this and change the parent transform as well (we do this a bit in the next example).

Then!

In the OnDrag function, we simply we simply set the position (excuse the typo - no need for the double transform call) to the position of the pointer minus the offset. And that’s all it takes to drag a UI object.

But! I did add a bit more juice. The OnPointEnter and OnPointer Exit functions tween the scale of the object to give a little extra feedback. Then in OnEndDrag I play a simple SFX to give yet a bit more polish.

Drag and Drop “Inventory”

There is a Unity package with this prefab in the Github repo (link at the top)

Creating a full inventory system is much more complicated than this example. BUT! This example should be a good foundation for the UI part of an inventory system or a similar system that allows players to move UI objects. That said this is definitely the most complex of all the examples and it requires two classes. One is on the moveable object and the other is on the slot itself.

The UI structure also requires a bit of setup to work. In my case, I’ve used a grid (over there —>) with white slots (image) to drop in an item. The slots themselves have a vertical layout group - this helps snap the item into place and makes sure that it fills the slot.

Basic Setup of the Inventory Slot Object

Inventory Slot Component

The slots also have the “Inventory Slot” component attached. This is the simpler of the two bits of code so let’s start there.

The inventory slot makes use of the IDropHandler interface. This requires the OnDrop function - which gets called when another object gets dropped on it. In this case, all we want to do is set the parent of the object being dragged to the slot it was dropped on. And thankfully our event data has a reference to the object being dropped - once again keeping things clean and simple.

There are a ton of edge cases that aren’t addressed with this solution and are beyond the scope of this tutorial. For example: Checking if the slot is full. Limiting slots to certain types of objects. Stacking objects…

Okay. Now the more complicated bit. The inventory tile itself. The big idea here is we want to drag the tile around, keep it visible (last sibling) and we need to toggle off the raycast target while dragging so that the inventory slot can register the OnDrop event. Also, if the player stops dragging the item and it’s not on top of an inventory slot then we’re going to send the item back to its starting slot.

At the top, there are two variables. The first tracks the offset between the item and the pointer, just like in the previous example. The second will track which slot (parent) the item started in.

Then OnBeginDrag, we set the starting slot variable, set the parent to the root object (canvas) and set this object to the last sibling. These last two steps help to keep the item visible and dragging above other UI objects. We then cache the offset and set the raycast target to false. This needs to be set to false to ensure that OnDrop is called consistently on the inventory slot - i.e. it only gets called if the raycast can hit the slot and isn’t blocked by the object being dragged.

An important note on the raycast target: RaycastTarget needs to be set to false for all child objects too. In my case, I turned this off manually in the text object - but if you have a more complex object a Canvas Group component can be used to toggle this property for all child objects.

Moving on to the OnDrag function, this looks just like the example above, where we set the position of the object to the pointer position minus the offset.

Finally, the OnEndDrag function is where we need to toggle the raycastTarget back on so that we can move it again later. Also now that the dragging has ended we want to see if the current parent of the item is an inventory slot. If it is - it’s all good - if not we want to set the parent back to the starting slot. Because of the vertical layout group setting the parent will snap the position of the item back to it’s starting position. It’s worth noting that OnEndDrag (item) gets called after OnDrop (slot) which is why this works.

Note: I also added a SFX to the OnEndDrag. This is optional and can be done in a lot of different ways.

Pointer Event Data

I had hoped to go into a bit more detail on the Pointer Event Data class, but this post is already feeling a bit long. That said there is a ton of functionality in that class that can make adding functionality to Event Handlers so much easier. I’d also argue that a lot of the properties are mostly self explanatory. So I’ll cut and paste the basic documentation with a link to the page here.

Properties

button The InputButton for this event.

clickCount Number of clicks in a row.

clickTime The last time a click event was sent.

delta Pointer delta since last update.

dragging Determines whether the user is dragging the mouse or trackpad.

enterEventCamera The camera associated with the last OnPointerEnter event.

hovered List of objects in the hover stack.

lastPress The GameObject for the last press event.

pointerCurrentRaycast RaycastResult associated with the current event.

pointerDrag The object that is receiving OnDrag.

ointerEnter The object that received 'OnPointerEnter'.

pointerId Identification of the pointer.

pointerPress The GameObject that received the OnPointerDown.

pointerPressRaycast Returns the RaycastResult associated with a mouse click, gamepad button press or screen touch.

position Current pointer position.

pressEventCamera The camera associated with the last OnPointerPress event.

pressPosition The screen space coordinates of the last pointer click.

rawPointerPress The object that the press happened on even if it can not handle the press event.

scrollDelta The amount of scroll since the last update.u

seDragThreshold Should a drag threshold be used?

Public Methods

IsPointerMovingIs the pointer moving.

IsScrollingIs scroll being used on the input device.

Inherited Members

Properties

used Is the event used?

currentInputModule A reference to the BaseInputModule that sent this event.

selectedObject The object currently considered selected by the EventSystem.

Public Methods

Reset Reset the event.

Use Use the event.

*Quitting a Job I Love

This has nothing to do with game development or the OWS YouTube channel. I’m writing this to get my thoughts out. Nothing more. Nothing less.

Here’s how it all turned out

I’m one of those lucky people. I have a job that I love. I really do. It’s an amazing job. I’ve taught just about every level of math from Algebra to Differential Equations. I’ve taught physics, robotics, game design, and an art class using Blender. I’ve spent countless hours each fall riding with and coaching the competitive mountain bike team. I’ve spent many winter days on the ski hill trying to convince students that carving a turn on skis is more fun than just “pointing it.” I’ve helped to build up the robotics team from nothing to a team that is competitive at the state level. Every spring and fall, I’ve packed up a bus full of mountain bikers and headed out on week-long trips to the Colorado and Utah desert or to the beautiful mountains of Crested Butte. It’s an amazing job. I have poured my heart and soul into this school.

I don’t want to quit. But the job has taken a toll. I am tired. I am exhausted. I am burned out.

My school has a policy of not counting hours. There is no year-end evaluation or mechanism for feedback. This means no one knows how hard we actually work. This means there is no limit to how much we work. This means we can be asked to do more at any time with little or no compensation.

The school board is painted a rosy picture by the administration. Most teachers have been here for over a decade and many for over 2 decades. But things are changing. We grumble in private. When we do approach the administration we are told we are doing a good job and this is just what it takes to work at a boarding school (and there is truth to that). But our concerns are wiped away with excessive positivity or seemingly ignored. It doesn’t feel good. At a school that is about community and relationships, there is little to none of that sense of community between the administration and teaching staff.

As a school, we pride ourselves, and justifiably so, on the strong relationships with our students, but after two years of a pandemic, no administrator has truly taken the time to see how I’m doing personally or professionally. They are stressed and overworked too. I think the presumption is if I haven’t quit I’m doing okay.

We are a “family” when the school needs something from us and when we need something from the school we are told we are being “transactional.” We sign a contract in February that binds us to the school until the next June. There is no meaningful negotiation. No way to earn more (beyond our annual 3% raise). No promotions. No way to adjust our workload. No way to move off-campus. The only lever we have to pull to change our situation is to quit. If we do quit, we lose a paycheck, housing, utilities, food, and health insurance. It is terrifying to make a change and few of us do.

During my time here I have seen kids who barely knew how to mountain bike become state champion racers. I’ve seen aimless students discover computer science or physics or art and find a reason to go to college. I’ve seen kids that have been bullied in previous schools find friends and community. I’ve watched countless students discover a sport that has given them confidence and a sense of belonging.

We do amazing things for students and I love being a small part of this school. But like so many schools this work is done on the backs of the teachers.

In many ways, we are a rudderless ship. I can’t tell you the last time I saw an administrator in the classroom building to observe let alone when I last had any meaningful feedback. I couldn’t tell you what the mission and vision of the school are. I can’t tell you the school’s goals - other than to provide for students in any way possible and to fundraise for new buildings. We seem increasingly driven by budget and money. While I’m sure that is not 100% fair or even true, that is what it feels like, and what things feel like can be just as important or even more so than what is actually true.

While there is so much good at our school, there also feels like there is willful blindness to what is not working or feeling good. Throwing spouses off insurance, cancelation of sabbatical, no published pay scale, poor maternity leave, worse paternity leave, ever-increasing expectations and workloads, and most of all the lack of voice. As teachers, as professionals, as members of the community, we want to be heard. We want to have some agency.

Again I love my job. I do. It pisses me off. It makes me angry. But I love it. Like any relationship, it’s flawed. That’s okay. I would love to find a way forward, a way to make the job sustainable and not feel emotionally drained and burned out. But relationships that only go one way are dysfunctional.

I believe there are many at the school who do truly care about staff, but they are overworked and hamstrung by policies that make sense on paper but that forget that we are people, not cogs in a machine.

I have slowly come to peace with the situation. I am not entitled to having the school change. I can’t make the school change. All I can do is control how I react and what I do.

With a tear in my eye and a lump in my throat, I am pulling the only lever I have to pull. I am quitting.

Split Screen: New Input System & Cinemachine

Some Background Knowledge ;)

While networked multiplayer is a nightmare that can easily double your development time local split-screen is much much easier to implement. And Unity has made it even easier to do thanks in big part to Unity’s New Input System and some of the tools that it ships with.

So in this tutorial, we’re going to look at a few things:

  • Using the built-in systems (new input system) to create local multiplayer.

  • Adding optional split-screen functionality

  • Modifying controller code for local multiplayer

  • Responding when players added through C# events

    • Spawning players at different points on the map.

    • Toggling objects

  • Using Cinemachince with split-screen.

We are NOT going to look at creating a player selection screen or menu. But! That is very possible with the system and could be a topic of a future tutorial. There is also a bit of crudeness to how Unity splits the screen. It initially splits left/right not up/down. Also if the split-screen sizes don’t fill the screen which means, for example, 3 player screens will not cover the entire screen. To fix these issues would require some customization that’s beyond the scope of this tutorial.

I’ll be using the character controller from my “Third Person Controller” video for this tutorial. Although any character controller (even just a jumping cube) using the new input system should work equally well. You can find the code for the Third Person Controller here and the code for this tutorial here.

Split Screen in Action

So What is ACTUALLY Happening?

There is a lot going on behind the scenes to create split-screen functionality most of which is handled by two components - Player Input Manager and Player Input. Both of these components ship with the New Input System. While these classes are not simple - 700 and 2000 (!!) lines respectively - the end result is pretty straightforward and relatively easy to use.

The Player Input Manager detects when a button on a new device (keyboard, gamepad, etc) is pressed. When that happens an object with a Player Input component is instantiated. The Player Input creates an instance of an Input Action Asset and assigns the device to that instance.

The object that is instantiated could be the player object but in reality, it’s just holding a reference to the Input Action Asset (via the Player Input component) for a given player and device. So if you do want to allow players to select their character, or perform some other action before jumping into the game, you could connect the character selection UI elements to the Input Action Asset and then when the player object is finally created you connect it to the Input Action Asset. This becomes easier if you create additional action maps - one for selection and one for in-game action.

The Basics

To get things started you’ll need to add in the New Input System through the Unity Package Manager. If you haven’t played with the New Input System, definitely check out the earlier post and video covering the basics.

Here’s what needs to happen:

  1. Add the New Input System to your project

  2. Create an Input Action Asset. (Saved it and generate C# class)

  3. Add the Player Input Manager component to a scene object.

  4. Create a “player” prefab and add the Player Input component.

  5. Assign the Input Action Asset to the Player Input component.

  6. Assign the player prefab to the Player Input Manager component.

With that done, kick Unity into play mode and press a button on your keyboard or mouse. You should see a character prefab get instantiated. If you have a controller press a button on it and another prefab should be created.

In some cases, I have seen Unity treat multiple devices all as one. This occurred when I connected the devices before setting up the Player Input Manager. For me, a quick restart of Unity resolved this issue.

A Little Refinement

I have had some issues with Unity detecting the mouse and keyboard as separate devices. One way to resolve this is by defining control schemes, but I haven’t found the secret sauce to make that work smoothly and consistently. Another way around this is in the Player Input Manager is to set “Join Behavior” to “Join Players When Join Action Is Triggered" and to create a Join action in the Input Action Asset. I set the join action to “any key” on the keyboard and the “start” button on a gamepad.

If you want your players to all play with the same camera, i.e. all have the same view for a co-op style game, then much of the next section can be skipped.

Adding Split Screen

If you want each player to have their own camera for example, in an FPS, the next step is to make sure that the player prefab has a camera component - this is important so that when each player object is instantiated it has it’s own camera object.

The structure of my Player PRefab

In my case, the camera and the player object need to be separate objects and I’d guess this is true for many games. To make this work, simply create an empty object and make the camera and player objects children of the empty. Then create a new prefab from the empty object (with attached children) and reassign this prefab to the Player Input Manager. The Player Input component (in my experience) can go on any object on the prefab - so put it where it makes the most sense to you - I kept mine on the player object itself rather than on the empty parent.

You may have noticed that the Player Input component has a camera object. So on the prefab, assign the camera to the slot. This is needed so the split-screen can be set up correctly.

The last step before testing is to click the “split screen” toggle on the Player Input Manager. If you are using Cinemachine for your camera control, you should still get split-screen functionality, but all the views are likely looking through the same camera. We’ll fix that in a bit.

Connection to the Input Action Asset

Old code is commented out. New code is directly below.

If you’ve been playing around with a player object that has a controller component you may have noticed that all the players are still being controlled by a single device - even if you have split-screen working.

To fix this we need that controller component to reference the Input Action Asset on the Player Input component. To do that we need to change the type of our Input Action Asset from whatever specific type you’ve created, in my case “Third Person Action Asset,” to the more general “Input Action Asset.” We can then get a reference to the Player Input component with GetComponent or GetComponentInChildren depending on the structure and location of your components. To access the actual Input Action Asset we need to add a “dot Actions” to the end.

Now for the messy bit. Since there is no way to know what type of Input Action Asset we’ve created we need to find the Action Maps and individual actions using strings. Yuck. But it works.

We can get references to action maps using FindActionsMaps and references to actions using FindActions. Take care to spell the names correctly and with the correct capitalization. And this is all we need to do. Update the references to the Input Action Asset, Action Maps, and Actions and the rest of your controller code can stay the same.

Give it a quick test and each player object should now be controlled by a unique device.

Reacting to Players Joining

If you want to control where players spawn or maybe turn off a scene overview camera once the first player spawns we’re going to need to add in a bit more functionality. Unity gives us an OnPlayerJoin (and OnPlayerLeft) action that we can subscribe to and allows us to do stuff when a player joins. In addition, the OnPlayerJoin Action sends a reference to the PlayerInput component - which turns out to be very useful.

To make use of this action, we need to change the “Notification Behavior” on the Player Input Manager to “Invoke C Sharp Events.” Unity won’t throw errors if this isn’t set correctly, but the actions won’t get invoked.

Spawn Locations

To demonstrate how to control where players spawn, let’s create a new PlayerManager class. This class will need access to UnityEngine.InputSystem so make sure to add that using statement to the top. The first task is to get a reference to the PlayerInputManager component and I’ve done that with FindObjectOfType. We can then subscribe and unsubscribe from the OnPlayerJoin action. In my case, I’ve subscribed an “AddPlayer” function that takes in the PlayerInput component.

There are several ways to make this work, but I choose to create a list of the PlayerInput components - effectively keeping a reference to all the spawned players - as well as a list of transforms that will function as in-game spawn points. These spawn points can be anything, but I used empty gameObjects.

When a player joins, I add the PlayerInput component to the list and then set the position of the player object to the corresponding transform’s position in the spawn list. I’ve kept it simple, so that player 1 always spawns in the first location, player 2 in the second location, and so on.

Because of the structure of my player prefab, I am setting the position of the parent not the character object. My player input component is also not on the prefab root object. So your code may look a bit different if your prefab is structured differently.

Toggling Objects on Player Join

If the only camera objects in your scene are part of the player objects that means that players see a black screen until the first player joins. Which is fine for testing, but isn’t exactly polished.

A quick way to fix this is to add a camera to the scene and attach a component that will toggle the camera off when a player joins. You could leave the camera on, but this would make the computer work harder than it needs to as it’s having to do an additional and unseen rendering.

So just like above when controlling the spawn location, we need a new component that has access to the Input System and will subscribe to the OnPlayerJoin action. Then we just need a simple function, subscribed to the action, that will toggle the gameObject off. Couldn’t be simpler.

This of course can be extended and used in as many systems as you need. Play a sound effect, update UI, whatever.

Cinemachine!

If you are using more than one camera with Cinemachine it’s going to take a bit more work. We need to get each virtual camera working with the corresponding Cinemachine Brain. This is done by putting the virtual camera on a specific layer and then setting the camera’s culling mask accordingly.

The first step is to create new layers - one for each possible player. In my case, I’ve set the player limit in the Player Input Manager component to 4 and I’ve created four layers called Player1 through Player4.

To make this easier, or really just a bit less error-prone once set up, I‘ve added a list of layer masks to the Player Manager component. One layer mask for each player that can be added. The value for the layer masks can then be set in the inspector - nice and easy.

Same Add Player Function from above

Then comes the ugly part. Layer masks are bit masks and layers are integers. Ugh. I’m sure there are other ways to do this but our first step is to convert our player layer mask (bitmask) to a layer (integer). So in our Player Manager component and in the Add Player function, we do the conversion with a base 2 logarithm - think powers of 2 and binary.

Next, we need to get references to the camera and virtual camera. In my case the Player Input component (which is what we get a reference to from the OnPlayerJoin action) is not on the parent object, so I first need to get a reference to the parent transform and then search for the CinemachineFreeLook and Camera components in the children. If you are using a different virtual camera you’ll need to search for the type you are using.

Once we have reference to the Cinemachine Virtual Camera component we can set the gameObject layer to the layer integer value we created above.

Go to 9:00 on the video for bitwise operations.

For the camera’s culling mask it’s a bit more work as we don’t want to just set the layer mask we need to add our player layer to the mask. This gets done with the black magic that is bitwise operations. Code Monkey has a pretty decent video explaining some of how this works (go to the 9:00 mark) albeit in a slightly different context.

If everything is set up correctly, we should be able to test our code and have each Cinemachine camera looking at the correct player.

But! You might still see an issue - depending on your camera and how it’s being controlled.

Cinemachine Input Handler

If you are using a Cinemachine Input Handler to control your camera you are likely still seeing all the cameras controlled by one device. This is because the Cinemachine Input Handler is using an Input Action Reference which connects to the Input Action Asset - the scriptable object version - not the instance of the Input Action Asset in the Player Input component. (You’ve got to love the naming…)

To fix this we are going to create our own Input Handler - so we’ll copy and modify the “Get Axis Value” function from the original Cinemachine Input Handler. This function takes in an integer related to an axis and returns a float value from the corresponding action.

Note that this component implements the IInputAxisProvider interface. This is what the Cinemachine virtual camera looks for to get the input.

Replace the Cinemachine Input Handler with this new component and you should be good to go.

(Better) Object Pooling

Why Reinvent?

Object Pooling 1.0

Yes, I’ve made videos on Object Pooling already. Yes, there a written post on it too. Does the internet really need another Object Pooling post. No, not really. But I wanted something a bit slicker and easier to use. I wanted a system with:

  1. No Object Pool manager.

  2. Objects can return themselves without needing to “find” the Object Pool.

  3. Can store a reference to a component, not just the gameObject.

  4. An interface to make the initialization of objects easy and consistent.

Easily the best video on generics I’ve ever made.

So after a lot of staring at my computer and plenty of false starts in the wrong direction, I came up with what I’m calling Object Pool 2.0. It makes use of generics, interfaces, and actions. So it’s not the easiest to understand object pooling solution but it works. It’s clean and easier to use than my past solutions. I like it.

If you’re just here for the code. You can get it on github. But you should definitely skim a bit further to see how it’s implemented.

If you’re asking why not just use the Unity 2021 object pool solution. Well, I’m scared of Unity 2021 (at this point in time) AND I’ve seen some suggestions that it’s not quite ready for prime time. Plus my solution has some features that Unity’s doesn’t and creating an object pooling solution isn’t hard.

Implementation

Maybe this seems backward. Maybe it is? But I think in the case of this object pool solution, it makes sense to show how it’s implemented before going into the gory details. It’s a reasonably abstract solution and that can make it difficult to wrap your head around. So let’s start with how to use it. Then we’ll get to how it works.

First, there needs to be an object that is responsible for spawning the objects. This object owns the pool and needs a reference to the object being pooled - in the case shown I’m using a gameObject prefab. The spawner object then creates an instance of the object pool and sends a reference to the prefab to the pool so it knows what object it is storing and what to create if it runs out and more are being asked for. To get an object from the pool, we simply need to call Pull.

Spawning object with the Object Pool

Just Slap on the Pool Object component and you’re good to go.

The objects being stored also need some logic to work with the pool. The easiest way to attach that logic is to slap on the Pool Object component to the object prefab. This default component will return the object to the object pool when the object is disabled.

Do you see why I like this solution? Now on to the harder part. Maybe even the fun part. Let’s look at how it works.

A Couple Interfaces

To get things started, I created two interfaces. The first one could be useful if I ever have a need to pool non-monobehaviour objects - but is admittedly not 100% necessary at the moment.The second interface, however, is definitely useful and is a big part of this system working smoothly.

But let’s start with the first interface which helps define the object pool. It has just two functions, a push and a pull. It is a generic interface, where the generic parameter is the type of object that will be stored. This works nicely as then our push and pull functions know what types they will be handling

Is this strictly necessary? Probably not.

The second interface is used to define objects that can be in the object pool. When used as intended the object pool can only contain types that implement the IPoolable interface.

This interface has an initialize function that takes in an Action. This action will get set in the object pool and is intended to be the function that returns the object to the pool. This action is then invoked inside of the ReturnToPool function.

If that doesn’t all make sense. Well, that’s reasonable. It can feel a bit circular. Let’s hope that’s not still the case by the time we get finished.

Creating the Pool

Let’s next take a look at the Object Pool definition - or at least the definition I’m using for monobehaviours. The Object pool itself has a generic parameter T and implements the IPool interface. T is then constrained to be a monobehaviour that must also implement the IPoolable interface.

Next, come the variables and properties for the object pool.

First up are two optional actions. These actions can be assigned in a constructor. This allows you to call a function (or multiple functions) EVERY time an object is pulled out of the pool or pushed back to the pool. This could be used to play SFX, increment a score counter or just about anything. It seemed useful so I stuck it in there.

Next is the stack (first in first out collection) that holds all the pooled objects.

Since we know the object being stored is a component we also know it’s attached to a gameObject. It’s this gameObject that will be instantiated if and when the pool runs out of objects in the stack.

Lastly, I added a property to count the number of objects in the pool. I stole this directly from the Unity object pool solution. I haven’t found a use for it yet, but maybe at some point.

Constructors

When we create a pool we need to tell it what object it will store and I think the easiest and best way to do that is to inject the object (prefab) using a constructor. In some cases, it’s also nice to pre-fill the pool. So the first constructor (and easily added to the second) takes in a number of objects to pre-spawn using the Spawn function.

The second constructor takes in the prefab as well as references for the pullObject and pushObject actions.

Push and Pull

The pull function is called whenever an object from the pool is needed.

First, we check if there are objects in the pool, if there are we pop one out. The gameObject is then set to active and the initialize function on the IPoolable object is called. Notice here that we are providing a reference to the Push function. This is the secret sauce.

This push function is the function used to return an object to the pool. This means the spawned object has a reference to this function and can return itself to the pool. We’ll take a closer look at how this happens later.

We then check if the pullObject action was assigned and if it was we invoke it and pass in the object being spawned.

Finally! We return the object so that whatever object asked for it, can have a reference to it.

The push function is pretty simple. It takes in the object and pushes it onto the stack. It then checks if the pushObject action was assigned and invokes it if it was. Lastly, the gameObject is turned off.

As a side note. the turning on and off of the object in the pull and push functions is not 100% needed, but is there to ensure the object is toggled on and off correctly and to help keep the initialize functions clean.

Poolable Objects

Every object that can go into this pool needs to implement the IPoolable interface. Now in some cases, you might want to implement the interface specifically for a given class.

Both as an example of how to implement the interface and also to provide an easy to use and reusable solution I created the PoolObject class. This component can simply be added to any prefab to allow that prefab to work with the object pool.

When implementing the IPoolable interface we should set the generic parameter to the class that is implementing the interface - PoolObject in the example.

The class will also need an action to store a reference to the push function. The value of this action is set in the initialize function - which was called in the Pull function of the object pool.

The ReturnToPool function, in this example, is called in the OnDisable function. This means all we need to do to return the object to the pool is turn the object off! Inside the function, we check if the returnToPool action has a value and if so, we invoke the action and pass in a reference to the object being sent to the object pool.

Overloads

To make the object pool a bit more useful and user friendly I also added several overloads for the Pull function. These allow the position and rotation of the object to be set when pulling it.

I also created functions that return a gameObject, as in some cases this is what is really needed and not the poolable object component.

One More Example

Since actions (and delegates) can be confusing I thought I’d toss in one more example - that of using the second constructor and assigning functions that will be called EVERY time an object is pushed or pulled from the instance of the object pool.

In this example, I’ve added the CallOnPull and CallOnPush functions. Notice that they must have the input type that is being stored in the object pool. Again the idea here is that these functions could trigger an animation, SFX, a UI counter, just about anything.

And that’s it. It’s an abstract solution but actually pretty simple (note that simple is not the same as easy). That’s both why it took a while to create and why I like it.

Designing a New Game - My Process

Some of my projects….

This is my process. It’s been refined over 8+ years of tinkering with Unity, 2 game jams, and 2 games published to Steam.

My goal with this post is just to share. Share what I’ve learned and share how I am designing my next project. My goal is not to suggest that I’ve found the golden ticket. Cause I haven’t. I’m pretty sure the perfect design process does not exist.

So these are my thoughts. These are the questions I ask myself as I stumble along in the process of designing a project. Maybe this post will be helpful. Maybe it won’t. If it feels long-winded. It probably is.

I’ve tried just opening Unity and designing as I go. It didn’t work out well. So again, this is just me sharing.

TL;DR

  • Set a Goal - To Learn? For fun? To sell?

  • Play games as research - Play small games and take notes.

  • Prototypes system - What don’t you know how to build? Is X or Y actually doable or fun?

  • Culling - What takes too long? What’s too hard? What is too complicated?

  • Plan - Do the hard work and plan the game. Big and small mechanics. Art. Major systems.

  • Minimal Viable Product - Not the game just the basics. Is it fun? How long did it take?

  • Build it! - The hardest part. Also the most rewarding.

What Is The Goal?

When starting a new project, I first think about the goal for the project. For me, this is THE key step in designing a project - which is a necessary step to the holy grail of actually FINISHING a project. EVERY other step and decision in the process should reflect back on the goal or should be seen through the lens of that goal. If the design choice doesn’t help to reach the goal, then I need to make a different decision.

Am I making a game to share with friends? Am I creating a tech demo to learn a process or technique? Am I wanting to add to my portfolio of work? What is the time frame? Weeks? Months? Maybe a year or two (scary)?

I want another title in this list!

For this next project, I want to add another game to the OWS Steam library and I’d like to generate some income in the process. I have no dreams of creating the next big hit, but if I could sell 1000 or 10,000 copies - that would be awesome.

I also want to do it somewhat quickly. Ideally, I could have the project done in 6 to 9 months, but 12 to 18 months is more likely with the time I can realistically devote to the project. One thing I do know, is that whatever amount of time I think it’ll take. It’ll likely take double.

Research!

After setting a goal, the next step is research. Always research. And yes. I mean playing games! I look for games that are of a similar scope to what I think I can make. Little games. Games with interesting or unique mechanics. Games made by individuals or MAYBE a team of 2 or 3. As I play I ask myself questions:

What elements do I find fun? What aspects do I not enjoy? Do I want to keep playing? What is making me want to quit? What mechanics or ideas can I steal? What systems do I know or not know how to make? Which systems are complex? What might be easy to add?

Then there are three more questions. These are key and crucial in designing a game and can help to keep the game scope (somewhat) in check. Which in turn is necessary if a game is going to get finished

How did a game developer’s clever design decisions simplify the design? How does a game make something fun without being complex? Why might the developer have made decisions X or Y? What problems did that decision avoid?

These last questions are tough and often have subtle answers. They take thought and intention. Often while designing a game my mind goes towards complexity. Making things bigger and more detailed! Can’t solve problem A? Well, lets bolt-on solution B!

For example, I’ve wanted to make a game where the player can create or build the world. Why not let the player shape the landscape? Add mountains and rivers? Place buildings? Harvest resources? It would be so cool! Right? But it’s a huge time sink. Even worse, it’s complex and could easily be a huge source of bugs.

So a clever solution? I like how I’m calling myself clever. Hex tiles. Yes. Hex tiles. Let the player build the world, but do it on a grid with prefabs. Bam! Same result. Same mechanic. Much simpler solution. It trades a pile of complex code for time spent in Blender designing tiles. Both Zen World and Dorf Romantic are great examples of allowing the player to create the world and doing so without undue complexity.

Navigation can be another tough nut to crack. Issues and bugs pop up all over the place. Units running into each other. Different movement costs. Obstacles. How about navigation in a procedural landscape? Not to mention performance can be an issue with a large number of units.

My “Research” List

Creeper World 4 gets around this in such a simple and elegant way. Have all the units fly in straight lines. Hover. Move. Land. Done.

I am a big believer that constraints can foster creativity. For me, identifying what I can’t do is more important than identifying what I can do.

When I was building Fracture the Flag I wanted the players to be able to claim territory. At first, I wanted to break the map up into regions - something like the Risk map. I struggled with it for a while. One dead end after another. I couldn’t figure out a good solution.

Then I asked, why define the regions? Instead, let the players place flags around the map to claim territory! If a flag gets knocked down the player loses that territory. Want to know if a player can build at position X or Y? They can if it’s close to a flag. So many problems solved. So much simpler and frankly so much more fun.

With research comes a flood of ideas. And it’s crucial to write them down. Grab a notebook. Open a google doc. Or as I recently discovered Google Keep - it’s super lightweight and easy to access on mobile for those ah-ha moments.

I keep track of big picture game ideas as well as smaller mechanics that I find interesting. I don’t limit myself to one idea or things that might nicely fit together. This is the throwing spaghetti at the wall stage of design. I’m throwing it out there and seeing what sticks. Even if, maybe especially if, I get excited about one idea I force myself to think beyond it and come up with multiple concepts and ideas. This is not the time to hyper focus.

At this stage, I also have to bring in a dose of reality. I’m not making an MMO or the next E-Sports tile. I’m dreaming big, but also trying not to waste my time with completely unrealistic dreams. I should probably know how to make at least 70, 80 or maybe 90 percent of the game!

While you’re playing games as “research” support small developers and leave them reviews! Use those reviews to process what you like and what you don’t like. What would you change? What would you keep? What feels good? What would feel better? Those reviews are so crucial to a developer. Yes, even negative ones are helpful.

Prototype Systems - Not The Game

At this point in the process, I get to start scratching the itch to build. Up until now, Unity hasn’t been opened. I’ve had to fight the urge, but it’s been for the best. Until now.

Now I get to prototype systems. Not a game or the game. Just parts of a potential game. This is when I start to explore systems that I haven’t made before or systems I don’t know how to make. I focus on parts that seem tricky or will be core to the game. I want to figure out the viability of an idea or concept.

At this stage, I dive into different research. Not playing games, but watching and reading tutorials and articles. I take notes. Lots of notes. For me, this is like going back to school. I need to learn how other people have created systems or mechanics. Why re-invent the wheel? Sometimes you need to roll your own solution, but why not at least see how other folks have done it first?

If I find a tutorial that feels too complex. I look for another. If that still feels wrong, I start to question the mechanic itself.

Maybe it’s beyond my skill set? Maybe it’s too complex for a guy doing this in his spare time? Or maybe I just need to slow down and read more carefully?

Some prototype Art for a possible Hex tile Game

Understanding and implementing a hex tile system was very much all of the above. Red Blob Games has an excellent guide to hex grids with all the math and examples of code to implement hex grids into your games. It’s not easy. Not even close. But it was fun to learn and with a healthy dose of effort, it’s understandable. (To help cement my understanding, I may do a series of videos on hex grids.)

This stage is also a chance to evaluate systems to see if they could be the basis of a game. I’ve been intrigued by ecosystems and evolution for a long while. Equilinox is a great example of a fairly recent ecosystem-based game made by a single (skilled) individual. Sebastian Lague put together an interesting video on evolution, which was inspired by the Primer videos. All of these made me want to explore the underlying mechanics.

So, I spent a day or two writing code, testing mechanics, and had some fun but ultimately decided it was too fiddly and too hard to base a game on. So I moved on, but it wasn’t a waste of time!

After each prototype is functional, but not polished, I ask myself more questions.

Does the system work? Is the system janky? What parts are missing or still need to be created? Is it too complex or hard to balance? Is there too much content to create? Or maybe it’s just crap?

For me, it’s also important that I’m not trying to integrate different system prototypes (at this point). Not yet. I for sure want to avoid coupling and keep things encapsulated, but I also don’t want to go down a giant rabbit hole. That time may come, but it’s not now. I’m also not trying to polish the prototypes. I want the systems to work and be reasonably robust, but at this point, I don’t even know if the systems will be in a game so I don’t want to waste time.

(Pre-Planning) Let The Culling Begin!

With prototypes of systems built, it’s now time to start chopping out the fluff, the junk, and start to give some shape to a game design. And yes, I start asking more questions.

What are the major systems of the game? What systems are easy or hard to make? Are there still systems I don’t know how to make? What do I still need to learn? What will be the singular core mechanic of the game?

And here’s a crucial question!

What are the time sinks? Even if I know how to do X or Y will it take too long?

3D Models, UI, art, animations, quests, stories, multiplayer, AI…. Basically, everything is a time sink. But!

Which ones play to my strengths? Which ones help me reach my goal? Which ones can I design around or ignore completely? What time sinks can be tossed out and still have a fun game?

Assets I Use

When I start asking these questions it’s easy to fall into the trap of using 3rd party assets to solve my design problems or fill in my lack of knowledge. It’s easy to use too many or use the wrong ones. I need to be very picky about what I use. Doubly so with assets that are used at runtime (as opposed to editor tools). For me, assets need to work out of the box AND work independently. If my 3rd party inventory system needs to talk to my 3rd party quest system which needs to talk to my 3rd party dialogue system I am asking for trouble and I will likely find it.

The asset store is full of shiny objects and rat holes. It’s worth a lot of time to think about what you really need from the asset store.

What you can create on your own? What should you NOT create on your own? What you can design around? Do you really need X or Y?

For me, simple is almost always better. If I do use 3rd party assets, and I do, they need to be part of the prototyping stage. I read the documentation and try to answer as many questions as I can before integrating the asset into my project. If the asset can’t do what I need, then I may have to make hard decisions amount the asset, my design, or even the game as a whole.

I constantly have to remind myself that games aren’t fun because they’re complex. Or at the very least, complexity does not equal fun. What makes games fun is something far more subtle. Complexity is a rat hole. A shiny object.

Deep Breath. Pause. Think.

At this point, I have a rough sketch in my head of the game and it’s easy to get excited and jump into building with both feet. But! I need to stop. Breathe. And think.

Does the game match my goals? Can I actually make the game? Are there mechanics that should be thrown out? Can I simplify the game and still reach my goal? Is this idea truly viable?

Depending on the answers, I might need be to go back and prototype, do more research, or scrap the entire design and start with something a single guy can actually make.

This point is a tipping point. I can slow down and potentially re-design the game or spend the next 6 months discovering my mistakes. Or worse, ignoring my mistakes and wasting even more time as I stick my head in the sand and insist I can build the game. I’ve been there. I’ve done that. And it wasn’t fun.

Now We Plan

Maybe a third of the items on my to do list for Grub Gauntlet

Ha! I bet you thought I was done planning. Not even close. I haven’t even really started.

There are a lot of opinions about the best planning tool. For me, I like Notion. Others like Milanote or just a simple google doc. The tool doesn’t matters, it’s the process. So pick what works for you and don’t spend too much time trying to find the “best” tool. There’s a poop ton of work to do, don’t waste time.

Finding the right level of detail in planning is tough and definitely not a waste of time. I’m not creating some 100+ page Game Design Document. Rather I think of what I'm creating as a to-do list. Big tasks. Small tasks. Medium tasks. I want to plan out all the major systems, all the art, and all the content. This is my chance to think through the game as a whole before sinking 100’s or likely 1000’s of hours into the project.

To some extent, the resulting document forms a contract with myself and helps prevent feature creep. The plan also helps when I’m tired or don’t know what to do next. I can pull up my list and tackle something small or something interesting.

Somewhere in the planning process, I need to decide on a theme or skin for the game. The naming of classes or objects may depend on the theme AND more importantly, some of the mechanics may be easier or harder to implement depending on the theme. For example, Creeper World 4’s flying tanks totally work in the sci-fi-themed world. Not so much if they were flying catapults or swordsmen in a fantasy world. Need to resupply units? Creeper World sends the resources over power lines. Again, way easier than an animated 3D model of a worker using a navigation system to run from point A to point B and back again.

Does the theme match the mechanics? Does it match my skillset? Can I make that style of art? Does the theme help reach the goal? Does the theme simplify mechanics or make them more complex?

Minimum Viable Product (MVP)

Upgrade that

Knowlegde

Finally! Now I get to start building the project structure, writing code, and bringing in some art. But! I’m still not building the game. I’m still testing. I want to get something playable as fast as possible. I need to answer the questions:

Is the game fun? Have I over-scoped the game? Can I actually build it with my current skills and available time?

If I spent 3 months working on an inventory system and all I can do is collect bits on a terrain and sell them to a store. I’ve over-scoped the game. If the game is tedious and not fun then I either need to scrap the game or dig deeper into the design and try to fix it. If the game breaks every time I add something or change a system then I need to rethink the architecture or maybe the scope of the game or upgrade my programming knowledge and skill set.

If I can create the MVP in less than a month and it’s fun then I’m on to something good!

Why so short a time frame? My last project, Grub Gauntlet was created during a 48-hour game jam. I spent roughly 20 hours during that time to essentially create an MVP. It then took another 10 months to release! I figure the MVP is somewhere around 1/10th or 1/20th of the total build time.

It’s way better to lose 1-2 months building, testing, and then decide to scrap the project than to spend 1-2 years building a pile of crap. Or worse! Spend years working only to give up without a finished product.

Can I Build It Now?

This is the part we’re all excited about. Now I get to build, polish, and finish a game. There’s no secret sauce. This part is the hardest. It’s the longest. It’s the most discouraging. It’s also the most rewarding.

If I’ve done my work ahead of time then I should be able to finish my project. And that? That is an amazing feeling!

Strategy Game Camera: Unity's New Input System

I was working on a prototype for a potential new project and I needed a camera controller. I was also using Unity’s “new” input system. And I thought, hey, that could be a good tutorial…

There’s also a written post on the New Input System. Check the navigation to the right.

The goal here is to build a camera controller that could be used in a wide variety of strategy games. And to do it using Unity’s “New” Input System.

The camera controller will include:

  • Horizontal motion

  • Rotation

  • Zoom/elevate mechanic

  • Dragging the world with the mouse

  • Moving when the mouse is near the screen edge

Since I’ll be using the New Input System, you’ll want to be familiar with that before diving too deep into this camera controller. Check either the video or the written blog post.

If you’re just here for the code or want to copy and paste, you can get the code along with the Input Action Asset on GitHub.

Build the Rig

Camera rig Hierarchy

The first step to getting the camera working is to build the camera rig. For my purposes, I choose to keep it simple with an empty base object that will translate and rotate in the horizontal plane plus a child camera object that will move vertically while also zooming in and out.

I’d also recommend adding in something like a sphere or cube (remove its collider) at the same position as the empty base object. This gives us an idea of what the camera can see and how and where to position the camera object. It’s just easy debugging and once you’re happy with the camera you can delete the extra object.

Camera object transform settings

For my setup, my base object is positioned on the origin with no rotation or scaling. I’ve placed the camera object at (0, 8.3, -8.8) with no rotation (we’ll have the camera “look at” the target in the code).

For your project, you’ll want to play with the location to help tune the feel of your camera.

Input Settings

Input Action Asset for the Camera Controller

For the camera controller, I used a mix of events and directly polling inputs. Sometimes one is easier to use than another. For many of these inputs, I defined them in an Input Action Asset. For some mouse events, I simply polled the buttons directly. If that doesn’t make sense hopefully it will.

In the Input Action Asset, I created an action map for the camera and three actions - movement, rotate, and elevate. For the movement action I created two bindings to allow the WASD keys and arrows keys to be used. It’s easy, so why not? Also important, both rotate and elevate have their action type set to Vector2.

Importantly the rotate action is using the delta of the mouse position not the actual position. This allows for smooth movement and avoids the camera snapping around in a weird way.

We’ll be making use of the C# events. So make sure to save or have auto-save enabled. We also need to generate the C# code. To do this select the Input Action Asset in your project folders and then in the inspector click the “generate C# class” toggle and press apply.

Variables and More Variables!

Next, we need to create a camera controller script and attach it to the base object of our camera rig. Then inside of a camera controller class we need to create our variables. And there’s a poop ton of them.

The first two variables will be used to cache references for use with the input system.

The camera transform variable will cache a reference to the transform with the camera object - as opposed to the empty object that this class will be attached to.

All of the variables with the BoxGroup attribute will be used to tune the motion of the camera. Rather than going through them one by one… I’m hoping the name of the group and the name of the variable clarifies their approximate purpose.

The camera settings I’m using

The last four variables are all used to track various values between functions. Meaning one function might change a value and a second function will make use of that value. None of these need to have their value set outside of the class.

A couple of other bits: Notice that I’ve also added the UnityEngine.InputSystem namespace. Also, I’m using Odin Inspector to make my inspector a bit prettier and keep it organized. If you don’t have Odin, you should, but you can just delete or ignore the BoxGroup attributes.

Horizontal Motion

I’m going to try and build the controller in chunks with each chunk adding a new mechanic or piece of functionality. This also (roughly) means you can add or not add any of the chunks and the camera controller won’t break.

The first chunk is horizontal motion. It’s also the piece that takes the most setup… So bear with me.

First, we need to set up our Awake, OnEnable, and OnDisable functions.

In the Awake function, we need to create an instance of our CameraControls input action asset. While we’re at it we can also grab a reference to the transform of our camera object.

In the OnEnable function, we first need to make sure our camera is looking in the correct direction - we can do this with the LookAt function directed towards the camera rig base object (the same object the code is attached to).

Then we can save the current position to our last position variable - this value will get used to help create smooth motion.

Next, we’ll cache a reference to our MoveCamera action - we’ll be directly polling the values for movement. We also need to call Enable on the Camera action map.

In OnDisable we’ll call Disable on the camera action map to avoid issues and errors in case this object or component gets turned off.

Helper functions to get camera relative directions

Next, we need to create two helper functions. These will return camera relative directions. In particular, we’ll be getting the forward and right directions. These are all we’ll need since the camera rig base will only move in the horizontal plane, we’ll also squash the y value of these vectors to zero for the same reason.

Kind of yucky. But gets the job done.

Admittedly I don’t love the next function. It feels a bit clumsy, but since I’m not using a rigidbody and I want the camera to smoothly speed up and slow down I need a way to calculate and track the velocity (in the horizontal plane). So thus the Update Velocity function.

Nothing too special in the function other than once again squashing the y dimension of the velocity to zero. After calculating the velocity we update the value of the last position for the next frame. This ensures we are calculating the velocity for the frame and not from the start.

The next function is the poorly named Get Keyboard Movement function. This function polls the Camera Movement action to then set the target position.

In order to translate the input into the motion we want we need to be a bit careful. We’ll take the x component of the input and multiply it by the Camera Right function and add that to the y component of the input multiplied by the Camera Forward function. This ensures that the movement is in the horizontal plane and relative to the camera.

We then normalize the resulting vector to keep a uniform length so that the speed will be constant even if multiple keys are pressed (up and right for example).

The last step is to check if the input value’s square magnitude is above a threshold, if it is we add our input value to our target position.

Note that we are NOT moving the object here since eventually there will be multiple ways to move the camera base, we are instead adding the input to a target position vector and our NEXT function will use this target position to actually move the camera base.

If we were okay with herky-jerky movement the next function would be much simpler. If we were using the physics engine (rigidbody) to move the camera it would also be simpler. But I want smooth motion AND I don’t want to tune a rigidbody. So to create smooth ramping up and down of speed we need to do some work. This work will all happen in the Update Base Position function.

First, we’ll check if the square magnitude of the target position is greater than a threshold value. If it is this means the player is trying to get the camera to move. If that’s the case we’ll lerp our current speed up to the max speed. Note that we’re also multiplying Time Delta Time by our acceleration. The acceleration allows us to tune how quickly our camera gets up to speed.

The use of the threshold value is for two reasons. One so we aren’t comparing a float to zero, i.e. asking if a float equals zero can be problematic. Two, if we were using a game controller joystick even if it’s at rest the input value may not be zero.

Testing the Code so far - Smooth Horizontal Motion

We then add to the transform’s position an amount equal to the target position multiplied by the current camera speed and time delta time.

While they might look different these two lines of code are closely related to the Kinematic equations you may have learned in high school physics.

If the player is not trying to get the camera to move we want the camera to smoothly come to a stop. To do this we want to lerp our horizontal velocity (calculated constantly by the previous function) down to zero. Note rather than using our acceleration to control the rate of the slow down, I’ve used a different variable (damping) to allow separate control.

With the horizontal velocity lerping it’s way towards zero, we then add to the transform’s position a value equal to the horizontal velocity multiplied by time delta time.

The final step is to set the target position to zero to reset for the next frame’s input.

Our last step before we can test our code is to add our last three functions into the update function.

Camera Rotation

Okay. The hardest parts are over. Now we can add functionality reasonably quickly!

So let’s add the ability to rotate the camera. The rotation will be based on the delta or change in the mouse position and will only occur when the middle mouse button is pressed.

We’ll be using an event to trigger our rotation, so our first addition to our code is in our OnEnable and OnDisable functions. Here we’ll subscribe and unsubscribe the (soon to be created) Rotate Camera function to the performed event for the rotate camera action.

If you’re new to the input system, you’ll notice that the Rotate Camera function takes in a Callback Context object. This contains all the information about the action.

Rotating the camera should now be a thing!

Inside the function, we’ll first check if the middle mouse button is pressed. This ensures that the rotation doesn’t occur constantly but only when the button is pressed. For readability more than functionality, we’ll store the x value of the mouse delta and use it in the next line of code.

The last piece is to set the rotation of the transform (base object) and only on the y-axis. This is done using the x value of the mouse delta multiplied by the max rotation speed all added to the current y rotation.

And that’s it. With the event getting invoked there’s no need to add the function to our update function. Nice and easy.

Vertical Camera Motion

With horizontal and rotational motion working it would be nice to move the camera up and down to let the player see more or less of the world. For controlling the “zooming” we’ll be using the mouse scroll wheel.

This motion, I found to be one of the more complicated as there were several bits I wanted to include. I wanted there to be a min and max height for the camera - this keeps the player from zooming too far out or zooming down to nothingness - also while going up and down it feels a bit more natural if the camera gets closer or farther away from what it’s looking at.

This zoom motion is another good use of events so we need need to make a couple of additions to the OnEnable and OnDisable. Just like we did with the rotation we need to subscribe and unsubscribe to the performed event for the zoom camera action. We also need to set the value of zoom height equal to the local y position of the camera - this gives an initial value and prevents the camera from doing wacky things.

Then inside the Zoom Camera function, we’ll cache a reference to the y component of the scroll wheel input and divide by 100 - this scales the value to something more useful (in my opinion).

If the absolute value of the input value is greater than a threshold, meaning the player has moved the scroll wheel, we’ll set the zoom height to the local y position plus the input value multiplied by the step size. We then compare the predicted height to the min and max height. If the target height is outside of the allowed limits we set our height to the min or max height respectively.

Once again this function isn’t doing the actual moving it’s just setting a target of sorts. The Update Camera Position function will do the actual moving of the camera.

The first step to move the camera is to use the value of the zoom height variable to create a Vector3 target for the camera to move towards.

Zooming in action

The next line is admittedly a bit confusing and is my attempt to create a zoom forward/backward motion while going up and down. Here we subtract a vector from our target location. The subtracted vector is a product of our zoom speed and the difference between the current height and the target height All of which is multiplied by the vector (0, 0, 1). This creates a vector proportional to how much we are moving vertically, but in the camera’s local forward/backward direction.

Our last steps are to lerp the camera’s position from its current position to the target location. We use our zoom damping variable to control the speed of the lerp.

Finally, we also have the camera look at the base to ensure we are still looking in the correct direction.

Before our zoom will work we need to add both functions to our update function.

If you are having weird zooming behavior it’s worth double-checking the initial position of the camera object. My values are shown at the top of the page. In my testing if the x position is not zero, some odd twisting motion occurs.

Mouse at Screen Edges

At this point, we have a pretty functional camera, but there’s still a bit more polish we can add. Many games allow the player to move the camera when the mouse is near the edges of the screen. Personally, I like this when playing games, but I do find it frustrating when working in Unity as the “screen edges” are defined by the game view…

To create this motion with the mouse all we need to do is check if the mouse is near the edge of the screen.

We do this by using Mouse.current.position.ReadValue(). This is very similar to the “old” input system where we could just call Input.MousePosition.

We also need a vector to track the motion that should occur - this allows the mouse to be in the corner and have the camera move in a diagonal direction.

Screen edge motion

Next, we simply check if the mouse x and y positions are less than or great than threshold values. The edge tolerance variable allows fine tuning of how close to the edge the cursor needs to be - in my case I’m using 0.05.

The mouse position is given to us in pixels not in screenspace coordinates so it’s important that we multiply by the screen width and height respectively. Notice that we are again making use of the GetCameraRight and GetCameraForward functions.

The last step inside the function is to add our move direction vector to the target position.

Since we are not using events this function also needs to get added to our update function.

Dragging the World

I stole and adapted the drag functionality from Game Dev Guide.

The last piece of polish I’m adding is the ability to click and drag the world. This makes for very fast motion and generally feels good. However, a note of caution when implementing this. Since we are using a mouse button to drag this can quickly interfere with other player actions such as placing units or buildings. For this reason, I’ve chosen to use the right mouse button for dragging. If you want to use the left mouse button you’ll need to check if you CAN or SHOULD drag - i.e. are you placing an object or doing something else with your left mouse button. In the past I have used a drag handler… so maybe that’s a better route, but it’s not the direction I choose to go at this point.

I should also admit that I stole and adapted much of the dragging code from a Game Dev Guide video which used the old input system.

Since dragging is an every frame type of thing, I’m once again going to directly poll to determine whether the right mouse button is down and to get the current position of the mouse…

This could probably be down with events, but that seems contrived and I’m not sure I really see the benefit. Maybe I’m wrong.

Inside the Drag Camera function, we can first check if the right button is pressed. If it’s not we don’t want to go any further.

If the button is pressed, we’re going to create a plane (I learned about this in the Game Dev Guide video) and a ray from the camera to the mouse cursor. The plane is aligned with the world XZ plane and is facing upward. When creating the plane the first parameter defines the normal and the second defines a point on the plane - which for the non-math nerds is all you need.

Next, we’ll raycast to the plane. So cool. I totally didn’t know this was a thing!

The out variable of distance tells us how far the ray went before it hit the plane, assuming it hit the plane. If it did hit the plane we’re going to do two different things - depending on whether we just started dragging or if we are continuing to drag.

Dragging the world

If the right mouse button was pressed this frame (learned about this thanks to a YouTube comment) we’ll cache the point on the plane that we hit. And we get that point, by using the Get Point function on our ray.

If the right mouse button wasn’t pressed this frame, meaning we are actively dragging, we can update the target position variable with the vector from where dragging started to where it currently is.

The final step is to add the drag function to our update function.

That’s It!

There you go. The basics of a strategy camera for Unity using the New Input System. Hopefully, this gives you a jumping off point to refine and maybe add features to your own camera controller.