Raycasting - It's mighty useful
Converting the examples to use the new input system. Please check the pinned comment on YouTube for some error correction.
What is Raycasting?
Raycasting is a lightweight and performant way to reach out into a scene and see what objects are in a given direction. You can think of it as something like a long stick used to poke and prod around a scene. When something is found, we can get all kinds of info about that object and have access
So… It’s pretty useful and a tool you should have in your game development toolbox.
Three Important Bits
The examples here are all going to be 3D, if you are working on a 2D project the ideas and concepts are nearly identical - with the biggest difference being that the code implementation is a tad different.
It’s also worth noting that the code for all the raycasting in the following examples, except for the jumping example, can be put on any object in the scene, whether that is the player or maybe some form of manager.
The final and really important tidbit is that raycasting is part of the physics engine. This means that for raycasting to hit or find an object, that object needs to have a collider or a trigger on it. I can’t tell you how many hours I’ve spent trying to debug raycasting only to find I forgot to put a collider on an object.
But First! The Basics.

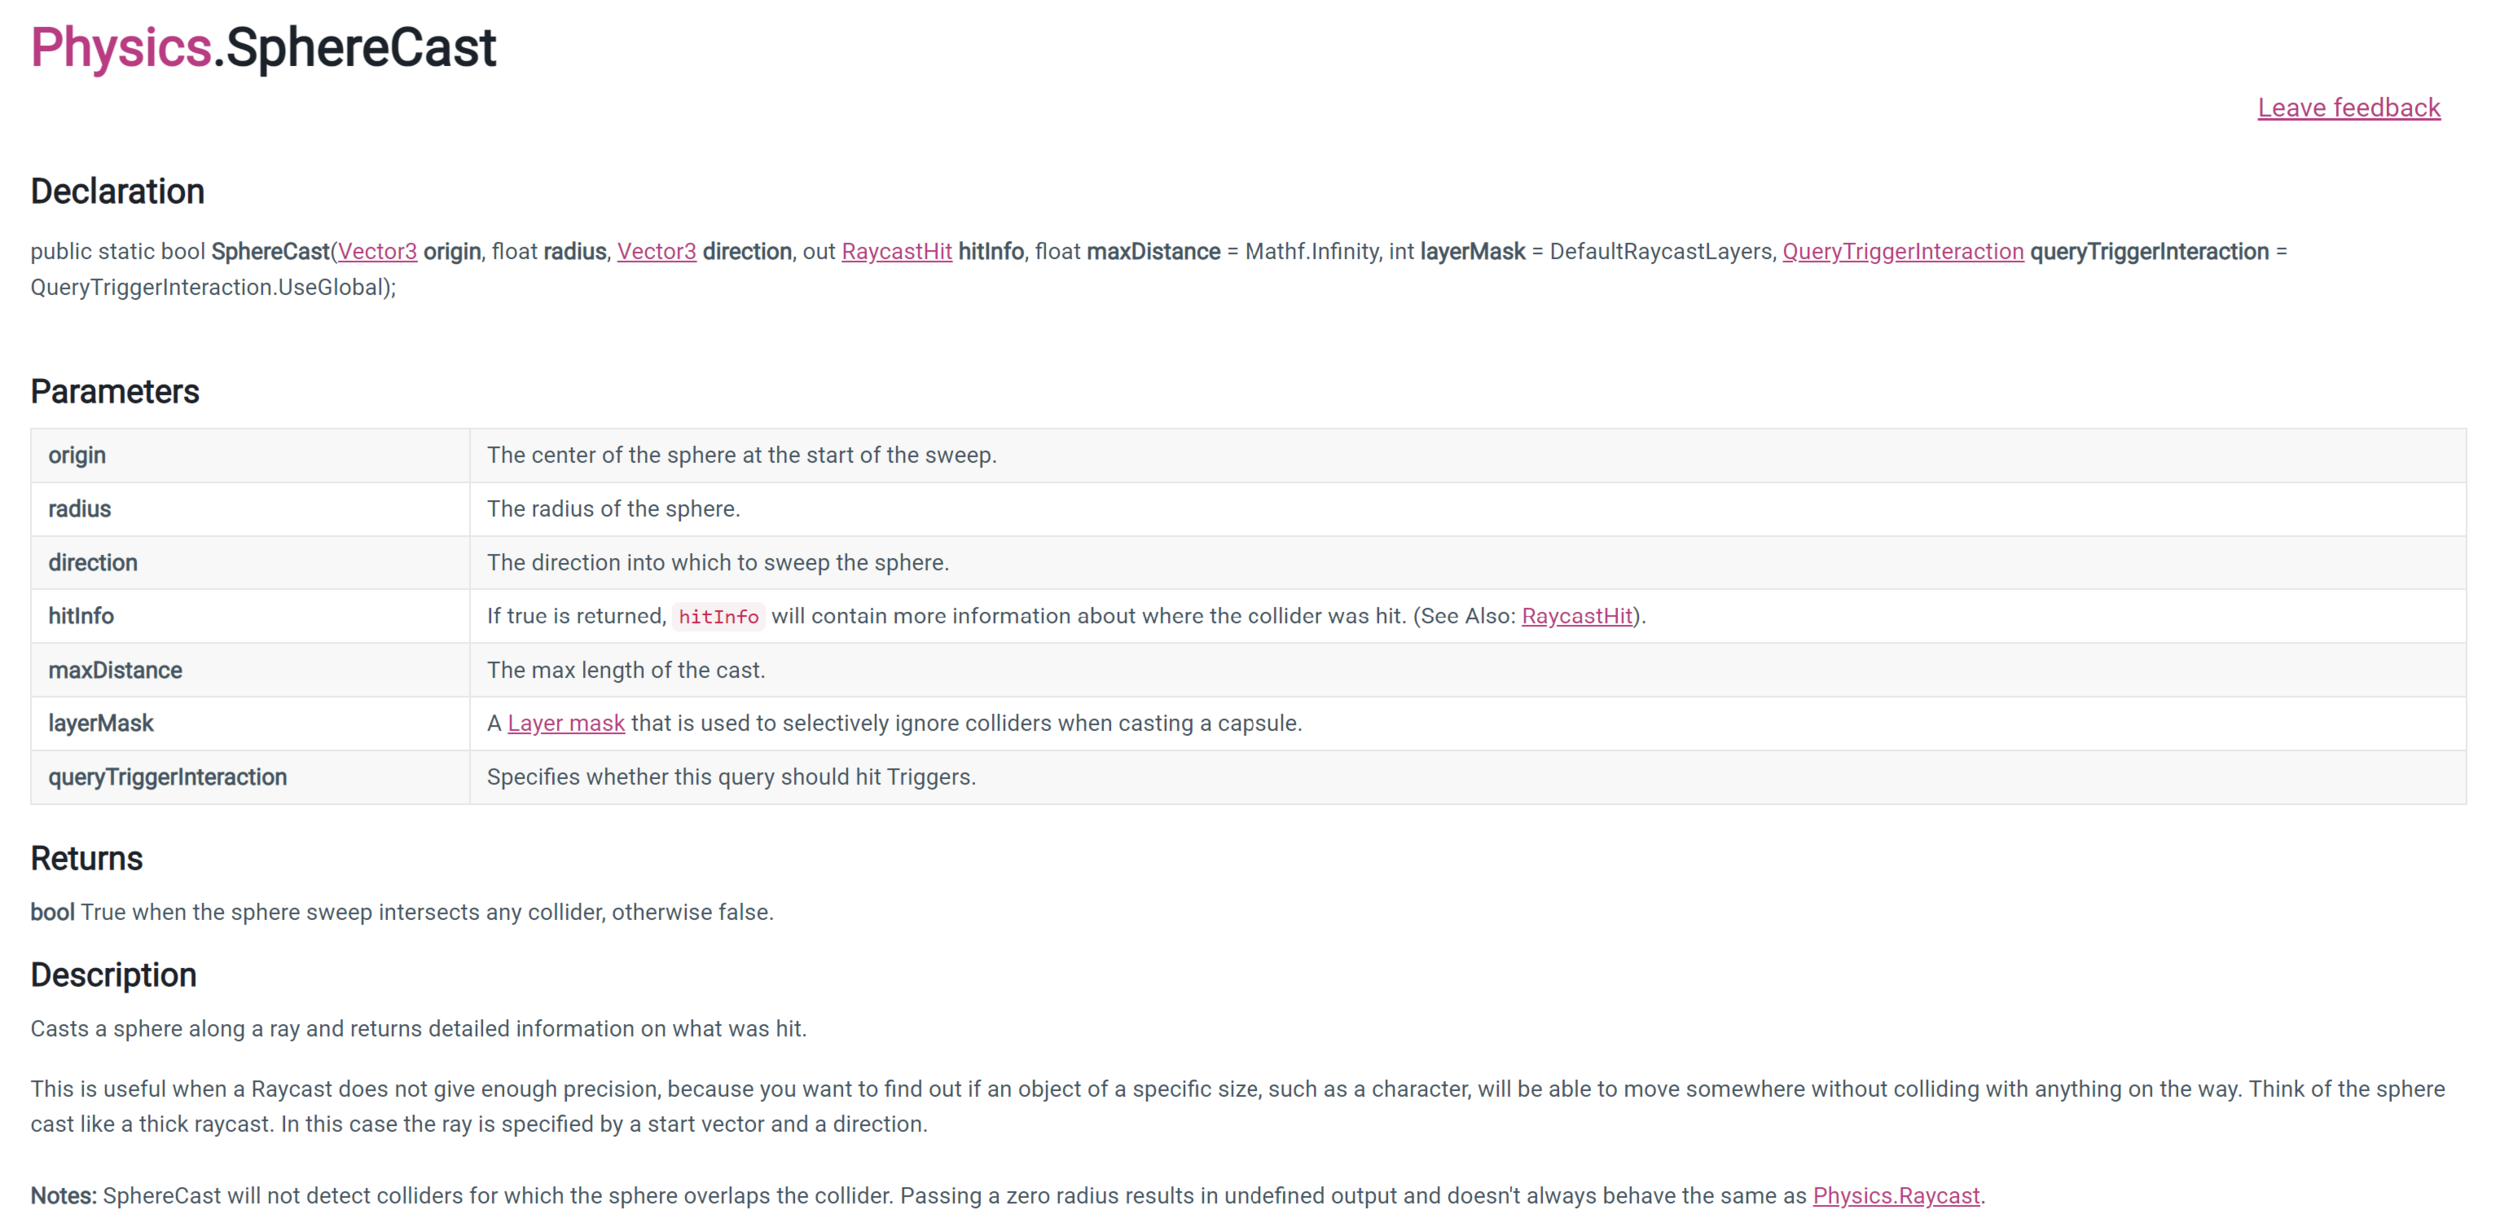
The basics Raycast function
We need to look at the Raycast function itself. The function has a ton of overloads which can be pretty confusing when you’re first getting started.
That said using the function basically breaks down into 5 pieces of information - the first two of which are required in all versions of the function. Those pieces of information are:
A start position.
The direction to send the ray.
A RaycastHit, which contains all the information about the object that was hit.
How far to send the ray.
Which layers can be hit by the raycast.
It’s a lot, but not too bad.

Defining a ray with start positon and the direction (both Vector3)

Raycast using a Ray
Unity does allow us to simplify the input para, just a bit, with the use of a ray. A ray essentially stores the start position and the direction in one container allowing us to reduce the number of input parameters for the raycast function by one.
Notice that we are defining the RaycastHit inline with the use of the keyword out. This effectively creates a local variable with fewer lines of code.
Ok Now Onto Shooting

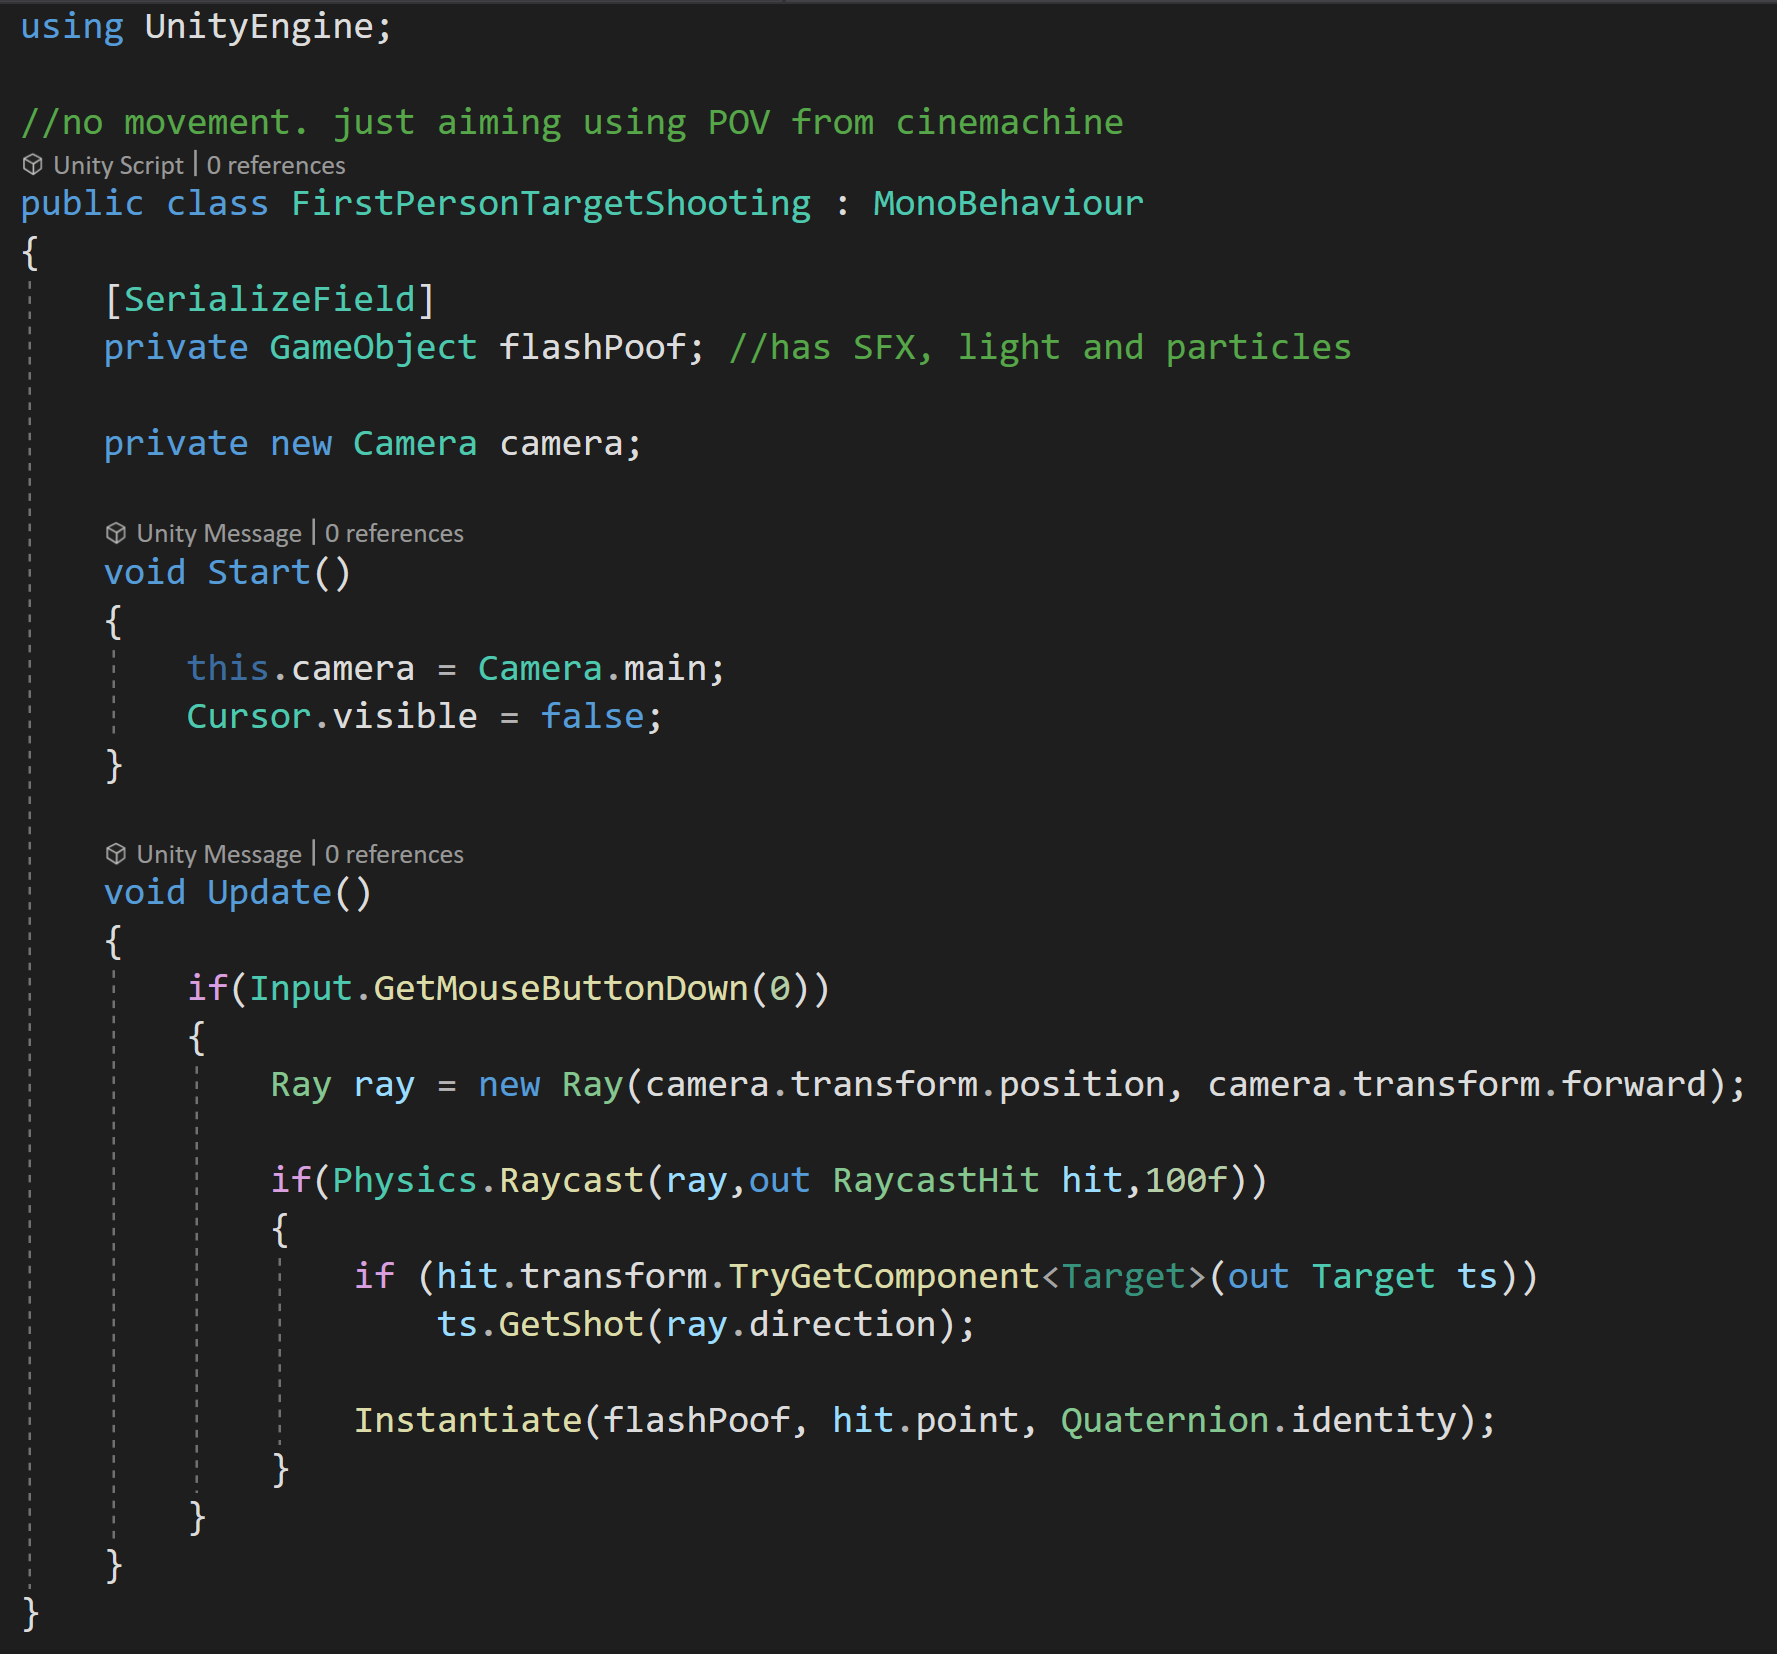
Creating a ray from the camera through the center of the screen
To apply this to first-person shooting, we need a ray that starts at the camera and goes in the camera’s forward direction.
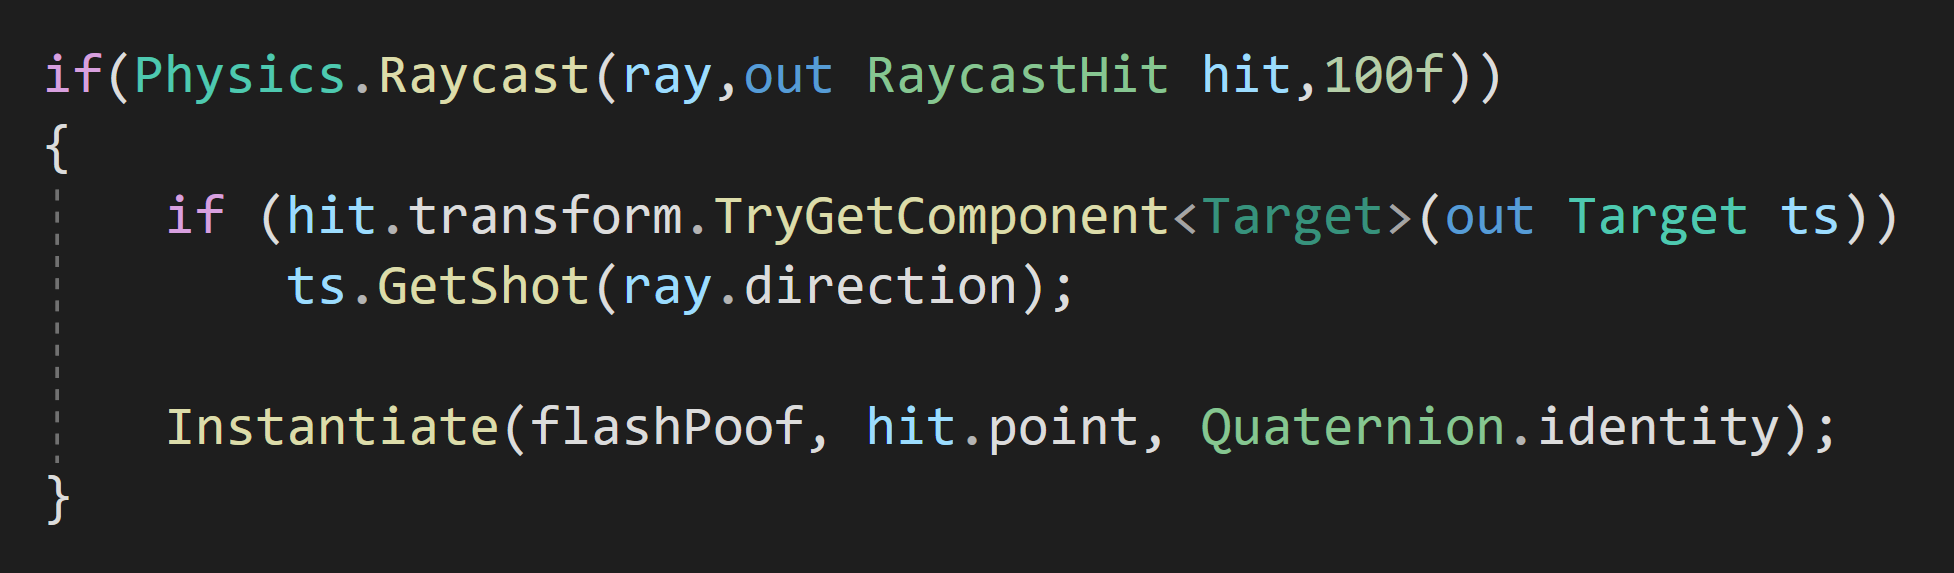
Then since the raycast function returns a boolean, true if it hits something, false if it didn’t, we can wrap the raycast in an if statement.
In this case, we could forgo the distance, but I’ll set it to something reasonable. I will, however, skip the layer mask as I want to be able to shoot at everything in the scene so the layer mask isn’t needed.
When I do hit something I want some player feedback so I’ll instantiate a prefab at the hit point. In my case, the prefab has a particle system, a light, and an audio source just to make shooting a bit more fun.

Okay, but what if we want to do something different when we hit a particular type of target?
There are several ways to do this, the way I chose was to add a script to the target (purple sphere) that has a public “GetShot” function. This function takes in the direction from the ray and then applies a force in that direction plus a little upward force to add some extra juice.
Complete first person shooting example
The unparenting at the end of the GetShot function is to avoid any scaling issues as the spheres are parented to the cubes below them.
Then back to the raycast, we can check if the object we hit has a “Target” component on it. If it does, we call the “GetShot” function and pass in the direction from the ray.
The function getting called could of course be on a player or NPC script and do damage or any other number of things needed for your game.
The RaycastHit gives us access to the object hit and thus all the components on that object so we can do just about anything we need.
But! We still need some way to trigger this raycast and we can do that by wrapping it all in another if statement that checks if the left mouse button was pressed. And all of that can go into our update function so we check every frame.
Selecting Objects
Another common task in games is to click on objects with a mouse and have the object react in some way. As a simple example, we can click on an object to change its color and then have it go back to its original color when we let go of the mouse button.
To do this, We’ll need two extra variables to hold references to a mesh renderer as well as the color of the material on that mesh renderer.
For this example, I am going to use a layer mask. To make use of the layer mask, I’ve created a new layer called “selectable” and changed the layer of all the cubes and spheres in the scene, and left the rest of the objects on the default layer. This will prevent us from clicking on the background and changing its color.
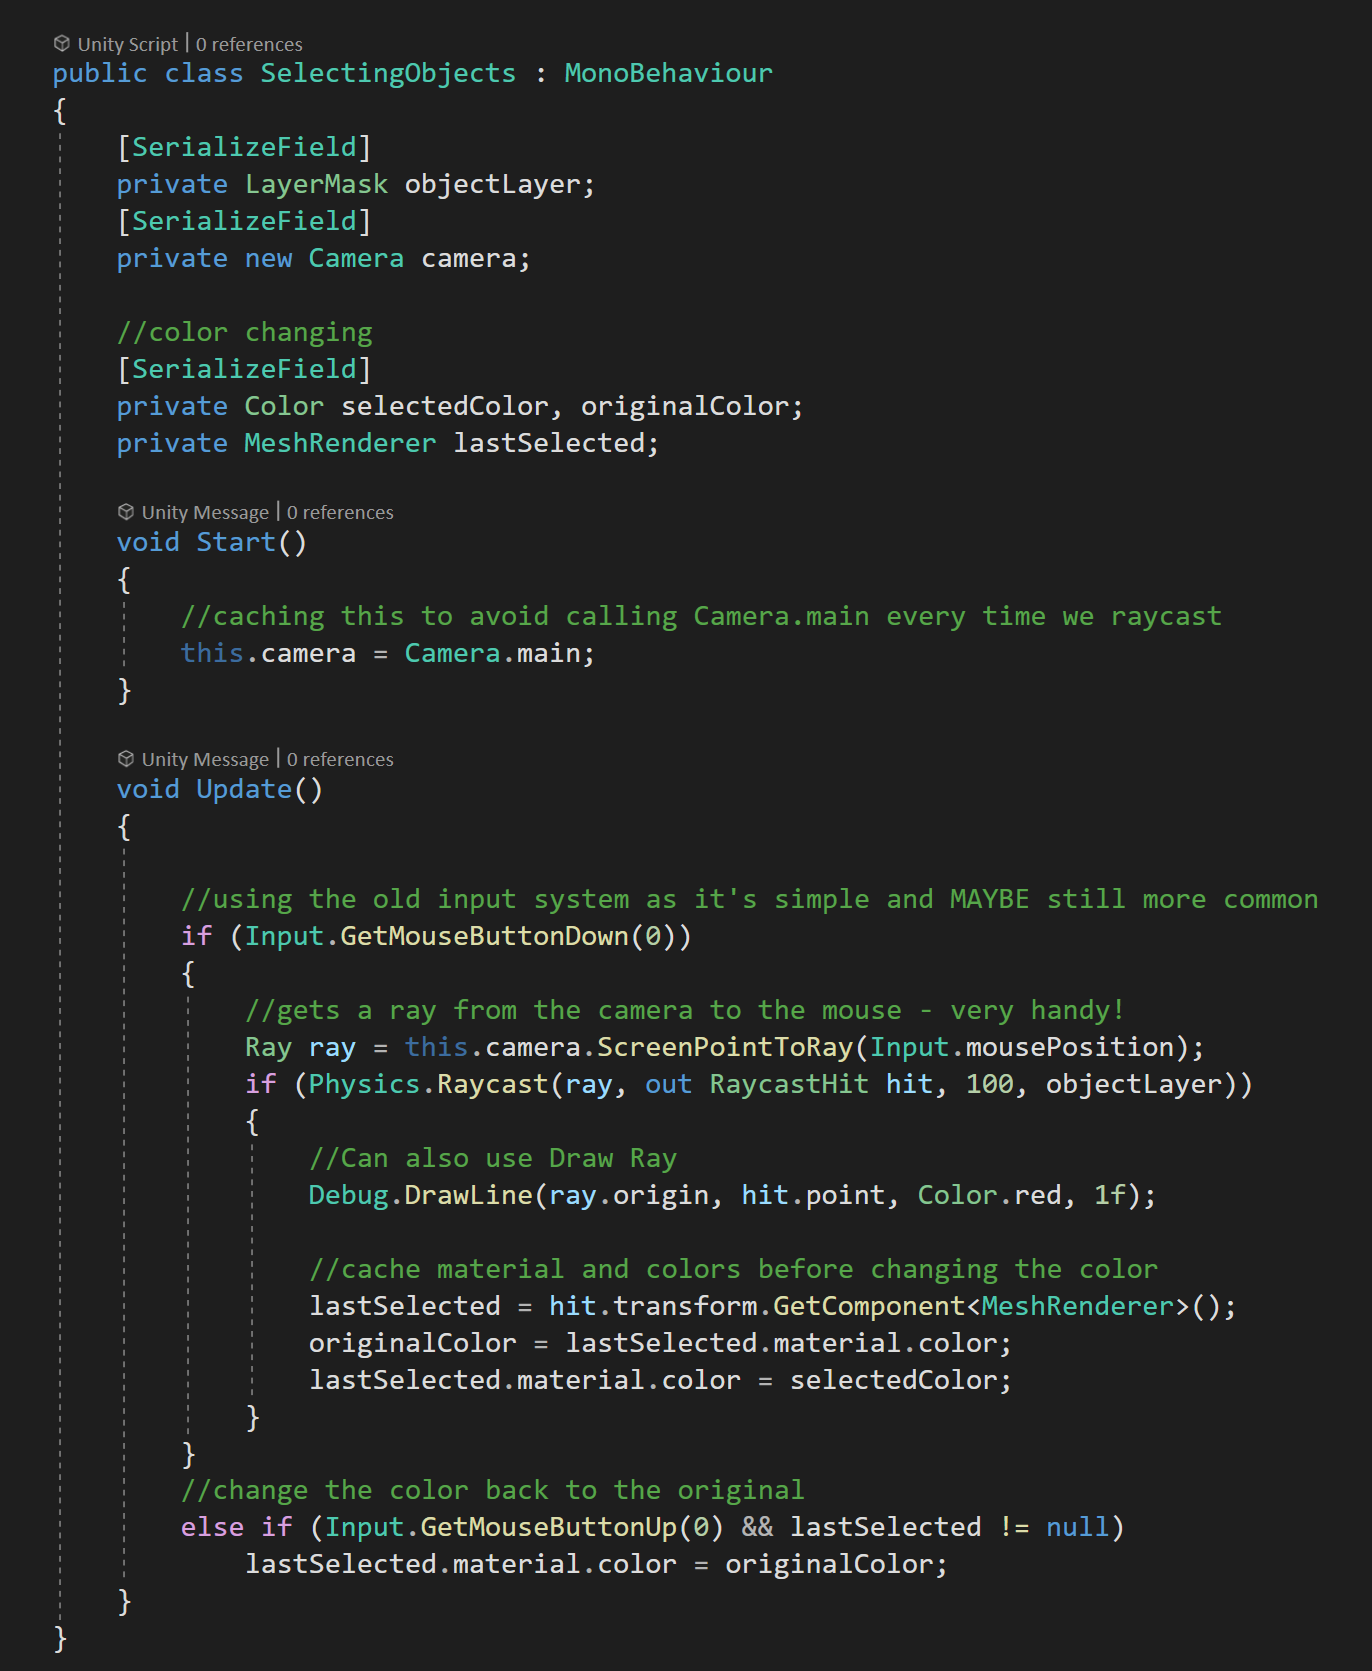
Complete code for Toggling objects color

Then in the script, I created a private serialized field of the type layer mask. Flipping back into Unity the value of the layer mask can be set to “selectable.”
Then if and else if statements check for the left mouse button being pressed and released, respectively.
If the button is pressed we’ll need to raycast and in this case, we need to create a ray from the camera to the mouse position.
Thankfully Unity has given us a nice built function that does this for us!
With our ray created we can add our raycast function, using the created ray, a RaycastHit, a reasonable distance, and our layer mask.
If we hit an object on our selectable layer, we can cache the mesh renderer and the color of the first material. The caching is so when we release the mouse button we can restore the color to the correct material on the correct mesh renderer.
Not too bad.
Notice that I’ve also added the function Debug.DrawLine. When getting started with raycasting it is SUPER easy to get rays going in the wrong direction or maybe not going far enough.
The DrawLine function does just as it says drawing a line from one point to another. There is also a duration parameter, which is how long the line is drawn in seconds which can be particularly helpful when raycasting is only done for one frame at time.
Moving Objects
Now at first glance moving objects seems very similar to selecting objects - raycast to the object and move the object to the hit point. I’ve done this a lot…
The problem is the object comes screaming towards the camera, because the hit point is closer to the camera than the objects center. Probably not what you or your players want to happen.

Don’t do this!!

One way around this is to use one raycast to select the object and a second raycast to move the object. Each raycast will use a different layer mask to avoid the flying cube problem.
I’ve added a “ground” layer to the project and assigned it to the plane in the scene. The “selectable” layer is assigned to all the cubes and spheres. The values for the layer masks can again be set in the inspector.
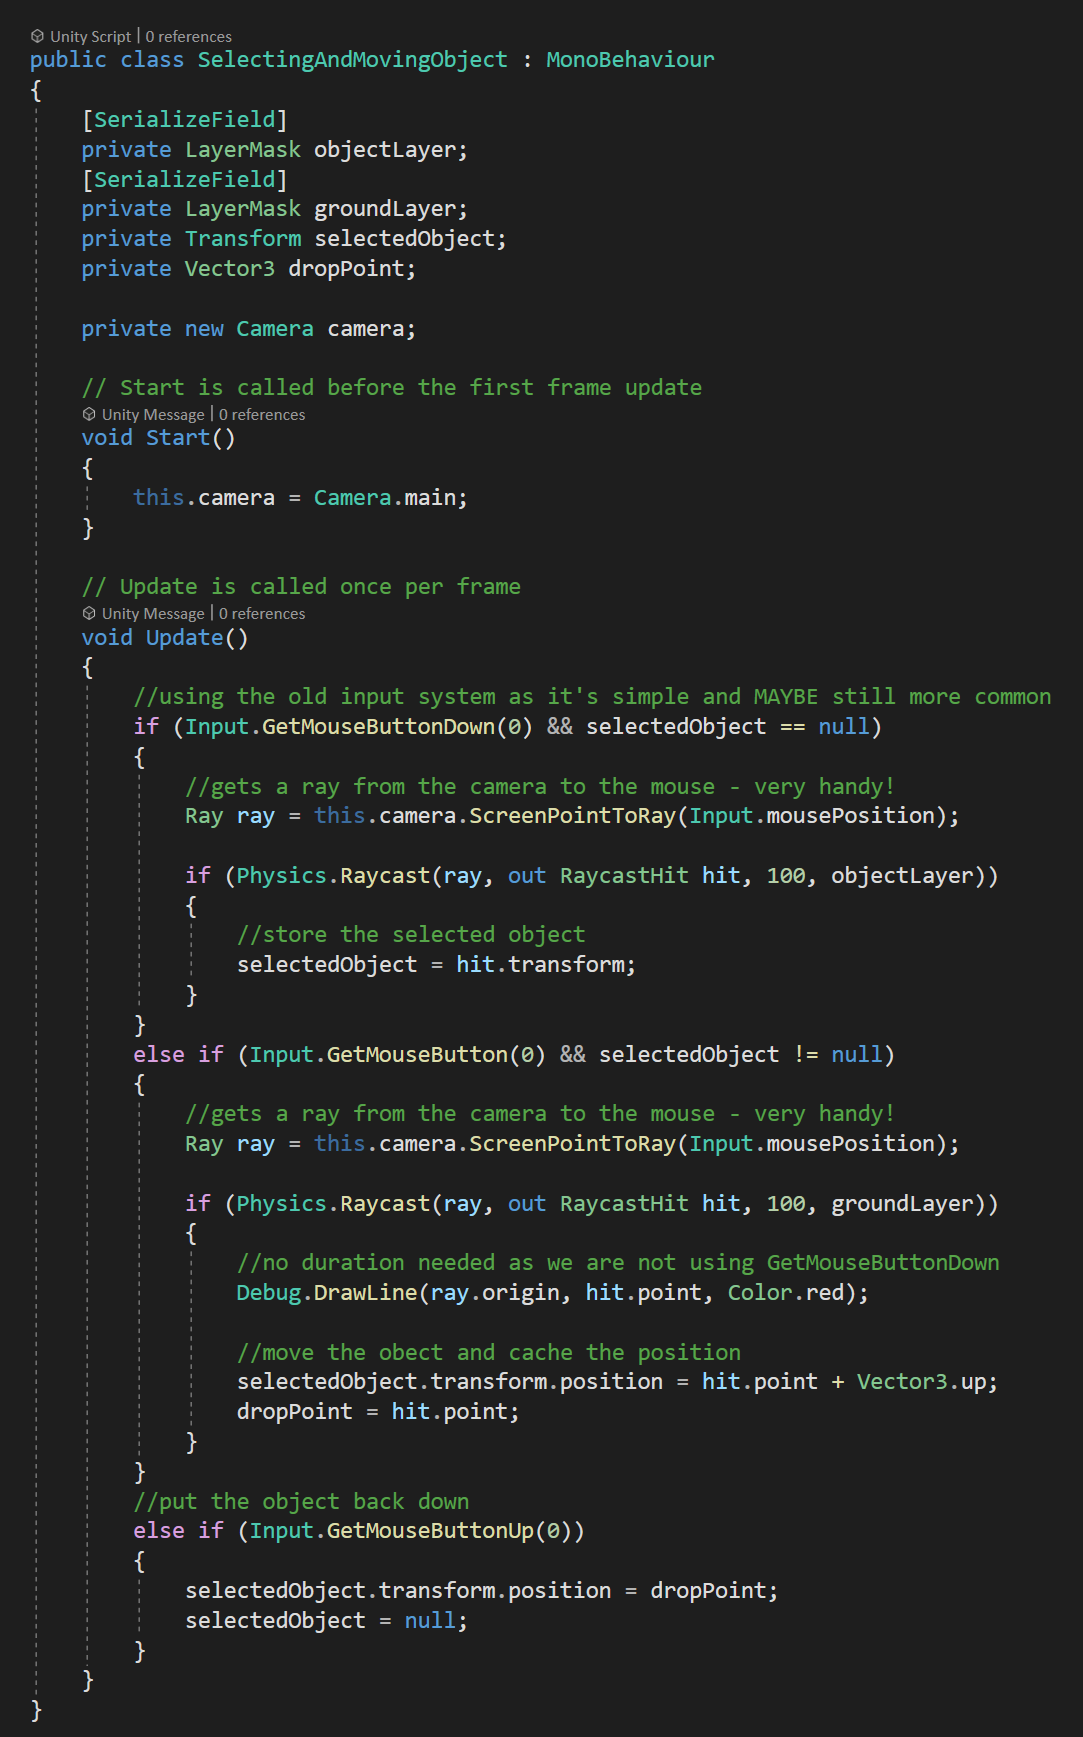
To make this all work, we’re also going to need variables to keep track of the selected object (Transform) and the last point hit by the raycast (Vector3).
To get our selected object, we’ll first check if the left mouse button has been clicked and if the selected object is currently null. If both are true, we’ll use a raycast just like the last example to store a reference to the transform of the object we clicked on.
Note the use of the “object” layer mask in the raycast function.
Our second raycast happens when the left mouse button is held down AND the selected object is NOT null. Just like the first raycast this one goes from the camera to the mouse, but it makes use of the second layer mask, which allows the ray to go through the selected object and hit the ground.
We now move the selected object to the point hit by the ray cast, plus for just for fun, we move it up a bit as well. This lets us drag the object around.
If we left it like this and let go of the mouse button the object would stay levitated above the ground. So instead, when the mouse button comes up we can set the position to the last point hit by the raycast as well as setting the selectedObject variable to null - allowing us to select a new object.
Jumping

The last example I want to go over in any depth is jumping, which can be easily extended to other platforming needs like detecting a wall or a slope or the edge of a platform - I’d strongly suggest checking out Sebastian Lague’s series on creating a 2D platformer if you want to see raycasting put to serious use not mention a pretty good character controller for a 2D game!
For this example, I’ve created a variable to store the rigidbody and I’ve cached a reference to that rigidbody in the start function.
For basic jumping, generally, the player needs to be on the ground in order to jump. You could use a trigger combined with OnTriggerEnter and OnTriggerExit to track if the player is touching the ground, but that’s clumsy and has limitations.
Instead, we can do a simple short raycast directly down from the player object to check and see if we’re near the ground. Once again this makes use of layer mask and in this case only casts to the ground layer.
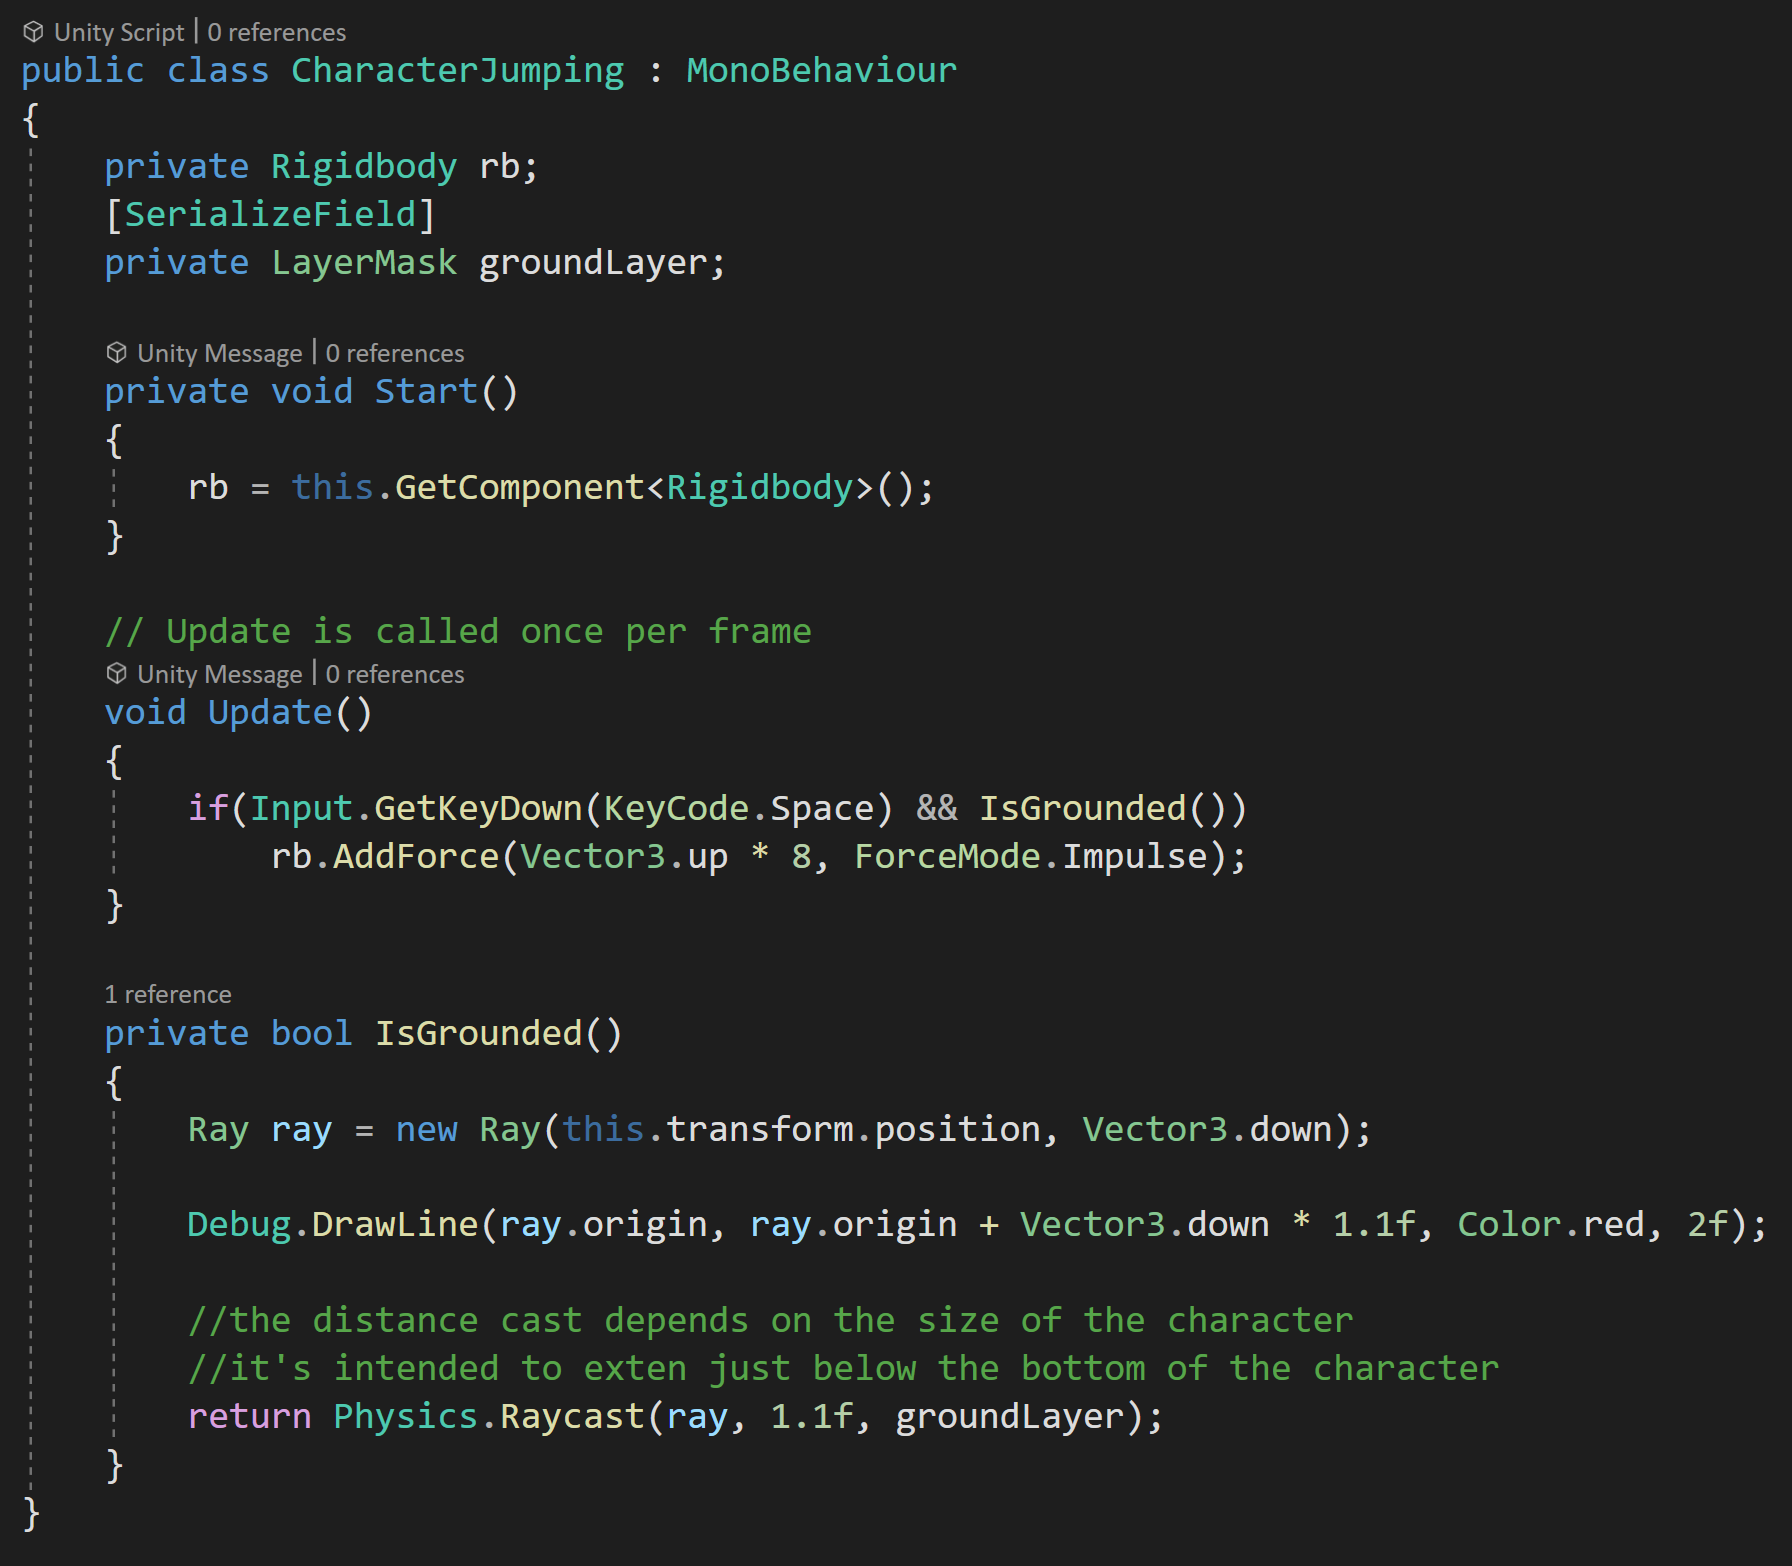
Full code for jumping
I’ve wrapped the raycast into a separate function that returns the boolean from the raycast. The ray itself goes from the center of the player character in the down direction. The raycast distance is set to 1.1 since the player object (a capsule) is 2 meters high and I want the raycast to extend just beyond the object. If the raycast extends too far, the ground can be detected when the player is off the ground and the player will be able to jump while in the air.
I’ve also added in a Debug.DrawLine function to be able to double-check that the ray is in the correct place and reaching outside the player object.
Then in the update function, we check if the spacebar is pressed along with whether the player is on the ground. If both are true we apply force to the rigidbody and it the the player jumps.
RaycastHit

The real star of the raycasting show is the RaycastHit variable.
It’s how we get a handle on the object the raycast found and there’s a decent amount of information that it can give us. In all the examples above we made use of “point” to get the exact coordinates of the hit. For me this is what I’m using 9 times out of 10 or even more when I raycast.
We can also get access to the normal of the surface we hit, which among other things could be useful if you want something to ricochet off a surface or if you want to have a placed object sit flat on a surface.
The RaycastHit can also return the distance from the ray’s origin to the hit point as well as the rigidbody that was hit (if there was one).
If you want to get really fancy you can also access bits about the geometry and the textures at the hit point.
Other Things Worth Knowing
So there’s 4 examples of common uses of raycasting, but there are a few other bits of info that could be good to know too.
There is an additional input for raycasting which is Physics.queriesHitTriggers. Be default this parameter is true and if its true raycasts will hit triggers. If it’s false the raycast will skip triggers. This could be helpful for raycasting to NPCs that have a collider on their body, but also have a larger trigger surrounding them to detect nearby objects.
Next useful bit. If you don’t set a distance for a raycast, Unity will default to an infinite distance - whatever infinity means to a computer… There could be several reasons not to allow the ray to go to infinity - the jump example is one of those.

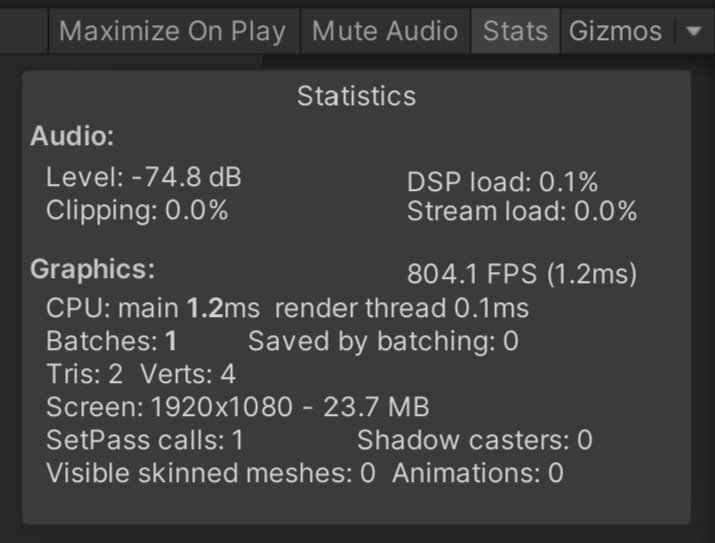
A very non precise or accurate way of measures performance
Raycasting can get a bad rap for performance. The truth is it’s pretty lightweight.
I created a simple example that raycasts between 1 and 1000 times per frame. In an empty scene on my computer with 1 raycast I saw over 5000 fps. With a 1000 raycasts per FRAME I saw 800 fps. More importantly, but no more precisely measured, the main thread only took a 1.0 ms hit when going from 1 raycast to 1000 raycasts which isn’t insignificant, but it’s also not game-breaking. So if you are doing 10 or 20 raycasts or even 100 raycasts per frame it’s probably not something you need to worry about.

1 Raycast per Frame
1000 Raycasts per Frame

Also worth knowing about, is the RaycastAll function. Which will return all objects the ray intersects, not just the first object. Definitely useful in the right situation.
Lastly, there are other types of “casting” not just raycasting. There is line casting, box casting, and sphere casting. All of which use their respective geometric shape and check for colliders and triggers in their path. Again useful in the right situation - but beyond the scope of this tutorial.