Coroutines - Unity & C#
Do you need to change a value over a few frames? Do you have code that you’d like to run over a set period of time? Or maybe you have a time-consuming process that if run over several frames would make for a better player experience?
Like almost all things there is more than one way to do it, but one of the best and easiest ways to run code or change a value over several frames is to use a coroutine!
But What Is A Coroutine?
Coroutines in many ways can be thought of as a regular function but with a return type of “IEnumerator.” While coroutines can be called just like a normal function, to get the most out of them, we need to use “StartCoroutine” to invoke them.
But what is really different and new with coroutines (and what also allows us to leverage the power of coroutines) is that they require at least one “yield” statement in the body of the coroutine. These yield statements are what give us control of timing and allow the code to be run asynchronously.
It’s worth noting that coroutines are unique to Unity and are not available outside of the game engine. The yield keyword, IEnumerable interface, and the IEnumerator type are however native to C#.
But before we dig in too deep, let’s get one misconception out of the way. Coroutines are not multi-threaded! They are asynchronous multi-tasking but not multi-threaded. C#does offer async functions, which can be multi-threaded, but those are more complex and I’m hopeful it will be the topic of a future video and blog post. If async functions aren’t enough you can go to full-fledged multi-threading, but Unity is not thread-safe and this gets even more complex to implement.
Changing a Numeric Value - Update or Coroutine?
Update method… Not so awesome
So let’s start with a simple example of changing a numeric value over time. To make it easier to see the results, let’s display that value in a UI text element.
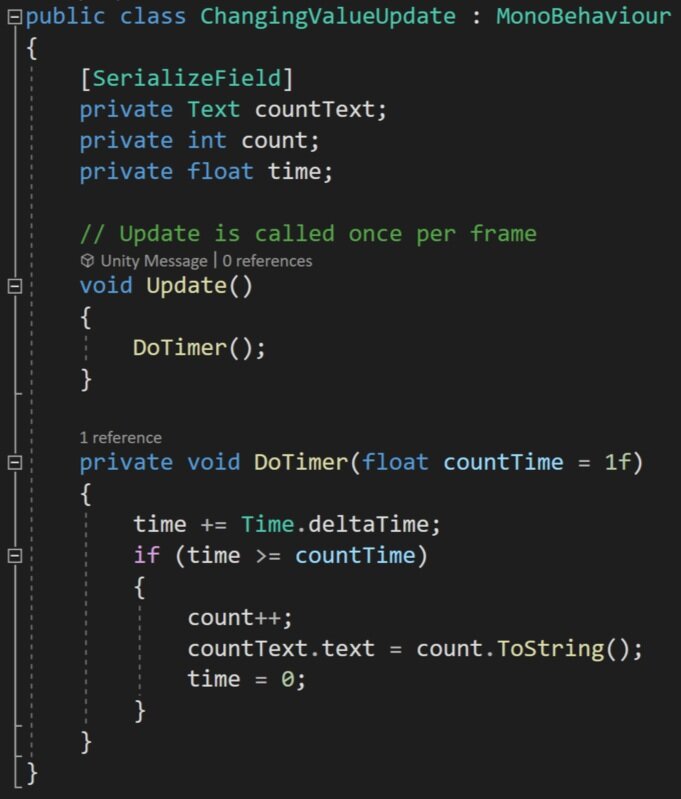
We can of course do this with the standard update function and some type of timer, but the implementation isn’t particularly pretty. I’ve got three fields, an if statement, and an update that is going to run every frame that this object is turned on.
While this works, there is a better and cleaner way. Which of course is a coroutine.
Corountines are much Cleaner
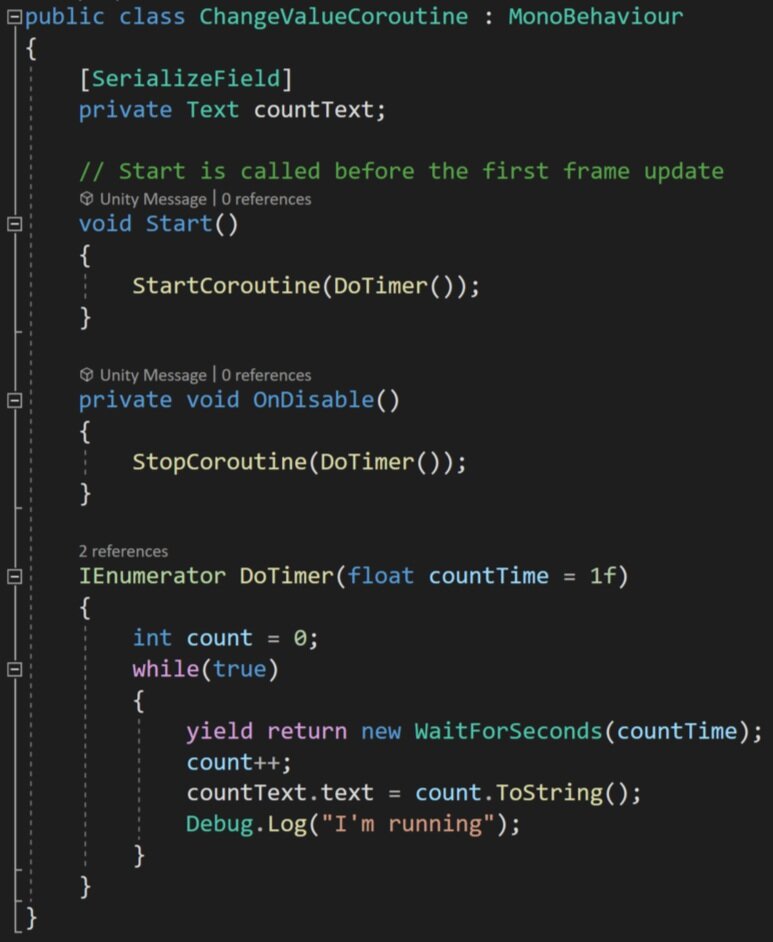
So let’s look at a coroutine that has the same result as the update function. We can see the return type of the coroutine is an IEnumerator. Notice that we can include input parameters and default values for those parameters - just like a regular function. Then inside the coroutine, we can define the count which will be displayed in the text. This variable will live as long as the coroutine is running, so we don’t need a class-wide variable making things a bit cleaner.
And despite personally being scared of using while statements this is a good use of one. Inside the while loop, we encounter our first yield statement. Here we are simply asking the computer to yield and wait for a given number of seconds. This means that the computer will return to the code block that started the coroutine as if the coroutine had been completed and continue running the rest of the program. This is an important detail as some users may expect the calling function to also pause or wait.
THEN! When wait time is up the thread will return to the coroutine and run until it terminates or in this case loops through and encounters another yield statement.
The result, I would argue while not shorter is much cleaner than an update function. Plus the coroutine only runs once per second vs. once per frame and as a result, it will be more performant.
In my personal projects, I’ve replaced update functions with coroutines for functionality that needed to run consistently but not every frame - and it made a dramatic improvement in the performance of the game.
As mentioned earlier, to invoke the coroutine we need to use the command “StartCoroutine.” This function has 2 main overloads. One that takes in a string and the second which takes in the coroutine itself. The string-based method can not take in input parameters and I generally avoid the use of strings, if possible, so I’d recommend the strongly typed overload.
Stopping a Coroutine
If you have a coroutine, especially one that doesn’t automatically terminate, you might also want to stop that coroutine when it’s no longer needed or if some other event occurs and you want to stop the process of the coroutine.
Unlike an update function if the component is turned off the coroutine will not automatically stop. But! If the gameObject with the coroutine is turned off or destroyed the coroutine will stop.
So that’s one way and can certainly work for some applications. But what if you want more control?
You can bring down the hammer and use “StopAllCoroutines” which stops all the coroutines associated with the given component.
Stop a particular coroutine by reference
Personally, I’ve often found this sufficient, but you can also stop individual coroutines with the function “StopCoroutine” and give it a reference to the particular coroutine that you want to stop. This is done by telling it explicitly which coroutine by name OR I recently learned you can cache a reference to a coroutine and use that reference in the stop coroutine function. This method is useful if there is more than one coroutine running at a time - we’ll look at an example of that later.
If you want to ensure that a coroutine stops when a component is disabled, you can call either call stop coroutine or stop all coroutines from an “OnDisable” function.
It’s also worth noting that you can get more than one instance of a coroutine running at a time. This could happen if a coroutine is started in an update function or a while loop. This can cause problems especially if that coroutine, like the one above, never terminates and could quickly kill performance.
A Few Other Examples
Other uses of coroutines could be simple animations. Such as laying down the tiles of a game board. Using a coroutine may be easier to implement and quicker to adjust than a traditional animation.
The game board effect, shown to the right, actually makes use of two coroutines. The first instantiates a tile in a grid and waits a small amount of time before instantiating the next tile.
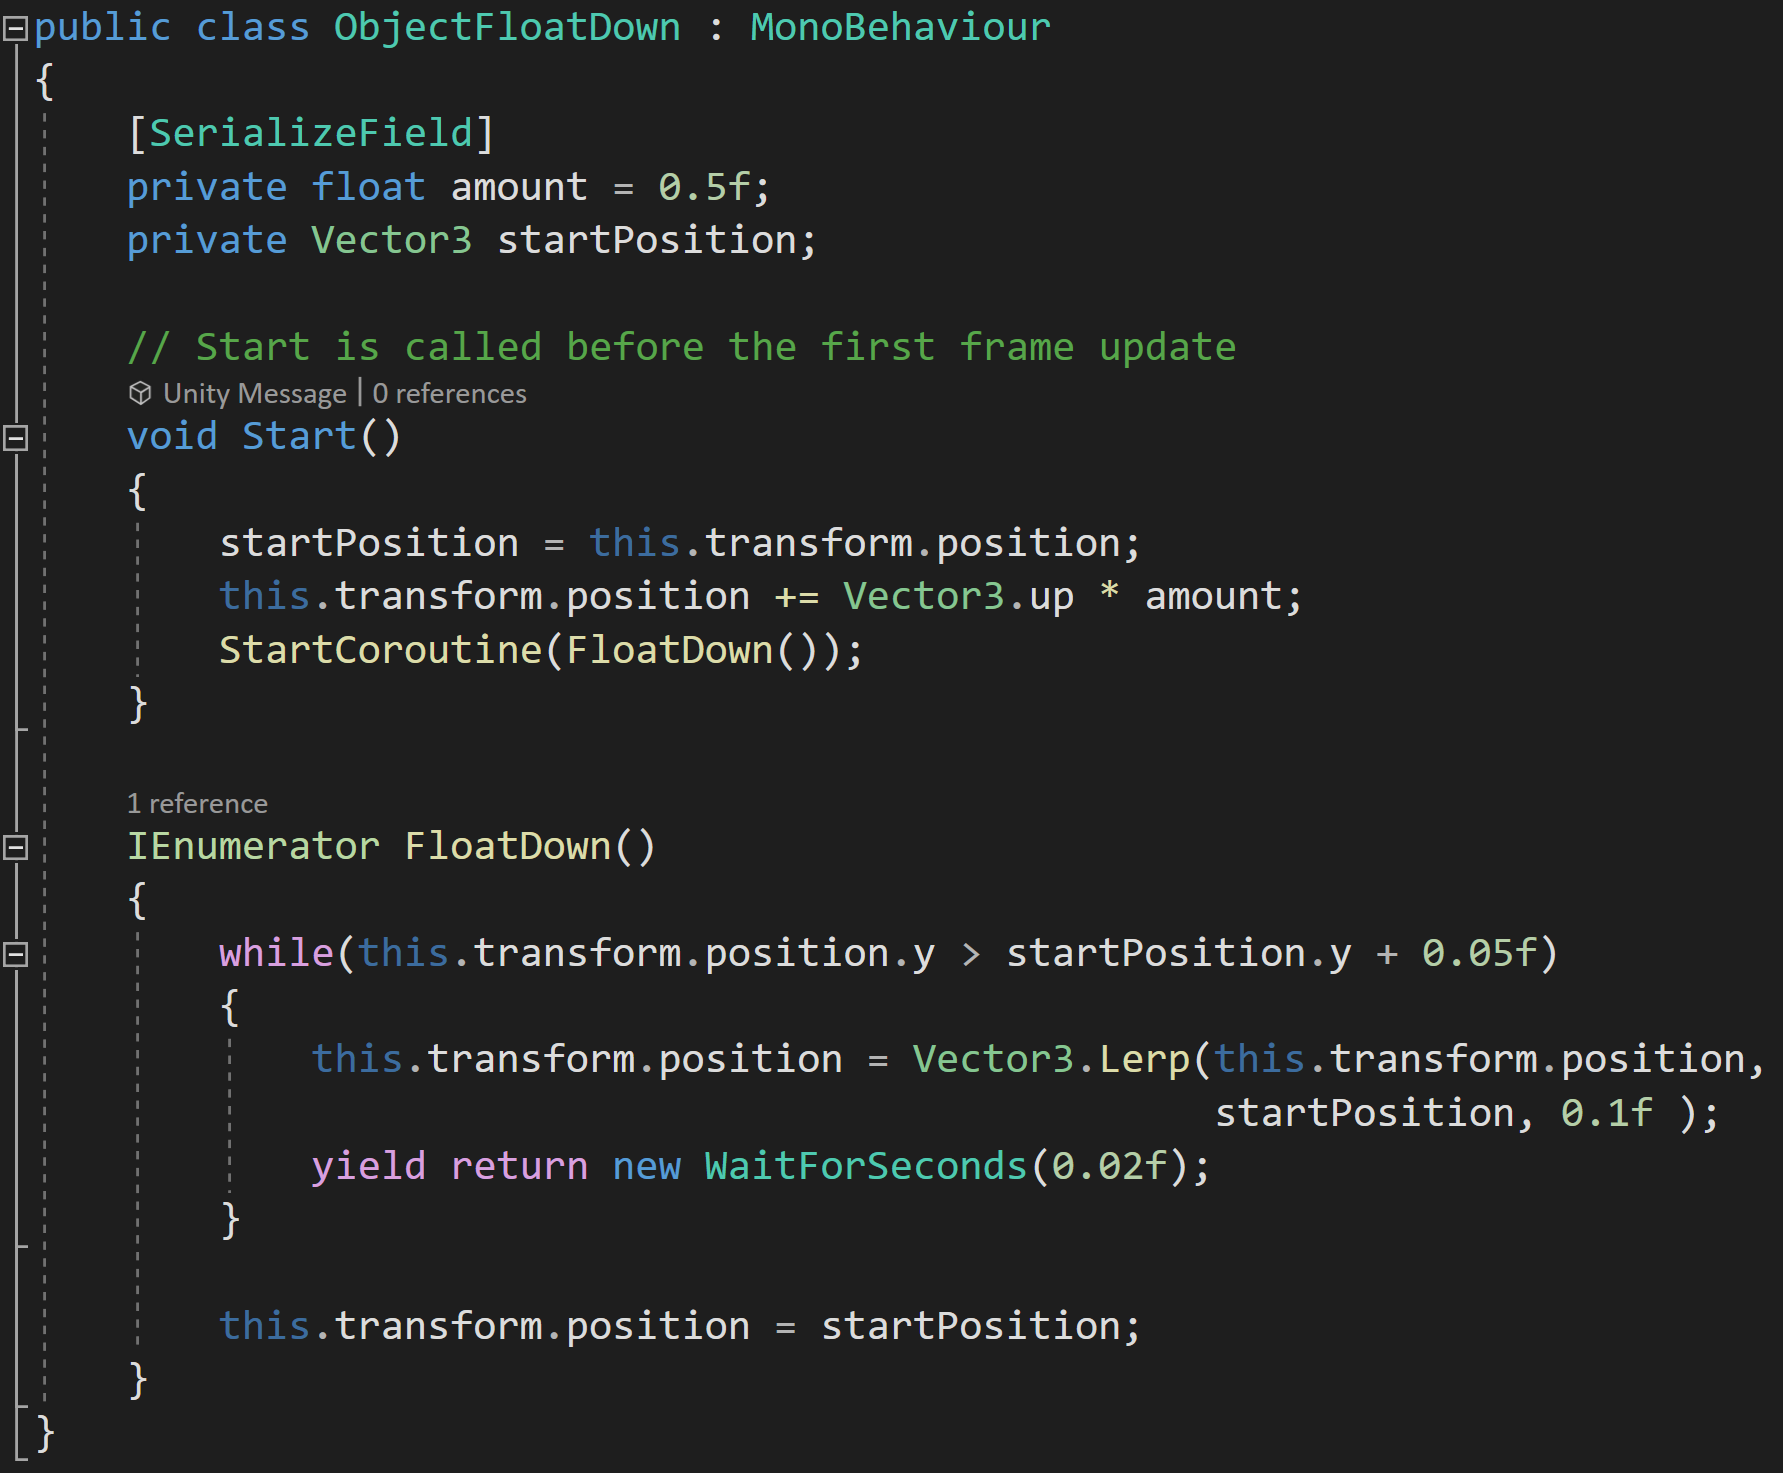
The second coroutine is run from a component on each tile. This component caches the start location then moves the object a set amount directly upward and then over several frames lerps the object’s position back to the original or intended position. The result is a floating down-like effect.
Another advantage of using a coroutine over a traditional animation is the reusability of the code. The coroutine can easily be added to any other game object with the parameters of the effect easily modified by adjusting the values in the inspector.
Instantiate the Board Tiles
Make those Tiles float down into position
Notice that in the float down code it doesn’t wait for the position to get back to the original location since a lerp will never get to the final value. So if the coroutine ran the while loop until it got to the exact original position the coroutine would never terminate. If the exact position is important the position can be set after exiting the while loop.
Caching and Stopping Coroutines
Coroutines can also be used to easily create smooth movement such as a game piece moving around the board.
But there is a potential snag with this approach. In my case, I’m using a lerp function to calculate where the game piece should move to for the next frame. The problem comes when using a lerp function that operates over several frames. This creates the smooth motion - but in that time the player could click on a different location, which would start another instance of the coroutine, and then both coroutines would be trying to move the game piece to different locations and neither would ever be successful or ever terminate.
This is a waste of resources, but worse than that the player will lose control and not be able to move the game piece.
A simple way to avoid this issue is to cache a reference to the coroutine. This is made easy, as the start coroutine function returns a reference to the started coroutine!
Then all we need to do, before starting a new coroutine is to check if the coroutine variable is null, if it’s not we can stop the previous coroutine before starting the next coroutine.
It’s easy to lose control or lose track of coroutines and caching references is a great way to maintain that control.
Yield Instructions!
The yield instructions are the key addition to coroutines vs. regular functions and there are several options built into Unity. It is possible to create your own custom yield instructions and Unity provides some documentation on how to do that if your project needs a custom implementation.
Maybe the most common yield instruction is “wait for seconds” which pauses the coroutine for a set number of seconds before returning to execute the code. If you are concerned about garbage collection and are using “wait for seconds” frequently with the same amount of time you can create an instance of it in your class. This is useful if you’ve replaced some of your update functions with coroutines and that coroutine will be called frequently while the game is running.
Another common yield statement is to return “null.” This causes Unity to wait until the next frame to continue the corountine which is particularly useful if you want an action to take place overall several frames - such as a simple animation. I’ve used this for computationally heavy tasks that could cause a lag spike if done in one frame. In those cases, I simply converted the function to a coroutine and sprinkled in a few yield return null statements to break it up over several frames.
An equally useful, but I think often forgotten yield statement is “break” which simply ends the execution of a coroutine much like the “return” command does in a traditional function.
“Wait Until” and “Wait While” are similar in function in that they will pause the coroutine until a delegate evaluates as true or while a delegate is true. These could be used to wait a specific number of frames, wait for the player score to equal a given value, or maybe show some dialogue when a player has died three times.
“Wait For End of Frame” is a great way to ensure that the rest of the game code for that frame has completed as well as after cameras and GUI have rendered. Since it is often hard, or impossible, to control what code executes before other code this can be very useful if you need specific code to run after other code is complete.
“Wait for Fixed Update” is pretty self-explanatory and waits for “fixed update” to be called. Unity doesn’t specify if this triggers before, after, or somewhere in the in-between when fixed update functions are getting called.
Wait for “Seconds Real-Time” is very similar to “wait for seconds” but as the name suggests it is done in real-time and is not affected by the scaling of time whereas “wait for seconds” is affected by scaled time.
Other Bits and Details
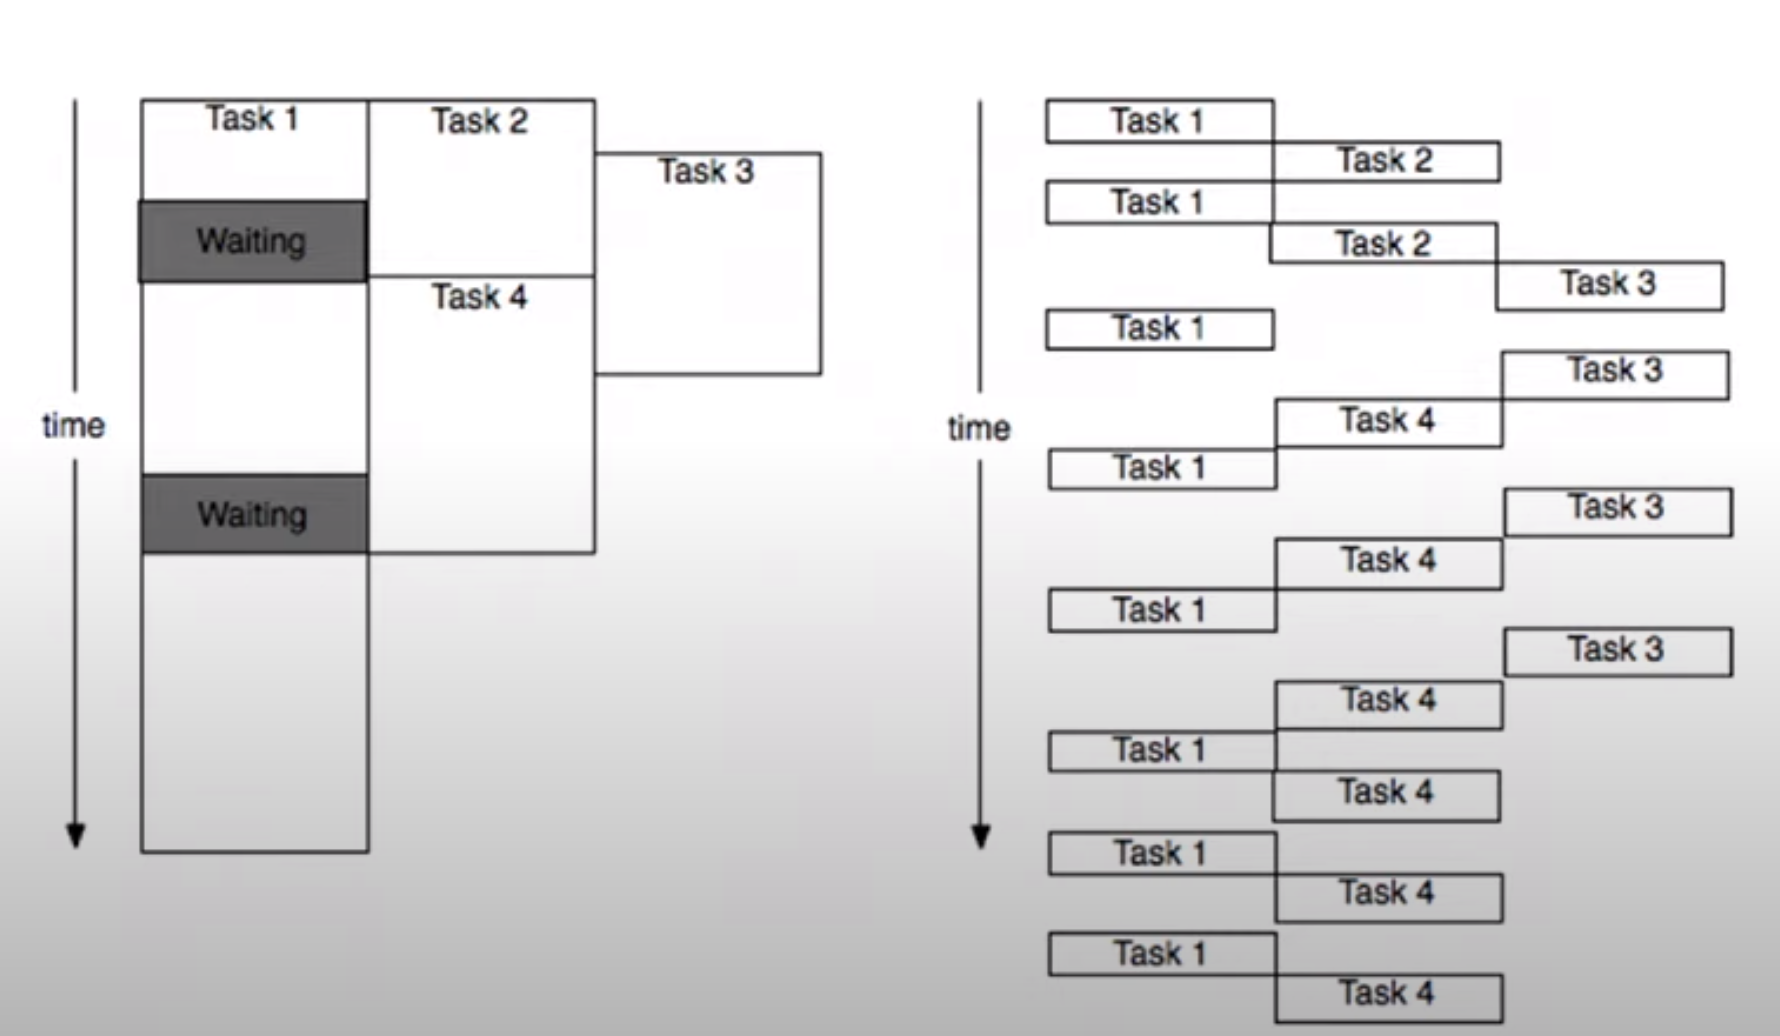
Many when they get started with Unity and coroutines think that coroutines are multi-threaded but they aren’t. Coroutines are a simple way to multi-task but all the work is still done on the main thread. Mult-threading in Unity is possible with async function or manually managing threads but those are more complex approaches. Multi-tasking with coroutines means the thread can bounce back and forth between tasks before those tasks are complete, but can’t truly do more than one task at once.
The diagram to the right is stolen from the video Best Practices: Coroutines vs. Async and is is a great visual of real multi-threading on the left and what multi-tasking with coroutines actually does.
While pretty dry, the video does offer some very good information and some more detailed specifics on coroutines.
It’s also worth noting that coroutines do not support return values. If you need to get a value out of the coroutine you’ll need a class-wide variable or some other data structure to save and access the value.


