Command Pattern - Encapsulation, Undo and Redo
Programming folks (otherwise known as “programmers”) often talk about encapsulation - which can be a very power concept and tool that can save plenty frustration and prevent bugs as a project grows large.
The idea of encapsulation is that a class or a system has everything it needs to function INSIDE of itself - it doesn’t need to reach out for references and is not dependent on other classes or systems to function. Encapsulation decouples classes and systems. The coupling of systems or classes should generally be avoided to keep your project stable and robust as it grows and has features added.
The command pattern is all about sending information, or a command, to an object. In the case of the command pattern the command itself is encapsulated! The sender and the receiver of the command are not necessarily encapsulated, but rather the command itself is.
This means that all the information needed to execute that command is wrapped up inside a command class. What this means is the object executing the command doesn’t need any external references - all it needs to do is tell the command to do its thing and the command is fully independent and decoupled from other systems!
While this requires some framework and intentionally to create - it can be very useful. It means that commands can be added to a list or queue, run immediately, or run at any later time. This adds or allows significant functionality that would be difficult to achieve with just direct function calls.
This makes it great for asynchronous applications - one example might be a turn-based strategy game where a sequence of commands is created one at a time and then all the commands, or a select number of commands, can be run when it is that object’s turn.
The command pattern can also be used to “easily” create of an undo system - which depending on your project might be helpful or even crucial.
For this post (video), we’re going to start simple. Just using the command pattern to collect commands in a list and execute them over a short time interval. We’ll then add in the ability to undo and redo commands. This will result in some messy code, but we’ll finish up the post by wrapping all that messiness into a “command handler” class - which ends up pretty clean and tidy due to the encapsulation of the commands.
The Code Begins!
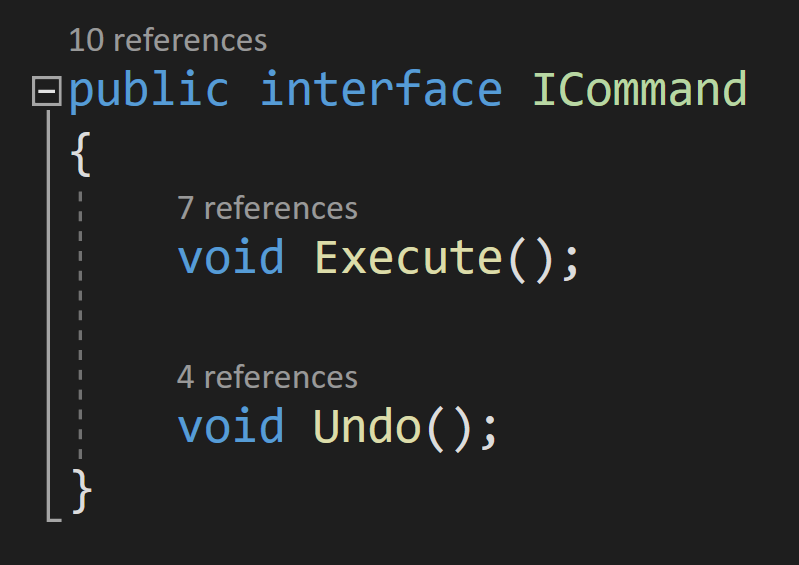
The Command Interface
Again, the core idea of the command pattern is to encapsulate the command in an object. To do that we first need to create an interface that will have two functions. The first function is the “execute” or “do” function. This will contain all the code for the command to complete its action.
The second function is an “undo” function - which will need to have code that reverses or undoes whatever happens in the execute function.
Exactly what the undo function looks like is 100% dependent on what the command is doing.
With the interface complete, we then need to create classes for the actual commands.
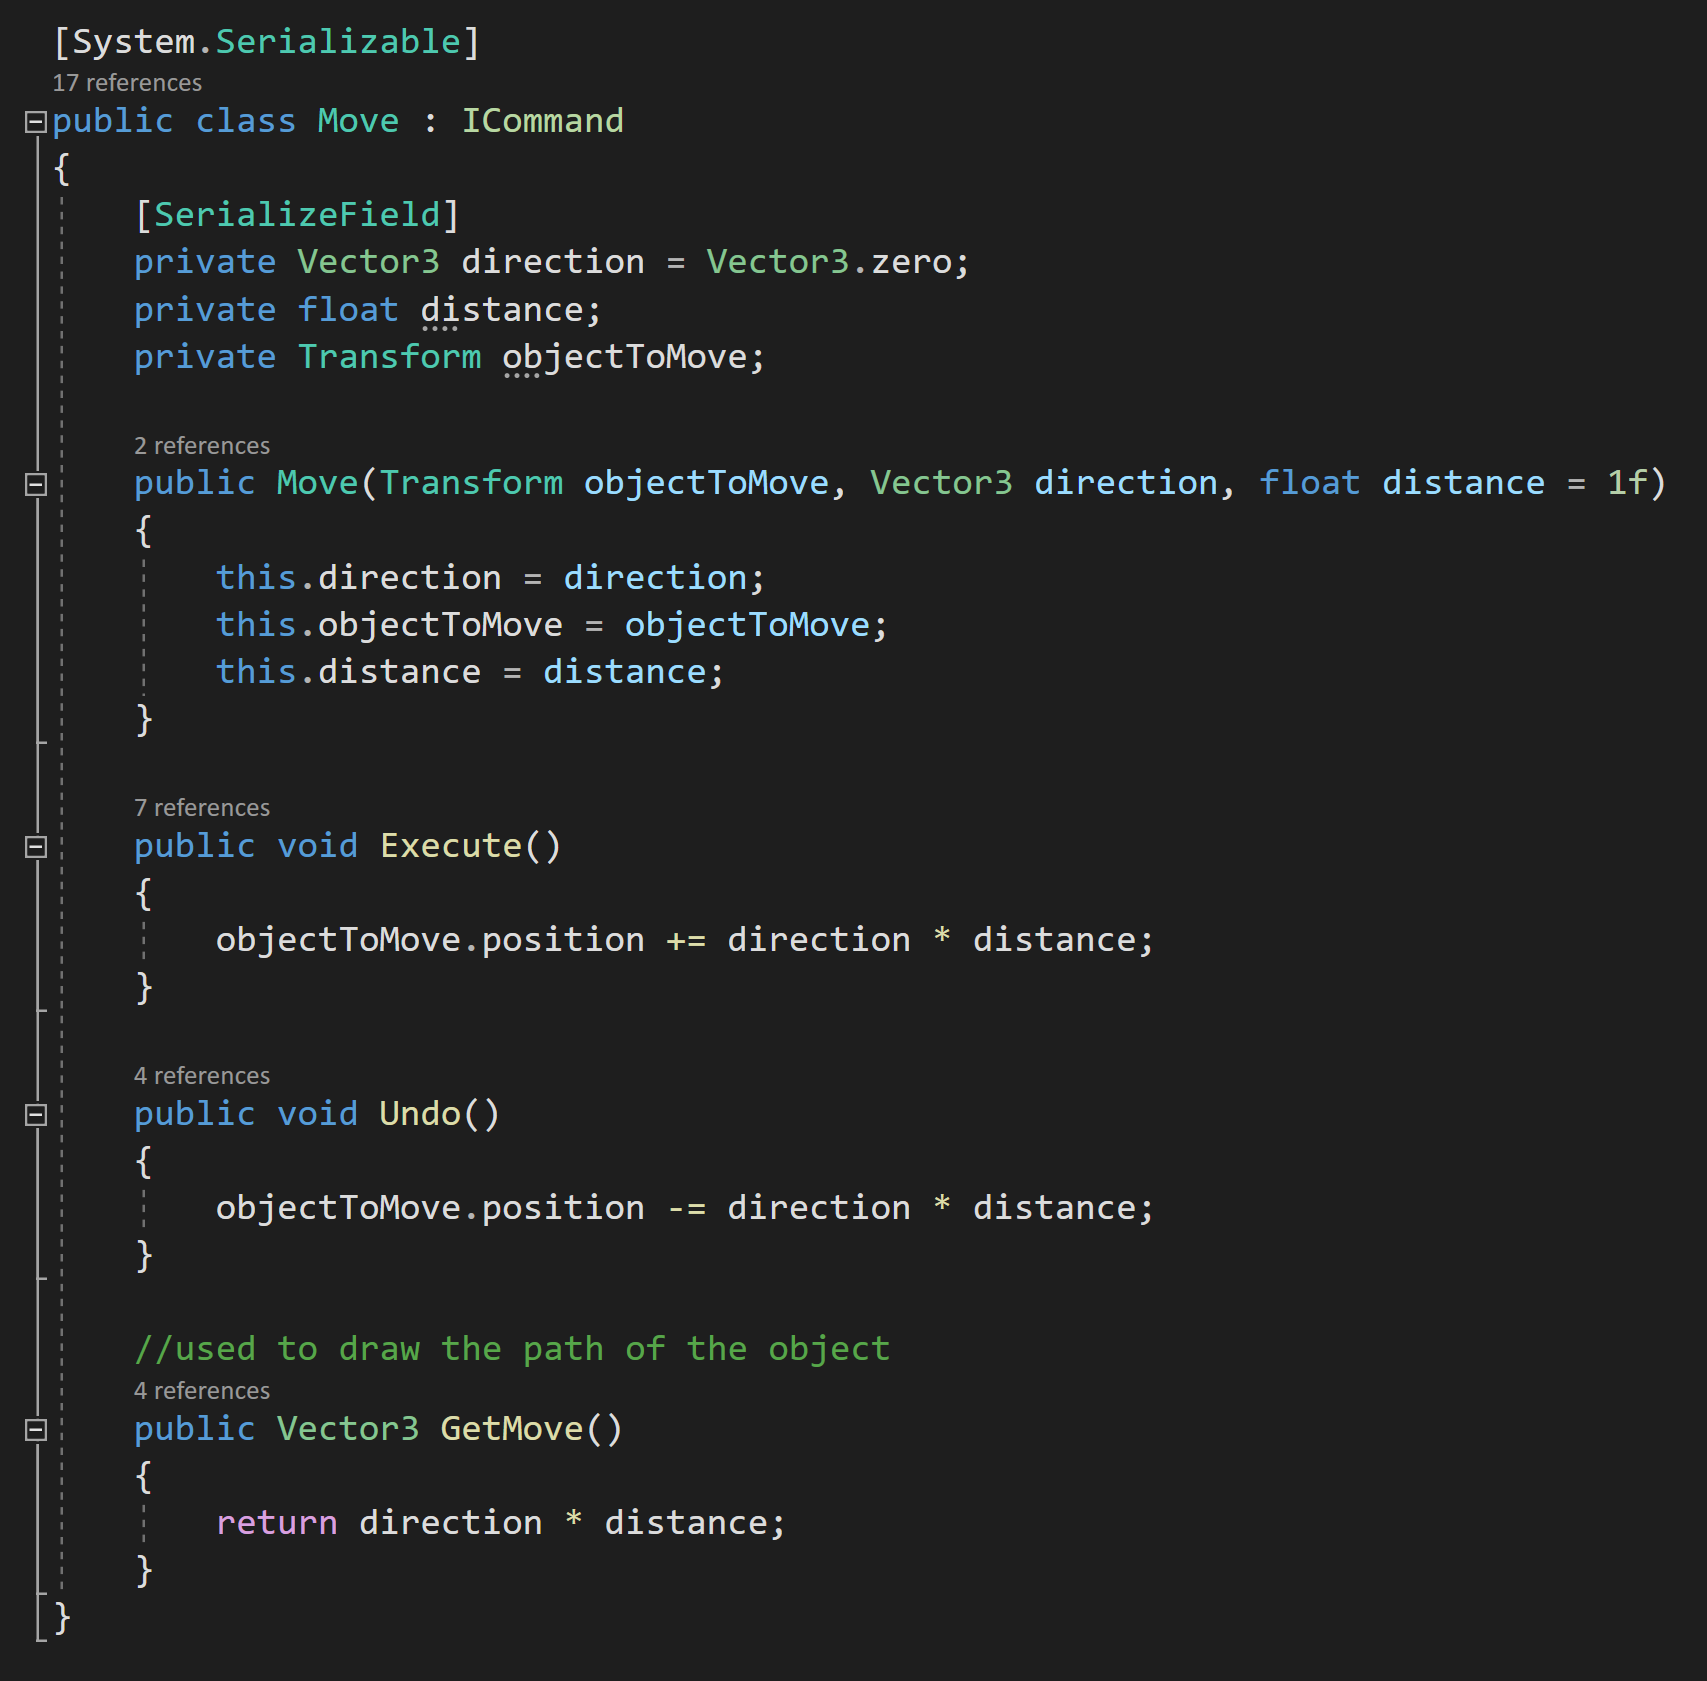
The Move Command - Which Implements the Command Interface
For the purposes of this video, I’m just going to create one command which is a “move command.” This class will of course need to implement the command interface.
In the move class, we need three variables. The first is the direction to move, the second is the distance to move and the third is the transform that will be moving. All three of these variables are private and will have their values set in a constructor.
By doing this, the command instance will have all the information and references that it will need to execute the move command.
This is pretty clever in its simplicity. It’s also pretty clean!
The Execute and Undo functions are fairly straight forward in that they change the position of the transform. The execute moves the transform in one direction and the undo moves it in the opposite direction.
Simple and tidy. Just the way I like it.
I’ve also included a “get move” function that is used in order to draw the path taken by the object - this certainly isn’t the only way to do it. It’s not particularly clean, but it gets the job done and it’s not the focus of this video. For the most part I will be ignoring the path drawing functionality as it’s tangential at best to the command pattern.
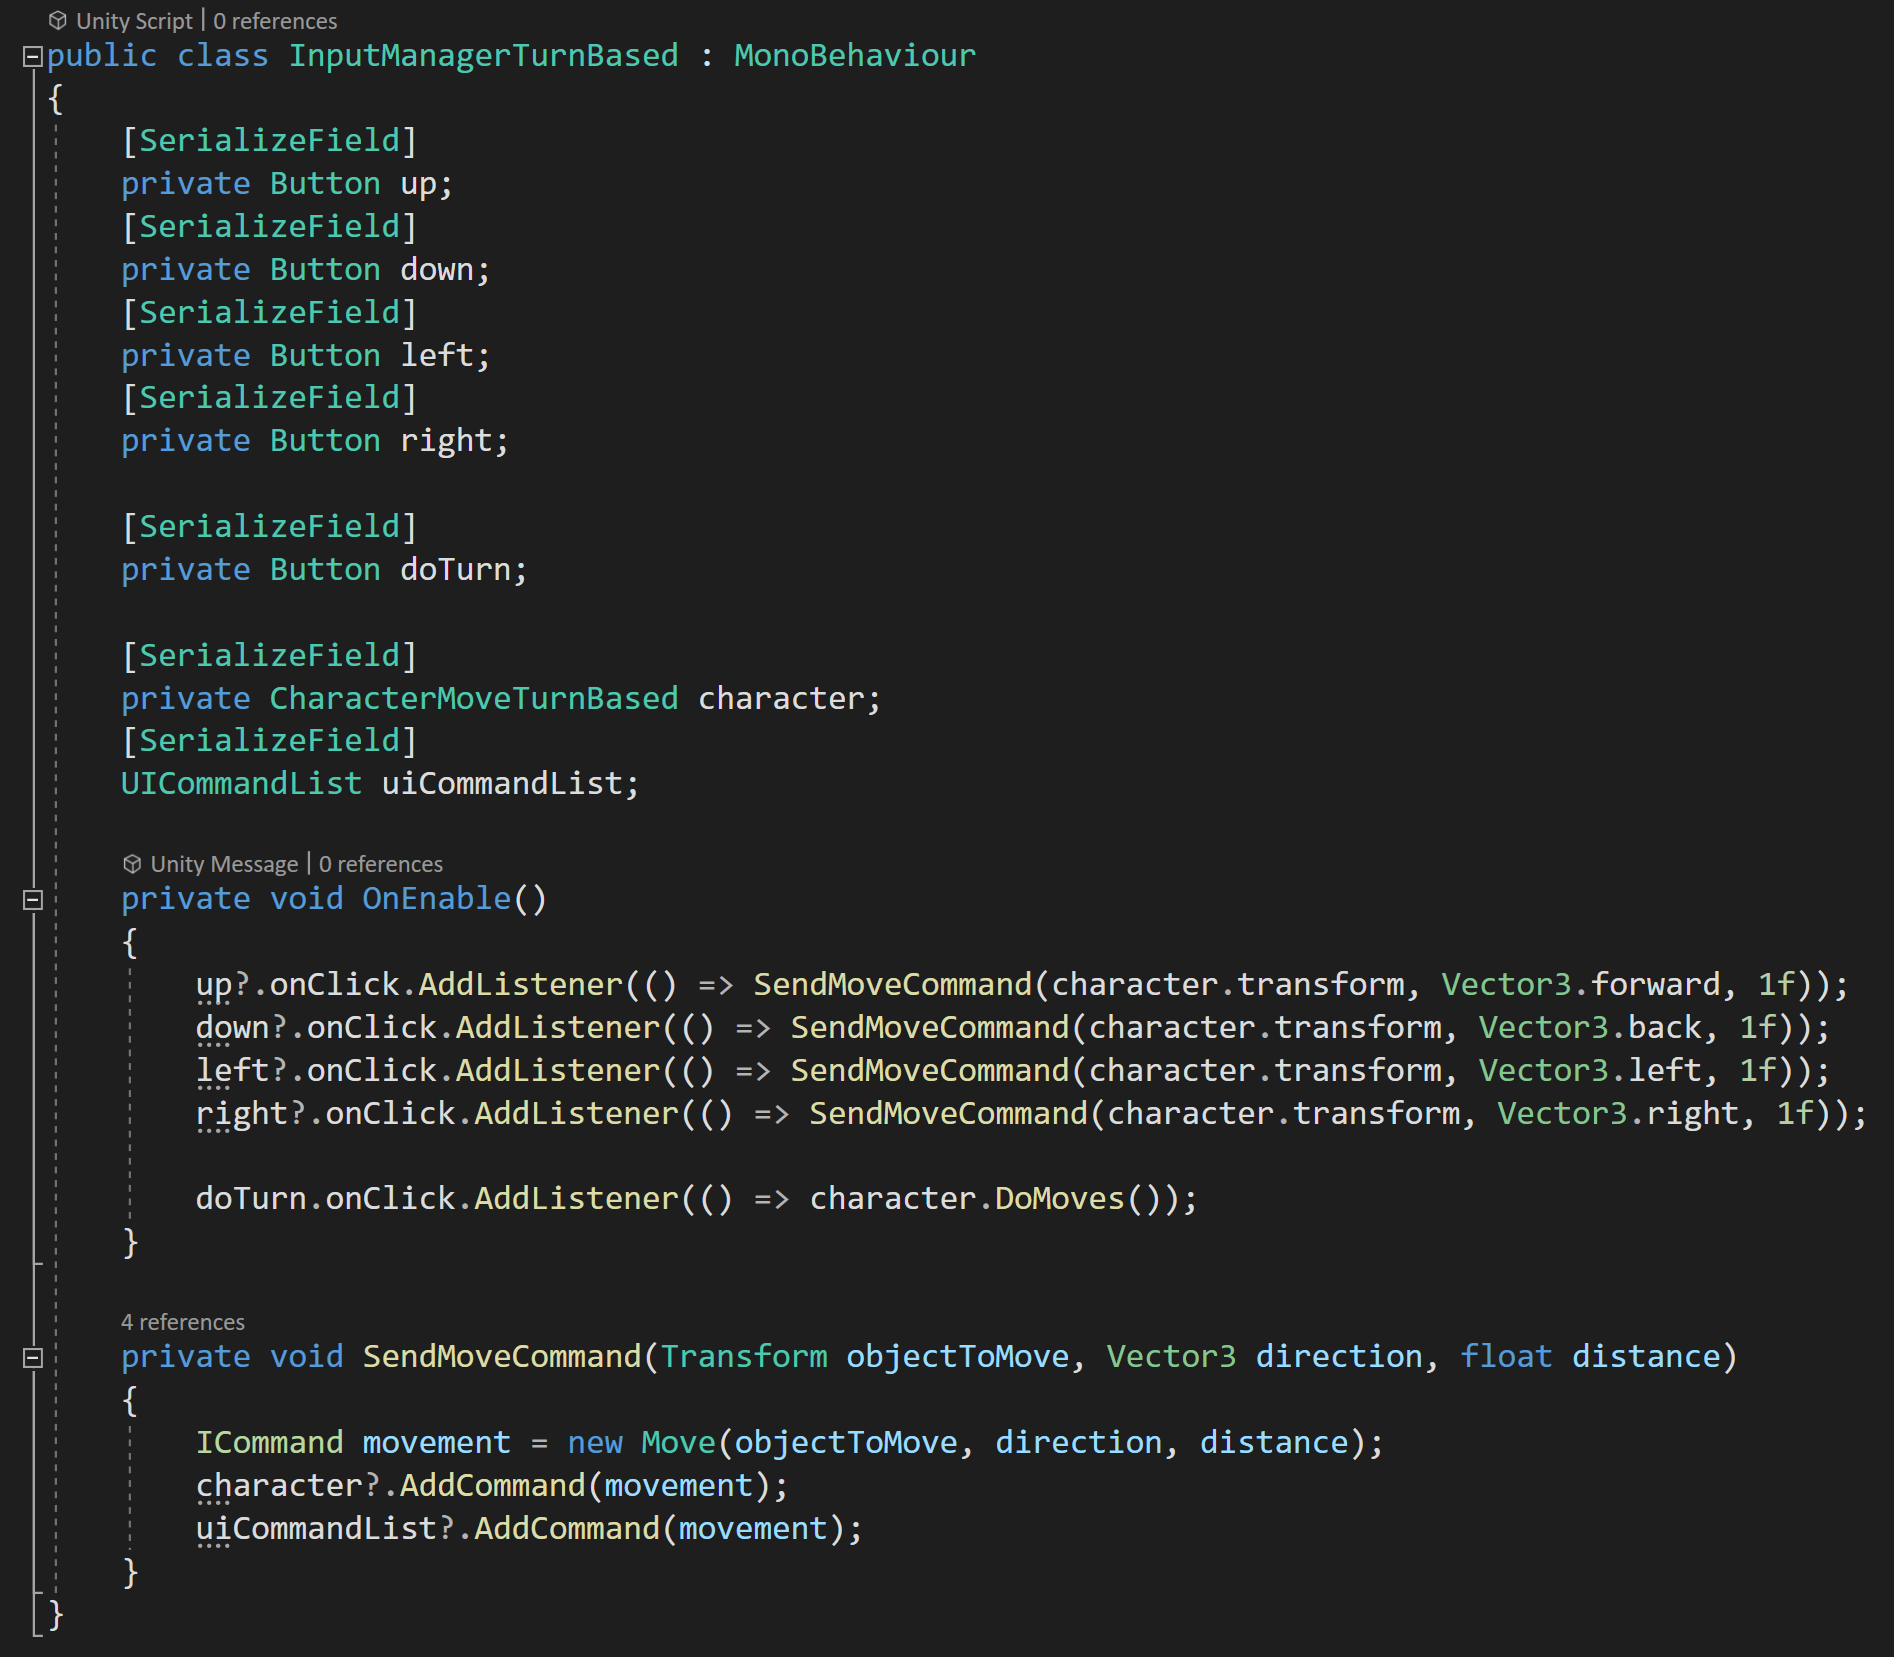
turn Based Input Manager
To control the object and issue the commands, I’ve created a few UI buttons. These are connected into a basic “input manager.”
In the start function a listener is added to each button. The direction buttons all call a “send move command” function. While the “do turn” button will call a function on the player object that will execute the list of commands.
How exactly the input is gathered, of course doesn’t matter, but the “send move command” is crucial and does a few important things.
This function takes in the transform to be moved, in this case the player object’s transform, the direction to move as well as the distance to move. The function then creates a new instance of the move command and send the command to the character controller.
For my example it also adds the command to a UI element that displays the commands on the screen.
A better approach to sending out these commands would probably be to use the Observer pattern or in other words use events… but I didn’t want to go too far astray from the command pattern and complicate the main idea. If you aren’t familiar with the observer pattern or events - definitely go check out that video it’s easily one of my favorite and most used patterns.

Turn Based Character Controller
In our character move class, there is a list of move commands that each incoming command will be stored in. You can see this happening in the “add command” function.
In general, the list could hold types of ICommand, but in order for my path drawing to work I needed to constrain the list to the more specific type.
For simplicity I’m not showing the code that does the path drawing, but if you want to see that you can check out the full code.
There is then a “Do Moves” function that will be called by pressing the “do turn” button. This function calls a coroutine that iterates through the command list and calls “execute” on a command and then waits a short time before looping through to the next command.
And that’s pretty much it for a basic implementation of the command pattern. You just wrap up the commands which contain everything that needs to happen and ship it off to a list for storage so it can be executed when needed.
Again, pretty simple, nice and tidy.
Adding Undo
So let’s look at how an “undo” system might work. The command interface and the move command class remain the exact same. No changes needed at all.
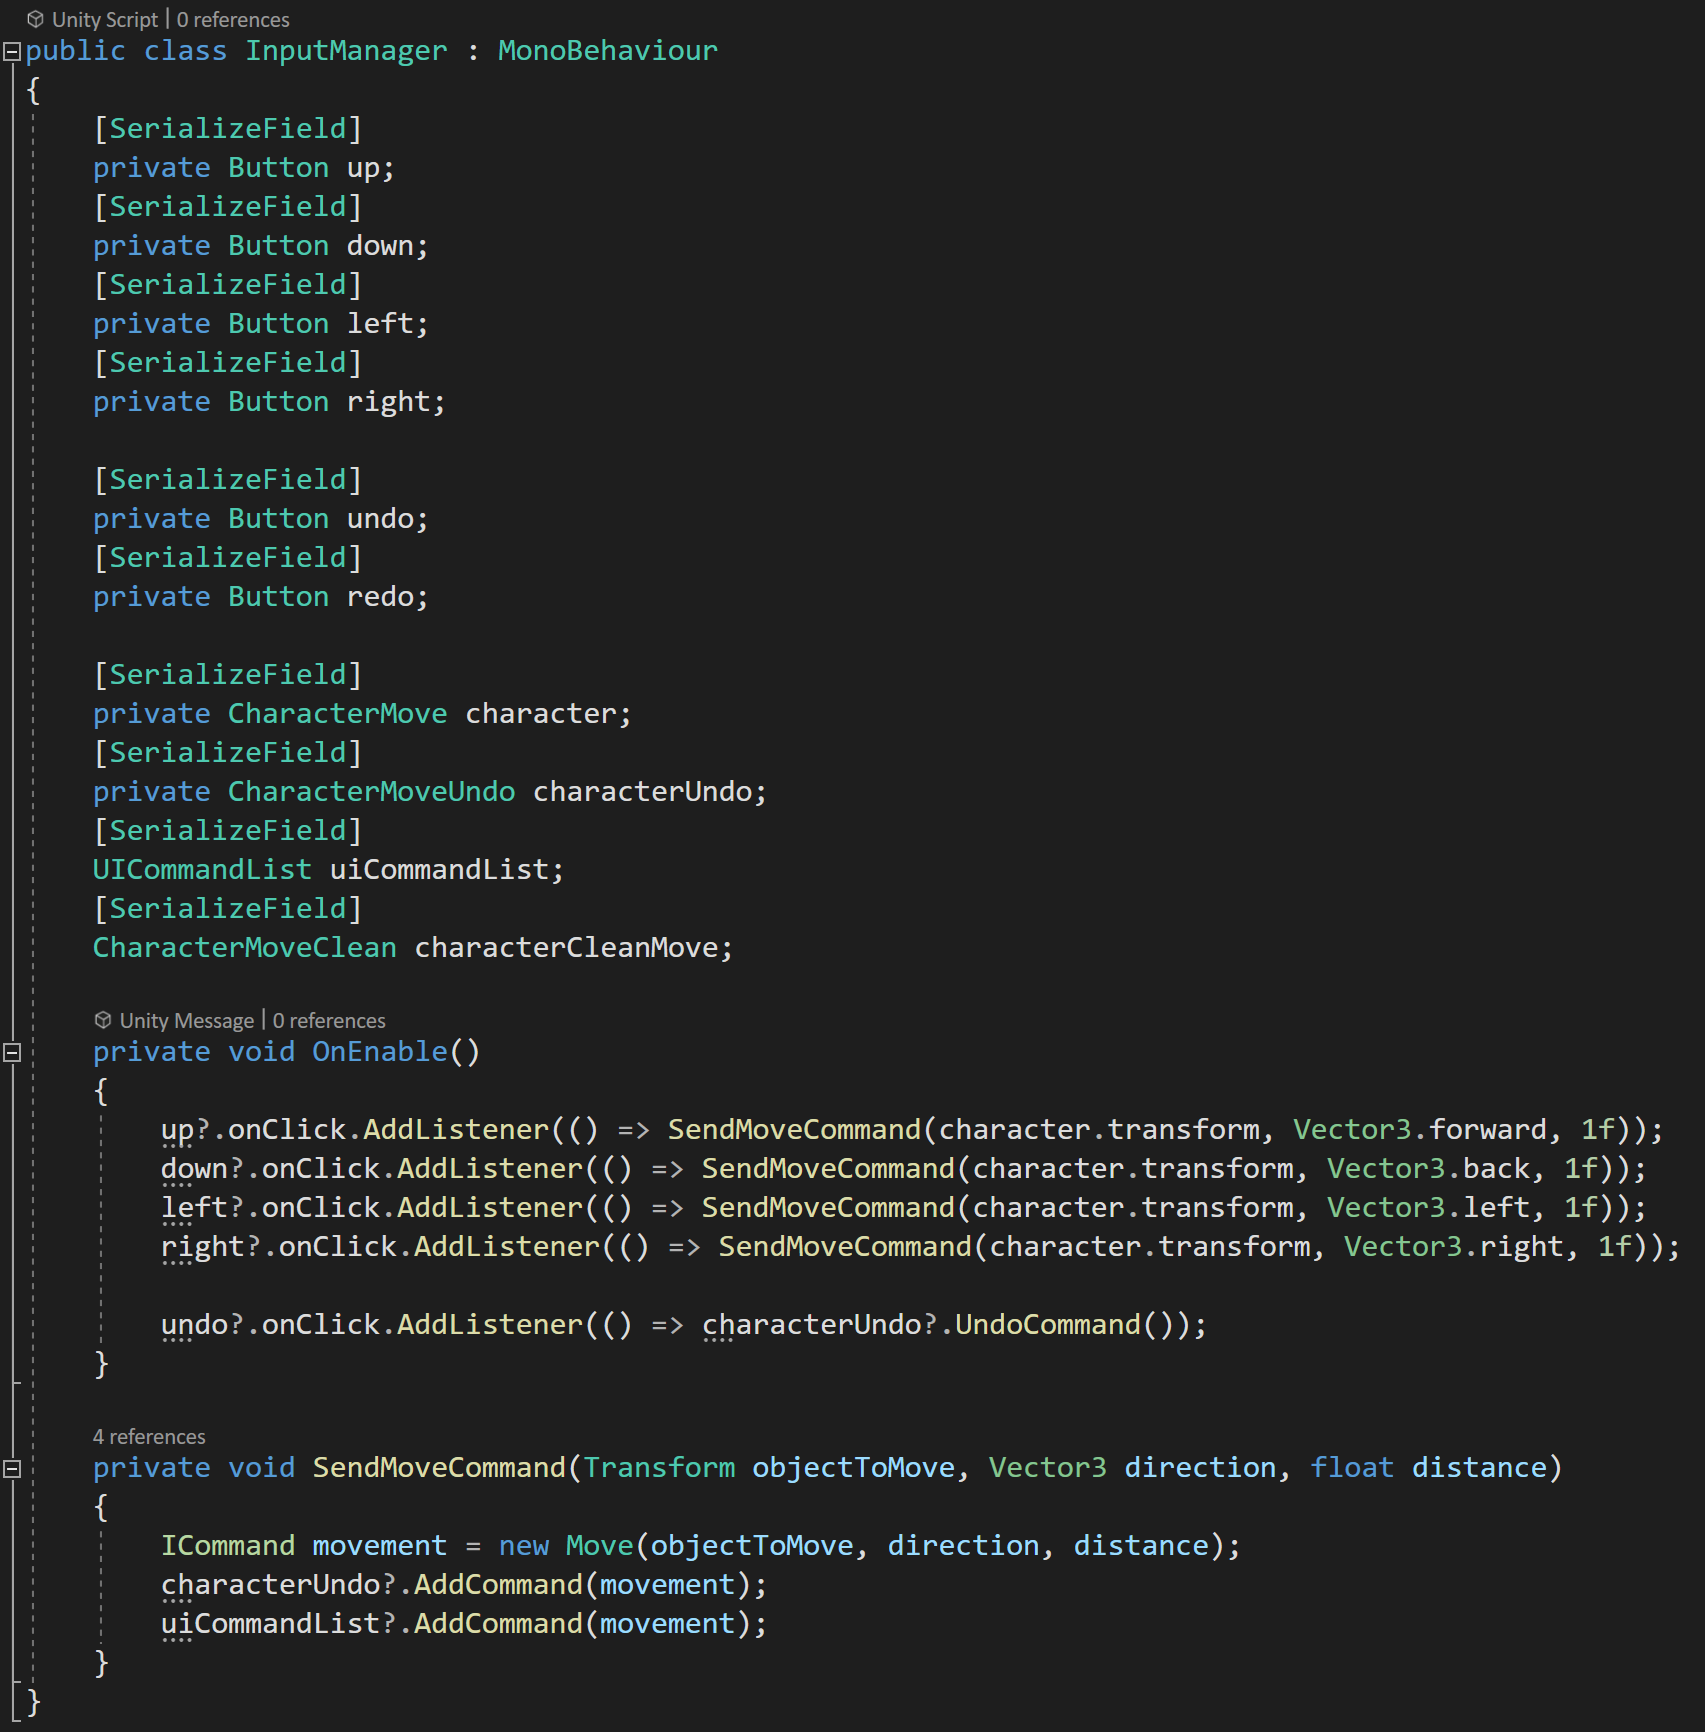
The input manager is functionally the same, but now has an option for an undo button. This new button will call a public “undo” function on the character controller - again not the cleanest implementation and an event would likely be better.
The big difference comes in the character controller script. Here I’ll modify the behavior by now having the player object move in real time as the buttons are pressed. This isn’t necessary for the undo function to work, but I think it makes it easier to demonstrate the undo functionality.
In order for the player object to move in real time, we simply need to execute an incoming command whenever that new command is added.
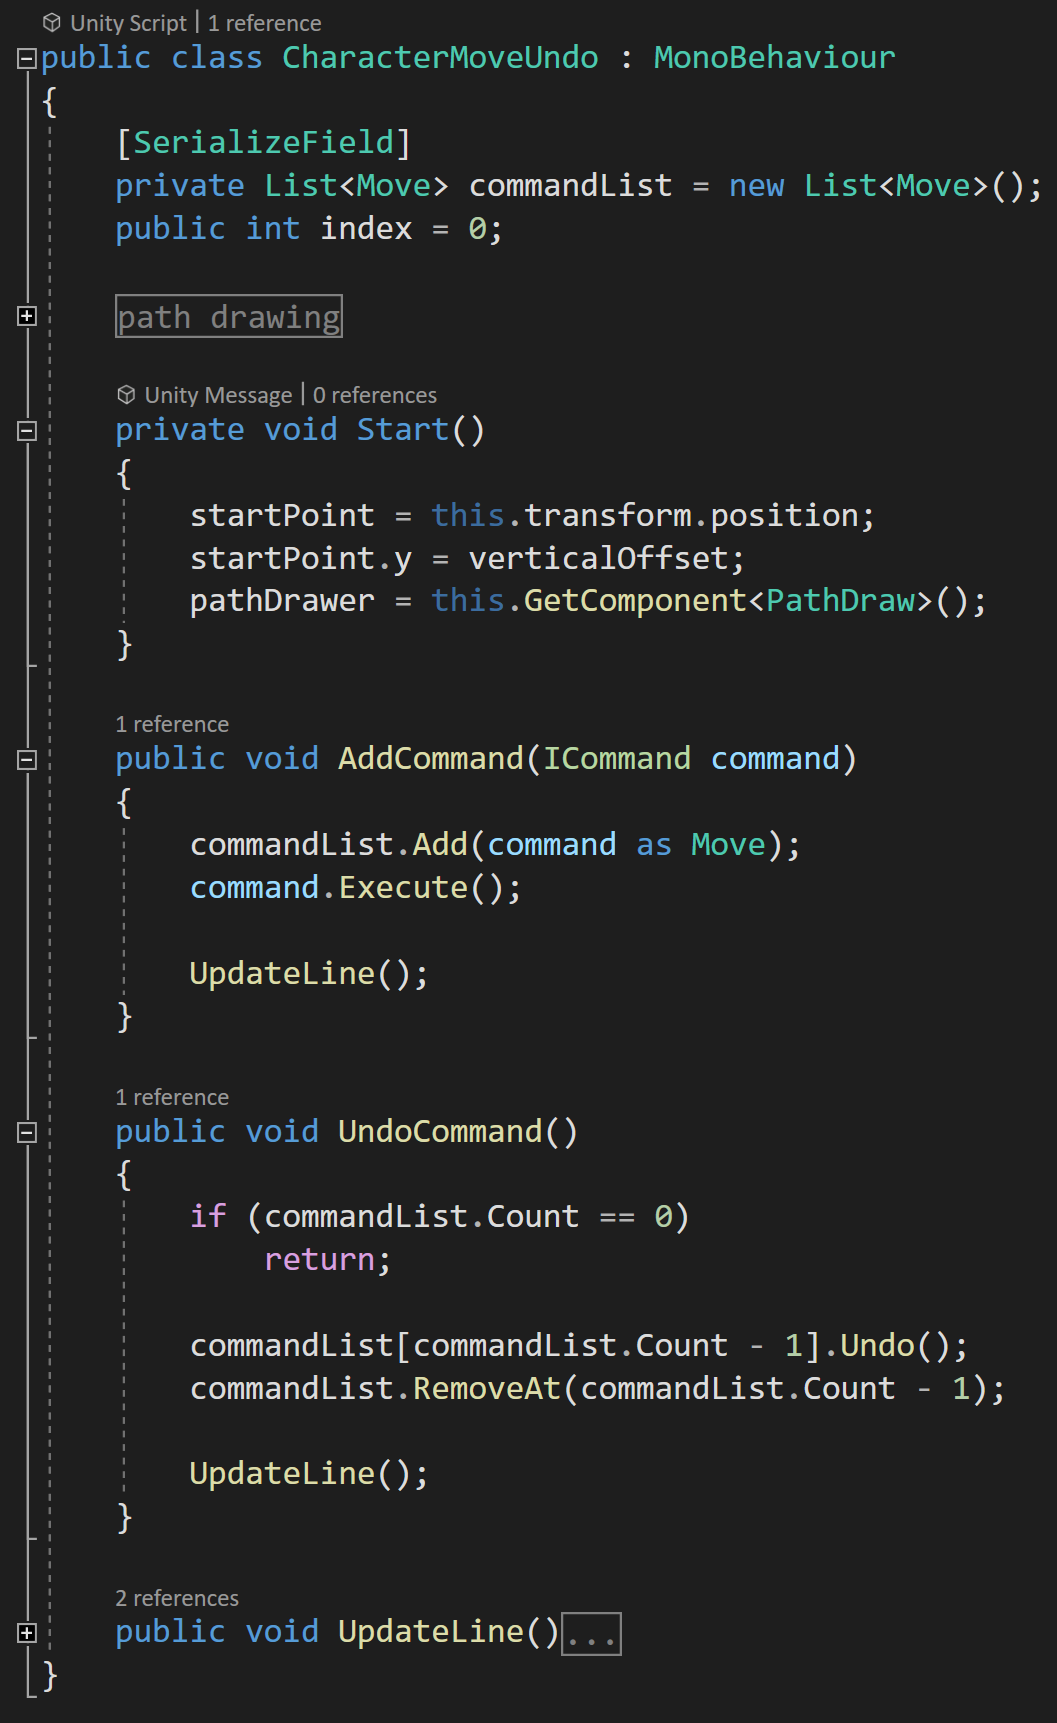
Real time Character Controller with Undo
New to the class is the “undo command” function. This function first checks that there is a command to “undo” by checking the number of commands in the command list, then calls “undo” on the last command in the list and then removes that command from the list.
Tis is super simple! All thanks to the command interface!
When I first saw this I was surprised and even a bit shocked how easy this could be. Now of course if the command is more complex than the move command the writing and testing of the undo function will be more difficult and more time consuming.
BUT!
The interface makes it easy to call that undo function and the inclusion or encapsulation of all the values and references provides a solid framework to create undo functionality.
Redo…
For many games this may be enough, but if you want to also implement a “redo” functionality things are going to get a bit messier - or at least the way I did it. All the changes are made on the character controller. The commands stay the same and the only change to the input manager is to add the redo button and connect it to a redo function on the character controller.

Character with Undo and Redo
For a redo system, we could simply not remove commands from the command list and then execute them again when a redo button is pressed. Essentially just working our way up and down the list of commands...
But! And there is a but.
If some commands are undone and then new commands are added this will cause problems as those new commands would just get added to the end of the command list…
SO!
We need to modify our lists and keep track of which command on the list we currently executing or undoing. So yeah. Sounds simple, and it’s not crazy, but it does get a bit messy.
So the first thing we need to do is add an index variable that can track which command on the list we currently working with.
Each additional command added to the list, the index will increment up one AND with each command undone the index will increment down one. This means we also need to change which command is being undone to correlate with the index and not just the length of the command list.
With that all done we now need to add a few lines to our “add command” function. We need to check and see if our index is at the end of the list - meaning we’ve undone some commands and are now adding a new command.
If it’s not then we need to remove all the commands between our current index and the end of the list by using the “remove range” function.
With this complete, we should be able to add commands, undo some of them and add more commands without screwing anything up. If we were to test this, on the surface we haven’t gained new functionality, but it does mean we can now add a “Redo Command” function.
This function is actually fairly simple, we do some checks to make sure we won’t get a null command or get an out of range error. And then we simply execute the command that correlates to the value of the index.
Once again, the interface with the execute and undo functions makes this surprisingly simple - minus the tracking of the index.
But!
It’s So Ugly!
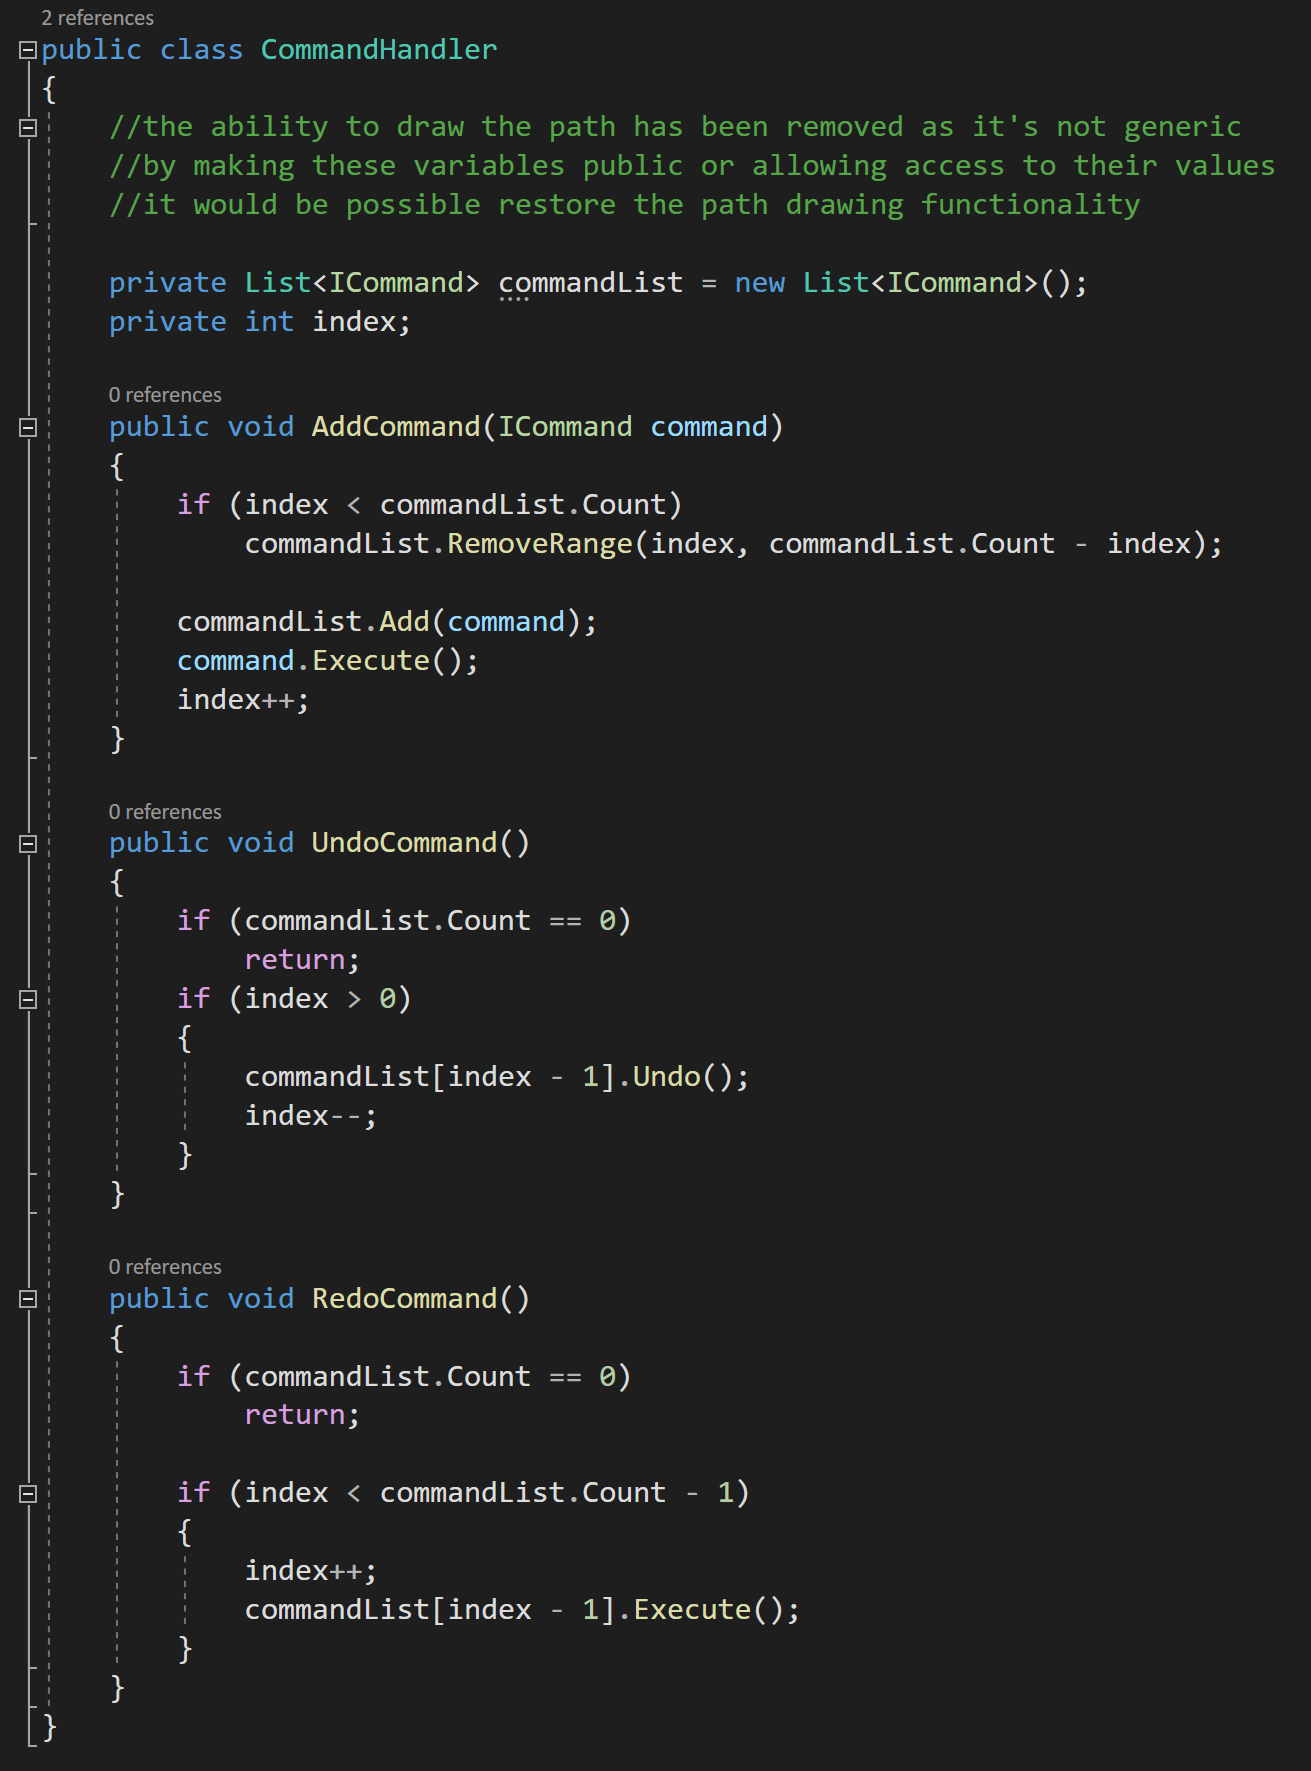
Command Handler Class
There is still some overall ugliness to this solution. I don’t like that this code is in my player controller… The AddCommand, UndoCommand and RedoCommand have NOTHING to do with the player controller they could and should be general and usable with ANY command. This code is generic and should be reusable.
Remember the whole point of the command pattern was to encapsulate the command… so these functions and the list of commands could be just about anywhere.
So is no need for all this code to be in the player controller AND if you were making a game with multiple types of objects that could all receive commands it would be a pain, and more importantly error prone, to repeat this code in multiple classes.
So let’s extract the command code and stick it into a command handler class.

Super Clean!!!
This class contains the list of commands, the index as well as the functions to add, undo and redo commands. Then in the player controller script, we simply need an instance of the command handler class.
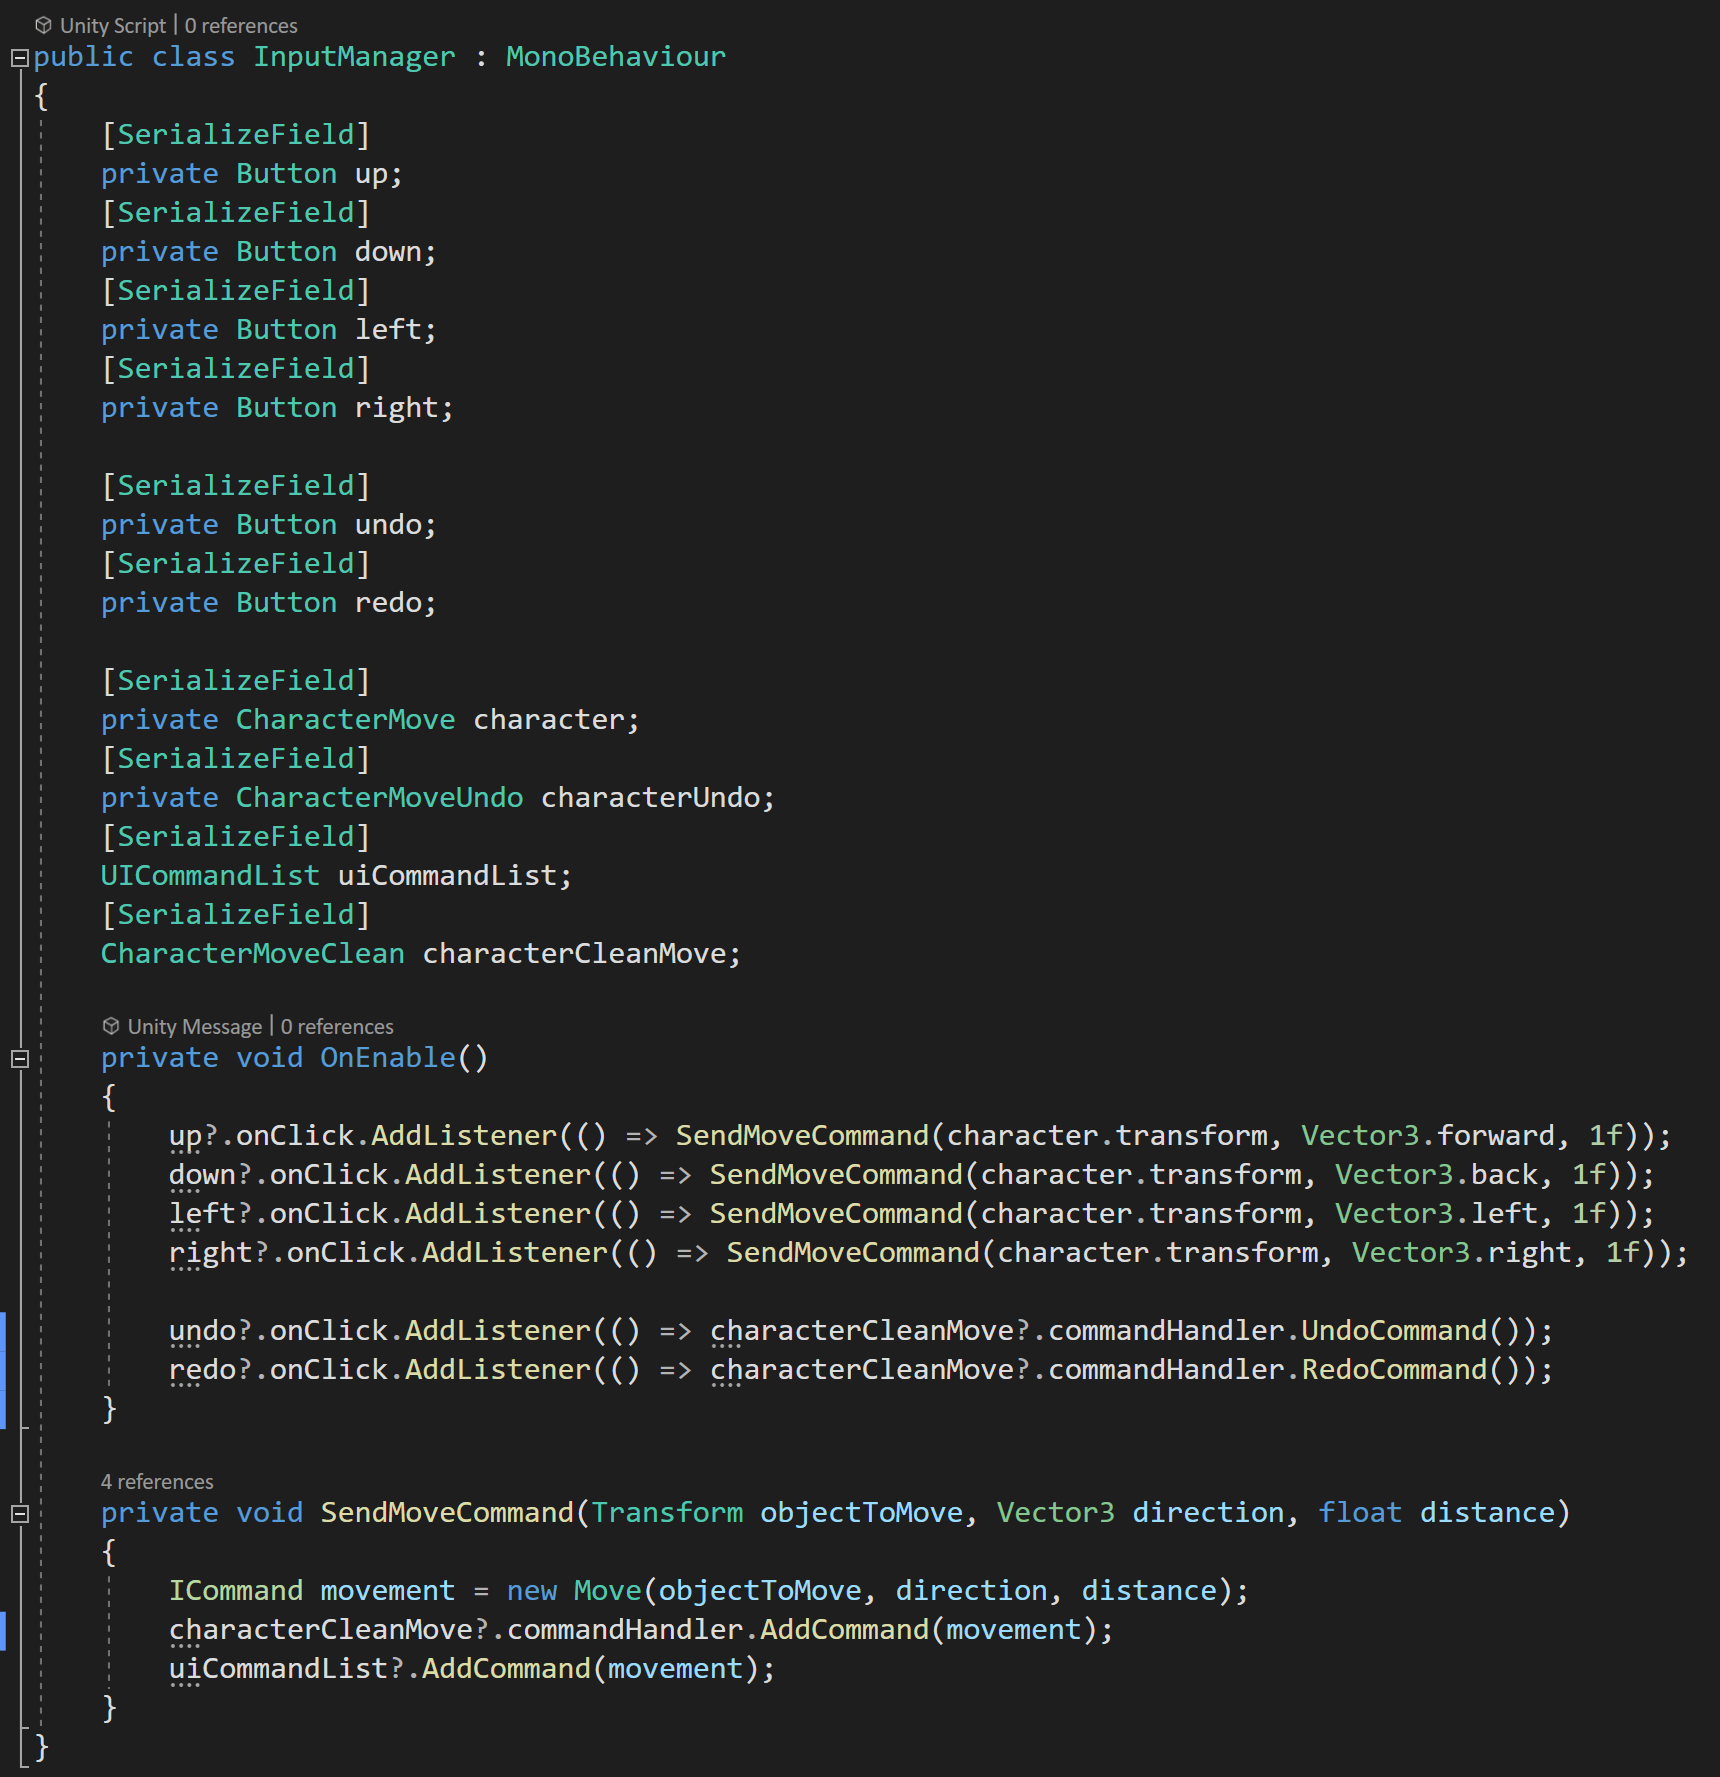
Final Input Manager
The final tweak is to reroute our buttons in the input listener to call functions on the command handler.
If we take a step back, what we have is really clean and surprisingly generic.
Yes, we do have a lot of classes, but that is often a trade off with our programming patterns and I think cleanliness of the implementation more than makes up for the extra classes.
Due note that this implementation does lose our ability to easily draw the path of the player, but with some cleverness, especially if commands are sent with events, this can be gotten around without too much work.
A few last thoughts…
Like many patterns it’s not the exact implementation that is important, but rather the large idea and framework. While I used direct function calls, I think using events i.e. the observer pattern could be more generic and more powerful.
The command pattern may result in commands being created and destroyed with some frequency. Which can create unneeded garbage collection. While not a problem with my simple example, it would be possible to implement an object pooling solution to use with the commands if performance is crucial or if you just want to squeeze out a few more FPS out of your game.
Code
GitHub Link: https://github.com/onewheelstudio/Programming-Patterns