Dev Log
Minute 5 to Minute 10 - Completing the Game Loop
So here I am making another Dev Log post on my project Deep Space Directive and I’ve made a ton of progress! Placeholder art is gone, bugs have been squashed, a tile-based fog of war has been added, a Steam store page is up and running, and so many other small details are getting polished. It’s starting to look and feel like a real game!
With any game project I’ve ever worked on there are successes and challenges. And to be honest one of the things I love most about making games is the creative problem-solving process. The problem-solving space is SO BIG. I love it. There are so many ways to solve a given problem. Some good, some bad, and those rare rainbow unicorn solutions that make everything better.
Which brings me to the topic of this post! I’ve been working to complete the game loop for Deep Space Directive - all with the goal of releasing a demo and starting to get some feedback. I’ve been searching for one of those rare solutions that solves multiple problems and adds to the player experience.
And I think I’ve found it.
But first! Let’s rewind a bit so you know where I started.
Game Loop
The first half of the game loop is working. The player is guided through adding the basic buildings and when that’s done the first wave of enemies spawns. But after that, we start to run into problems. Why should the player continue? And what should they continue to do? They’re kind of left hanging…

Check out that amazing graphic!
I know, this all sounds pretty basic and like things I should have planned out earlier. Maybe I should have but I didn’t and frankly I like letting the design evolve somewhat organically. I had an overall vision and plan for the game, but I knew the details would get challenged once I could play the game and I’d need to tweak, adjust, or scrap ideas altogether in order to make the game fun.
Or at least, this is my current rationalization for not seeing these problems when I was first planning the game.
Taking a Few Steps Back
One of the original design pillars of the game was to allow the player to build and shape the world around them. So I wanted to make the starting landmass small to create a need for the player to expand the terrain. But to build land you need the resources dropped by the enemy and the enemy only spawns at night. Which means you have to wait to kill the enemy and collect the resources.
You might see where I’m going with this… It adds up to a slow start to the game. Which isn’t a great way to engage new players! So, I came up with a few solutions.
Option 1: Increase the drop rate of the land-building resource.
Option 2: Spawn more enemies.
Option 3: Give the player more to do by making more buildings available at the start of the game.
Any of these solutions solve the problem now but would cause a bigger design problem down the road.
Increasing the drop rate makes for resource inflation. Enemy waves will get substantially bigger and the amount of land-building resources will scale with those larger waves. Spawning more enemies does the exact same thing. Making more buildings available at the beginning of the game takes a lot of development time and reduces the amount the player gets to earn or unlock later in the game.
This is why I was stuck. I had three options. None of them solved the problem in a good way.
More Problems
Which brings up yet another problem that I’ve been trying to solve. With a small initial starting landmass, it's easy to put buildings in the "wrong" place and block the "correct" placement of other buildings.
Putting solar panels near water seems like a perfectly reasonable thing to do! But then it comes time to place the water pump which MUST be placed next to water. With limited waterfront real estate it’s really easy to run out of building locations.
I don’t want to hold the player’s hand too much, but this kind of mistake early on would be more than frustrating and a really good reason to quit and try a different game.

It looks Nice, but where does the water pump get built?
Maybe this all sounds bad like a failed project, but these issues are so central to the game being fun, to me it seems reasonable to spend a lot of time trying to solve these problems. Again, despite what might appear as complaining, what I see is a challenge and problem to solve! And I love that!
Moving Forward
When I get stuck or am hyper-focused on a particular problem, I’ve learned to take a step back, get a different perspective, and ask myself a few questions.
What is the real problem? What is it that I’m actually trying to achieve? Is there a bigger overarching problem, that if solved would solve this problem too?
In this case, what I want is for the player to continue to build their base with their current level of tech. But there's no space to build. Not to mention that the player doesn’t have any motivation to continue building. Nothing is asking for more food or more metal ore. Things are good. So why would the player do anything?
When it comes to solving problems, I’m a pretty firm believer that more isn’t better. More tech. More content. More code. Those things don’t necessarily make for a better game. Better is better.
I’ve also often found that multiple problems can often be solved by a single good choice or design decision. And it’s that rare unicorn solution that I’m so determined to find!
Solving Initial Building Placement
Of course, as always, there’s more than one solution to any given problem. My first thought to solve the building placement was to add in some helper system for the player to show where they should or shouldn’t put the building - some nice visual overlay as the player is adding buildings. This could add some polish and solve one of the problems, but It doesn’t solve the larger pacing problem of what the player should do after the first wave of enemies.
This solution also feels like feature creep… One more manager. One more system to create, debug, and maintain. It sets off internal mental warnings that I’m trying to solve a problem by doing more not being better.
And! Real the issue is less about the player knowing exactly where to put the buildings and more about the player easily blocking the few positions near resources early in the game.
Realizing this was a breakthrough.
So! Why not surround the water and metal ore with buildable grass tiles? When this dawned on me I couldn’t believe how simple it was. Both in terms of the idea itself and the implementation. A couple of lines of code to create a new coroutine and it works!
Problem solved! I love it when this happens.


Once again, simple beats complex! Not only can the player not realistically screw up the placement of the first few buildings - they now have more land and more area to expand and build. This also turns out to be a partial solution to the problem that started this whole post - completing the game loop.
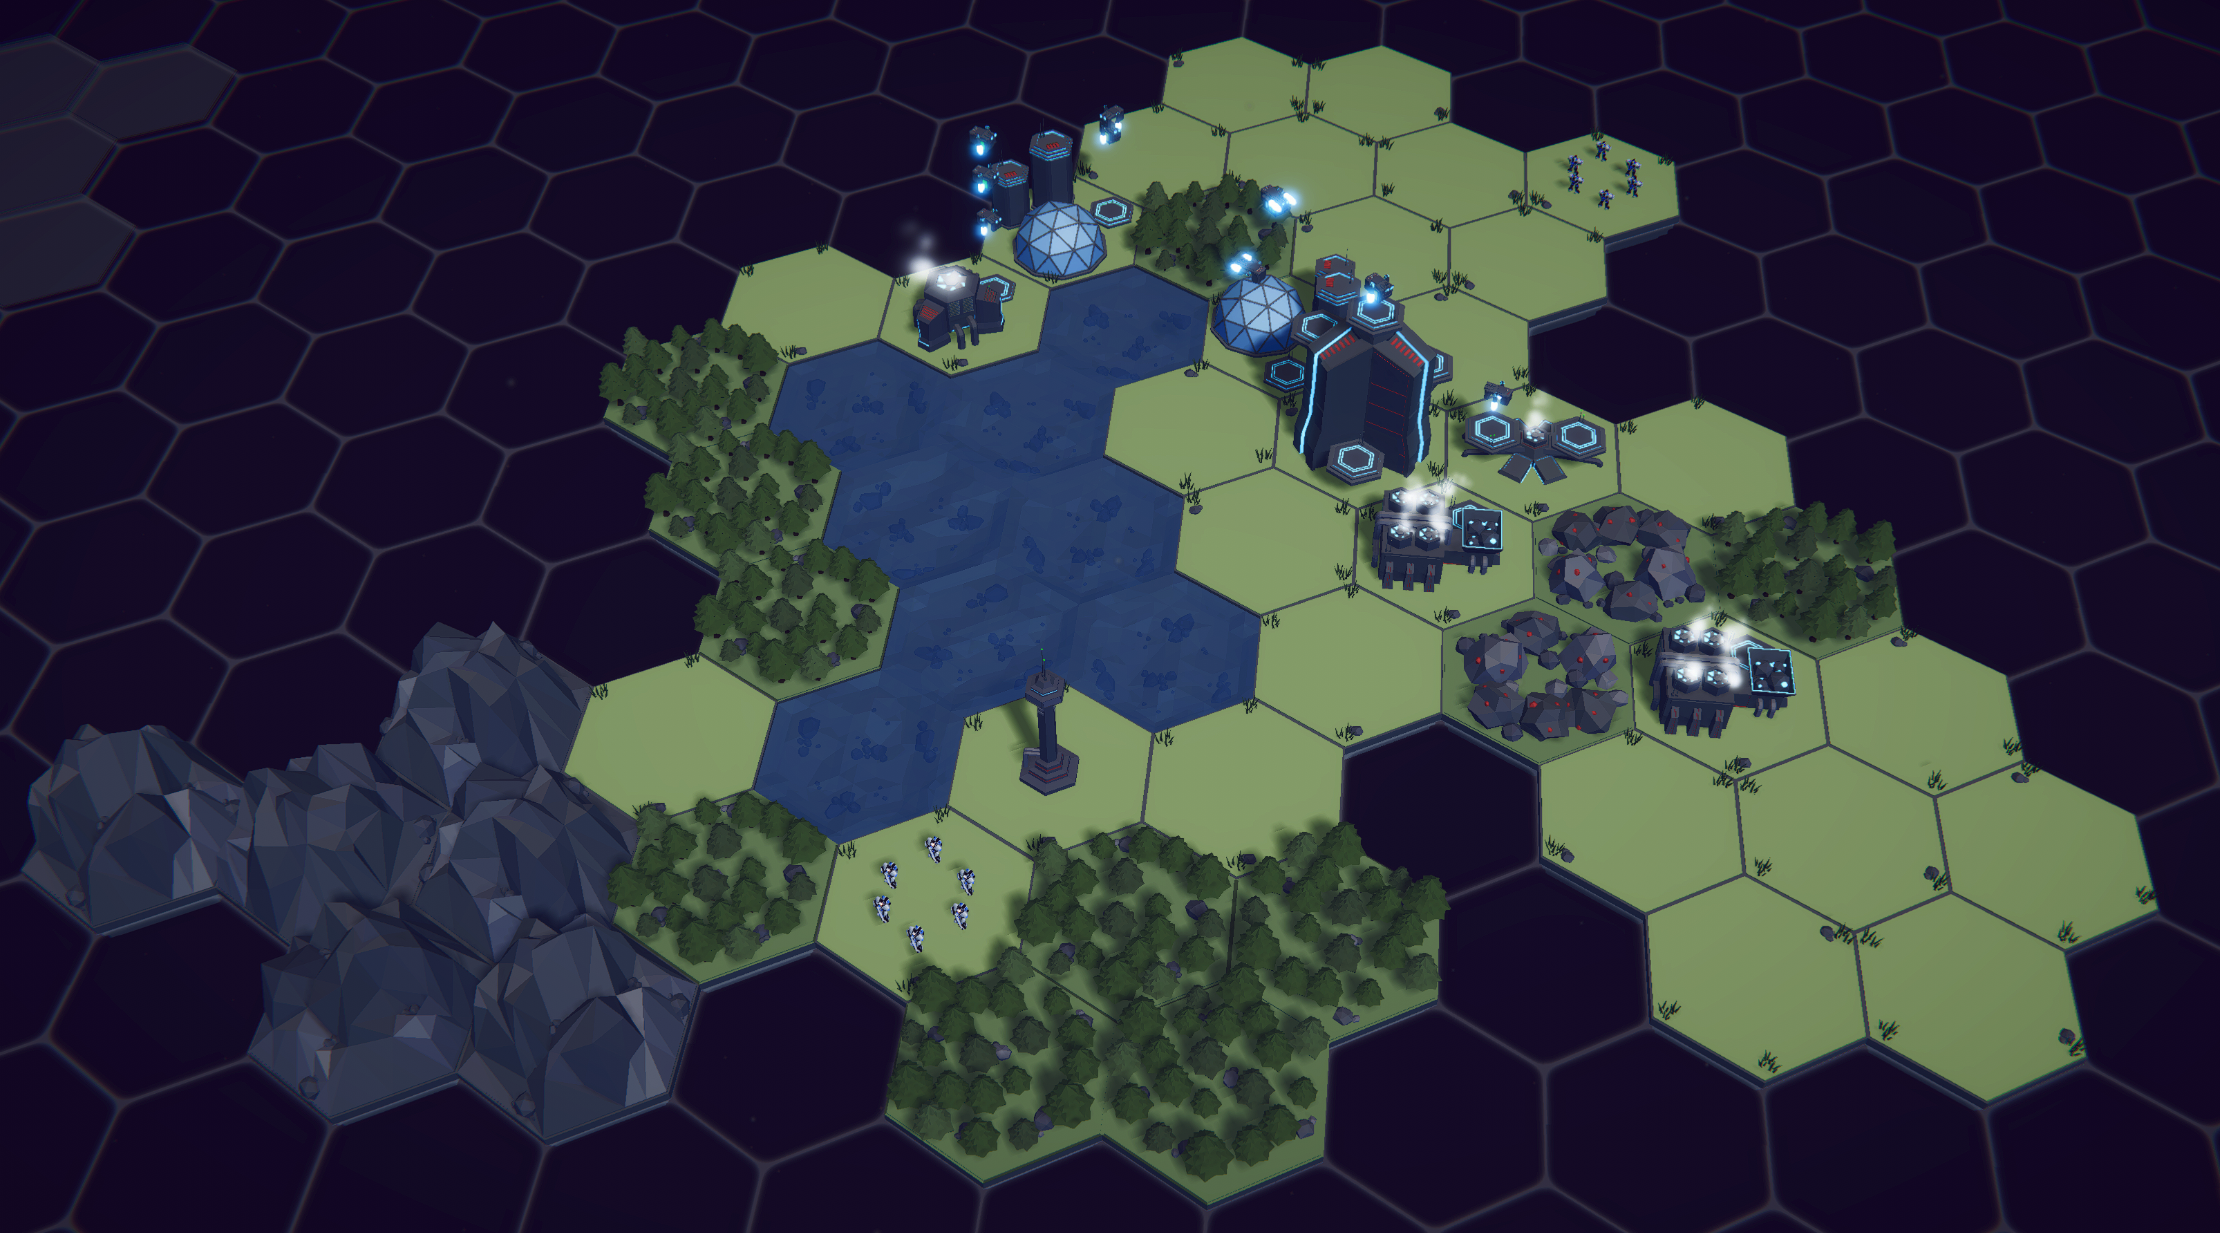
Look at all that lake front real estate!
This small amount of added land means there is now room to expand after that first wave of enemies. There’s room for more mines, more water pumps more everything. I love simple solutions like this. This is exactly what I was looking for!
Still, Need to Complete the Game Loop
Alright, the player now has space to expand and build, but why? Why would they do that? The game loop still isn’t complete. There needs to be something more. Something for the player to accomplish.
The main goal or directive (see what I did there!) of the game is to explore and exploit the resources of a given world and ship those resources off-world. So it totally makes sense that this is how I complete the game loop.
In game design terms, we need a resource “sink.” This creates a demand for resources and consumes those resources. Now, at a cynical level, this is just a fancy fetch quest, which is frankly what a lot of base-building games are - albeit pretty elaborate fetch quests.
So! I give you the final piece of the game loop… The supply ship!
Precious resources will be collected and shipped off-world to make your corporate overlords happy or maybe to support a global war effort - I still need to fine-tune the theming. I’m definitely leaning toward the corporate idea.
Maybe this all sounds obvious. But it feels so good to have the loop complete. It’s a massive step forward in being able to release a demo.
What’s Next?
Well, what gets shipped off-world needs to be more than just a counter or slider that appears on the screen and slowly increments toward completion. I want it to be meaningful to the player and to do that there needs to be some type of reward connected to completing the directive.
And this is what I’m currently working on. It might be as simple as choosing directives (and rewards) from a list or it might get integrated into a tech-tree-like approach. I’m not sure what will feel best as a player. I might also use one solution for the demo and another for the full game… We’ll just have to wait and see what happens.
Visual Debugging with Gizmos
We’re going to keep this post short and sweet, cause that’s what I do here…
A few weeks ago, or maybe months ago, I rediscovered Unity’s gizmos as a fantastic visual debugging tool. It might be a little bit of a niche use case for some, but when you need gizmos they can be super useful.
Now there’s a ton that you can do with gizmos (and handles) in making custom tools. I’m not going there. For this post, we’re keeping it simple and using Gizmos just for debugging and visualizations with the big goal of adding one more easy-to-use tool to your toolbox.
Simple Example
Let’s look at a simple example. Someone on my Discord was creating a power-up for their 2D platformer. When the power-up was collected or used the player would do a zigzag jump upward. The path of the jump was to be predetermined by the position of some empty children objects. Using empty children objects is easy, but often all we really need is a Vector3 position. The empty child is just a stand-in that can be easily moved and visualized in the sceneview.
But! In the case of the zigzag jump, gizmos could remove the need for those empty objects cleaning up the hierarchy while still providing a visualization of those positions. So let’s take a look at how that would work.

First, we need to create a list of Vector3’s - these will be positions relative to the player. Then we need to add the function OnDrawGizmos(). In the function we can check if the list is empty if it’s not then we can draw our gizmos.
To start drawing, we first need to set a color for the gizmos.

Side note: It’s important here to know that you are setting the color for all the gizmos that will be drawn after setting the color or until the color is set to a different value. You are not setting the color for a particular gizmo. It’s a bit different than other Unity objects, but it’s pretty easy all the same.
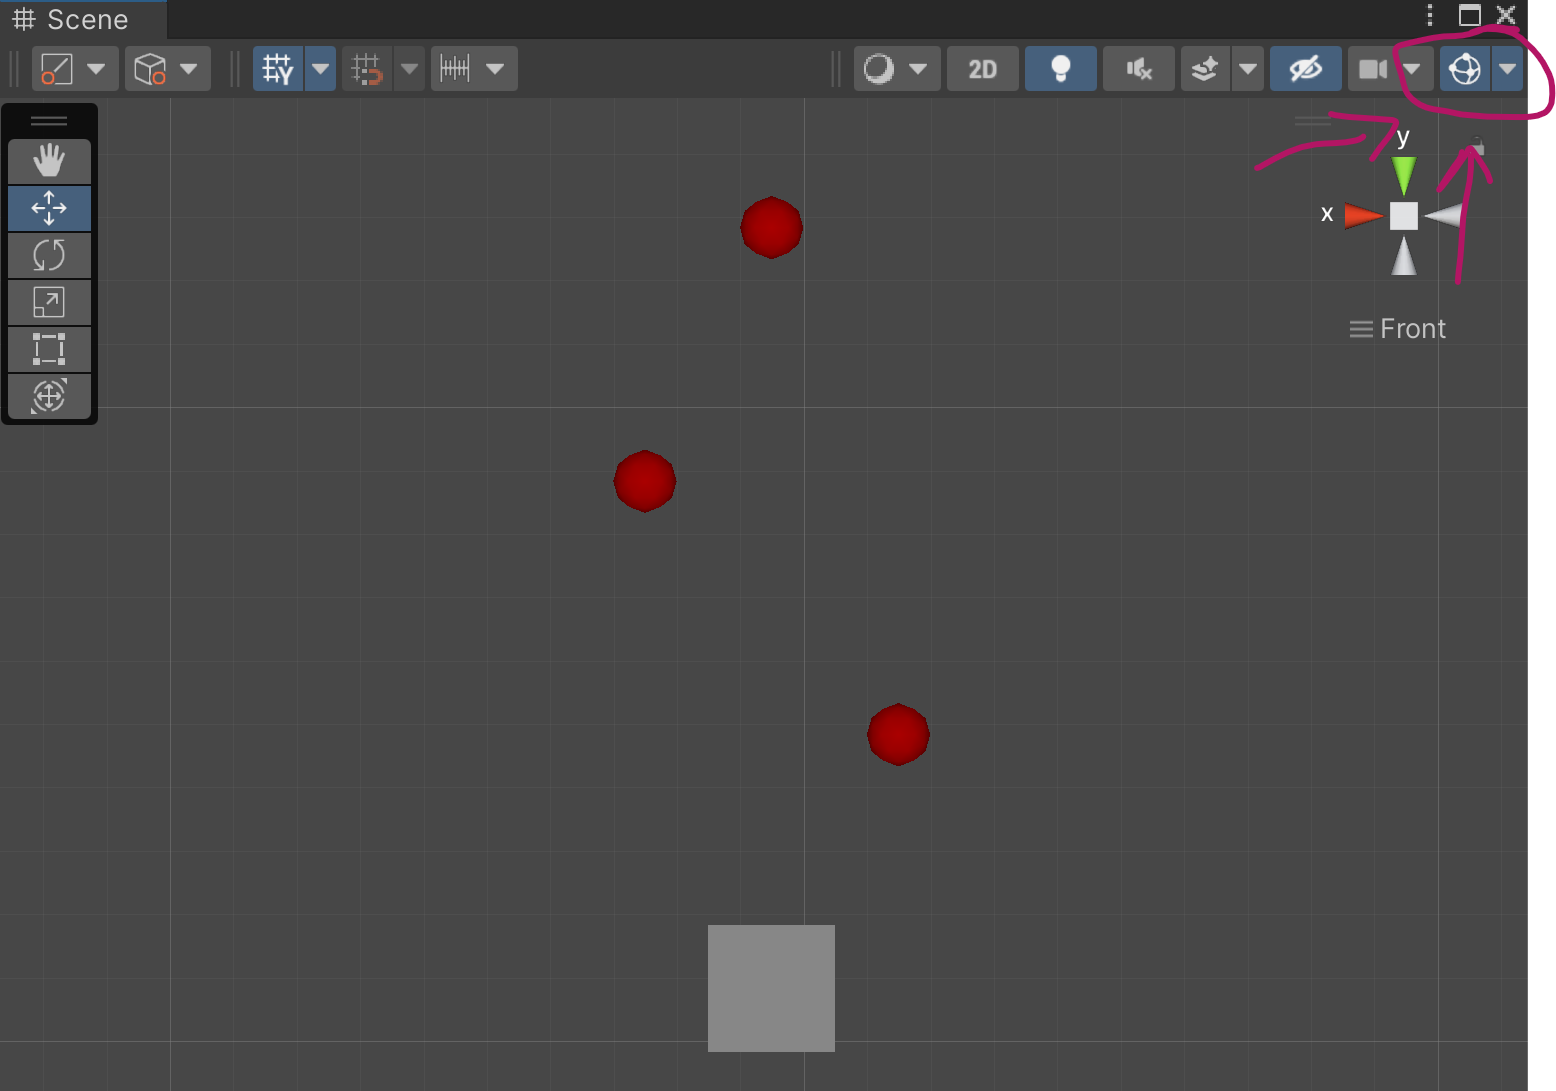
Make sure the Show gizmos button is toggled on
With the color set we can then iterate through the points in our list and call Gizmo.DrawSphere(). This function takes in a position, which is in world space, as well as the radius of the sphere to be drawn.
And that’s it.
If we jump back into Unity, making sure the component is added to an object, we can then set values in our list and the gizmos will be drawn in realtime as we adjust the Vector3 values.
If you’re not seeing the gizmos make sure you are looking at the scene view, gizmos will not be drawn in the game view, and that the “show gizmos” button is toggled on.
Adding Lines

Okay, let’s take a it a step further. Let’s imagine you want to now want to add a line to the path to make an even better visualization. Which could have the added bonus of making sure you points are in the correct order!
Now we could definitely do this all in one for loop, but for the sake of clarity I’m going to add a second loop.
However, before the start of the second loop, I’m going to change the color of the gizmos to blue.

In our case, we need a bit of special handling as we don’t have a starting point in the list. So if the index is zero, we’re going to draw the line from “this” object to the first point. If the index isn’t zero, we’ll draw from the previous point to the current point.
Once again, noting that our points are in local space and we are drawing in world space so we have to add the position of “this” object to each point.
Quick style comment, if you don’t like the lines showing through the spheres or in reality being drawn on top of the spheres, you can move the line drawing code above the sphere drawing code - this will cause the lines to get drawn first making things look a bit nicer.
Drawing When Selected

If you’d like your gizmos to only be drawn when the object is selected you can put all of your code into OnDrawGizmosSelected() instead of OnDrawGizmos().
Or, if you want to get wild and crazy you could put the line drawing code in OnDrawGizmosSelected() and leave the sphere drawing code in OnDrawGizmos().
Options. You’ve ‘em.
More Things to Draw
There are several more types of gizmos that can be drawn such as rays, icons, wire spheres, and all kinds of other good stuff. Check out the Unity documentation for more details. Each gizmo has its own use, but the big-picture functionality is largely the same. Add one of the DrawGizmo functions, set the color, and then draw your gizmo with whatever logic you might need.
Personally, I’ve found gizmos immensely useful with data generated at runtime. If you look, you’ll find gizmos used in all kinds of 3rd party assets or tools to help debug or find the correct settings for a particular use case.
Easy Mode - Unity's New Input System
I’ve seen a few comments in my videos about Unity’s “new” input system that the system is just harder to use than the old input system. This is largely true based on how my channel and lots of other channels have presented the system.
But there’s an Easy Mode that rarely get talked about. Easy mode loses some of the power and flexibility of the new input system, but it claws back almost all of the ease of use of the old input system. So if you’re prototyping or if you are okay with hardcoding your input then easy mode presents a quick and easy way to get player input working all with the new input system. It even brings some advantages over the old input system when it comes to gamepad support.
Easy Mode

Keyboard inputs
My preferred method with the new input system is to generate a C# class and use C# events. There are lots of advantages to this, but it can take some time to set up and it can fluff up your code by subscribing, unsubscribing, and responding to those events. And I think developers wanting to avoid that workflow is pretty reasonable if you’re just trying to quickly prototype something or your project is simple.
So! Easy Mode!
Keyboard
In an update function, we can do the same kinds of things that we could with the old input system. Like what’s shown to the right to get input from the keyboard.
This code has the same functionality as GetKey, GetKeyDown, and GetKeyUp, but instead, we are using isPressed, wasPressedThisFrame, and wasReleasedThisFrame.
Hopefully, it goes without saying, but this works with any key on the keyboard you just change the key that’s being queried. If you can’t find the exact key, make use of autocomplete. It’s definitely your friend.

Mouse button inputs
Mouse
We can do similar things with the mouse and recreate the functionality of GetMouseButton, GetMouseButtonDown, and GetMouseButtonUp.
Pretty easy.
So, what about reading the position of the mouse? Not an issue. This can be really handy for scrolling a map when players mouse over to an edge of the screen OR when you need to raycast from the camera through the mouse to detect where in the scene a player may be pointing or clicking.
How about the scroll wheel? Again, no problem, just read the value and you get back a vector2 just like with the old system.

REading the mouse positon
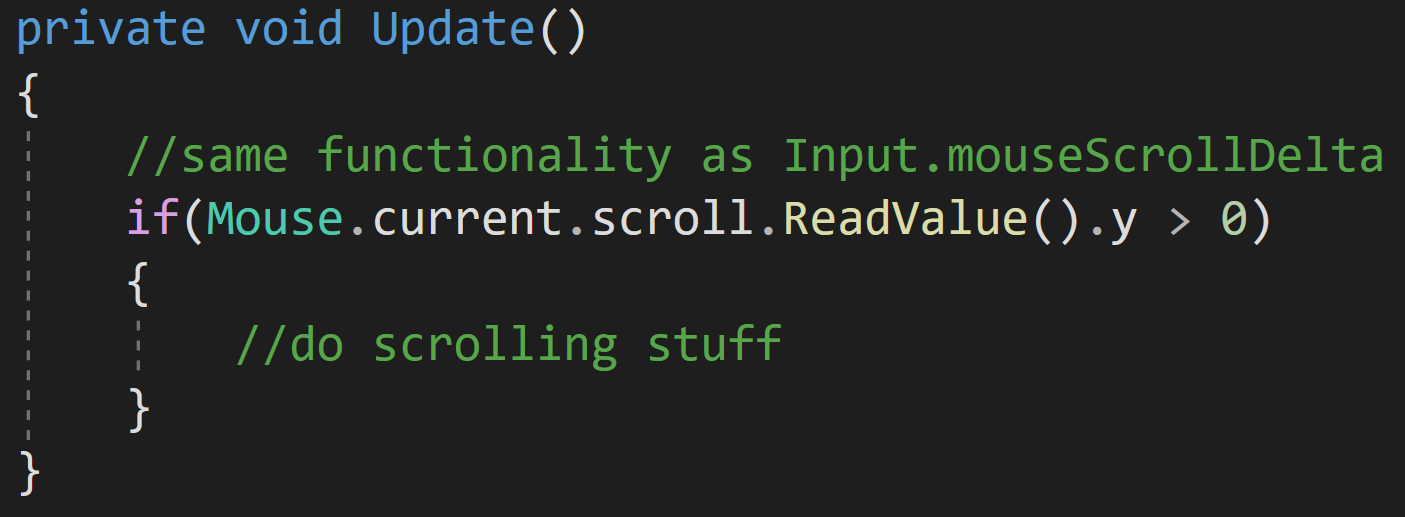
Reading the Mouse Scroll Wheel
Gamepads
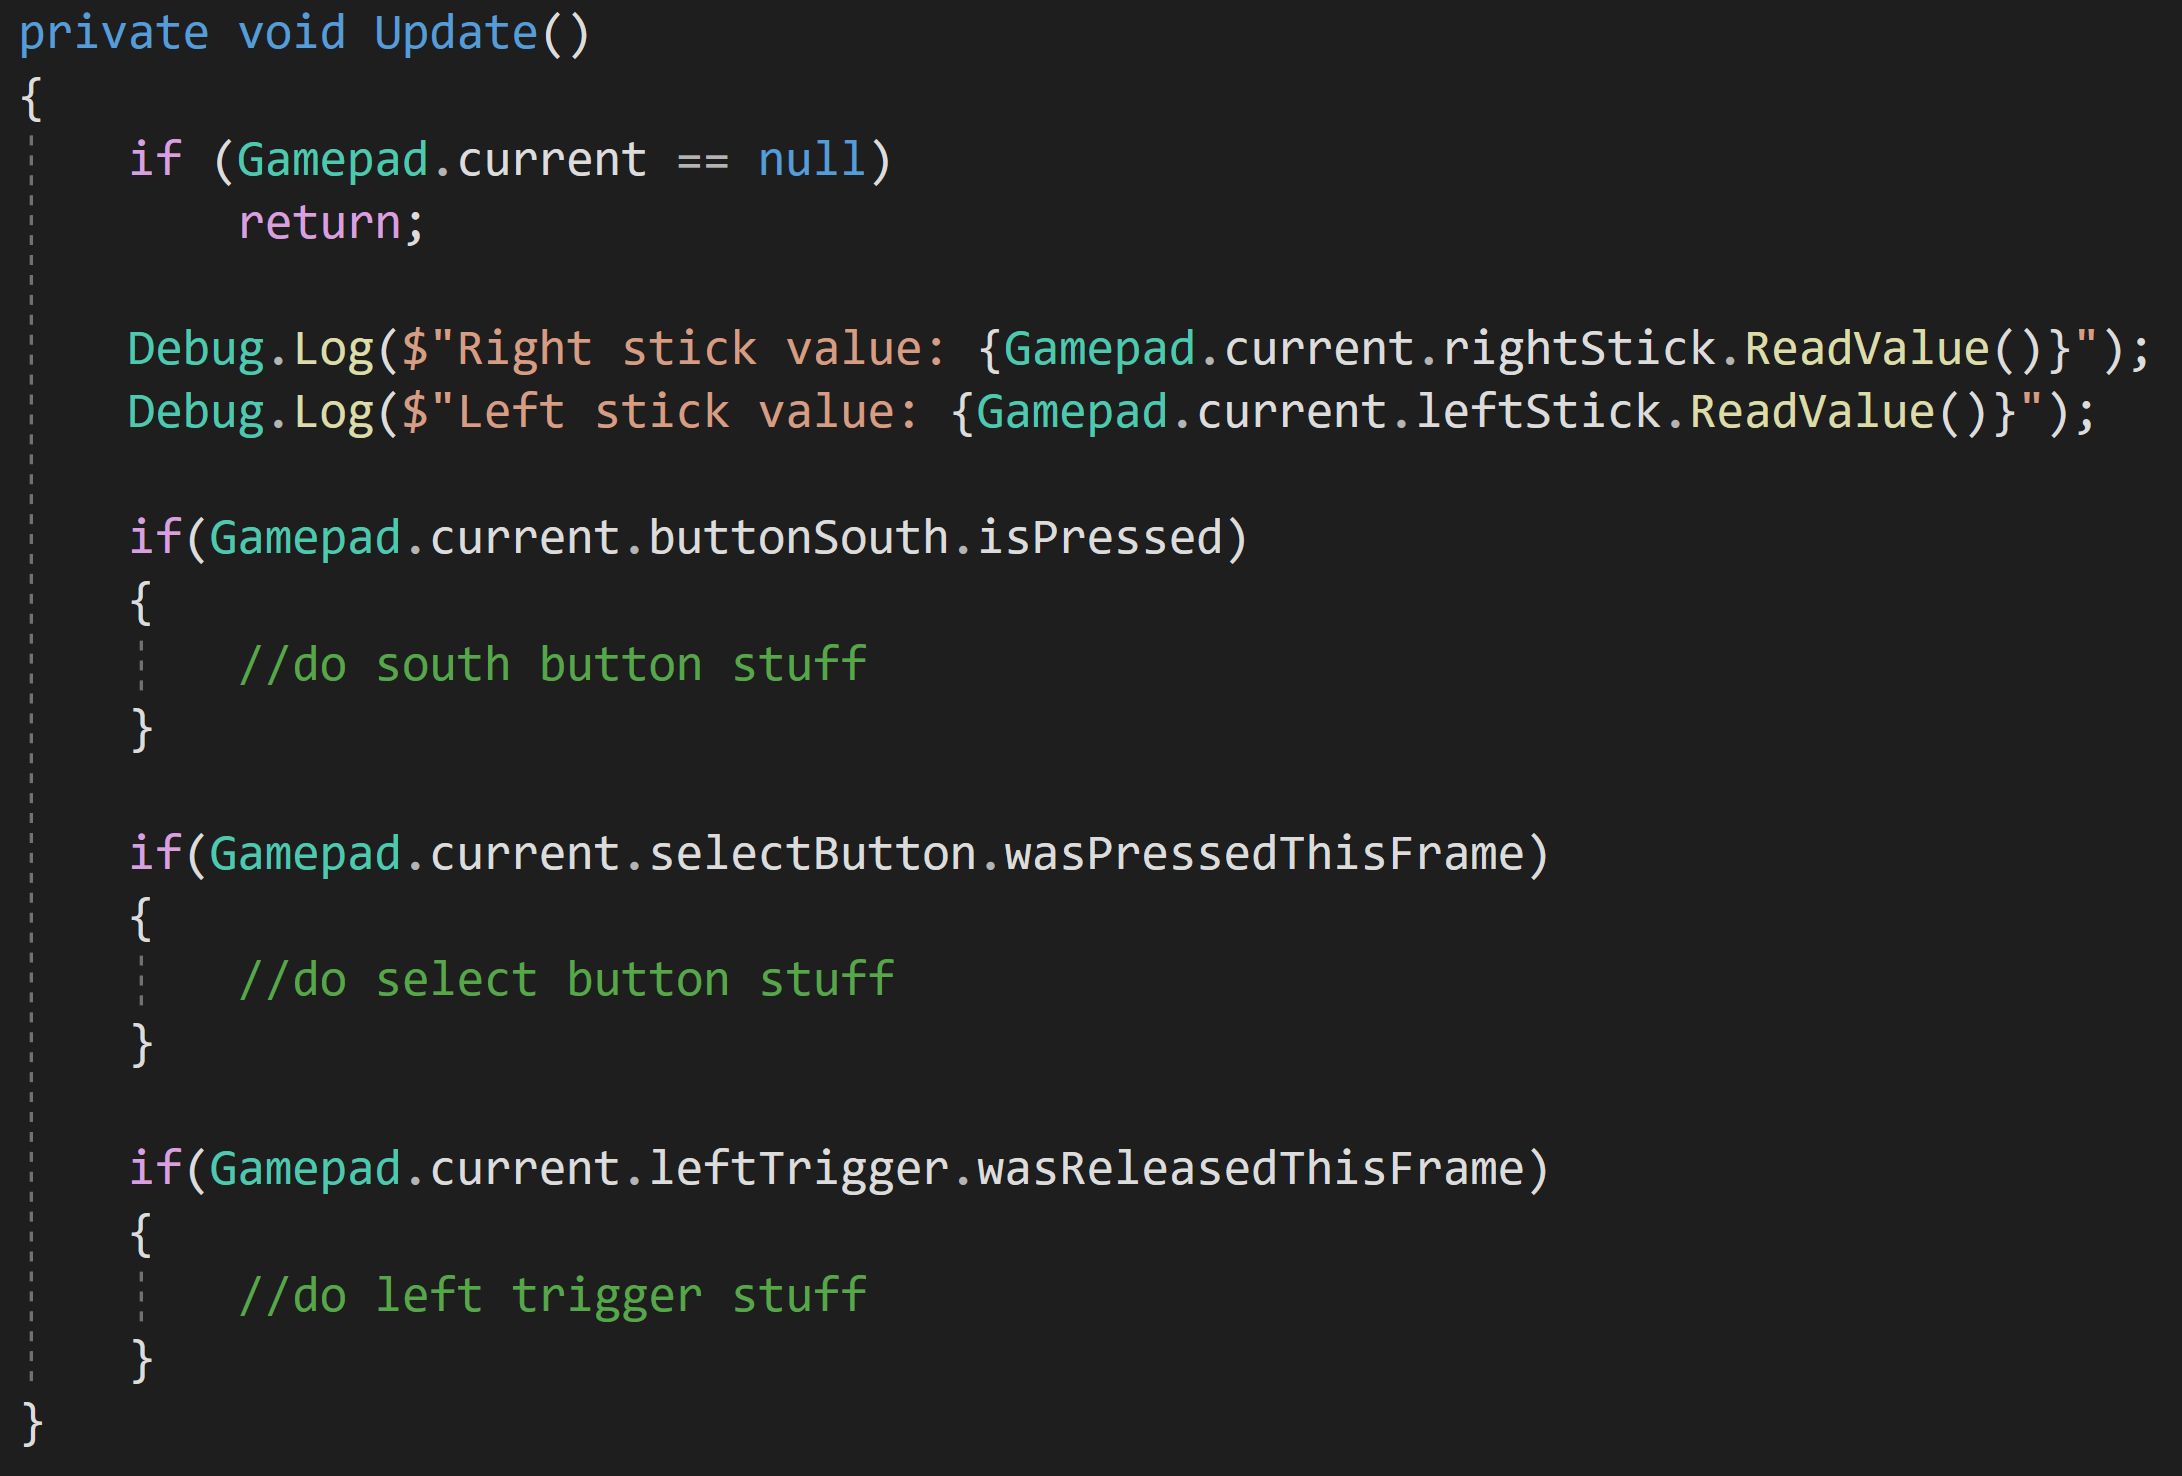
Is there an easy mode with gamepads? Yep, and it works pretty much the same as the keyboard and mouse. We can read the left and right sticks, all of the buttons, as well as the shoulders and triggers.
This is also where we see the first big advantage of easy mode over the old input system. We’re not having to muck about in the old input manager defining this and that and filling our code with string references to axes and buttons. It just works.
One note of caution, it’s quite possible that a gamepad is not connected (as opposed to a keyboard or mouse). So checking if the current gamepad is null before reading values can help prevent errors in the console.
Conclusion
Easy mode is awesome. Especially for gamepads where it truly makes for easier functionality than with the old input system. And because it is the NEW input system a wide range of gamepads should be supported out of the box with zero extra effort.
But you are leaving some functionality on the table with easy mode. Most notably in my mind, you don’t easily have support for multiple gamepads. Plus if you are creating equal functionality for keyboards and gamepads you’ll likely have some duplicate and rather ugly code all sitting in the middle of an update function. But if you are just quickly prototyping or working on a truly simple project that may be a worthwhile trade-off.
Older Posts
-
January 2026
- Jan 27, 2026 Save and Load Framework Jan 27, 2026
-
April 2024
- Apr 10, 2024 Ready for Steam Next Fest? - Polishing a Steam Page Apr 10, 2024
- Apr 1, 2024 Splitting Vertices - Hard Edges for Low Poly Procedural Generation Apr 1, 2024
-
November 2023
- Nov 18, 2023 Minute 5 to Minute 10 - Completing the Game Loop Nov 18, 2023
-
September 2023
- Sep 13, 2023 Visual Debugging with Gizmos Sep 13, 2023
-
July 2023
- Jul 4, 2023 Easy Mode - Unity's New Input System Jul 4, 2023
-
May 2023
- May 19, 2023 Level Builder - From Pixels to Playable Level May 19, 2023
-
April 2023
- Apr 11, 2023 Input Action in the Inspector - New Input System Apr 11, 2023
-
February 2023
- Feb 26, 2023 Tutorial Hell - Why You're There. How to Get Out. Feb 26, 2023
-
December 2022
- Dec 31, 2022 Upgrade System (Stats Part 2) Dec 31, 2022
-
November 2022
- Nov 10, 2022 Stats in Unity - The Way I Do it Nov 10, 2022
- Nov 5, 2022 State of UI in Unity - UI Toolkit Nov 5, 2022
-
August 2022
- Aug 17, 2022 Knowing When A Coroutine Finishes Aug 17, 2022
-
April 2022
- Apr 23, 2022 Unity Input Event Handlers - Or Adding Juice the Easy Way Apr 23, 2022
-
March 2022
- Mar 15, 2022 *Quitting a Job I Love Mar 15, 2022
-
February 2022
- Feb 8, 2022 Split Screen: New Input System & Cinemachine Feb 8, 2022
-
January 2022
- Jan 24, 2022 (Better) Object Pooling Jan 24, 2022
- Jan 19, 2022 Designing a New Game - My Process Jan 19, 2022
- Jan 16, 2022 Strategy Game Camera: Unity's New Input System Jan 16, 2022
-
December 2021
- Dec 16, 2021 Raycasting - It's mighty useful Dec 16, 2021
-
November 2021
- Nov 22, 2021 Cinemachine. If you’re not. You should. Nov 22, 2021
-
August 2021
- Aug 3, 2021 C# Extension Methods Aug 3, 2021
-
June 2021
- Jun 27, 2021 Changing Action Maps with Unity's "New" Input System Jun 27, 2021
-
May 2021
- May 28, 2021 Unity's New Input System May 28, 2021
- May 8, 2021 Bolt vs. C# - Thoughts with a dash of rant May 8, 2021
-
March 2021
- Mar 10, 2021 Coroutines - Unity & C# Mar 10, 2021
-
January 2021
- Jan 14, 2021 Where's My Lunch? - January Devlog Update Jan 14, 2021
-
December 2020
- Dec 27, 2020 C# Generics and Unity Dec 27, 2020
- Dec 7, 2020 Steam Workshop with Unity and Facepunch Steamworks Dec 7, 2020
-
November 2020
- Nov 27, 2020 Simple Level Save and Load System (Unity Editor) Nov 27, 2020
- Nov 9, 2020 Command Pattern - Encapsulation, Undo and Redo Nov 9, 2020
-
October 2020
- Oct 28, 2020 GJTS - Adding Steamworks API and Uploading Oct 28, 2020
- Oct 9, 2020 Game Jam... Now What? Oct 9, 2020
-
August 2020
- Aug 16, 2020 Strategy Pattern - Composition over Inheritance Aug 16, 2020
-
July 2020
- Jul 24, 2020 Observer Pattern - C# Events Jul 24, 2020
- Jul 15, 2020 Object Pooling Jul 15, 2020
- Jul 3, 2020 Cheat Codes with Unity and C# Jul 3, 2020
-
June 2020
- Jun 16, 2020 The State Pattern Jun 16, 2020
-
August 2019
- Aug 12, 2019 Easy UI Styles for Unity Aug 12, 2019
-
July 2019
- Jul 3, 2019 9th Grade Math to the Rescue Jul 3, 2019
-
June 2019
- Jun 12, 2019 Introducing My Next Game (Video DevLog) Jun 12, 2019
-
May 2019
- May 29, 2019 Programming Challenges May 29, 2019
-
March 2019
- Mar 2, 2019 Something New - Asking "What Can I Learn?" Mar 2, 2019
-
November 2018
- Nov 30, 2018 A Growing Channel and a New Tutorial Series Nov 30, 2018
-
October 2018
- Oct 11, 2018 Procedural Spaceship Generator Oct 11, 2018
-
July 2018
- Jul 11, 2018 Implementing SFX in Unity Jul 11, 2018
-
May 2018
- May 31, 2018 Prototyping Something New May 31, 2018
-
April 2018
- Apr 17, 2018 When to Shelve a Game Project? Apr 17, 2018
-
February 2018
- Feb 9, 2018 State of the Game - Episode 3 Feb 9, 2018
-
December 2017
- Dec 16, 2017 State of the Game - Episode 2 Dec 16, 2017
-
November 2017
- Nov 7, 2017 The Bump From A "Viral" Post Nov 7, 2017
-
October 2017
- Oct 30, 2017 NPC Job System Oct 30, 2017
-
September 2017
- Sep 1, 2017 Resources and Resource Systems Sep 1, 2017
-
August 2017
- Aug 3, 2017 State of the Game - Episode 1 Aug 3, 2017
-
June 2017
- Jun 20, 2017 Resources: Processing, Consumption and Inventory Jun 20, 2017
- Jun 15, 2017 Energy is Everything Jun 15, 2017
-
May 2017
- May 16, 2017 Graphing Script - It's not exciting, but it needed to be made May 16, 2017
- May 2, 2017 Tutorials: Low Poly Snow Shader May 2, 2017
-
April 2017
- Apr 28, 2017 Low Poly Snow Shader Apr 28, 2017
- Apr 21, 2017 Environmental Simulation Part 2 Apr 21, 2017
- Apr 11, 2017 Environmental Simulation Part 1 Apr 11, 2017
-
March 2017
- Mar 24, 2017 Building a Farming Game Loop and Troubles with Ground Water Mar 24, 2017
-
February 2017
- Feb 25, 2017 The Inevitable : FTF PostMortem Feb 25, 2017
-
December 2016
- Dec 7, 2016 Leaving Early Access Dec 7, 2016
-
November 2016
- Nov 28, 2016 Low Poly Renders Nov 28, 2016
- Nov 1, 2016 FTF: Testing New Features Nov 1, 2016
-
October 2016
- Oct 27, 2016 Watchtowers - Predictive Targeting Oct 27, 2016
- Oct 21, 2016 Click to Color Oct 21, 2016
- Oct 19, 2016 Unity Object Swapper Oct 19, 2016
-
September 2016
- Sep 18, 2016 Testing Single Player Combat Sep 18, 2016
-
May 2016
- May 25, 2016 Release Date and First Video Review May 25, 2016
-
March 2016
- Mar 26, 2016 Getting Greenlit on Steam Mar 26, 2016