Dev Log
Input Action in the Inspector - New Input System
the “old” input system
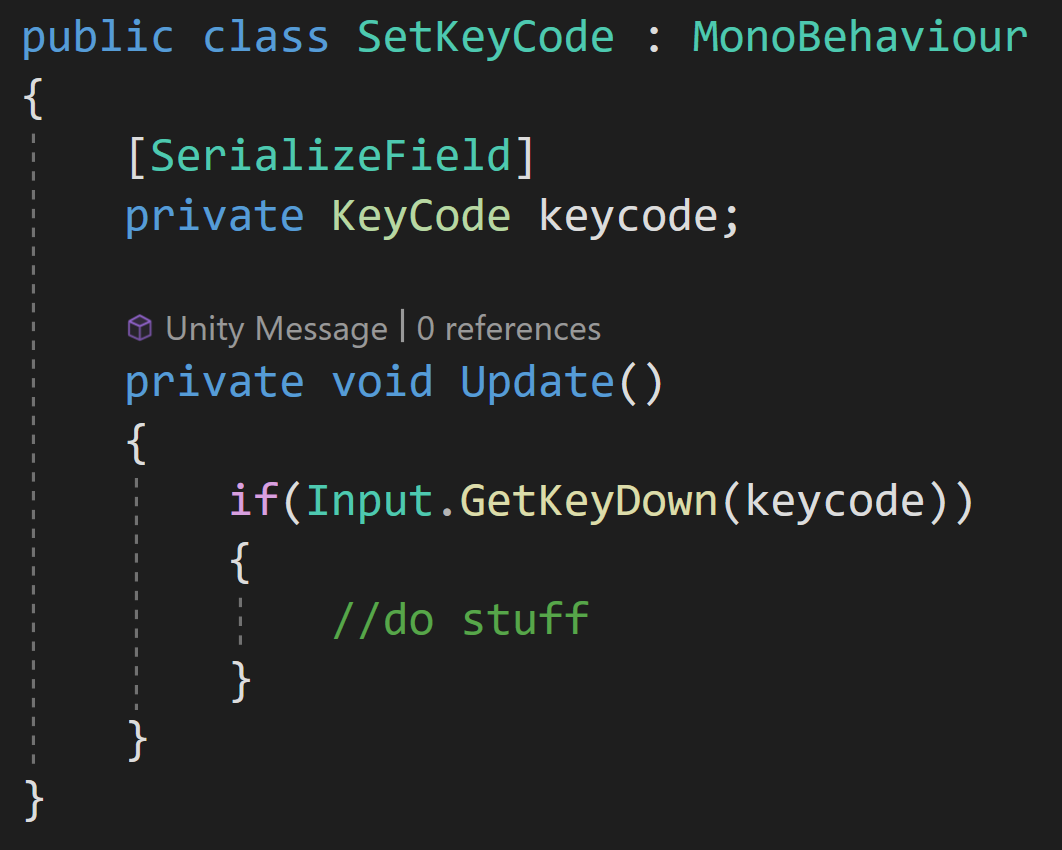
Setting a key in the inspector with the “old” input system is pretty easy. Create an instance of a keycode and then use it however you like with GetKey, GetKeyDown, or GetKeyUp.
But what if you’re using the “new” input system? Did you know that you can easily assign input actions in the inspector? I didn’t. And until today I never really had a need for that functionality. For things like menus, buttons, or other objects that might make use of a hotkey this is pretty nice to be able to do.
Background
I wanted to add hotkeys to my building menus
I was working on some UI functionality and wanted to add hotkeys to allow the player to open menus. Normal stuff. But all the menus I was working with were the same type - meaning they were using the same component just with different data and children objects. This meant I couldn’t easily program different keys to trigger different menus without making an ugly mess.
You can add an Input Action to your inspector, but this creates or defines a new input action, which isn’t quite what I wanted to do. I wanted to use an input action that I’ve already created in an Input Action Asset.
But, this sparked a memory from my local multiplayer video where a component made by Unity did allow the selection of input actions in the inspector. So I went digging into that old project to see what I could find.
Input Action Reference
Useful, but not what I was looking for.
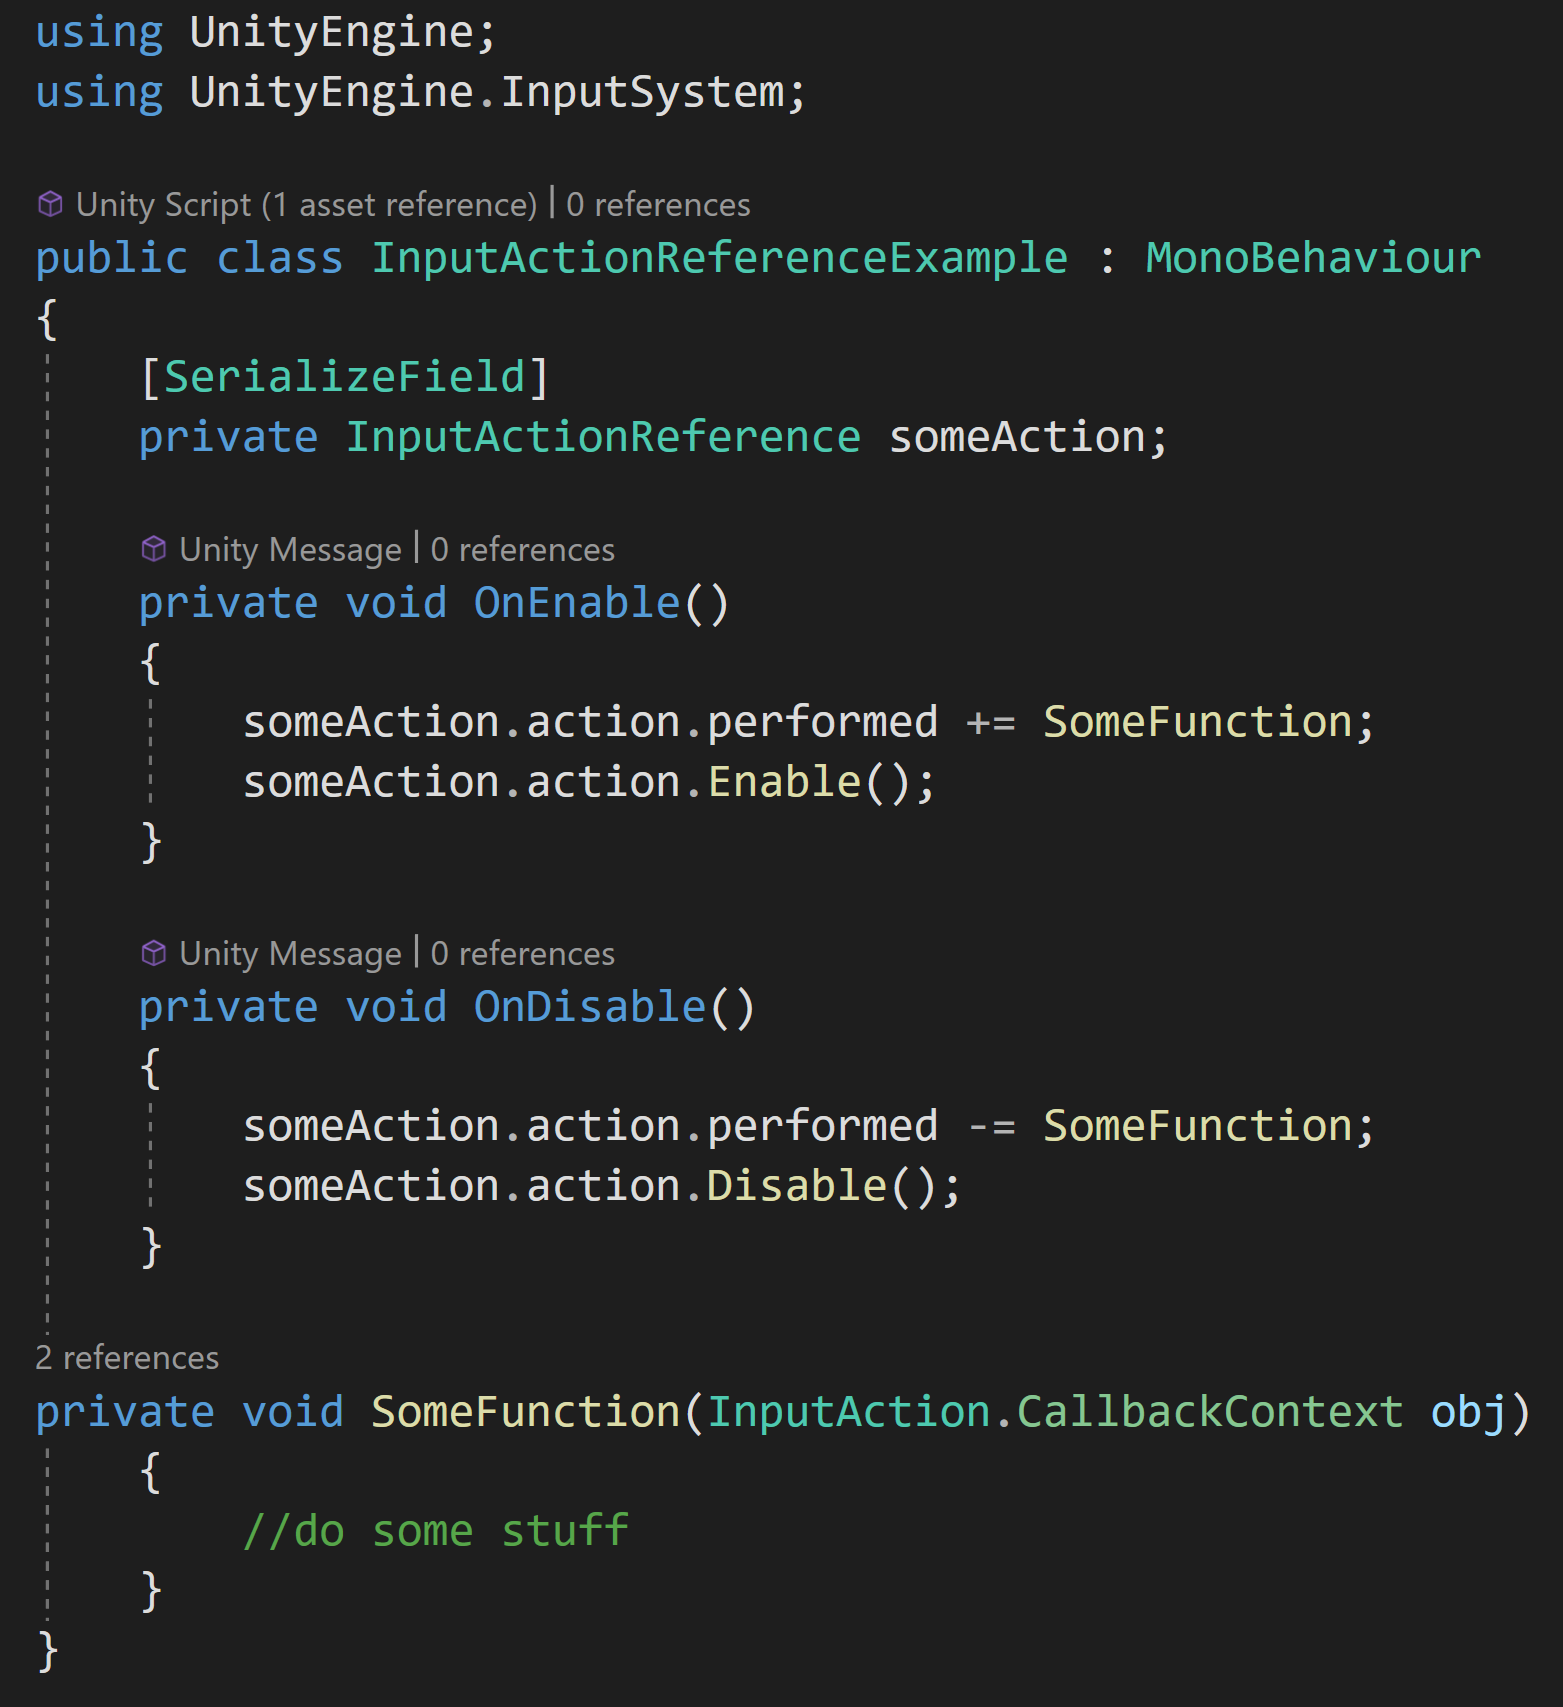
It turns out Unity has an Input Action Reference class that’s built into the new input system. And it’s about as simple as it sounds. All you need to do is create an instance in your class, then in the inspector, you’ll be able to select any of the input actions that you’ve created.
Then, assuming you are using the C# generated class, you can subscribe functions to the various events for the input action just like normal. Just don’t forget to enable the input action.
If you’re looking for more info on the new input system itself or aren’t sure how to create input actions with the input system - this blog post will give you a lot more background.
Final Thoughts
This is what I want!
It’s hard to think how this could be simpler… That said, I’m not sure how this system will work if you allow players to rebind keys. My assumption is that using the Input Action Reference instead of an Input Action will work with rebinding, but maybe not. Beyond that, this seems like one more great tool to have that easily allows extra functionality.
Tutorial Hell - Why You're There. How to Get Out.
TL;DR Your projects are over scoped and you are missing a solid skill foundation. There is no magic step. No magic course. No magic book. Build the foundation of your knowledge and finish lots of small and simple projects to build your skills.
You. Me. And everyone who’s going to read this post. Has over-scoped a project. We have big dreams and amazing ideas, but the projects never get finished. By the third, fourth, or maybe fifth failed project it starts to get pretty discouraging. I’d guess more than half of people give up within a year of watching their first tutorial and almost no one makes it to the point of releasing a complete and polished game.
This can be tormenting and dream-crushing. It’s so easy to get stuck watching one video after another. Feeling like the next one will make it all come together. While never feeling like you’re making progress or never feeling like you can truly create something on your own.
Content creators are rewarded for creating engaging content, not for their viewer’s success. Most content out there is well intended, but most of it is oversimplified and ends up selling the viewer a load of horse shit.
Quickly and easily add multiplayer!
Build an inventory system in under 10 minutes!
By glossing over the difficult bits many viewers get in over their heads thinking they are one step closer to their dream game. What feels helpful turns out to be the opposite. Most videos are about the product and not the process. Teaching a process takes time and patience, but neither of these is rewarded by the algorithms of YouTube or Udemy. The result, especially for beginners, is frustration, maybe giving up or all too often starting a search for the next tutorial.
This is tutorial hell.
It’s easy to feel stuck and I think many or even most folks eventually give up trying to make progress. So here’s my hot take on tutorial hell, why you’re there, and how to get out.
Learn More
The quick, dirty, and admittedly blunt reason you’re in tutorial hell? It’s because you don’t know enough to finish your current project. With the internet and clever thumbnails, learning looks like it would be easy. But it isn’t and good resources to learn are hard to find.
Building a solid foundation of knowledge is hard. My number one recommendation for folks who want to learn Unity is to work through the Create with Code course from Unity.
It’s 30 to 40 hours of work. It’s a real course and it’s free! If you are serious about wanting to make games with Unity this is the best starting place I have seen - hands down. You need to 100% this course. No cheating. No skipping content. If you already know the content covered by a lesson or unit, quickly read the text, skip the videos, but do the projects.
Speaking as a classroom teacher for over 15 years, the challenges are where the learning is really going to happen. This is where you will do more than listen and repeat steps. The challenges will make you think. You might even struggle. And that’s okay. Learning comes from forming new neural pathways in your brain and that’s not easy. So buckle up.
When you do finish Create with Code, I promise, you will be able to create and complete a project of your own. It won’t be an MMO, it won’t be the next mobile hit and it certainly won’t be the next hot e-sports title. But it’ll be YOUR game. And you’ll be fucking proud of it.
Your Project Is Too Big
If you’ve finished Create with Code (or have all the skills from that course) and you’re still finding yourself stuck, then the likely culprit is your projects. It’s not you. It’s not the way you think. It’s your projects. They’re too big and too complex. Getting started with a project is “easier than you think” but finishing those projects is so much harder.
Everyone has a graveyard of incomplete projects. Ideas that lived for a few hours or maybe a few months. And that’s fine. Perfectly normal. Frankly, it’s part of the journey. But I see tutorial hell as the result of biting off too much. Trying to build your dream game too early. Or not having the skills or the team to build that dream game.
But! This doesn’t mean you are giving up on that dream project.
So here’s my advice. Pick ONE mechanic. Running, jumping, shooting, or maybe just clicking. Or be more creative. It doesn’t really matter. Make a game around that singular mechanic and give yourself one month to finish the game. That’s it. No spending money. No 3rd party assets. Use free art if you want, but nothing else that isn’t built into the game engine and of your own creation. And no HDRP or stupid shit like that. Basic. Game.
At the end of the month if your game isn’t done. You designed too big of a game. Regardless you’ve learned something. So you’re done. Close the project. Basta cosi.
Pick a new mechanic. If your scope was wrong last month then adjust. But still no spending money. Zero. If you finished your last project, this time you are going to add more polish. More particles, more SFX, and more overall juice. You still have a month. No more. No less.
This process takes discipline. This is the actual hard part. If you find yourself wanting to add more mechanics and features. Tell yourself to fuck off and get back to work. If you find yourself getting bored, try designing even smaller games and give yourself two weeks or maybe just one week, but you must finish those smaller projects.
The goal is not to make good games. Or fun games. The goal is to learn to finish a game.
Design. Build. Reflect. Repeat. With each new project pick a new mechanic to explore and add to your knowledge base.
As a rough rule of thumb, you should know how to do at least 80% of each new project WITHOUT help or tutorials. That’s not to say you can’t look up documentation or get a quick refresher, but the goal of quick short projects is to learn and build your knowledge not add to your YouTube view history. If there’s too much that you don’t know how to do, then redesign a smaller project.
Finish 3, 4, or maybe 5 small month-long projects and you’ll be surprised at what you now know how to do. This will be easier for some and some will learn faster than others. But everyone will learn. Everyone will get better.
You’re Out
Easier said than done? Absolutely. But it is this simple and that hard. There is no magic trick. No magic tutorial series. No magic book. Build the foundation of your knowledge and build lots of small and simple projects to build your skills.
If you do? You’ll have found your way out of tutorial hell.
You’ve made it further than most! But you’ve still only started.
Moving forward you start designing slightly bigger games. Games that might combine more than one mechanic. Maybe this is the time to buy books, or maybe pay for a course or two. Or maybe this is the time to start learning to make fun games rather than bigger games. But stick to the rule of thumb - know how to build 80% of your next project before you start.
Upgrade System (Stats Part 2)
Upgrades! Who doesn’t like a good upgrade when enemies are getting tough and you need a little boost?
Implementing a system can be easy if it’s small. An upgrade system is no different. Need to boost the speed of a spaceship? No problem make a variable a bit bigger. But when the number of stats, the number of units, and the number of possible upgrades grows the need for a system becomes more and more obvious.
With 20, 50, or 100 different upgrades you can’t write a new class for each upgrade and have any realistic hope of maintaining that code base let alone debugging each and every upgrade.
So just like I did with my stats system I wanted to share how I created my upgrade system (which is closely tied to my stats system) in hopes that it might spark ideas for you to create your own upgrade system that matches the needs for your project.
Important Details
Just like my Stats system, I wanted my upgrade system to be based on scriptable objects - they provide asset-level data packages that allow for an easy workflow, and frankly I just like them. Just like with my stats system, I’ve continued to make use of Odin Inspector to allow the serialization of dictionaries and access to those dictionaries in the inspector. If you don’t have Odin Inspector, you can use the same workarounds from the stats system to use lists instead of dictionaries.
Base Class
I don’t always love using inheritance, but in this case, I’m using it as I have several varieties of upgrades in my project - including leader upgrades, global upgrades, and building unlock upgrades.
For this post, I’ll show the inheritance, but stay focused on implementing basic upgrades for altering unit stats. If you don’t need different types of upgrades, then I’d suggest you use a single non-abstract Upgrade class.
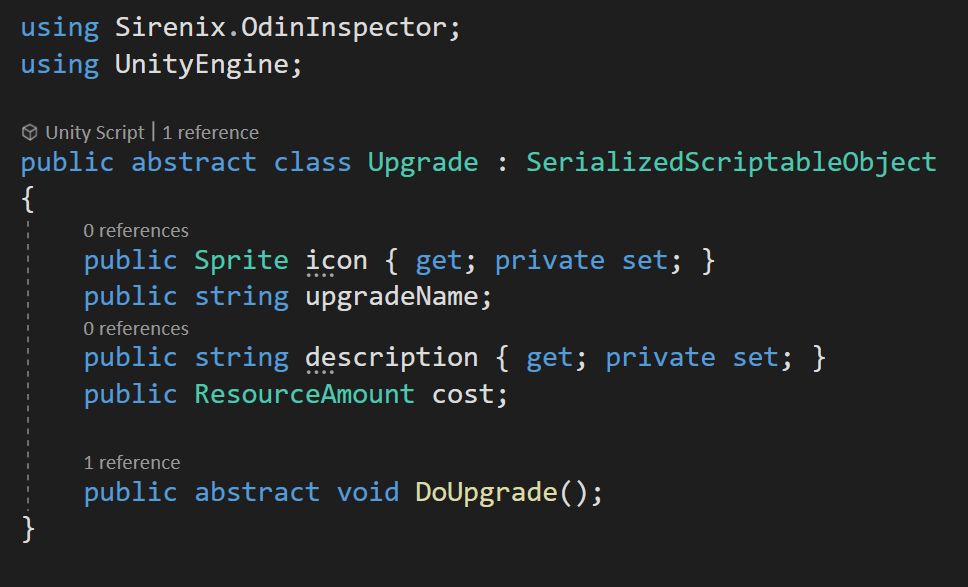
The base upgrade class is an abstract class because (for me) each type of upgrade will need to implement DoUpgrade slightly differently and I don’t want any instances of the base Upgrade class in the project. The class defines some basic properties such as a name, a description, cost, and an icon for the UI.
Stats Upgrade
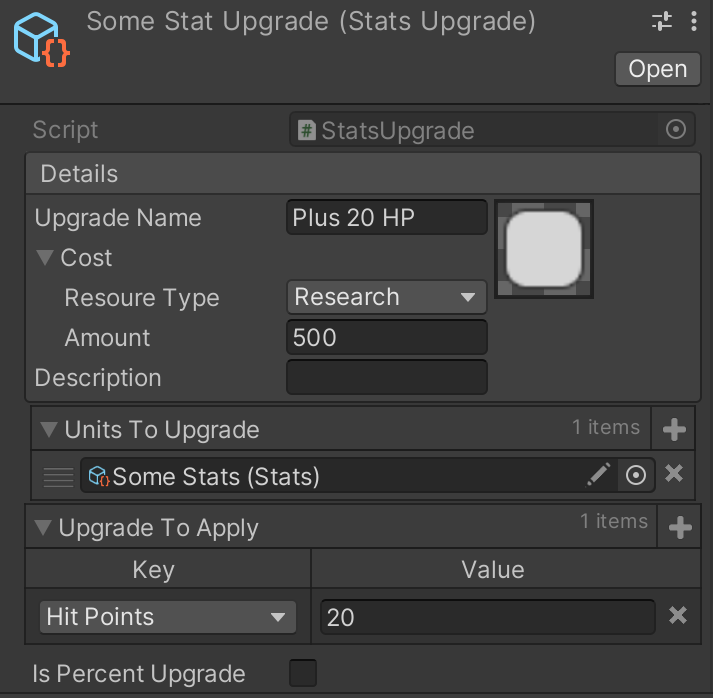
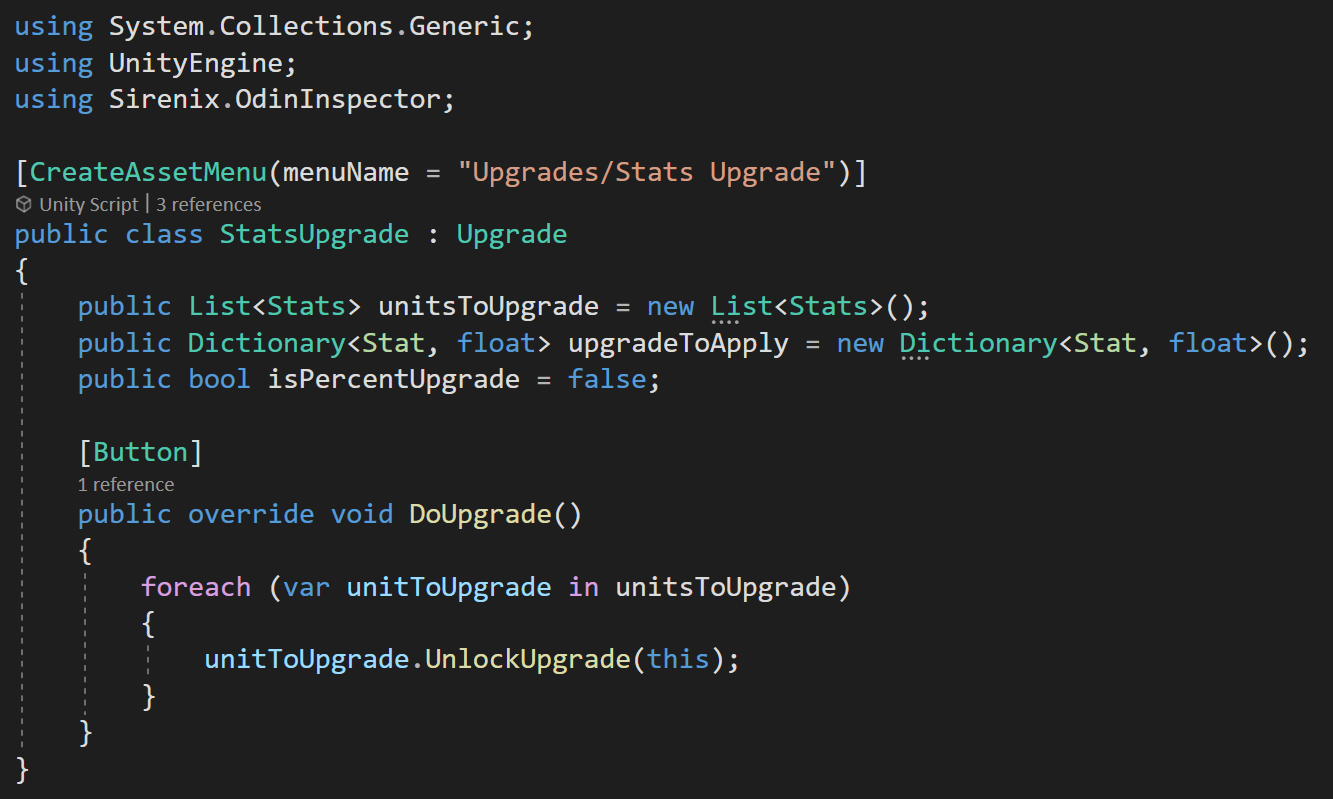
All the real functionality comes in the StatsUpgrade subclass. Here I define two important collections.
The first is a list of the units that this upgrade is to be applied to. Notice that it’s actually a list of stats objects (which are themselves scriptable objects) and not the prefabs of the unit objects. I simply drag in the stats scriptable object for any unit that I want to apply this upgrade to.
The second collection is a dictionary, but could easily be a list, of the individual stats that are affected by this upgrade and the amount that the stat is altered. Again, I’m manually adding items to define the upgrade.
Then the real functionality comes from the DoUgprade function, but even that is pretty simple. All that happens is we iterate through all the stats to upgrade and call UnlockUpgrade and pass in the upgrade itself.
That’s it. That’s all the stats upgrade does.
To make this useful, we need to make some modifications to the stats class that we built in the last post (or video) to handle the upgrades.
Modifying the Stats Class
If you read the post or watched the video on my stats system you may also notice that I’ve implemented my suggestion of an “instance stats” dictionary to separate stats like “health” or “hit points” that will belong not to the type of object but to the instance of an object.
To work with the upgrade system the stats class needs a new list to track the upgrades and it’ll need a handful of new functions as well.
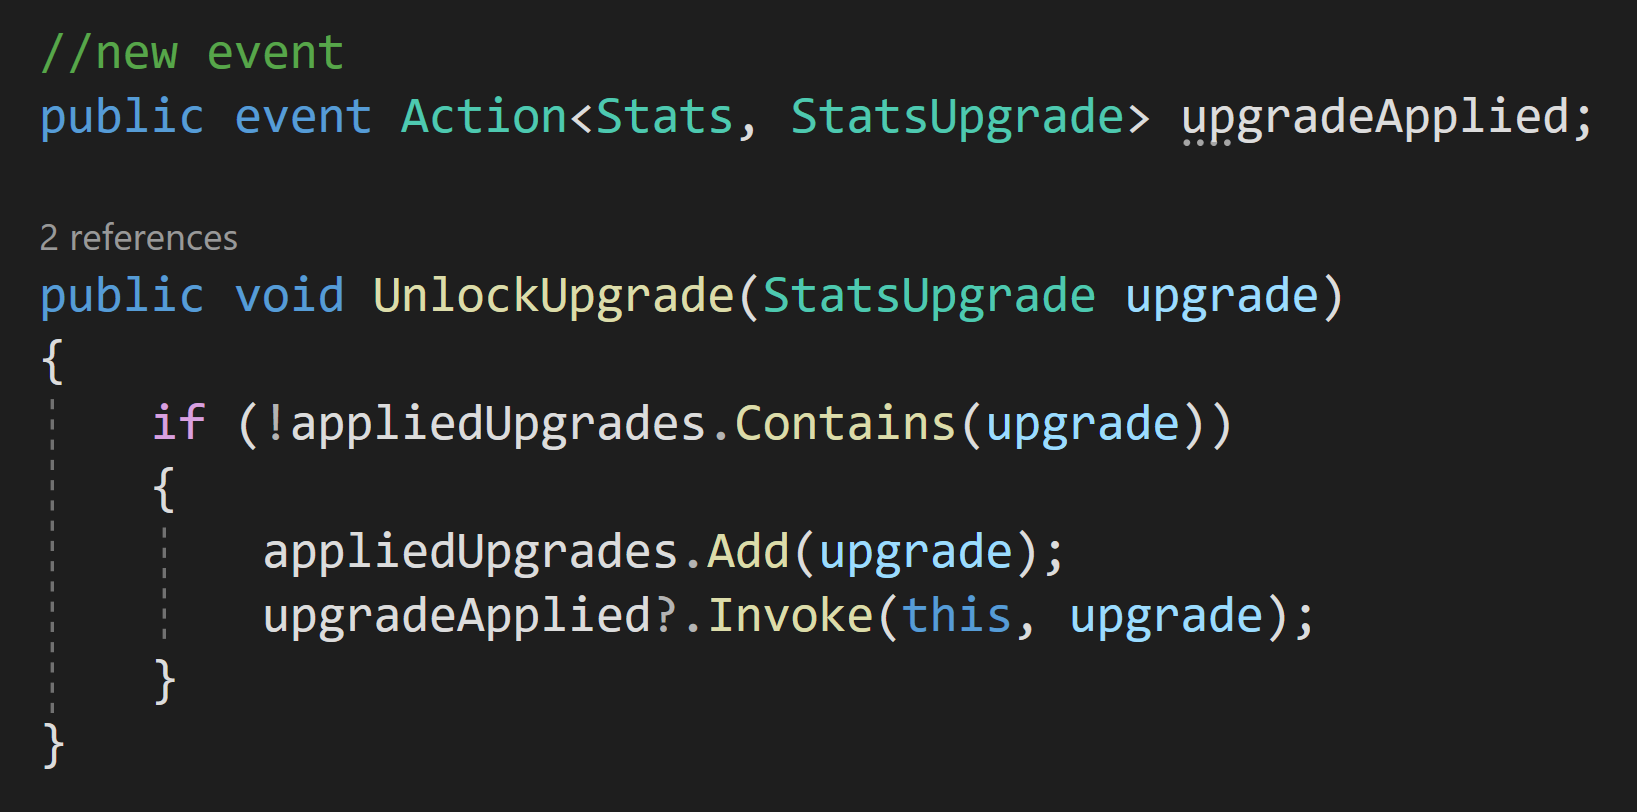
First, we need to define the UnlockUpgrade function that was called in the StatsUpgrade class. This function simply needs to check if the upgrade is already contained in the applied upgrade list and if not add it to the list.
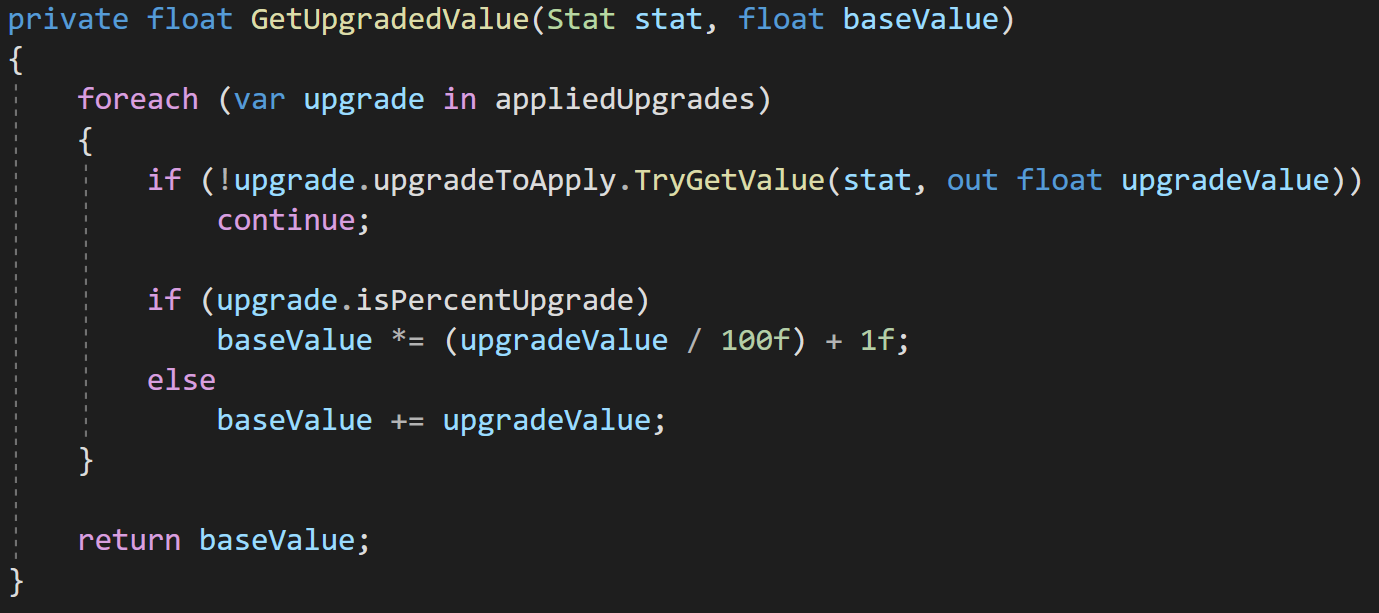
Next, we need to modify our GetStats function to take into account any potential upgrades. To do this we first check if the desired stat is in either the instance stats dictionary or in the stats dictionary. If we find it in either dictionary we get the base value for that stat and pass it into the GetUpgradedValue function.
Inside this new function, we loop through all the applied stat upgrades and check if any of those stat upgrades apply to the current stat type - by looking for that stat type in the dictionary of upgrades to apply.
If we find an upgrade, we apply the value to the stat. If the upgrade was a percent upgrade the math is a bit different but the idea is the same. When we’re done looping through all the possible upgrades we return the value to the GetStats function.
I like this approach as the entire upgrade path is dealt with by the StatsUpgrade and Stats classes. Nothing outside these classes needs to know or even cares what’s going on - keeping things nice and tidy.
Fixing Loose Ends
#1 There is one problem in the current system which comes from using scriptable objects and modifying them in the Unity editor. When applying an upgrade by adding it to a list during play mode that upgrade will still be part of the list when you leave play mode. Meaning you could accidentally ship your game with an upgrade pre-applied which is less than awesome. This is the same reason, I choose to recalculate the upgraded stat value each time the value is requested rather than simply setting the value.
The solution to this is pretty simple. We just need to clear the list of applied upgrades when we enter or exit play mode.
There are no “lifetime” functions like OnEnable or OnDisable for scriptable objects so where and how this function gets called is really up to you. I haven’t come up with a particularly clever solution, if I do I’ll post it here, but for now, my implementation is to simply have a Stats manager that will call the reset function on each stat object when going into play mode. This same stats manager could also tie into a future save system so that applied upgrades can be saved and restored in standalone builds.
If you come up with a more clever solution I’d love to hear about it in the comments below or on the OWS discord.
Reminder: Scriptable objects are not suitable for a save system. So don’t try and turn this “problem” into a janky-ass save system. It just won’t work.
#2 There is an edge case where an upgrade may be applied to one of the “instance stats.” For example, let’s say we get an upgrade that adds 20 hit points to our tanks. With no further modification, any tank that is added AFTER the upgrade is applied should see the extra 20 hit points, but tanks that are already in the scene won’t. Maybe that’s okay or even desired, but in my game not so much.
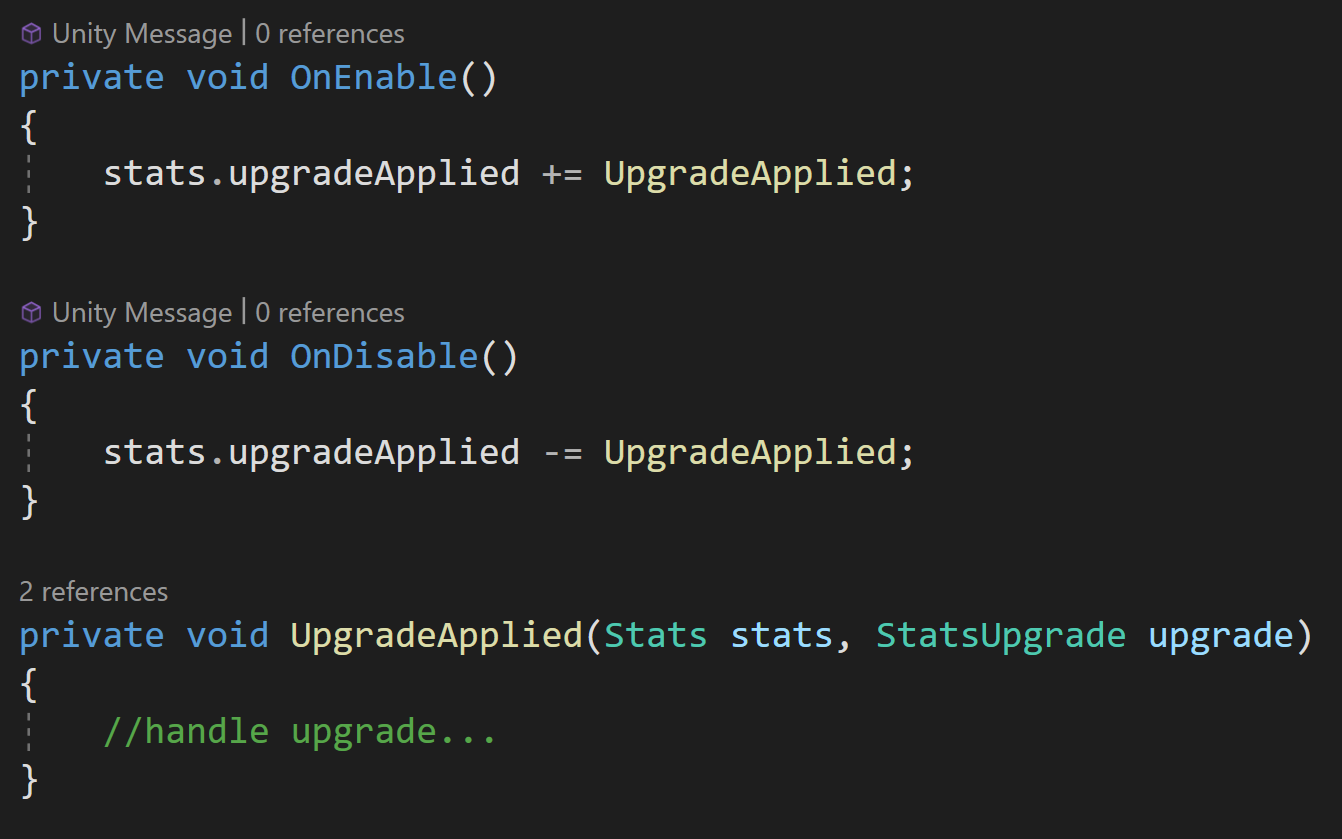
So here is my suggested fix. It’s not the tidiest, but it works. I’m going to add a public non-static event to the Stats class that will get invoked when an upgrade is applied. Any class that might care about an upgrade can then be notified - which could be useful for functionality such as SFX or VFX or other player feedback to let them know an upgrade has been applied to a particular unit.
Changes to the Stats class
A class subscribing to the new event to process the upgrade
Older Posts
-
April 2024
- Apr 10, 2024 Ready for Steam Next Fest? - Polishing a Steam Page Apr 10, 2024
- Apr 1, 2024 Splitting Vertices - Hard Edges for Low Poly Procedural Generation Apr 1, 2024
-
November 2023
- Nov 18, 2023 Minute 5 to Minute 10 - Completing the Game Loop Nov 18, 2023
-
September 2023
- Sep 13, 2023 Visual Debugging with Gizmos Sep 13, 2023
-
July 2023
- Jul 4, 2023 Easy Mode - Unity's New Input System Jul 4, 2023
-
May 2023
- May 19, 2023 Level Builder - From Pixels to Playable Level May 19, 2023
-
April 2023
- Apr 11, 2023 Input Action in the Inspector - New Input System Apr 11, 2023
-
February 2023
- Feb 26, 2023 Tutorial Hell - Why You're There. How to Get Out. Feb 26, 2023
-
December 2022
- Dec 31, 2022 Upgrade System (Stats Part 2) Dec 31, 2022
-
November 2022
- Nov 10, 2022 Stats in Unity - The Way I Do it Nov 10, 2022
- Nov 5, 2022 State of UI in Unity - UI Toolkit Nov 5, 2022
-
August 2022
- Aug 17, 2022 Knowing When A Coroutine Finishes Aug 17, 2022
-
April 2022
- Apr 23, 2022 Unity Input Event Handlers - Or Adding Juice the Easy Way Apr 23, 2022
-
March 2022
- Mar 15, 2022 *Quitting a Job I Love Mar 15, 2022
-
February 2022
- Feb 8, 2022 Split Screen: New Input System & Cinemachine Feb 8, 2022
-
January 2022
- Jan 24, 2022 (Better) Object Pooling Jan 24, 2022
- Jan 19, 2022 Designing a New Game - My Process Jan 19, 2022
- Jan 16, 2022 Strategy Game Camera: Unity's New Input System Jan 16, 2022
-
December 2021
- Dec 16, 2021 Raycasting - It's mighty useful Dec 16, 2021
-
November 2021
- Nov 22, 2021 Cinemachine. If you’re not. You should. Nov 22, 2021
-
August 2021
- Aug 3, 2021 C# Extension Methods Aug 3, 2021
-
June 2021
- Jun 27, 2021 Changing Action Maps with Unity's "New" Input System Jun 27, 2021
-
May 2021
- May 28, 2021 Unity's New Input System May 28, 2021
- May 8, 2021 Bolt vs. C# - Thoughts with a dash of rant May 8, 2021
-
March 2021
- Mar 10, 2021 Coroutines - Unity & C# Mar 10, 2021
-
January 2021
- Jan 14, 2021 Where's My Lunch? - January Devlog Update Jan 14, 2021
-
December 2020
- Dec 27, 2020 C# Generics and Unity Dec 27, 2020
- Dec 7, 2020 Steam Workshop with Unity and Facepunch Steamworks Dec 7, 2020
-
November 2020
- Nov 27, 2020 Simple Level Save and Load System (Unity Editor) Nov 27, 2020
- Nov 9, 2020 Command Pattern - Encapsulation, Undo and Redo Nov 9, 2020
-
October 2020
- Oct 28, 2020 GJTS - Adding Steamworks API and Uploading Oct 28, 2020
- Oct 9, 2020 Game Jam... Now What? Oct 9, 2020
-
August 2020
- Aug 16, 2020 Strategy Pattern - Composition over Inheritance Aug 16, 2020
-
July 2020
- Jul 24, 2020 Observer Pattern - C# Events Jul 24, 2020
- Jul 15, 2020 Object Pooling Jul 15, 2020
- Jul 3, 2020 Cheat Codes with Unity and C# Jul 3, 2020
-
June 2020
- Jun 16, 2020 The State Pattern Jun 16, 2020
-
August 2019
- Aug 12, 2019 Easy UI Styles for Unity Aug 12, 2019
-
July 2019
- Jul 3, 2019 9th Grade Math to the Rescue Jul 3, 2019
-
June 2019
- Jun 12, 2019 Introducing My Next Game (Video DevLog) Jun 12, 2019
-
May 2019
- May 29, 2019 Programming Challenges May 29, 2019
-
March 2019
- Mar 2, 2019 Something New - Asking "What Can I Learn?" Mar 2, 2019
-
November 2018
- Nov 30, 2018 A Growing Channel and a New Tutorial Series Nov 30, 2018
-
October 2018
- Oct 11, 2018 Procedural Spaceship Generator Oct 11, 2018
-
July 2018
- Jul 11, 2018 Implementing SFX in Unity Jul 11, 2018
-
May 2018
- May 31, 2018 Prototyping Something New May 31, 2018
-
April 2018
- Apr 17, 2018 When to Shelve a Game Project? Apr 17, 2018
-
February 2018
- Feb 9, 2018 State of the Game - Episode 3 Feb 9, 2018
-
December 2017
- Dec 16, 2017 State of the Game - Episode 2 Dec 16, 2017
-
November 2017
- Nov 7, 2017 The Bump From A "Viral" Post Nov 7, 2017
-
October 2017
- Oct 30, 2017 NPC Job System Oct 30, 2017
-
September 2017
- Sep 1, 2017 Resources and Resource Systems Sep 1, 2017
-
August 2017
- Aug 3, 2017 State of the Game - Episode 1 Aug 3, 2017
-
June 2017
- Jun 20, 2017 Resources: Processing, Consumption and Inventory Jun 20, 2017
- Jun 15, 2017 Energy is Everything Jun 15, 2017
-
May 2017
- May 16, 2017 Graphing Script - It's not exciting, but it needed to be made May 16, 2017
- May 2, 2017 Tutorials: Low Poly Snow Shader May 2, 2017
-
April 2017
- Apr 28, 2017 Low Poly Snow Shader Apr 28, 2017
- Apr 21, 2017 Environmental Simulation Part 2 Apr 21, 2017
- Apr 11, 2017 Environmental Simulation Part 1 Apr 11, 2017
-
March 2017
- Mar 24, 2017 Building a Farming Game Loop and Troubles with Ground Water Mar 24, 2017
-
February 2017
- Feb 25, 2017 The Inevitable : FTF PostMortem Feb 25, 2017
-
December 2016
- Dec 7, 2016 Leaving Early Access Dec 7, 2016
-
November 2016
- Nov 28, 2016 Low Poly Renders Nov 28, 2016
- Nov 1, 2016 FTF: Testing New Features Nov 1, 2016
-
October 2016
- Oct 27, 2016 Watchtowers - Predictive Targeting Oct 27, 2016
- Oct 21, 2016 Click to Color Oct 21, 2016
- Oct 19, 2016 Unity Object Swapper Oct 19, 2016
-
September 2016
- Sep 18, 2016 Testing Single Player Combat Sep 18, 2016
-
May 2016
- May 25, 2016 Release Date and First Video Review May 25, 2016
-
March 2016
- Mar 26, 2016 Getting Greenlit on Steam Mar 26, 2016
