Dev Log
Object Pooling
***New Object Pooling Post - Click Here or Check the Navigation to the Right***
If you’ve been around game design for very long you’ve likely seen a video or a post on “object pooling.” Despite the amazing performance of the modern PC a game can still start to slow down if objects are constantly being created or destroyed. By constantly, I don’t mean one object per frame. I mean 10 objects, or 100 objects per frame OR 1000 objects once every 5 seconds. Those are scenarios where object pooling can save the player from frustrating lag spikes and help an older machine squeeze out a few more FPS.
The idea of object pooling is clever, but prtettysimple. Rather than constantly creating and destroying objects the idea is to recycle or reuse objects. This is most often done by turning the object on/off or disabling it in some way. In Unity there is still some cost for turning objects on and off, but the cost is far lower than creating and destroying that object.
Before we get into the code there are lots of different “flavors” of object pooling. People have different preferences on how to keep references to objects. Personally, I like to keep a list (or queue) of objects that are not in use and that’s how I’ll be doing it here. Other ways to do this is to keep a list of all objects and search through the list for an object that can be used (often an object that is not active). While for most small game the performance difference isn’t much, but I still like the tidiness of a single collection for objects that are ready to go.

Such a Fancy game! :)
I’m also going to show two ways to create an object pool. The first will be the most usual way or at least the way that I’ve seen done in the past. The second will be more of my own take on the pattern and add more generic functionality. I can imagine there may be some performance hit to the way I’m doing it, but again the tidiness of the solution and ease of use, in my case, more than makes up for it.
For this tutorial, I’ll be using the same project as for the “State Pattern.” Check out the GIF to the right or the earlier post.
Simple Object Pooling

In the “simple” object pooling I’ll be using a queue to store references to game objects. These objects can then be retrieved from the queue when needed and returned to the queue when they are no longer needed.
If you haven’t heard of or used a “queue” it’s very much like a list in that it will contain multiple references or values. The biggest difference is a queue is a “first in first out” collection - just like a queue in real life. The first object to be “enqueued” will be the first to be “dequeued.” This makes it easy to get an object from the collection. Whereas with the more standard list we would need to get a reference to the object and then remove the object from the list. A queue does that work for us. If this is new to you make sure to check out “stacks” too which are “first in last out.”
The object pool class has three fields.
The first is the prefab that will be pooled. In my case, since I’m using the same project as for the “State Pattern” I’ll be pooling the “critter” objects.
The second is the queue that will hold references to all the gameObjects and the third is an optional parameter that will “preload” the object pool.
Preloading the pool (in the start function) may or may not be necessary and very much depends on your projects needs. If there will be a sudden and large demand for an object, think bullets in a bullet hell style game, then it might be smart to use the first frame (or several frames) of the game to create a large pool of object. This creates a lag spike at the beginning but avoids it during the game which is when the player is more likely to notice. In the case above, all I’m doing is instaniating copies of the prefab and adding them to the queue.
The object pool class also needs a function to “get” an object as well as “return” an object - both of which will be public. There can be a good argument to make these functions static as well, but I choose to keep things simple.
The “Get Critter” function will first check if there are any critters in the pool and if there are it’ll “dequeue” a critter, set it to active and then return that critter object. Instead, if the pool is empty the function will instantiate a new instance and return that object. Creating a new object is not always necessary or might not even be a good idea depending on your design constraints. In my case I’m happy to create as many critters as necessary. Another option would be to create a limit on the number that can be created - this could help control an unforeseen edge case.
The “Return Critter” function will be called by the critter itself when it has been disabled. This simply add the critter object back to the queue and then turns the object off. In some cases you may not need to or even want to not turn the object off - it just depends on the use case and the type of object. For my project turning the critter off is easy and I’m not worried about the minor performance hit of turning objects on and off.
Spawning

For object pooling to work we need a “spawner” object. To serve this purpose I’ve added a small cube with a “spawner class” on it. The class contains a value that controls how frequently an object is spawned, a values that tracks how long since the last object was spawned and a reference to the object pool.
In the start function a reference to the object pool is cached.
Then in the update fucntion the time since spawn is updated with the time of the last frame. This creates a basic timer.
Then if the time since the last spawn is greater than the spawn time - we get a new critter from the object pool. It’s important when using object pooling to be able to “initalize” the objects. In this case that means moving it to the correct position, but for more complicated objects you may need to create a dedicated initialize function. Lastly, we set the time since spawn to zero so the timer restarts - without this the spawner would create a new critter every frame!

The last piece of any object pooling system is returning the object to the pool. There are many ways to do this, but for simplicity I’ve created a new class that needs to be added to the critter. This class when disabled will return the critter to the object pool. This works, because when the NPC attacks the critter it calls a function that turns off the object.
Now this is all pretty good and not too complicated to implement.
BUT!
There is a glaring problem, at least in my eyes. When a project gets bigger and more complex their will be a need for more and more object pools.
Each. And. Every. Object will need it’s own pool. Yikes. That gets to be a mess in a hurry. And that’s where my next approach comes in.
“Advanced” Object Pooling
My personal project is a game that will be 100% okay if it runs at 30 fps or even 20 fps - it hopefully won’t but it would be okay. It also has a lot of objects that need to be created and destroyed. This includes spaceship modules and UI components. There will (hopefully) be 10’s or maybe 100’s of different ship modules. So it’s impractical to create a object pool for each type of object…

“Advanced” object Pool
It could be possible to just create one big object pool and then search through it trying to find the object that is currently needed, but I don’t like that approach either.
So my approach is to essentially create a pool of pools AND create pools dynamically at runtime when needed. How’s that sound?
The basic functionality is pretty similar to the earlier example in that we are getting and returning objects, but in this case I’ve created a dictionary that uses a string as a key and a queue of game objects as the values.
For each prefab the name of the prefab will be used as the key and a queue of those objects will be created. The object pool class is no longer specific to a given object and therefore we only need one instance per scene.
In the “Get Object” function we have an incoming prefab that is being requested - this is an important distinction to our previous verison of object pooling. We then check to see if we can find a value in the disctionary that matches the name of the requested prefab. If a value can be found we then check to see if the queue has any entries. If it doesn’t, then we create a new object and return that object. If the queue does contain a game object we “dequeue” it, set it to active and return the game object. Very much like what was done before.
There is one additional case, that of not being able to find a value in the dictionary. If this is true we also create and return a instance of the requested object.
NOTE: In the “create new object” function we are naming the new object the same as the incoming prefab. This is crucial since we are using the name as the key in the dictionary and if we don’t rename the object Unity will add a numerical suffix to the object’s name and will break our system. This is a major point of brittleness in this approach. You could also encode the key in another way such as an enum on a script.

Spawner Class
The real magic of this system comes in the return function. Here once again we check to see if we can find a matching value in the dictionary. If we can, we simply “enqueue” the object. If we can’t find a value then that means this is the first time this type of object or prefab has been added to the pool. So we need to create a new queue, enqueue the returned object and then add the queue to our dictionary along with the corresponding key.
It’s a bit more abstract, but quite a bit more useful!
Spawner
The spawner in this case is nearly identical to the previous case but with two important differences.
We’ve added a “gameObject” field that contains the prefab that will be spawned. The second important difference is that we are now calling a different function to get an object but more importantly we are also passing in the desired prefab.
Returning the Object

Just like with the earlier example we need to return the object to the pool. And this code is functionally identical to the earlier return class.
Conclusion
This second approach allows us to pool any prefab. All we need to do is give the spawning object a reference to the prefab. In my project this means I can create a “Green Critter” prefab and drop it into a different spawner object and it just works… In my opinion that’s pretty darn slick!

Cheat Codes with Unity and C#
Let’s talk cheat codes. This post, and the video that’ll get made from it, are all about the why and the how of adding cheat codes to your Unity project.
Why Add Cheat Codes?
You can see the code at the top right... If you look closely.
Great question! There’s the obvious answer is that they can be fun easter eggs for your players to find and discover. In my first game I placed cheat codes in the wallpapers that players could earn by collecting cards on Steam. I’m not sure anyone found them, but I thought it was a fun idea :)
But that wasn’t the reason I first put cheats into my game. The idea was a suggestion of a twitch viewer (Wago) as a way to help with testing and debugging.
In my game, like so many others, you had to collect resources. Those resources were then used to create things like buildings or catapults. If I wanted to test that my UI was working or the placement of a building was working, I’d have to start the game, create a bunch of workers, wait for them to collect the resource and then I could test the placement of the building.
Now this didn’t take much more than 5 minutes, but when you need to do it 5, 6 or maybe 10 times in a row you end up wasting a lot of time.
And that’s where the cheat codes come in. With a few lines of additional code I could instantly have as much of any resource as I needed. A few keystrokes and the resource was available.
This changed a 5 minute testing cycle into a 30 second testing cycle. Which is HUGE! And I’m willing to bet that your project can benefit from cheat codes too.
Enough Already! How Do We Do it?

Nothing too fancy here.
Adding cheat codes is surprisingly easy. Or at least the number of lines of code is pretty reasonable - we’re talking 75ish lines. Most of the code is working with strings which was a bit foreign to me but it’s pretty straightforward.
The way I’m going to do this takes advantage of Unity events and the first thing we need to do is create a custom class that will hold the code itself and the unity event. I’ve made the class serializable so that it will show in the inspector. Also note that the class is not a Monobehavior as we won’t be adding this to a gameObject, but rather we’ll be creating a list of instances of this class.
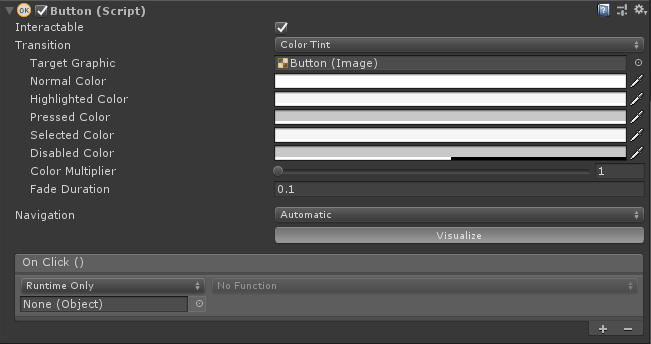
The “On click” portion contains Unity Events.
If you’re unfamiliar with Unity Events these are the same things that are in the inspector under “On Click” for a Button component where you can add an object and then call a public function when the button is pressed. They can be really handy and they can used in your own custom classes!
After the class is setup we need to create another class for the “cheat code manager” along with a few variables.
All the variables are private, but once again I’ve serialized them so that they can be seen in the inspector. This will help with debugging and in the case of the list it will help with the creation and assignment of the cheat codes themselves.
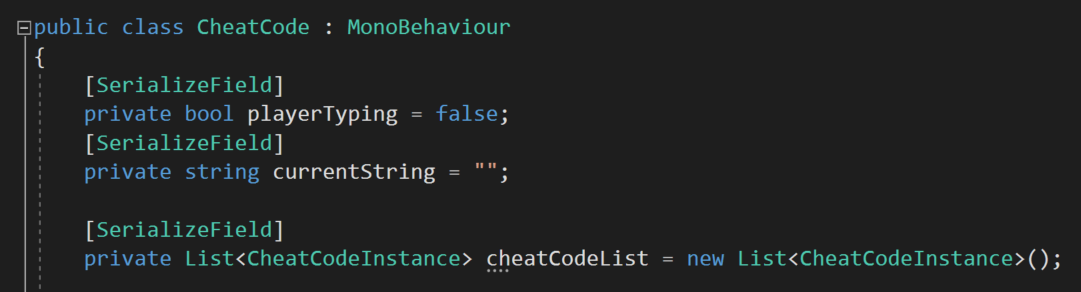
The first variable is a simple boolean which essentially tracks whether the player is typing. Which isn’t actually entirely true. Rather the value of the variable is toggled by pressing enter or return. This is how the player or developer will signal that they are entering or are finished entering a code - by pressing enter.
The string variable will simply track the characters that have been typed. This will also be used to compare against cheat codes in the list to determine if the correct code has been entered.
Lastly there’s the list - it’s a list of cheat code (instances) and the related Unity Event that will be called if that code is entered.

The backbone of the code - the Update function!
Next up is the core of the code, which is sitting in an Update function. The first step is to check if the enter or return key has been pressed. If this is done while (or after) the player was typing then that indicates that the cheat code is complete and we need to check if it’s correct. We’ll get to the “check cheat” function in just a bit. Try not to get too excited :)
After that we toggle the value of the “player typing” variable to the opposite of its current value.
The next piece is a bit of a mess of if’s and such but hopefully isn’t too tough to follow.
If the player is typing then we need to process the characters that they’ve been typing.
To do this I’m using a foreach loop that will loop through all the characters in the current input string. The value “Input.inputString” tracks all of the keys pressed in a given frame. While it’s unlikely that you can type so fast as to get multiple characters in a single frame it seems reasonable to cover all the cases.
So first we need to check if the backspace or delete (Mac, right?) keys have been pressed. If either was and the current string is longer than 0 characters we’re going to remove the last character in the string. This is done with the “substring” function. Which will essentially make a smaller string out of our “current string". We have to give the function a starting index, in this case the 0th character and and ending index, in this class the length of the string minus 1 so that we remove just the last character.
The next “if” checks whether the enter or return key was pressed. If this happened then we’ll reset the string back to an empty string.
Now you might be thinking that it might makes sense to put this further up in the update function when we were checking for the return being pressed.
But!
There is a subtle and important reason not to do that.
The enter and return keys are also recorded as characters with “Input.inputstring” and we don’t want those recorded in our current string as it will mess up the cheat code! So we need a way to filter them out - which is one of the purposes of this “else if” statement.
And lastly, the final conditional is going to add the character to the current string so we keep it updated and will be able to compare it to the cheat codes.

The last chunk of the C# code is the “check cheat” function.
This function is pretty straight forward. It takes in a string parameter, then loops through all the cheat codes in the cheat code list and checks if the input string matches the cheat code string.
If it does, the event on the cheat code instance is invoked and we return a true value.
Otherwise, if the loop finishes without finding a match a value of false is returned. The boolean return value for the function is totally optional, but could serve a purpose in some projects or applications.

The State Pattern
Whoa. It’s been nearly a year since I’ve made a post. I’ve been busy. A lot has happened, but that’s a topic for another post.
So I’m going to try something new, well a few things. But the first thing I’m going to try is writing a blog post for my next video. I figure taking the time to explain the video in writing will help me cement the ideas and provide one more resource for you all. There are many people who’d prefer to read than to watch a video. So maybe it’s a win-win? We’ll see.
But enough of that. Let’s get onto the second new thing.

That’s is exploring programming patterns. It’s something I’ve wanted to do because I want to learn more about programming patterns. Plus Bolt 2 will eventually (!!) get released and when it does many of the basic programming patterns will be far easier to implement AND folks developing with Bolt can benefit from implementing them.
Since Bolt 2 is now fully in hiding under the protection of Unity (who knows when the alpha will make it out to the public again) the upcoming video will be entirely C# based.
I should also give credit where it’s due. I’m no genius - that should be clear if you’ve read more than a few paragraphs of my writing. Much of what I know or think I know about programming patters comes from the book “Game Programming Patterns” by Robert Nystrom. It’s well worth a look if you are unfamiliar with the topic of programming patterns..
The State Pattern
“Allow an object to alter its behavior when its internal state changes. The object will appear to change its state.”
Like any other pattern the State pattern has its limitations, but also like any other pattern when used correctly it can help to detangle code which can make debugging code or adding features easier and much less frustrating. And that’s a win no matter how you look at it.
You may have heard the term “Finite State Machine” or “FSM” thrown around. Both of these terms refer to the same thing which is an implementation of the state pattern. The Unity asset Playmaker is based on the uses of FSMs and Bolt has the ability to create them with “State Macros.”
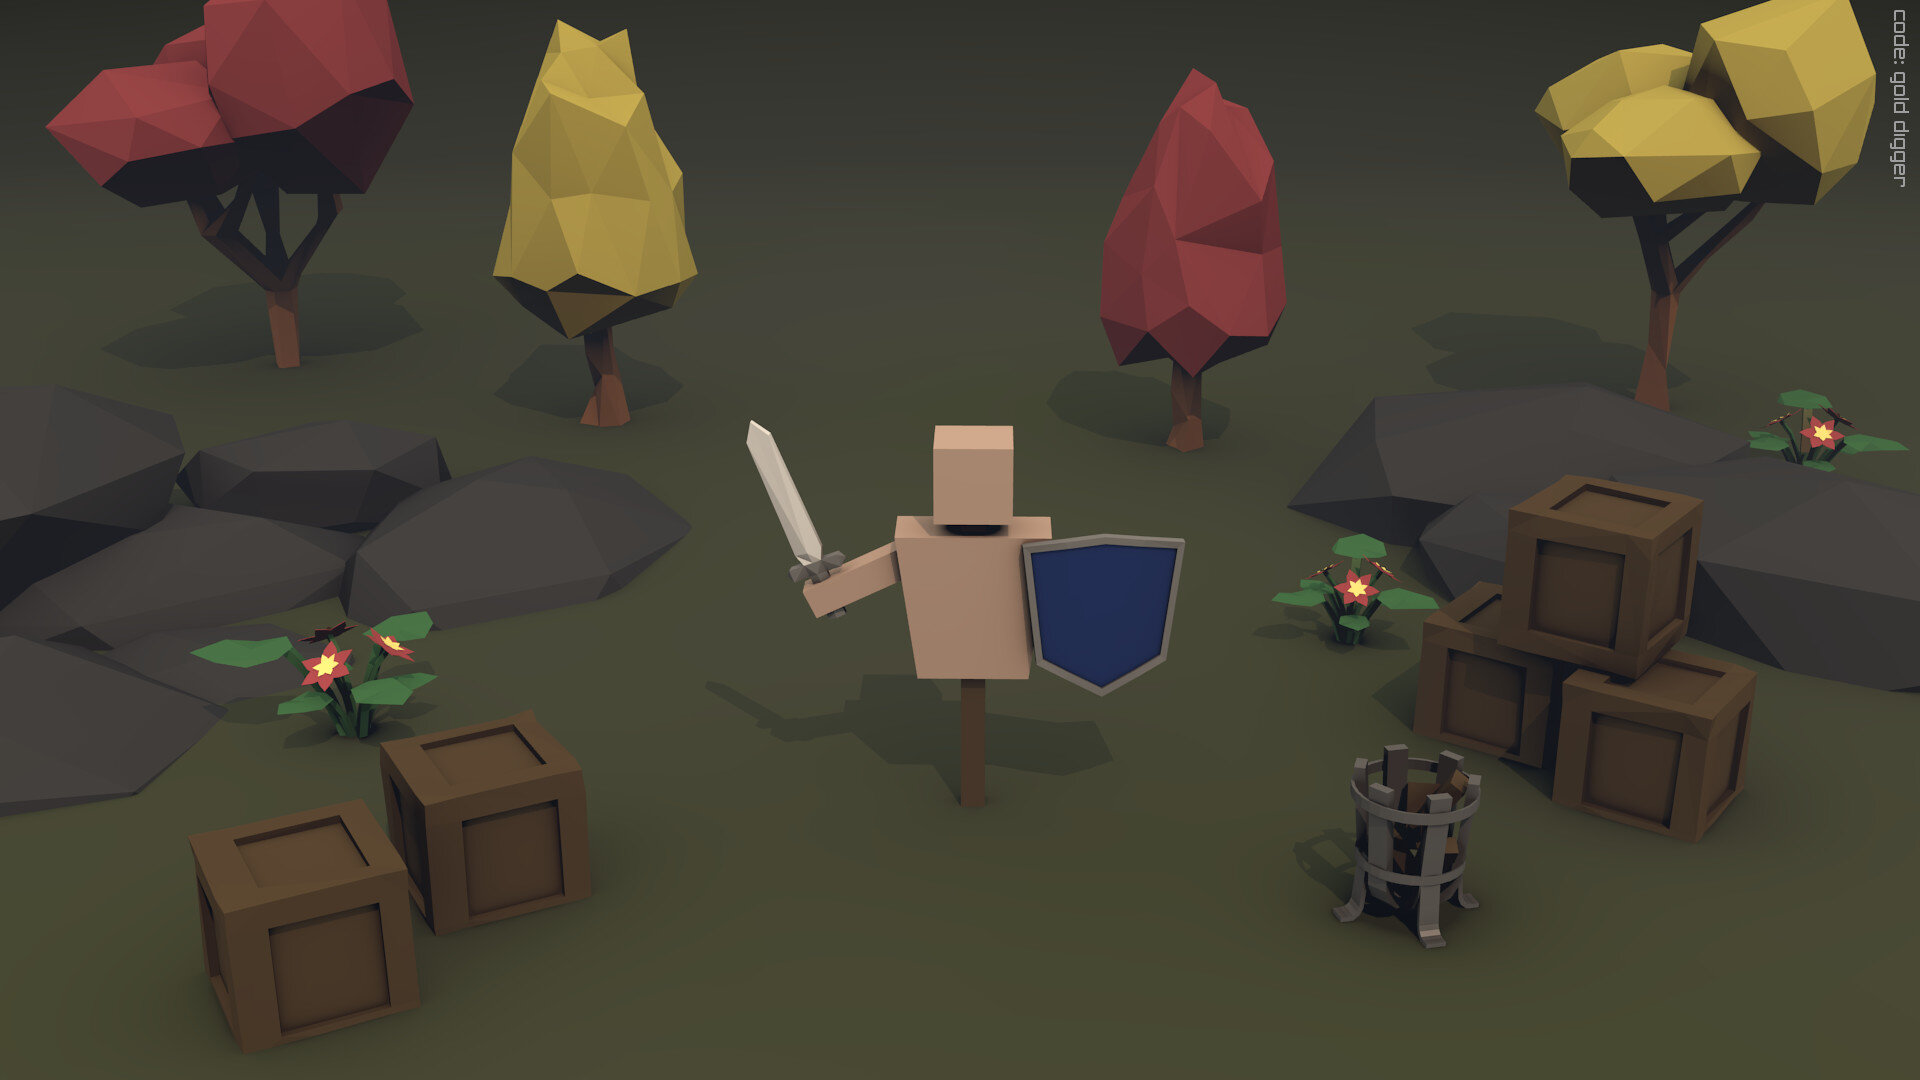
To help illustrate the state pattern, I’ve created a simple Unity project. There is a NPC played by a capsule and it’s goal is to wander around the maze and collect the yellow cubes. When it sees a red sphere (critter) it will chase it and attack it. Nothing too fancy.
So with that in mind, how would you program this behavior? Take a minute and think it through. No cheating!

Just about ready to go up on steam! ;)
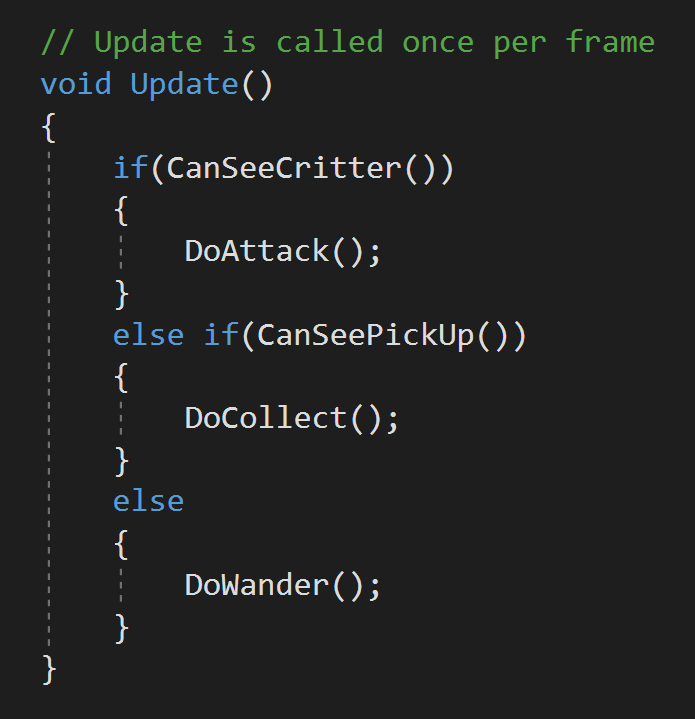
This actually doesn’t look too bade with the use of functions… but will get out of control in a hurry.
I know when I first got started with C# and Unity, I would have done it with an if statement or two (or seven). And that works. It really does. Until you need to add another behavior. Or another game mechanic gets layered in. And we all know it won’t end there. The layers will continue to get added until the code breaks, bugs appear or the project gets forgotten because it was getting too hard to work with.
Simple FSM = Enum + Switch
So let’s look at the simple FSM. I still remember learning about this and was utterly confused by how to implement it but at the same time amazed at what it did to my code once I finally got it working. At that time I hadn’t really learned to use functions well so I had 100’s of lines in my update function. Needless to say it was nearly impossible to debug and when I discovered FSMs it was a major break through!
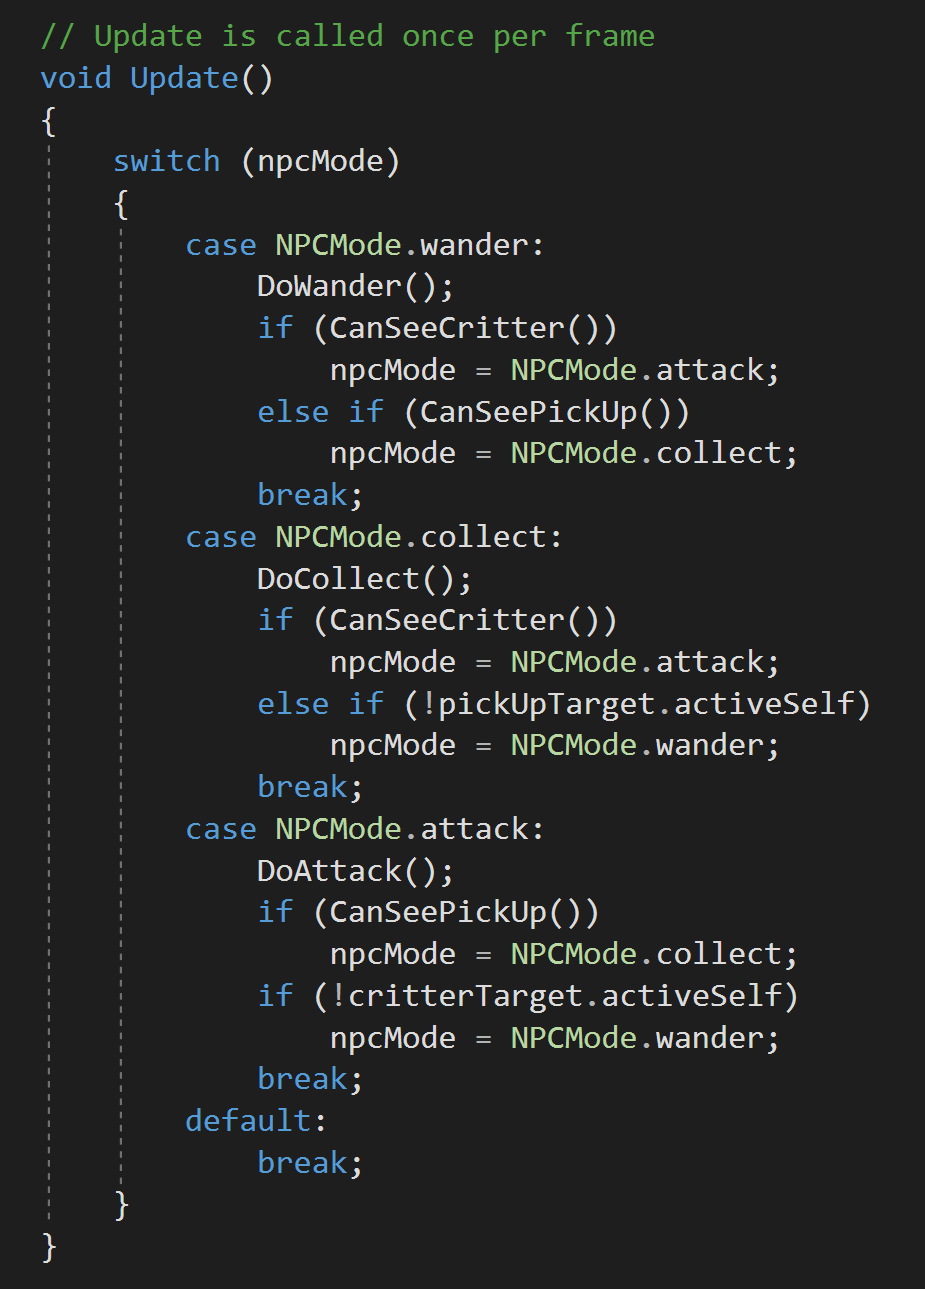
Simple FSM using an ENum and a Switch
In the case I described above the NPC behavior can be broken down into 3 different states or 3 different smaller behaviors. I thought of these as wander, collect and attack. A custom enum can then be created with these three values.
With the enum created a switch statement can be placed in the update function. For each case we can call the relevant function for that behavior. But we still need a way to change or switch (get it!) the state. For the most part this can still be done with basic if statements.
And now this may sound like we’ve back pedaled to our original solution and just made things more complex.
There is a major advantage here!
When we started, inside the update function we had to have a way to determine which state we were in - picking from ALL the possible states. Imagine how complicated that would be if there were 5, 6 or maybe even 10 different states. Yuck! Nothing clean about that.
With this method we only have to decide IF we need to change states GIVEN that we are already in a particular state. This greatly simplifies the decision making albeit at the cost of a few extra lines of code.
In a FSM it’s common that a given state can only transition to a limited number of other states. For example in my case maybe I don’t want the NPC to stop collecting if it sees a red sphere and it should only attack a sphere if it’s wandering around with no cubes in sight. If that’s the case the “state pattern” may actually reduce the amount of code needed as well as serving to untangle the code.
This implementation of the state pattern can be used for all kinds of different behaviors. It could be used to control animations, background music, or which UI elements are being displayed.
As an aside, in my personal project, I use a vaguely similar approach that makes use of a static enum and events for game modes so that various managers and UI elements can act or react based on the state of the game. The clarity of being in exactly one state has greatly simplified my code and made it far less error prone.
So this is all well and good, but you may be able to see the end result of this approach is still messy if the number of states starts to get large.
A Step Further => More Abstract + More Manageable
Having all the states switching inside the Update function can quickly get unmanagable and if nothing else is pretty hard to look at.
So let’s go one step further. This step adds another layer or two of abstraction to the system, still has some downsides but does clean up our code and will make larger FSMs easier to manage.
This step will place each state in its own (mostly) self contained class. The state will be in control of itself and will determine when to make a transition as well as determine which state to transition to.

Step 1 is to create a new interface. In my case I’ll call the interface INPCState. The interface will have just one function that will take in all the NPC data and will return a value of the type INPCState. This returned state will be the state for the next frame as the “Do Action” function will be called by the base class of the NPC which in turn will run the behavior for a given state.

The Wander State with all the functions included
Step 2 is to create a new class for each state of the FSM and that state needs to implement the interface INPCState. Each of these classes should also contain any functions or logic needed for that state. In my case I have choosen to leave all the variables on the NPC base class. This keeps each state class tidy, but does mean that the state class will be changing values on the NPC base class which is usually something I like to avoid - you win some and you lose some.
Inside each state’s “Do Action” function we need to call the relevant functions AND we need to decide which state to use for the next frame. You can see the full code to the left, but for now let’s jump back to the NPC base class which will help make sense of the return values.
Step 3 is to refactor the NPC base class. Here we need a new variable of the type INPCState that will hold a reference to the current state. We also need instances of each state - it would be possible to make this work with static classes and using an abstract class rather than an interface, but if you know what that means you can probably implement it yourself.

The simplified NPC Base Class
In the OnEnable function I’ve set the current state to the wander state to ensure that the current state variable is never null.
Then the real magic happens in the Update function. Here we have just one line! So awesome. Here we call the “do action” function on the current state and then set the current state to the value returned from that state.
That makes total sense, I swear it does, but it’s abstract.
Give a mintue to let it sink in.
This is so clean.
Step 4 is to add conditionals to the state classes to determine which state to be in for the next frame. Notice that we have passed in a reference to the NPC base class into the “Do Action” function and from there we can get a reference to the instances of the state classes.
Pro’s
The base class is exceptionally clean. You can now see how the class appears to change it’s state (behavior). Effectively the entire Update function changes depending on the current state and what in that state’s “Do Action” function. That’s cool.
If we want to add an additional state we simply create a new class, add an instance to the NPC base class and finally add conditions to allow a transition to the new state from other states.
As long as the number of states stays fairly small 5 or maybe 10 this is a pretty manageable solution.
Con’s
It’s hard to maintain if the system truly gets complex. In this case most sophicated structures such as behavior trees might be needed.
All the variables in the NPC base class are public. Which is a bit messy and not super awesome. This could be partially solved by creating a data container that itself is private in the NPC base class but has public variables… This passes the buck a bit, but would prevent those variable from being changed by classes without access to the data container. A generic data container would also potentially open the doors a bit wider for reuse of the states by other NPC types - so worth thinking about.
As mentioned before, the states are changing values of variables on the NPC base class. Not ideal and something I usually go out of my way to avoid if possible.
Older Posts
-
January 2026
- Jan 27, 2026 Save and Load Framework Jan 27, 2026
-
April 2024
- Apr 10, 2024 Ready for Steam Next Fest? - Polishing a Steam Page Apr 10, 2024
- Apr 1, 2024 Splitting Vertices - Hard Edges for Low Poly Procedural Generation Apr 1, 2024
-
November 2023
- Nov 18, 2023 Minute 5 to Minute 10 - Completing the Game Loop Nov 18, 2023
-
September 2023
- Sep 13, 2023 Visual Debugging with Gizmos Sep 13, 2023
-
July 2023
- Jul 4, 2023 Easy Mode - Unity's New Input System Jul 4, 2023
-
May 2023
- May 19, 2023 Level Builder - From Pixels to Playable Level May 19, 2023
-
April 2023
- Apr 11, 2023 Input Action in the Inspector - New Input System Apr 11, 2023
-
February 2023
- Feb 26, 2023 Tutorial Hell - Why You're There. How to Get Out. Feb 26, 2023
-
December 2022
- Dec 31, 2022 Upgrade System (Stats Part 2) Dec 31, 2022
-
November 2022
- Nov 10, 2022 Stats in Unity - The Way I Do it Nov 10, 2022
- Nov 5, 2022 State of UI in Unity - UI Toolkit Nov 5, 2022
-
August 2022
- Aug 17, 2022 Knowing When A Coroutine Finishes Aug 17, 2022
-
April 2022
- Apr 23, 2022 Unity Input Event Handlers - Or Adding Juice the Easy Way Apr 23, 2022
-
March 2022
- Mar 15, 2022 *Quitting a Job I Love Mar 15, 2022
-
February 2022
- Feb 8, 2022 Split Screen: New Input System & Cinemachine Feb 8, 2022
-
January 2022
- Jan 24, 2022 (Better) Object Pooling Jan 24, 2022
- Jan 19, 2022 Designing a New Game - My Process Jan 19, 2022
- Jan 16, 2022 Strategy Game Camera: Unity's New Input System Jan 16, 2022
-
December 2021
- Dec 16, 2021 Raycasting - It's mighty useful Dec 16, 2021
-
November 2021
- Nov 22, 2021 Cinemachine. If you’re not. You should. Nov 22, 2021
-
August 2021
- Aug 3, 2021 C# Extension Methods Aug 3, 2021
-
June 2021
- Jun 27, 2021 Changing Action Maps with Unity's "New" Input System Jun 27, 2021
-
May 2021
- May 28, 2021 Unity's New Input System May 28, 2021
- May 8, 2021 Bolt vs. C# - Thoughts with a dash of rant May 8, 2021
-
March 2021
- Mar 10, 2021 Coroutines - Unity & C# Mar 10, 2021
-
January 2021
- Jan 14, 2021 Where's My Lunch? - January Devlog Update Jan 14, 2021
-
December 2020
- Dec 27, 2020 C# Generics and Unity Dec 27, 2020
- Dec 7, 2020 Steam Workshop with Unity and Facepunch Steamworks Dec 7, 2020
-
November 2020
- Nov 27, 2020 Simple Level Save and Load System (Unity Editor) Nov 27, 2020
- Nov 9, 2020 Command Pattern - Encapsulation, Undo and Redo Nov 9, 2020
-
October 2020
- Oct 28, 2020 GJTS - Adding Steamworks API and Uploading Oct 28, 2020
- Oct 9, 2020 Game Jam... Now What? Oct 9, 2020
-
August 2020
- Aug 16, 2020 Strategy Pattern - Composition over Inheritance Aug 16, 2020
-
July 2020
- Jul 24, 2020 Observer Pattern - C# Events Jul 24, 2020
- Jul 15, 2020 Object Pooling Jul 15, 2020
- Jul 3, 2020 Cheat Codes with Unity and C# Jul 3, 2020
-
June 2020
- Jun 16, 2020 The State Pattern Jun 16, 2020
-
August 2019
- Aug 12, 2019 Easy UI Styles for Unity Aug 12, 2019
-
July 2019
- Jul 3, 2019 9th Grade Math to the Rescue Jul 3, 2019
-
June 2019
- Jun 12, 2019 Introducing My Next Game (Video DevLog) Jun 12, 2019
-
May 2019
- May 29, 2019 Programming Challenges May 29, 2019
-
March 2019
- Mar 2, 2019 Something New - Asking "What Can I Learn?" Mar 2, 2019
-
November 2018
- Nov 30, 2018 A Growing Channel and a New Tutorial Series Nov 30, 2018
-
October 2018
- Oct 11, 2018 Procedural Spaceship Generator Oct 11, 2018
-
July 2018
- Jul 11, 2018 Implementing SFX in Unity Jul 11, 2018
-
May 2018
- May 31, 2018 Prototyping Something New May 31, 2018
-
April 2018
- Apr 17, 2018 When to Shelve a Game Project? Apr 17, 2018
-
February 2018
- Feb 9, 2018 State of the Game - Episode 3 Feb 9, 2018
-
December 2017
- Dec 16, 2017 State of the Game - Episode 2 Dec 16, 2017
-
November 2017
- Nov 7, 2017 The Bump From A "Viral" Post Nov 7, 2017
-
October 2017
- Oct 30, 2017 NPC Job System Oct 30, 2017
-
September 2017
- Sep 1, 2017 Resources and Resource Systems Sep 1, 2017
-
August 2017
- Aug 3, 2017 State of the Game - Episode 1 Aug 3, 2017
-
June 2017
- Jun 20, 2017 Resources: Processing, Consumption and Inventory Jun 20, 2017
- Jun 15, 2017 Energy is Everything Jun 15, 2017
-
May 2017
- May 16, 2017 Graphing Script - It's not exciting, but it needed to be made May 16, 2017
- May 2, 2017 Tutorials: Low Poly Snow Shader May 2, 2017
-
April 2017
- Apr 28, 2017 Low Poly Snow Shader Apr 28, 2017
- Apr 21, 2017 Environmental Simulation Part 2 Apr 21, 2017
- Apr 11, 2017 Environmental Simulation Part 1 Apr 11, 2017
-
March 2017
- Mar 24, 2017 Building a Farming Game Loop and Troubles with Ground Water Mar 24, 2017
-
February 2017
- Feb 25, 2017 The Inevitable : FTF PostMortem Feb 25, 2017
-
December 2016
- Dec 7, 2016 Leaving Early Access Dec 7, 2016
-
November 2016
- Nov 28, 2016 Low Poly Renders Nov 28, 2016
- Nov 1, 2016 FTF: Testing New Features Nov 1, 2016
-
October 2016
- Oct 27, 2016 Watchtowers - Predictive Targeting Oct 27, 2016
- Oct 21, 2016 Click to Color Oct 21, 2016
- Oct 19, 2016 Unity Object Swapper Oct 19, 2016
-
September 2016
- Sep 18, 2016 Testing Single Player Combat Sep 18, 2016
-
May 2016
- May 25, 2016 Release Date and First Video Review May 25, 2016
-
March 2016
- Mar 26, 2016 Getting Greenlit on Steam Mar 26, 2016