Dev Log
GJTS - Adding Steamworks API and Uploading
So here we go! A new project and a new series! If you have no idea what I’m talking about you might want to check out the series intro video video.
Today’s goal is to get “Where’s my Lunch” working and downloadable on the steam client. And in the process, hopefully give you an idea of what that takes to do it with your game. While getting the entire store setup will take days or even weeks… getting your game on the Steam servers and ready to share with friends or supporters is actually pretty easy.
While it’s not necessary to do it this early in the development process, I want to do it as an exciting first step AND integrating steam at this point seems like a good idea as adding significant functionality early in the development process generally keeps things working smoothly down the road.
Steamworks
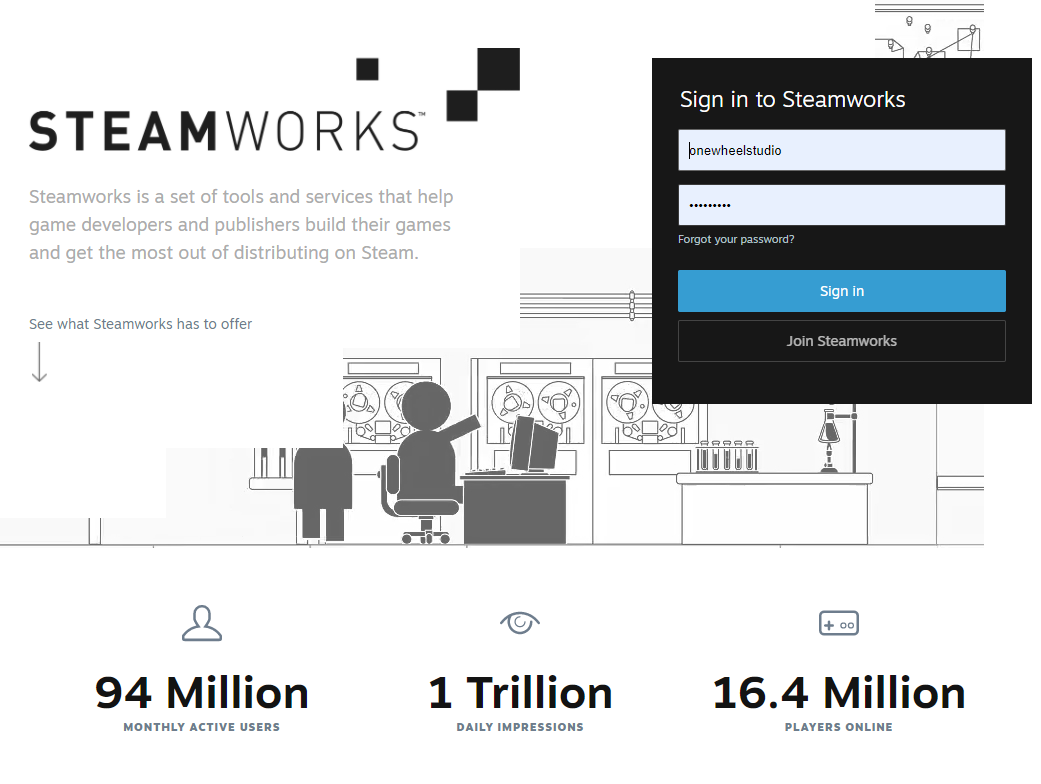
So if you are trying to follow along, the first thing you need to do is set up a Steamworks account. Now I already have one, but if I remember it’s not too complicated to do it - but you WILL need to provide quite a bit of information and it’s definitely more involved than creating a regular steam account, but very doable and Valve should walk you through the process.
I WOULD strongly recommend that you create a new Steam account too. DON’T use your personal account for publishing games. A layer of separation, even a small one will be appreciated when comments and questions about your game start flooding your notifications. Not to mention that keeping your branding clean and semi-professonal is much easier with a dedicated publisher account.
Personally, I log in with my OWS account in a browser and into the Steam Client with my personal account… This prevents tedious logging in and out while still keeping some separation. I’ve also got the two accounts setup to use family sharing which helps keep things simple in terms of accessing games.
As another side note, many people think they need to start a corporation to publish games… Now I’m not a lawyer, I hope that’s obvious, but please go talk to a lawyer first if you think you need to form a corporation. Taxes and such, at least here in the states, get way more complicated if you form a corporation and unless you start making real money it’s not worth it.
OWS is registered as a sole proprietorship which has worked perfectly fine over the last few years. And unless I sell 10’s of thousands of copies of this game, it’s going to stay that way for a while longer.
Once you have a steam account you can add an app to Steamworks. And THIS is the part you have to pay for… My first game went through Steam Greenlight, but these days you just have to pony up $100 and you can put your game on Steam.

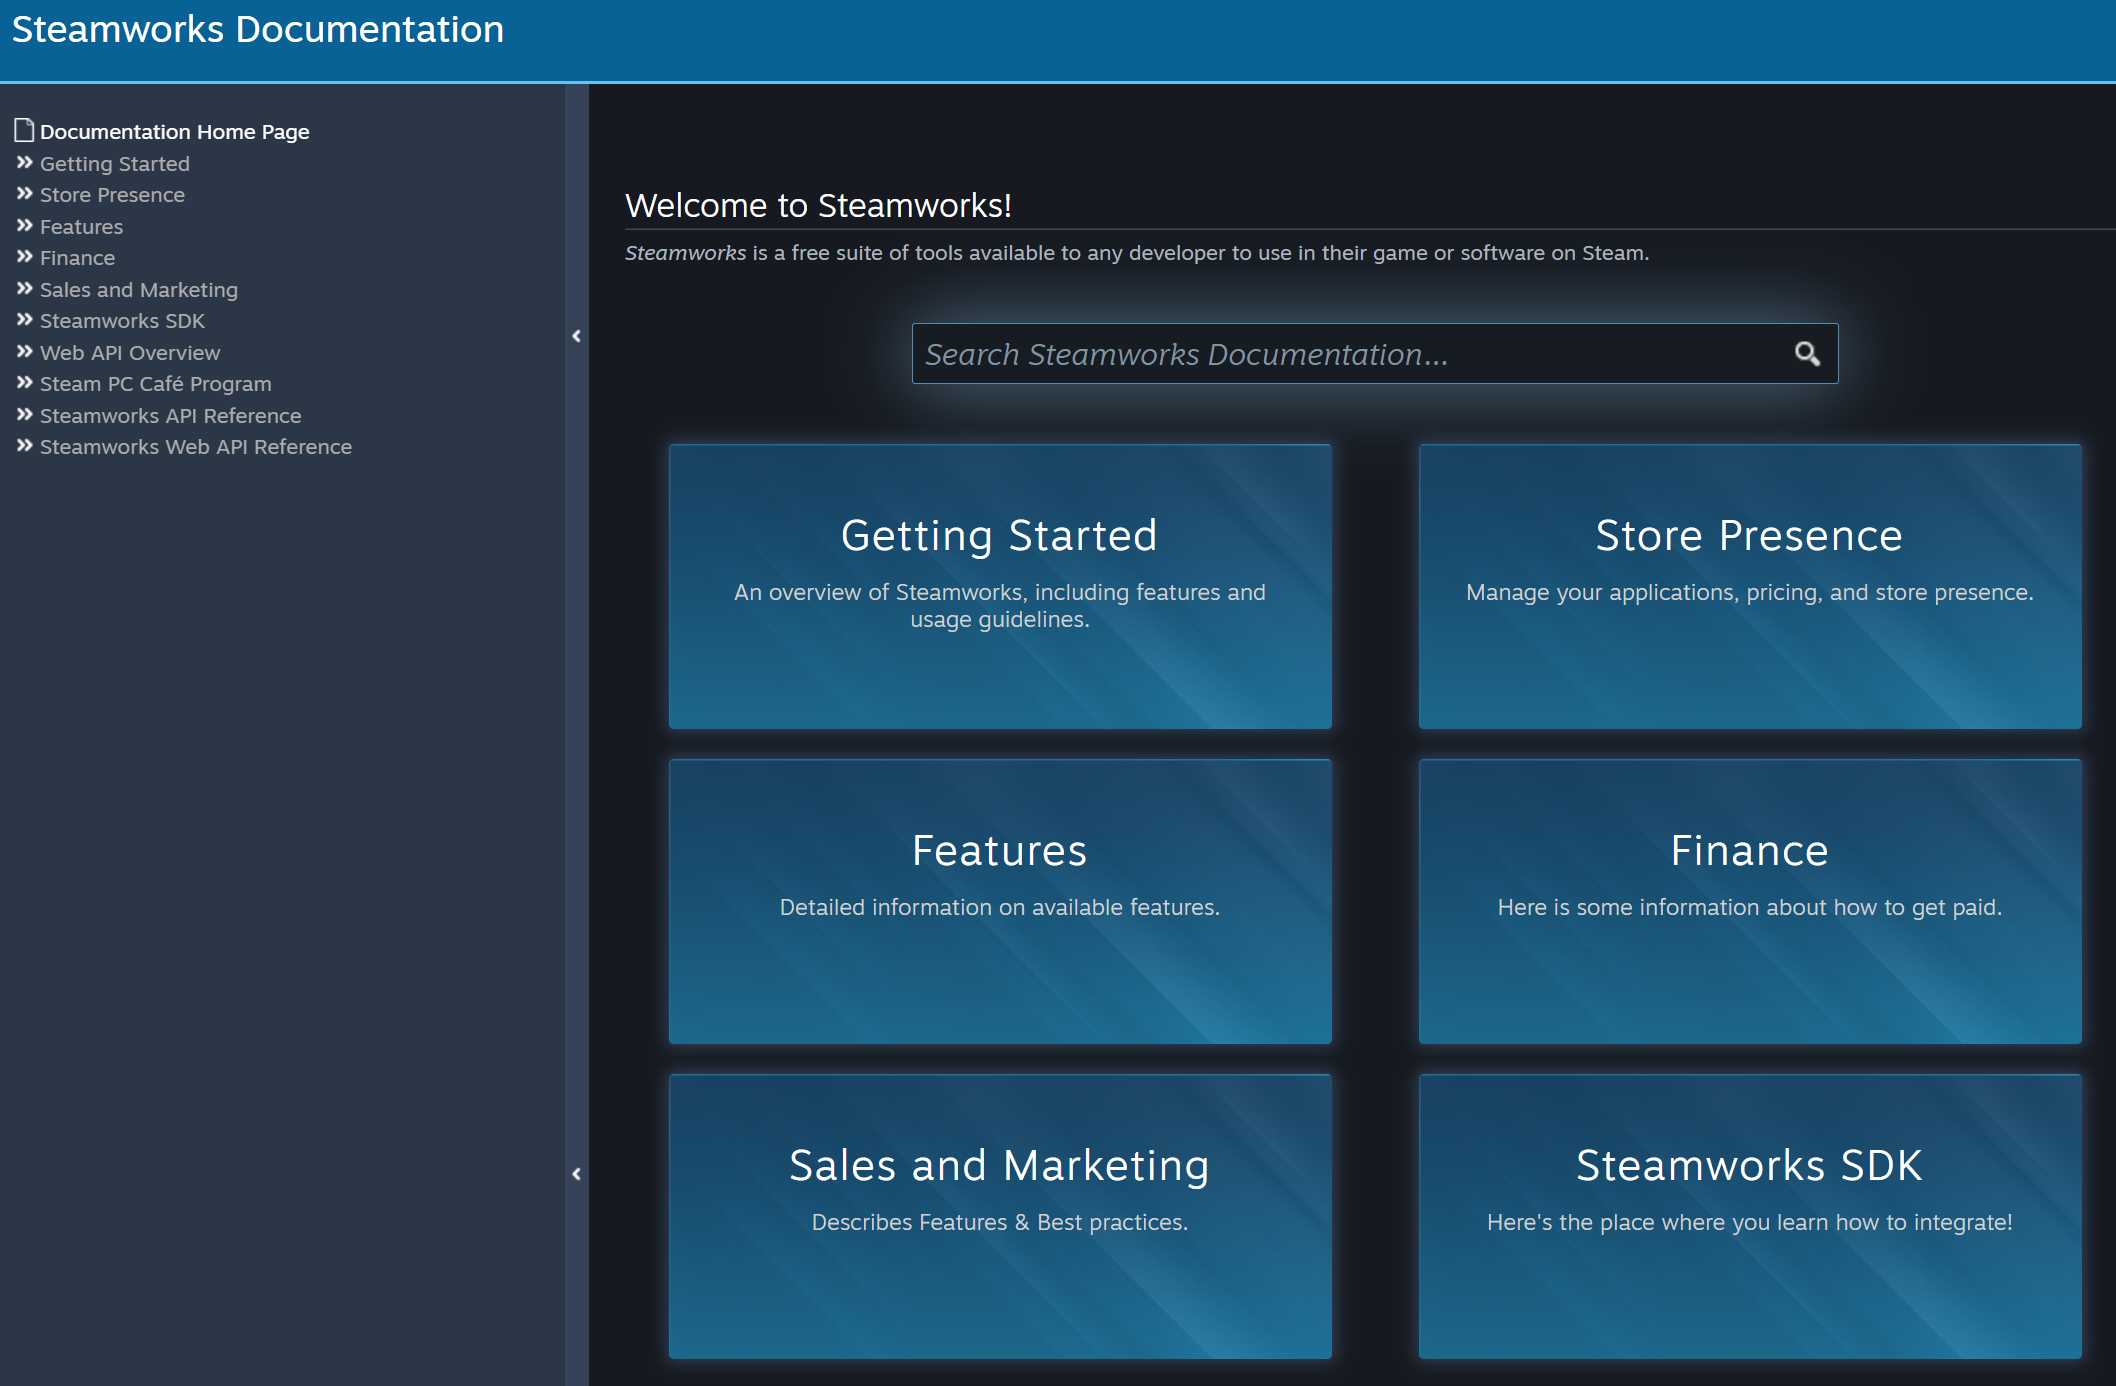
Once your application is added you’ll see an appID which we’ll be making use of quite a bit so it can be worth writing down or at least leaving the window open. With a Steamworks account you can now get access to the “Steamworks Development” group on steam.
It’s fantastic.
Just about every question you’ll have about publishing a game will be on the forum AND if you can’t find the answer you can always ask a new question. Valve has employees that monitor the group and will chime in from time to time when needed. If you’ve never published a game before… you should spend a lot of time reading in this forum.
It will be worth it.
Picking a Wrapper
The next step in the process is to pick a Steamworks wrapper… The steamworks API is all in C++ and since I’m using Unity, which uses C#, I’m going to need a wrapper or a layer of code to interact with that API. You could write your own, I suppose… but why?
Don’t do that.
For my first game I used Steamwork.NET which I think at the time was the only real option. Nowadays there’s a few more. So, I spent a few hours researching: watching videos, reading posts and articles.
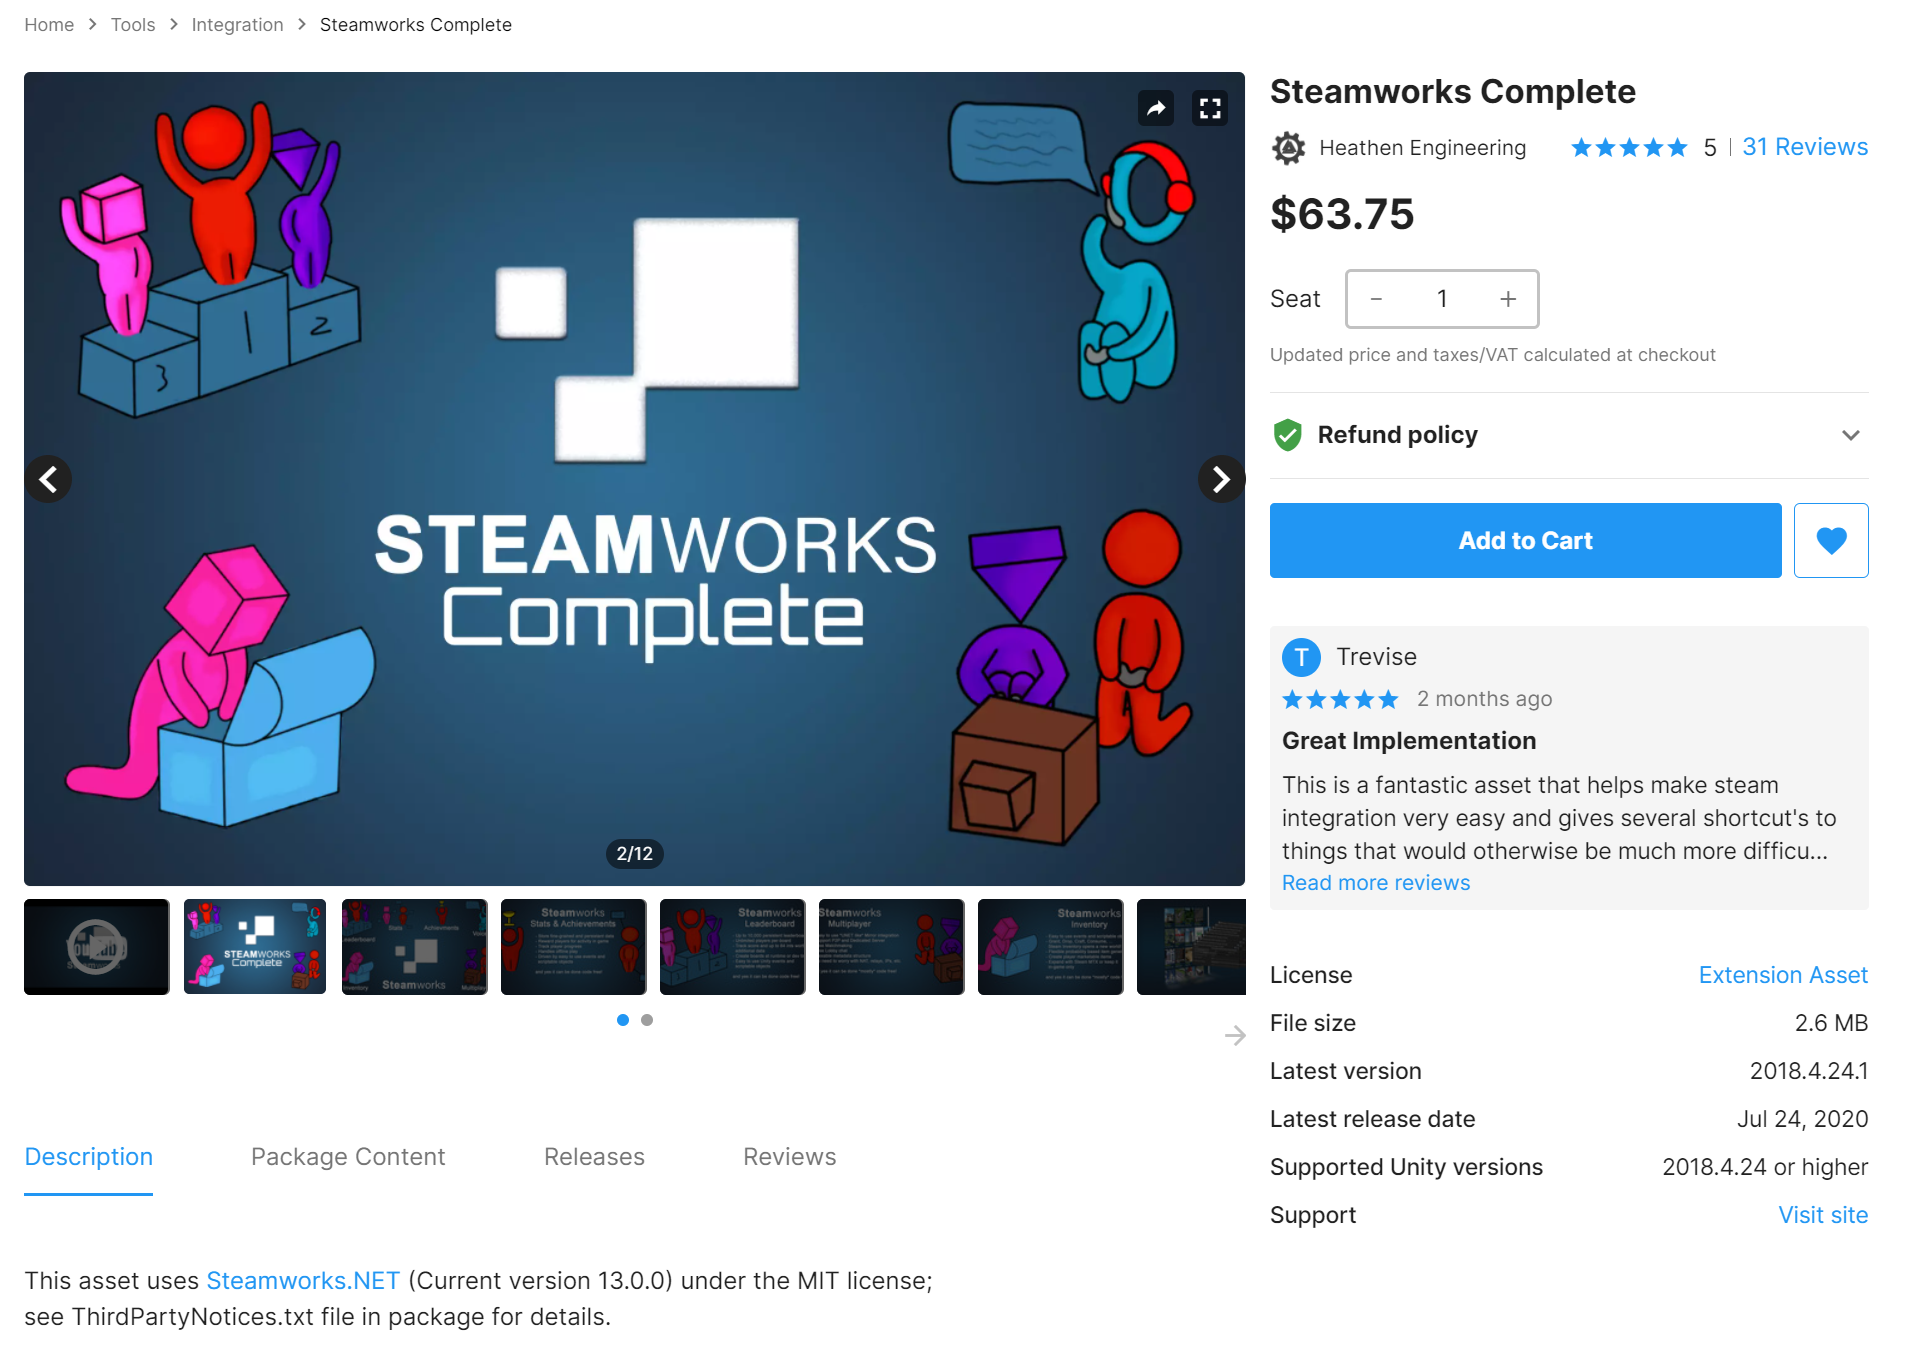
I found “Steamworks Complete” on the asset store. It uses Steamworks.NET and effectively wraps it in an easier to use package. Watching the videos it seems like the asset is well designed, but in the end, a wrapper of a wrapper to me didn’t seem like the best idea. I’ve grown cautious of using 3rd or 4th party tools…
After all, if I figured out Steamworks.NET several years ago with much less programming experience, I should be able to do it again and I don’t need someone else’s code to help…
I think.
I hope.

I was just about ready to download Steamworks.NET, but for some reason I hesitated and did one more google search - the choice of wrapper is something I’m going to have to live with until the project is finished so I wanted to make sure all my ducks are in a row!
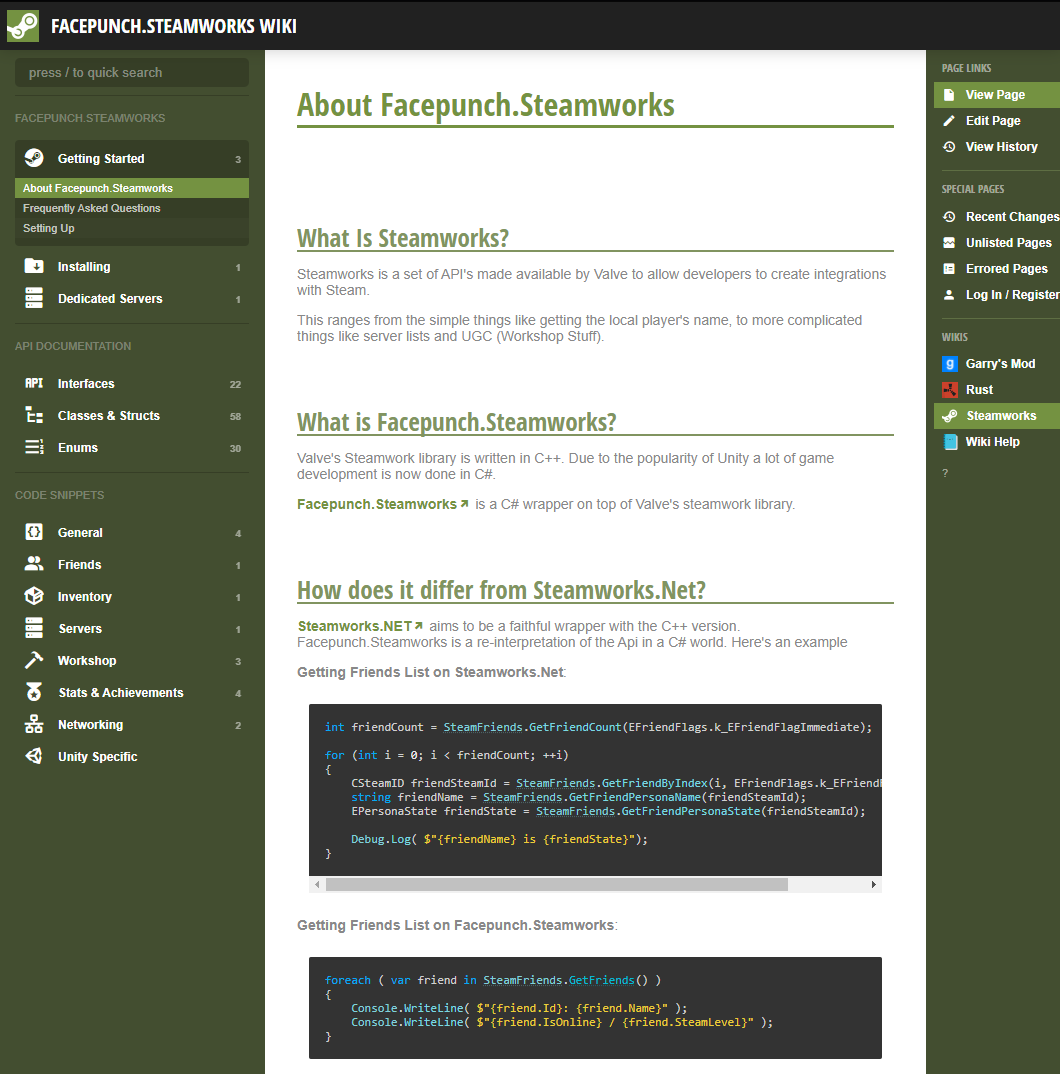
And I’m really glad I did. In an article, I found a link and reference to “Facepunch Steamworks!” And oh man, does it look better and easier to use! Steamworks.NET is all in C# but it’s not user friendly or at least not as much as it could be. Facepunch Steamworks is easy to read and easy to understand if you're comfortable with C#. Plus it’s in active development as it’s used in Rust and Gary’s Mod. Which is more than good enough for me.
Whether it’s true or not I also found a quote from the Steamworks.Net developer that “most people should use Facepunch.”
Okay. Definitely good enough for me.
The install process is dead easy, but I did find that locating the link for the instructions for doing so in Unity a bit hidden - but once I found them it’s a simple download and then just a matter of dropping the files into a folder in my project.
Honestly, I can’t imagine it being much easier.
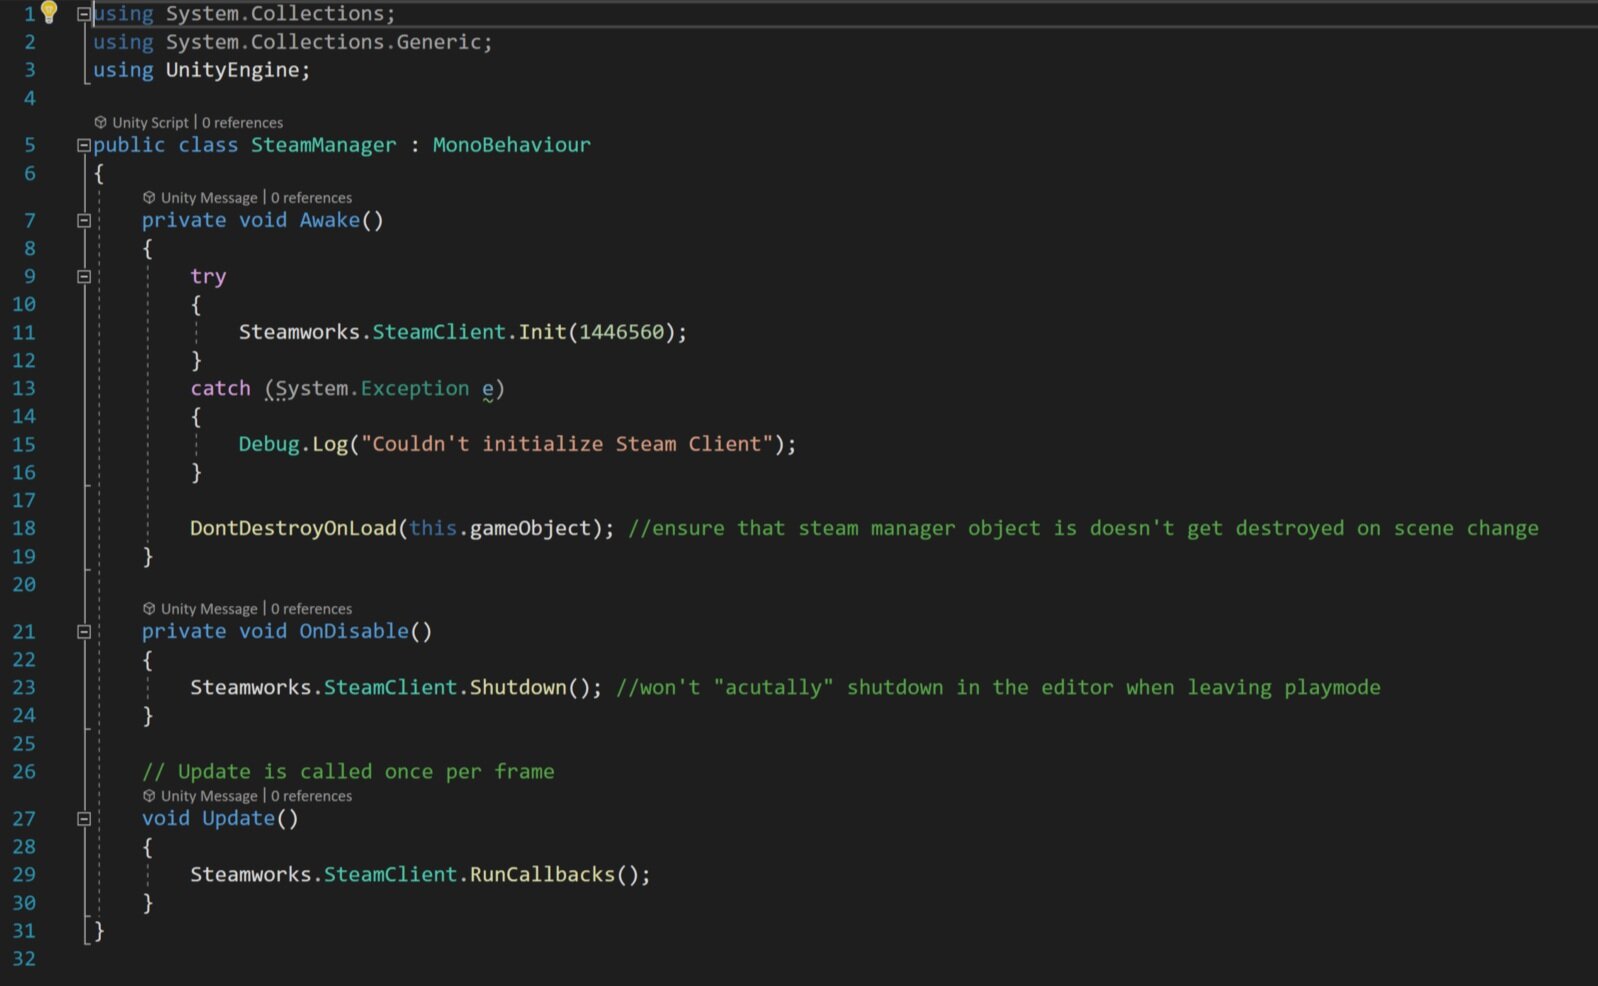
After that it’s just a matter of creating a simple “Steam Manager” and Facepunch provides an example of how to do just that. The steam manager will create a connection with Steam and make sure that the game is getting all the callbacks that it may need - most of this functionality will be needed later as I implement steam features like achievements, leader boards, and hopefully workshop functionality.
Do notice that I added the command “Don’t Destroy on Load” to ensure the steam manager will persist in all scenes. This is quick and easy, but I will likely need to revisit this down the road as returning to the start scene from another scene will create a duplicate copy of the steam manager. Not a big deal at this point, but I’d like to keep things tidy when possible.
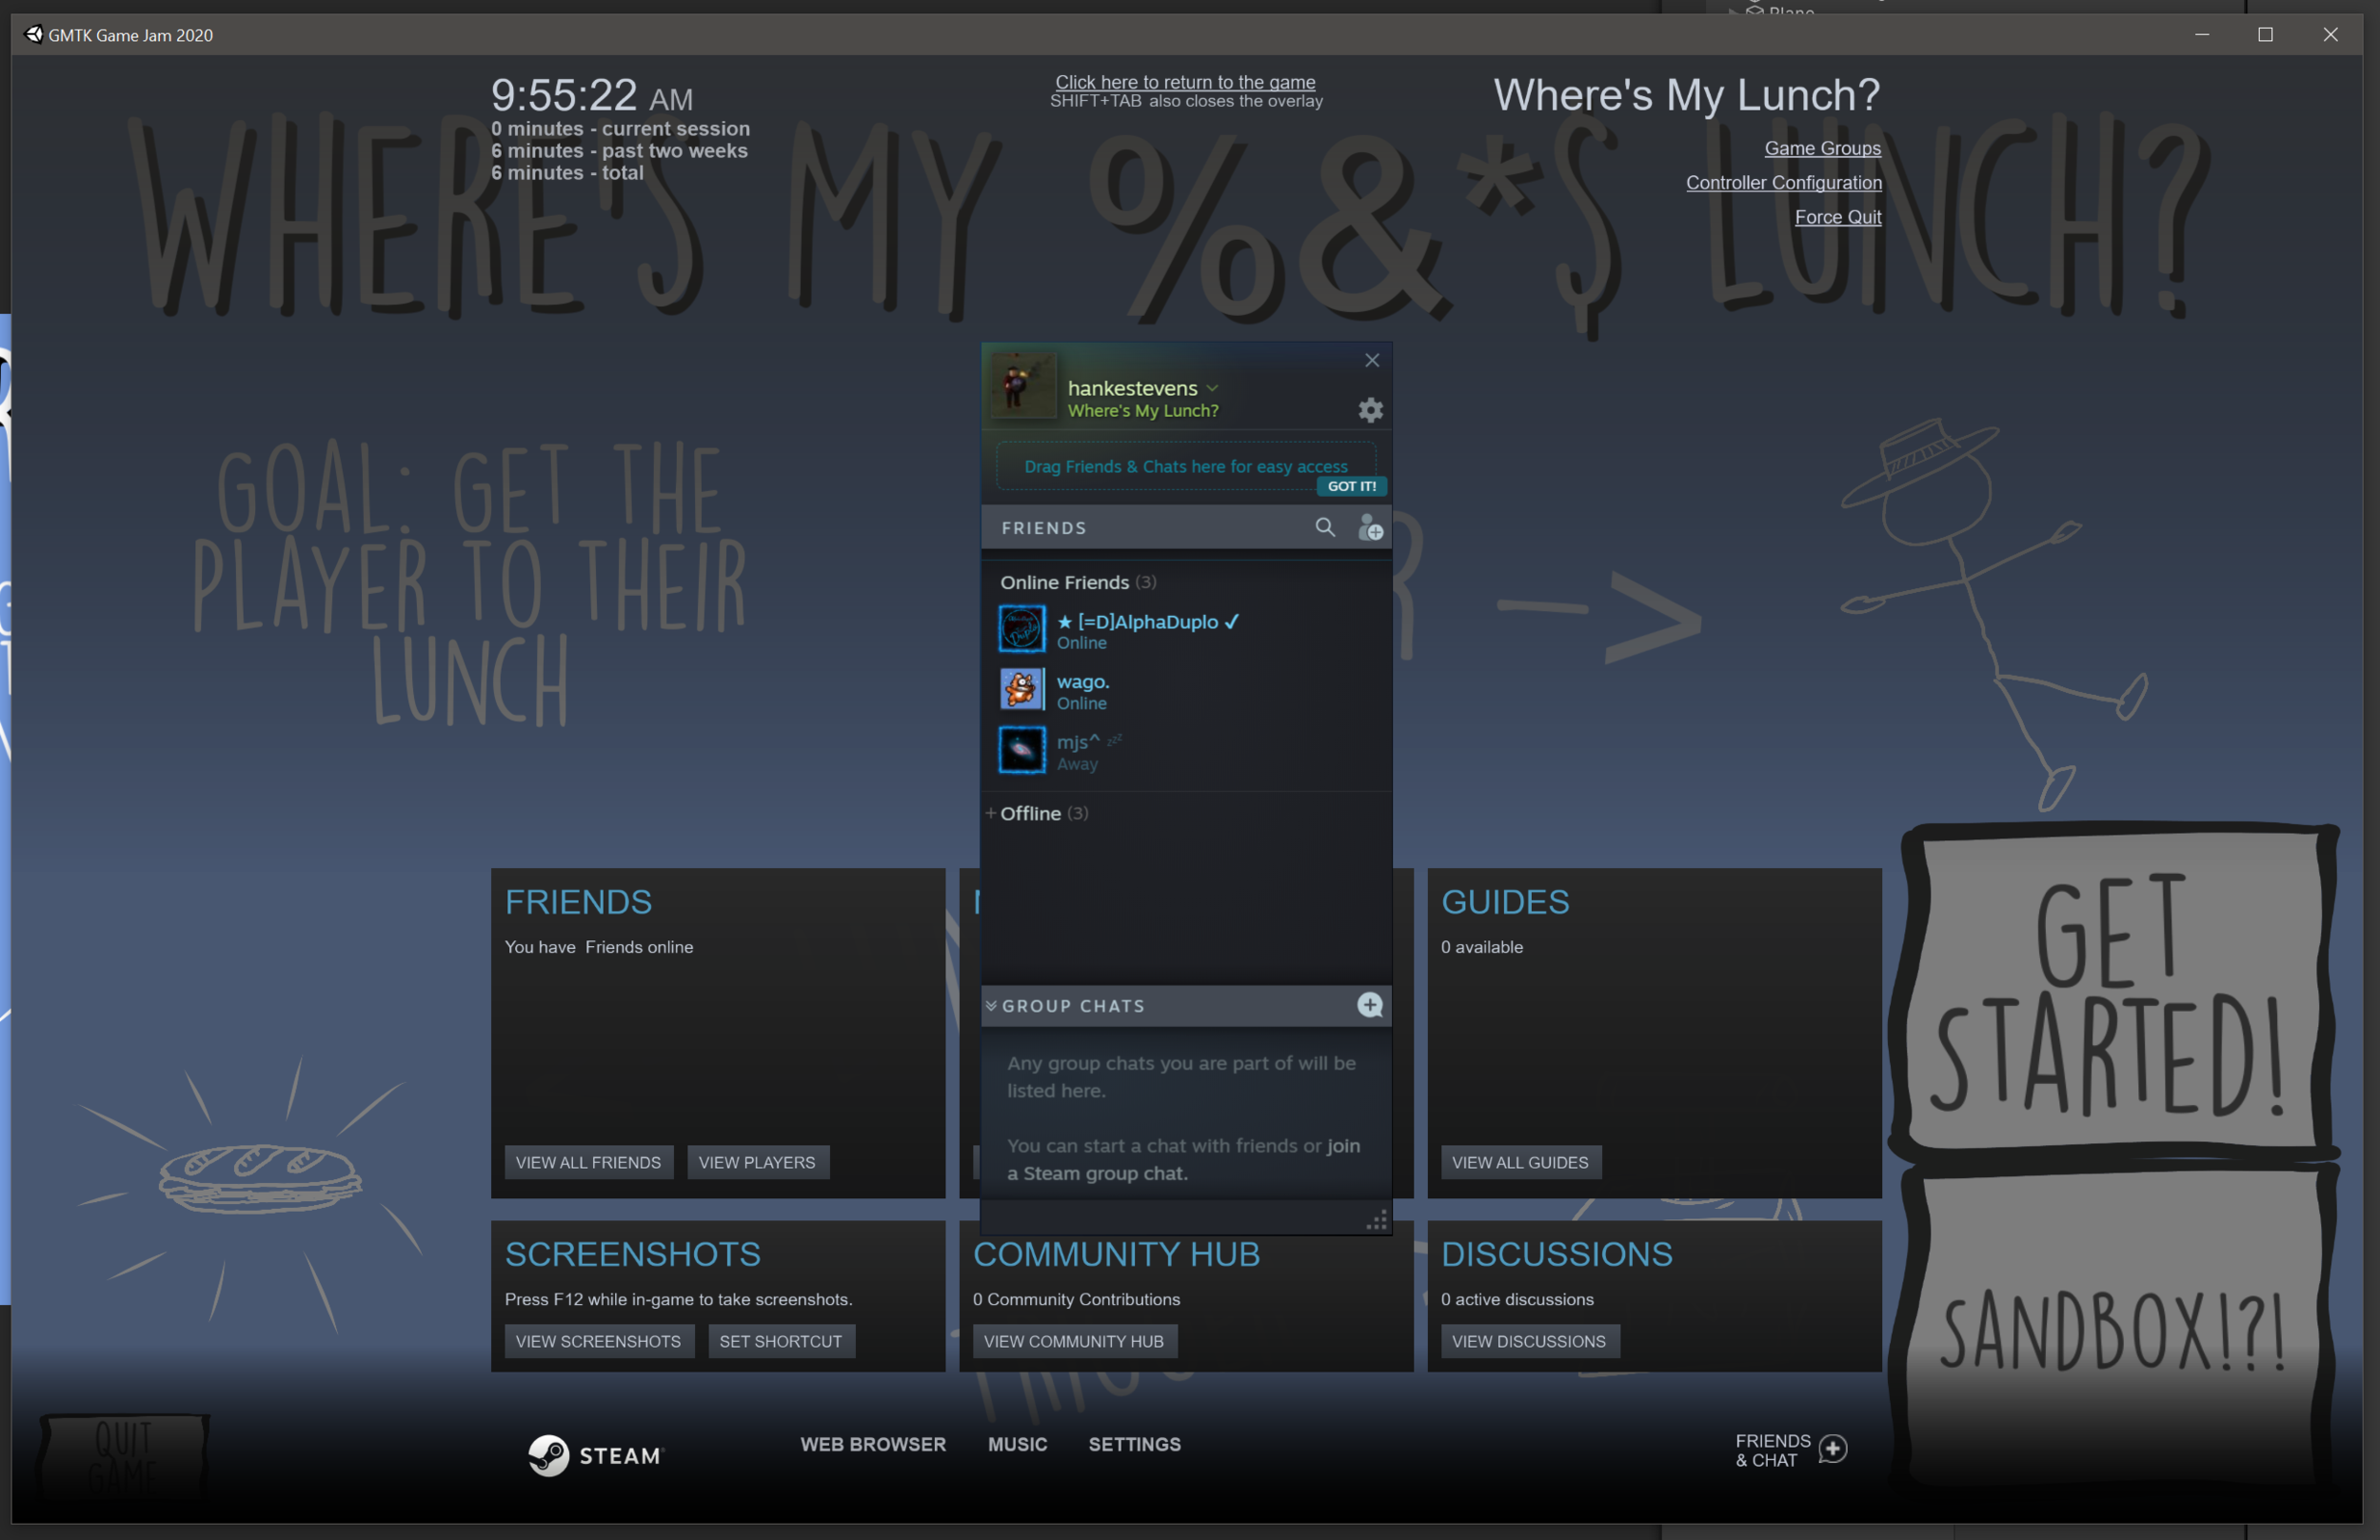
At this point, I wanted to do a little testing. So I made a build. And, sure enough, the steam overlay works AND Steam shows that I’m playing a game. Not a big step, but pretty fun all the same!
Now for the harder parts… I wanted to upload the game to steam and get it functional so I could push out a few keys and let folks play the game.
The rest of the post (and video) is going to look at how to do that and since I did get it working I decided to add a few Steam keys to the comments below... (Video only)
And if I remember I’ll keep adding keys with each video in the series. So make sure to get to the next video early!
If you happen to be a patron or a channel member supporting the channel with $5 or more per month - keep your eyes open as I’ll be looking to get keys into your hands as well.
Documentation! Probably more than you want to read ;)
But back to the actual point of the video, Valve provides pretty good documentation on how to upload your game to Steam, but still, I managed to fumble around and forgetting a few key steps. Those extra steps are there for good reason and give you, the developer, a bit more fine control on what players have access to and when they get that access.
So let’s take a look at how to make it all work.
The first step is pretty straight forward, and that’s to set the allowed operating systems. In my case, I’m sticking with 64 bit Windows for the time being. After that, a depot needs to get set up with the correct OS. Do note that each depo has an ID number that’ll be needed in the next steps - this number should be related to your appID.
You also need to set up the launch options, which essentially sets the executable file that needs to be opened to play the game.
After that I needed to download the SDK and put it somewhere convenient. Value recommends putting your game files into a folder inside the SDK folders, you don’t have to do this, but it’s not hard so I’m going with it. You could choose to manually move the files with each build OR have the SDK look into different folders… but this seems easiest for now.
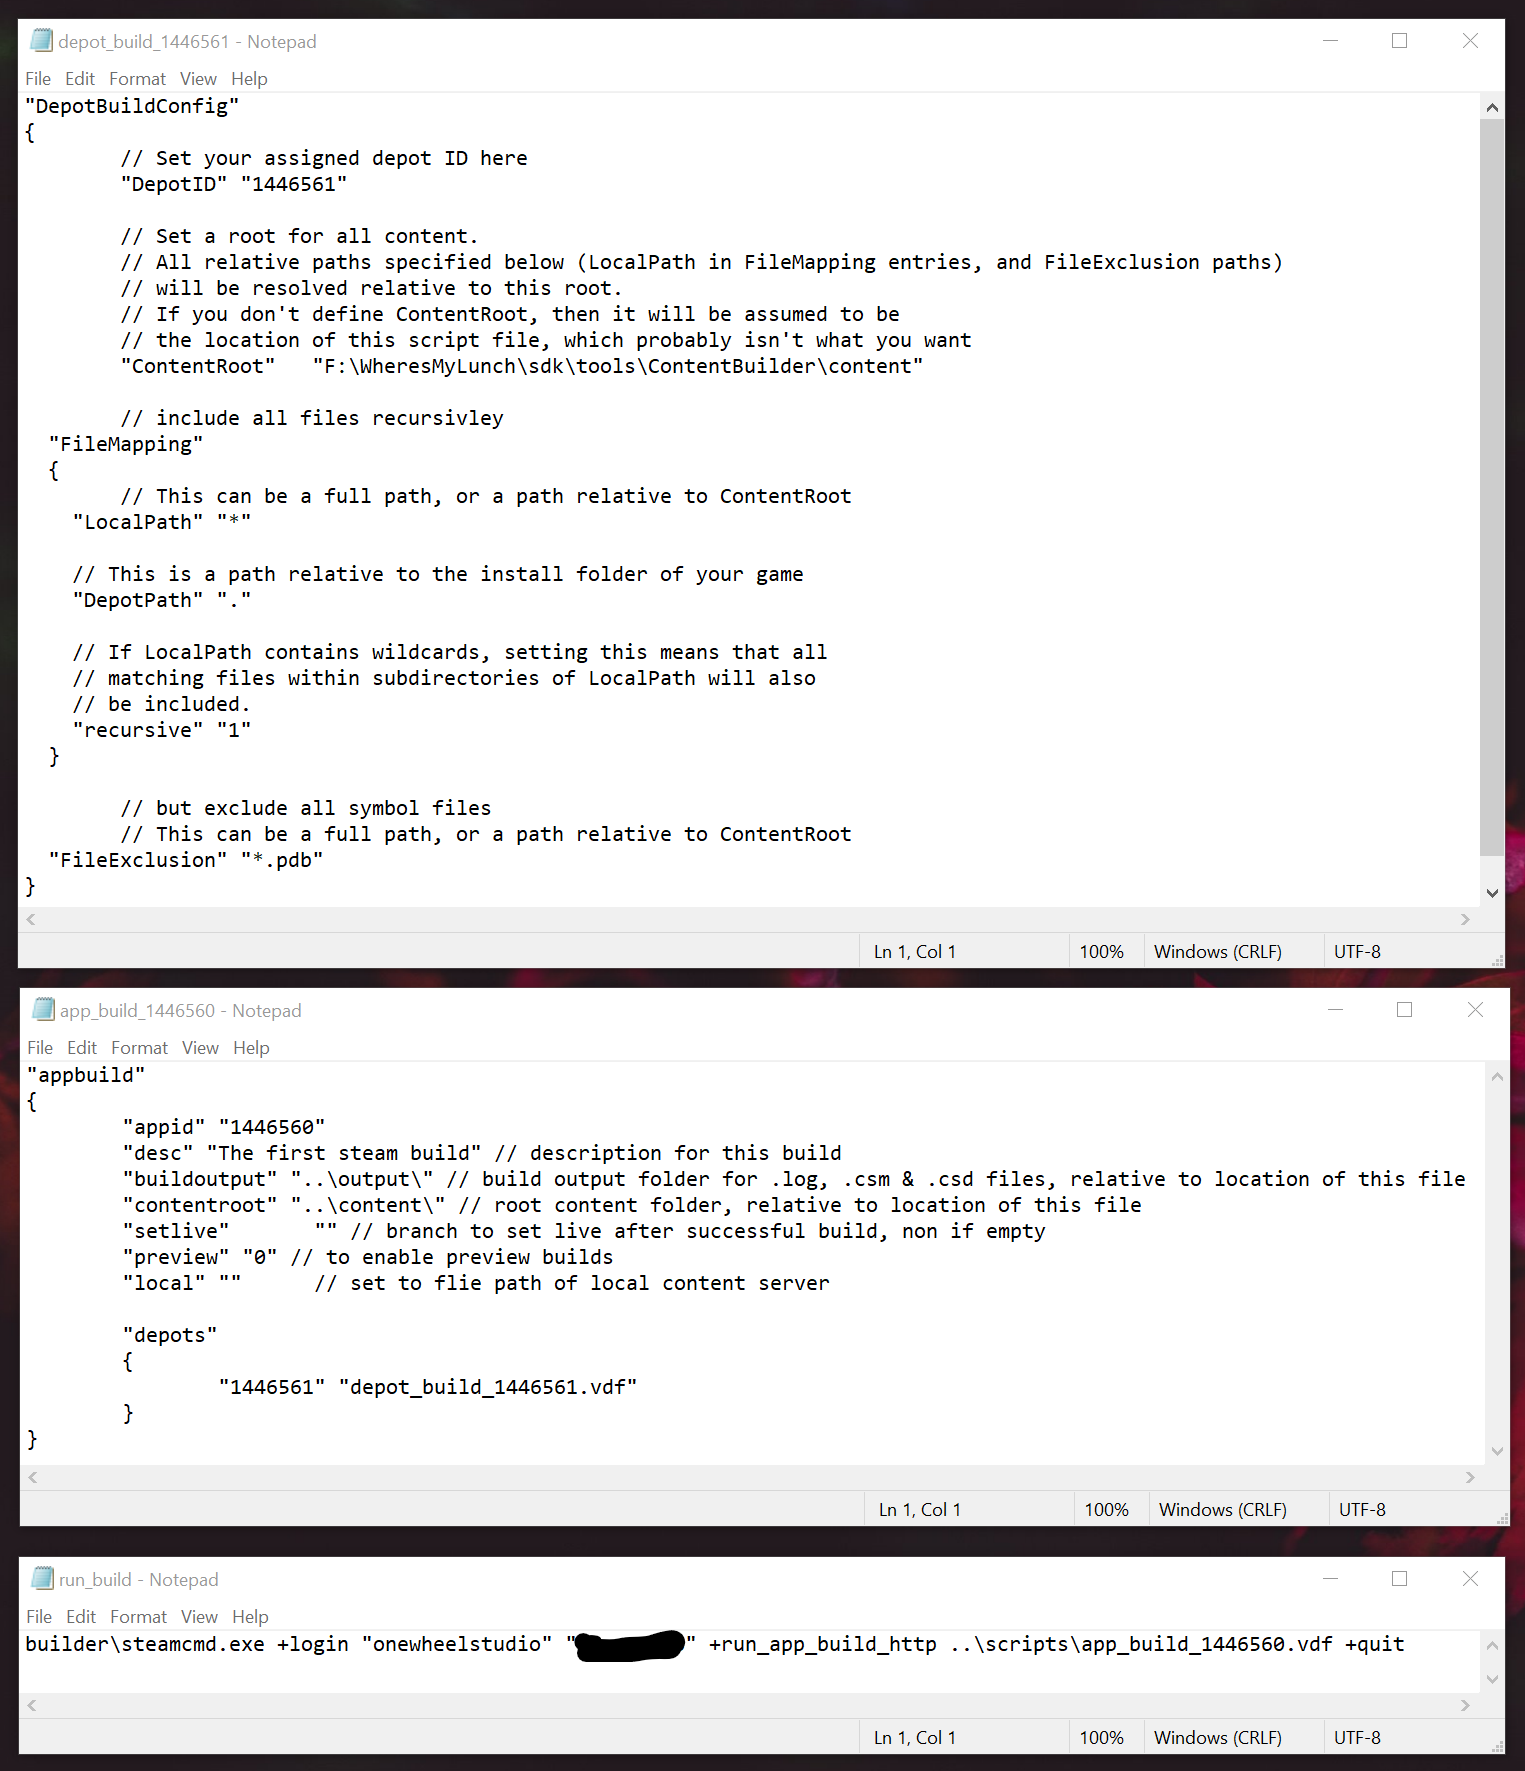
The three scripts that need to be edited
I did this by changing where Unity puts the builds and rebuilding the project.
Next, it’s just a matter of editing three text files to push the game files up to the steamworks backend. These files can be opened in just about any text editor - I use notepad for simplicity. As a tip for those on a windows machine: holding shift while right-clicking should give options to select a program to “open with” if they don’t automatically open in notepad.
The first script we need to edit is the “Depot build” file which can be found deep in the SDK folder structure under “content builder” and then in “scripts.” Here all that needs to be changed is the depot ID which we got when we created the depot.
In the same folder there is the “app build” file in which you will need to change the appID and information about the depot build file.
That last file that needs modification is the “run build” batch file. This file helps streamline the upload process. In this file, you’ll need to put in your username and password - both in plain text but surrounded by quotes.
Then all that needs to be done is to make sure all three files are saved and run the batch file.
I have two-factor authentication turned on so I got prompted for a code. If you don't have this turned on, especially in your developer account, go do it now! Even if you don’t make money this isn’t an account you want to lose control of.
Now, it might take a while to upload the first time or if big changes have been made but the game is on it’s way to the steam servers!
Sweet!
Now, when I got to this point I was feeling pretty confident and pretty happy. It should all work!
Right?

The branch build settings
Well, it didn’t.
The game showed up in steam, I could even “install” it and press the play button… But I got an error. I checked the local folders and there wasn’t anything there.
Hmm. What did I mess up?
Well, it turns out there are a few extra steps that I missed. The build branch needs to be set and the changes saved…. That’s easy.
So, confident that I’d fixed it, I did one more test and I still had the same problem. It took a search or two on the development forum to find the problem.
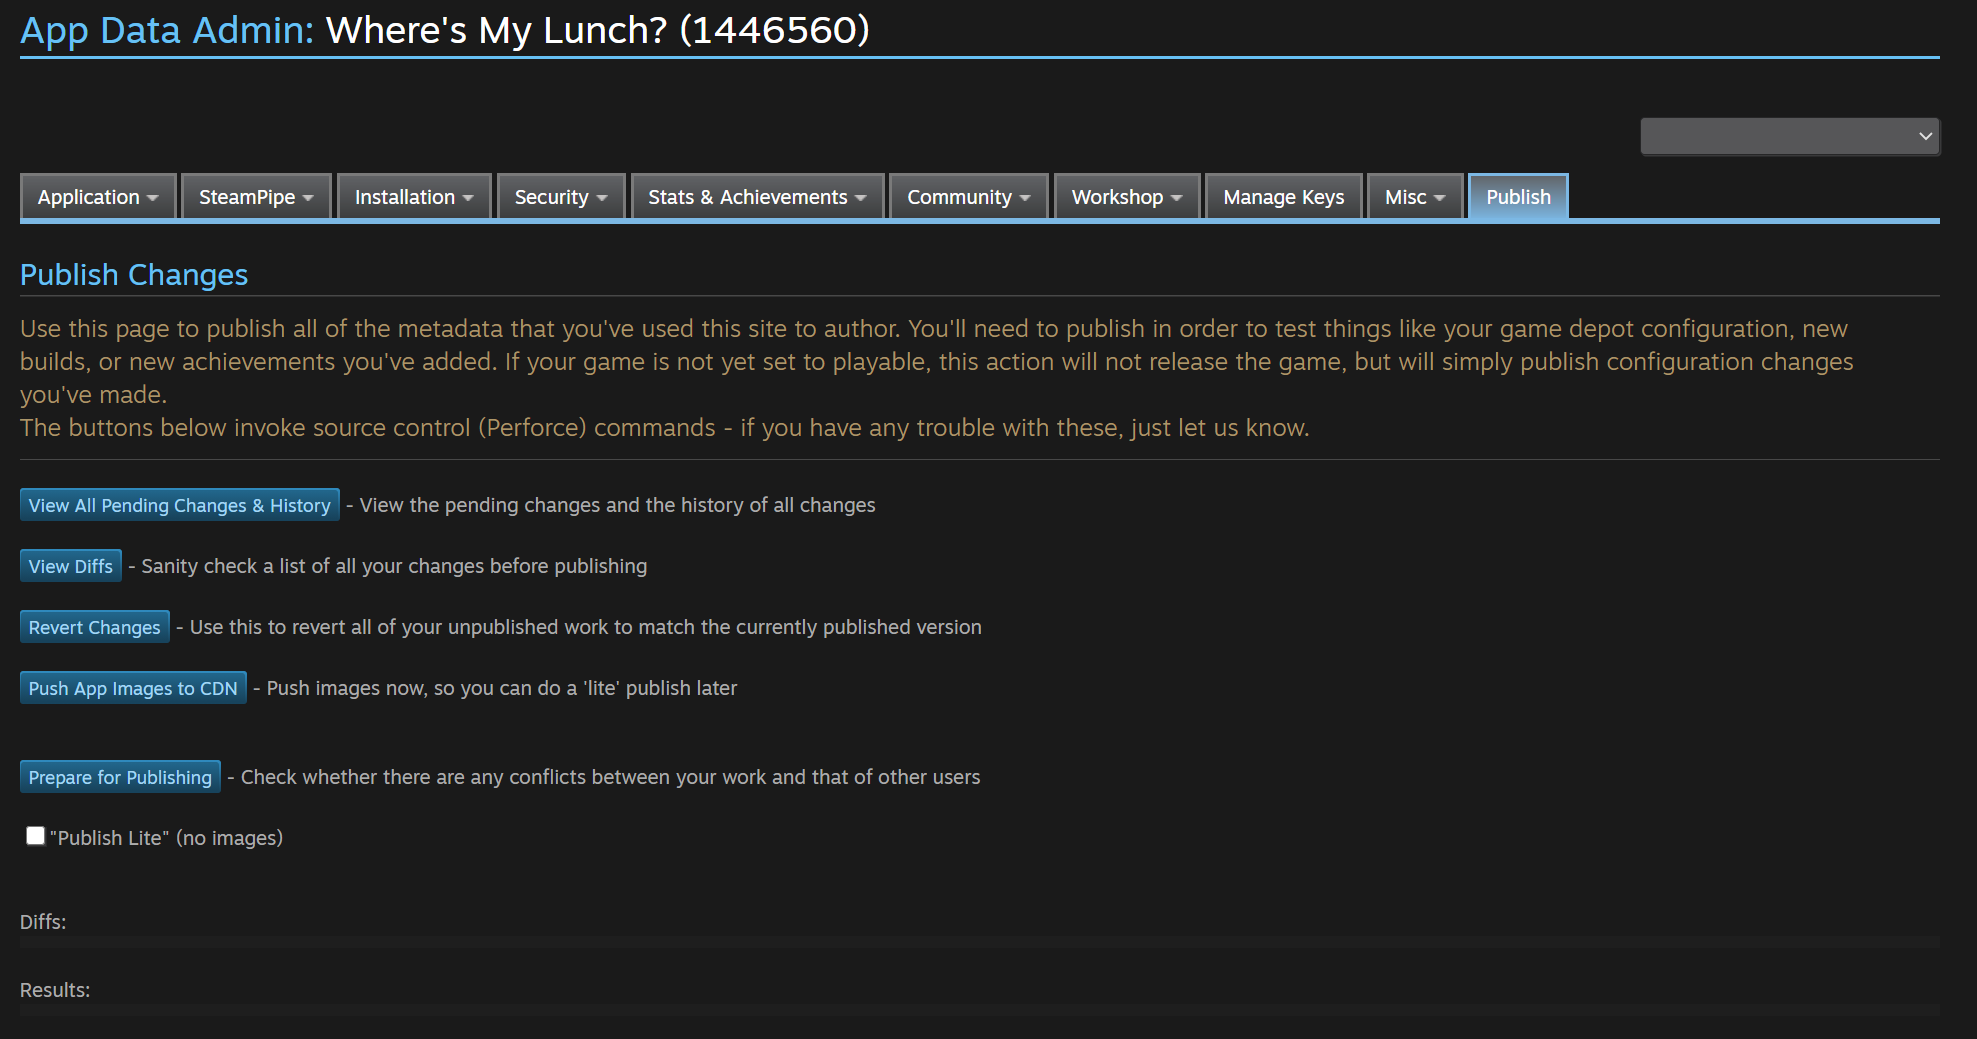
The magic button… “Publish!”
The missing step is to actually publish the build. Go figure.
When you do this SteamWorks makes you type a “password” into a field so that you don’t do it by accident. Which is good. This is Valve protecting me from myself. And I very much need that.
Remember that this is potentially going public AND steam will likely auto-update players versions so you want to be REALLY sure that you aren’t doing this by accident and pushing a test build when you aren’t ready.
So! with that last step… It finally works! “Where’s My Lunch” is playable through the steam client.
Even though I’ve done it before, this feels pretty great. I’m just going to enjoy this feeling for a little while…
Load/Save Manager with some Odin Goodness
In the next post (video) I’ll be taking a look at the level save system and making modifications so it can work with the Steam Workshop. Right now it’s pretty basic, but it saved me enormous amounts of time during the game jam. It allowed me to load, create and save a level in a matter of minutes! It’s generic enough and I think it could work for a lot of simpler 2D and 3D games. So I’m looking forward to sharing that with you.
I’ll also be working to implement the Steam Workshop - which will mean some tweaks and adjustments to the save system as well as creating a the UI to allow the players to upload and download content.

Game Jam... Now What?
When you finish a game jam you’re exhausted, but hopefully you’re proud of what you’ve made. Or better yet proud of what you’ve learned.
And that’s what game jams should really be about. Learning something new. Pushing yourself to create new systems or learn a new technique. And we should celebrate what we’ve learned and the new thing that we created. This is so much more important than how well you may have done compared to others.
Certainly, measuring yourself against others has its place, I won’t say it doesn’t - I race bikes for fun, but that shouldn’t be your sole focus or measure of your success when taking part of a game jam.
Which is great and all, but that’s not really what this is all about. I’m not here to give a pep talk. I want to talk about what to do with your game after the jam is over. Should it just gather digital dust never to be played again? Well, maybe.
But! What if there’s more to learn? What if there’s more to do with that game?
AND THAT!
That chance - that there’s more to learn and more to do is what this series of videos and blog posts is going to be all about.
So let’s rewind a bit.
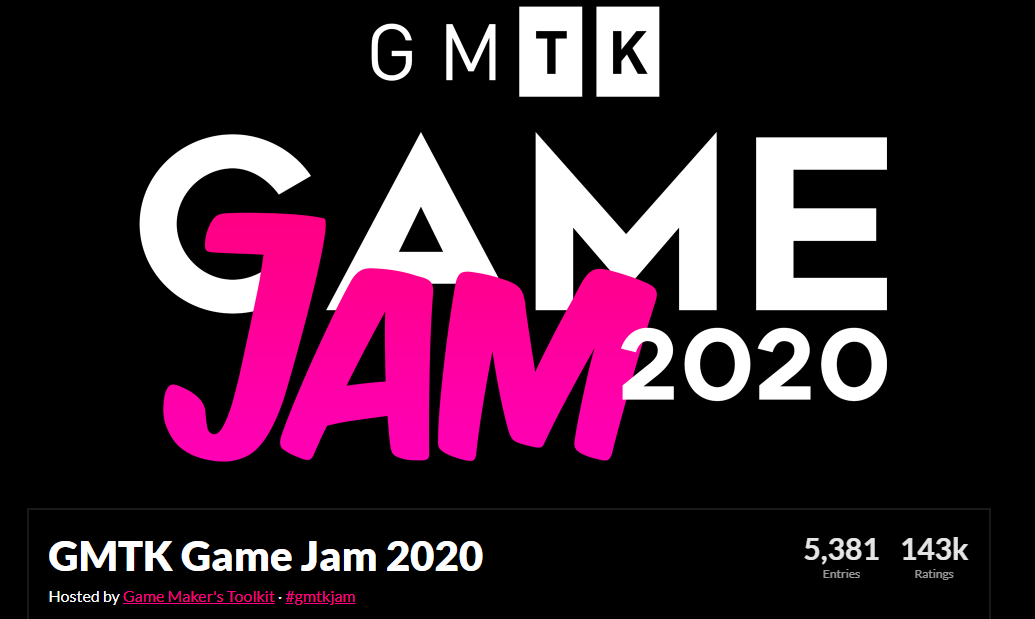
This summer, for the Game Maker’s Toolkit game jam I made the game “Where’s my lunch?” It was an okay game. Nothing profoundly creative or groundbreaking - just okay.
And I like many others I planned on leaving the game in a folder and never really looking at it again.
And then I got a suggestion from a viewer: Why not take that game and publish it? The process could make great video content and be a resource for others who might want to do more with their project.
Whoa!
I let the idea rattle around in my head for a few days - then a few weeks. The more I thought about it the more I liked it.
Over the last year or two I’ve been far more focused on making video content rather than working on my own project. Which means I often just have a few hours a month to work on the game. The progress is slow AND that progress is further slowed by needing to remember what I was doing two weeks ago or what problem I was trying to solve last month.
It’s not working great. And I suspect some of you know exactly what I’m talking about. It’s really really hard to find 10-20 hours a week to work on a project.
Now by their very nature game jam games are simple. Their scope is small - even tiny - and that makes it perfect for me, and maybe you.
Game Jam to Steam (GJTS)

We can all dream… right? :)
So maybe, just maybe… I can work on a game AND create decent tutorial content for the channel at the same time!
Now, this project isn’t going to make me piles of money - I don’t think that’s even a distance possibility and that’s really not the goal. The goal is to make something, finish that something... AND! Document the process so that others, maybe you, might do the same thing with your game.
How many of us have dreamt about publishing a game to steam? How many of us have a game from a game jam sitting in a folder that with a few months of polish could be worth sharing with a larger audience?
Now, I’m not talking about some generic 2D platformer with floaty jump mechanics that was your first Unity project. But I’m also not saying that you need to place in the top 10 of an international game jam. I certainly didn’t!

Out of 5381 games… Not too bad. Not Amazing.
Maybe your game needs some redesign or a few tweaks to be it’s best and that’s okay. “Where’s My Lunch” certainly does. It did well on fun factor and a few other bits but clearly isn’t a particularly original game idea.
And again.
That’s okay.
So let’s do it. Let’s do it together. Let’s take a game from a game jam, polish it and publish it!
Videos Incoming!
For the videos, I’ll be trying to find the sweet spot somewhere between a traditional dev log and a tutorial. All while bringing you along for the ride, showing you my progress, and hopefully helping you make progress on your own project.
I’ll be adding the game to steam (It already is! Just not public.), making use of Facepunch Steamworks, adding Steam features such as achievements, maybe the Steam Workshop, and of course, polishing and expanding the gameplay to add dozens of levels - all hopefully without too much feature creep.
I’m also looking into several of the features offered by Unity such as analytics and cloud diagnostics...
When there’s a system or process that can be of use to the larger game development community, I’ll slow down and do more of a complete tutorial on how the system works and how I built my version of that system.
Sound interesting? Sound useful? I hope so.
So Let Me Introduce You…

Okay, doesn’t show much… This is the sandbox level
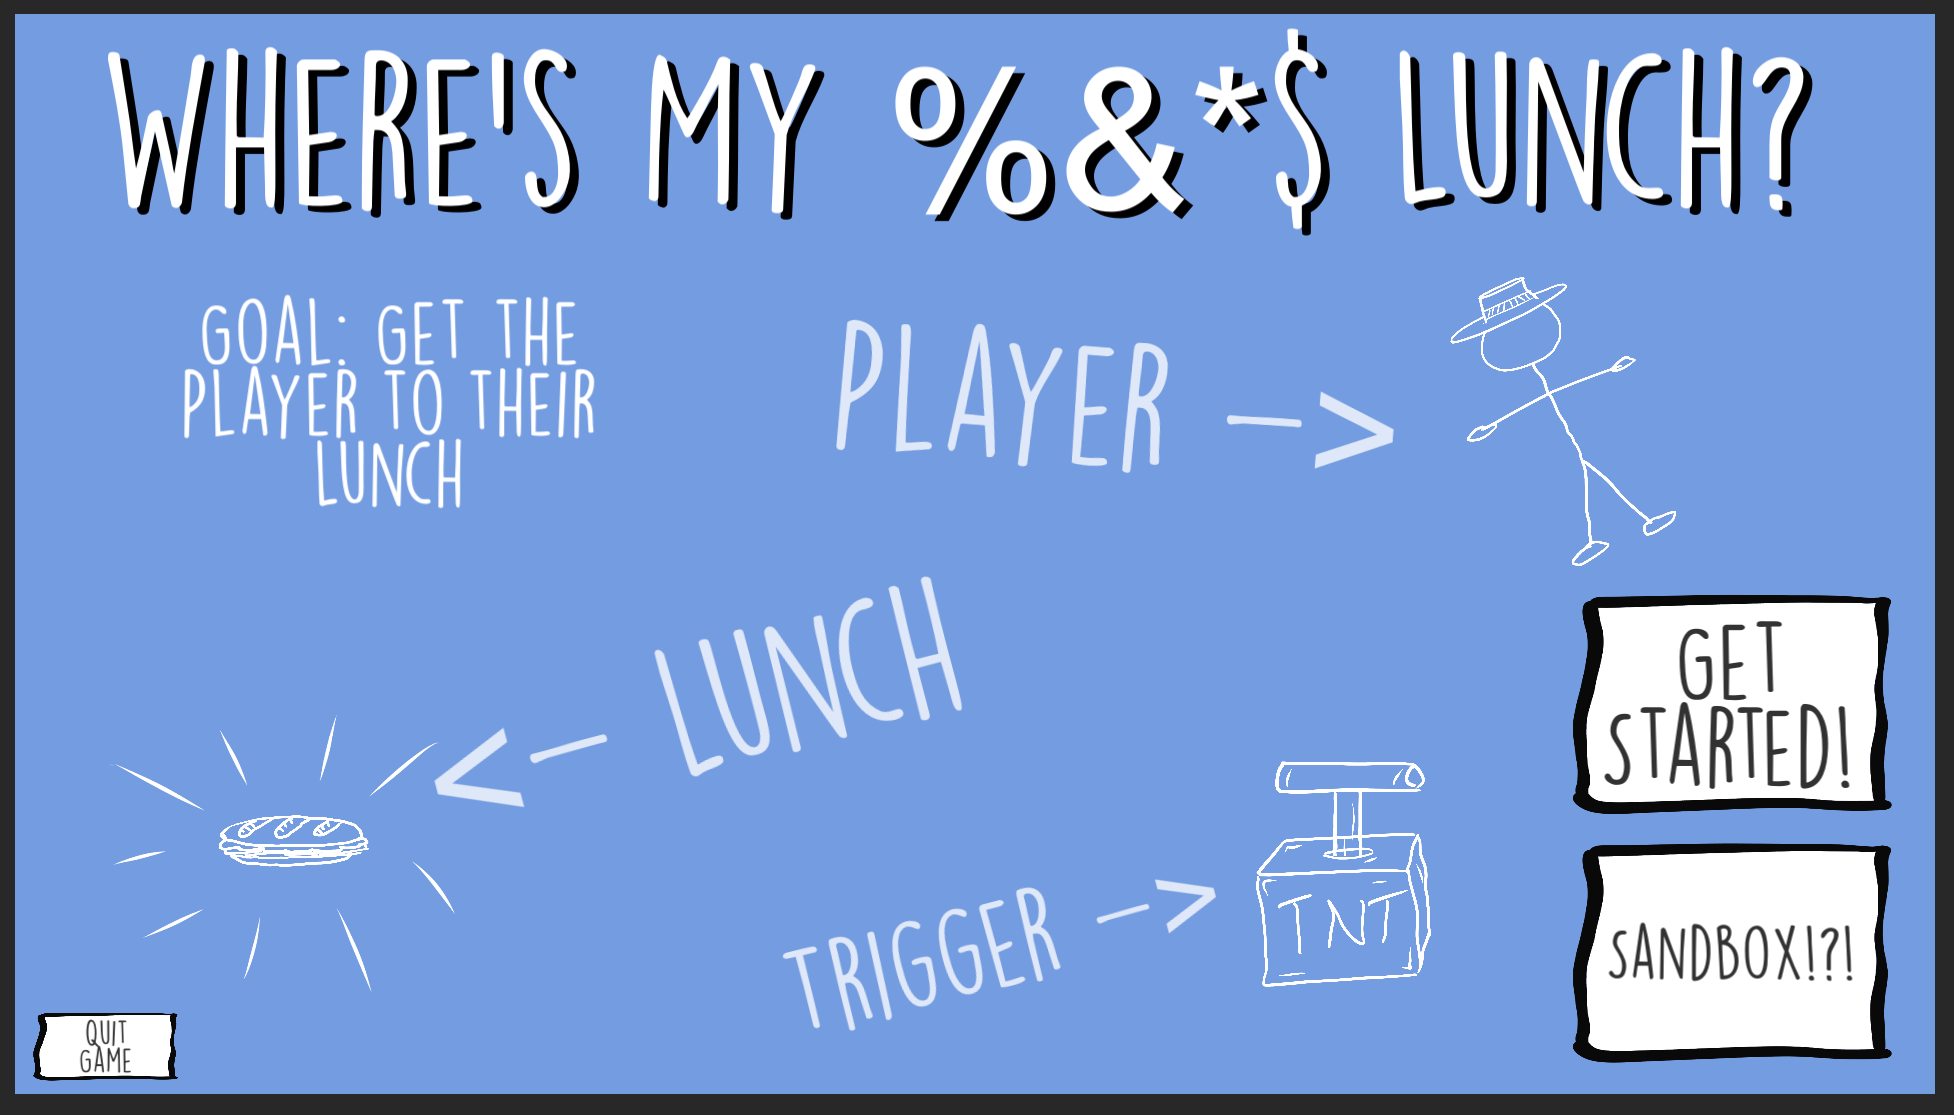
“Where’s My Lunch” is a hand drawn 2D game that presents a new puzzle to be solved by the player at each level. The goal is to steer the character towards their lunch --- but your controls aren’t very precise.
The theme for the game jam was “out of control” and that’s reflected in some of the chaos of the game play. Your only tools, in the current build, are bombs, portals, and gravity wells.
The bombs explode and exert a force.
The portals come in a linked pair and warp the player’s from one location to another.
And the gravity wells, they exert an attractive force based on distance from the player.
Now I WILL be adding to these as I work on the game, but the three mechanics were enough - or in reality it was all I could manage in a 48-hour game jam.
There are of course some bugs that need to get fixed or addressed. And mostly this has to do with placing items. At the moment it’s easy to place a portal on top of the player and then be unable to move it later. I also need to add a “clear level” functionality to let the player wipe the level and start over with a fresh attempt.
Other things like placing a gravity well near the sandwich seems to make it too easy, but more importantly, some of these flaws allow a player to “break” a level by finding a trivial solution - which is okay, but it can take some of the challenge and thus reward out of the game.
Clever level design is maybe the toughest challenge that I see in completing the game. Puzzle games, I think, are often seen as “easy” to make but the reality is they just as tough or tougher than other genres… But again I need to remind myself that the goal here isn’t to make the most awesome game just to make a decent game.
Down the Rabbit Hole!
Let’s dig in a bit into how things actually work in the game - the mechanics of the game so to speak.

Here it’s pretty simple, no surprise, and the game leans heavily on the physics engine - which does have downsides as it’s not fully deterministic - and by that, I mean that two identical starting conditions won’t have identical results - they’ll be close but not perfect.
But that’s a battle for another day, and the built-in physics engine is plenty good enough for my project.
The player object is a ragdoll with a basic bone structure built from 2D hinges. There’s not really any gameplay mechanics here, it’s just a lot more fun to watch the player fly across the screen with the arms and legs flopping all over the place.

Since the physics engine is non-deterministic, I chose to use a large circle collider on the player body as this made the motion of the object more repeatable with just a small loss in floppy ragdoll goodness.
After that, the code is mostly about triggers and a little custom code for each of the tiles or objects in the scene.
As a fun challenge during the game jam and at the suggestion of a viewer, I added a sandbox level that allows the player to create their own level from scratch. This is one of the systems that I plan on expanding so that players can not only build levels but share those levels! Hopefully using the Steam Workshop functions.
Maybe I’ll even be able to incorporate some player-made levels in the final build…?
During the game jam, I quickly realized that I needed to streamline the workflow for making and saving levels. Having each level in its own scene was going to get messy in a hurry! I needed a better way.
One of the great things about game jams is you are forced to get creative and do so efficiently and as a result, I came up with a simple but effective scene creation system.
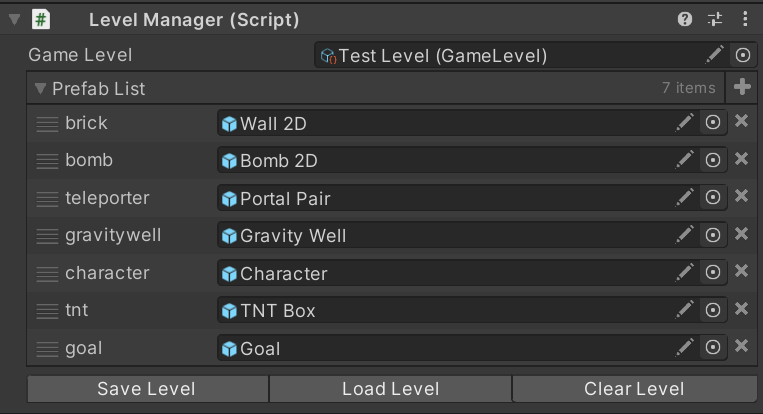
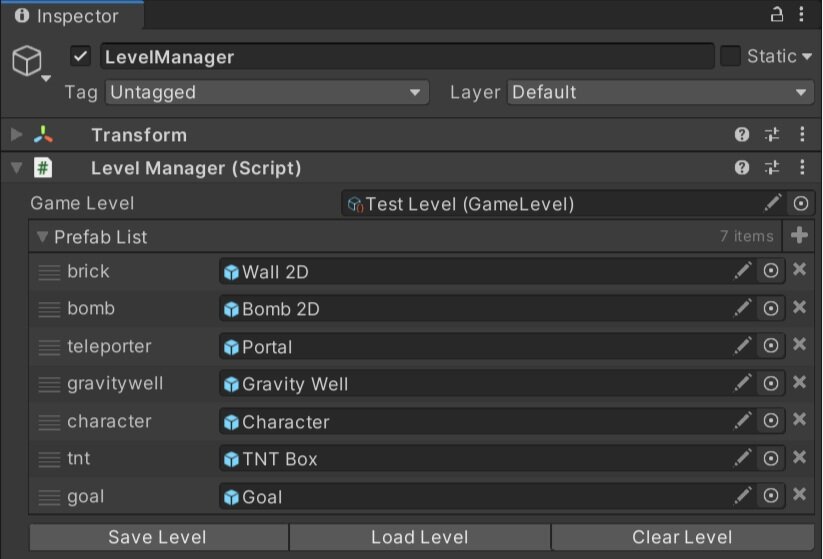
My system, which I’ll do a full tutorial on, essentially scans the scene in the editor for game tiles which all have a “save level object” component and then stores the basic transform information for each object as well as a reference to what type of object it is. The data is stored in a list on a scriptable object.
Since the data is stored in a simple list, I’m hoping this will make using 3rd party tools like Easy Save quick and hopefully relatively painless. The plan is to have each level stored in a separate save file which can, hopefully, be shared between players on the Steam Workshop. I’ve never done any work with the Steam Workshop, so I’m pretty excited about that!
And that’s pretty much it. There are certainly other chunks of code, such as the code that allows the player to wrap around the screen or to trace the path of the player, but those are small details and not core functionality. If you want to see those bits, let me know in the comments below.
What’s Next?
Where is the game going? What’s going to be added?

I’ve got a list of new mechanics that I want to add to the game. These include buttons, levers, doors, flame throwers, ice, electric fields, and whatever else may come up. These mechanics should be easy to add and shouldn’t cause significant changes in the core architecture.
There are things that WILL require significant changes such as steam integrations like achievements and the steam workshop.
I’m also exploring the idea of adding more than one goal to the game - to give a bit more depth as the levels progress. So maybe it's not just about getting your sandwich, but maybe you need to grab a drink and chips on your way to your sandwich?
I don’t know exactly, but I do know that I need to build the code for that functionality pretty early in the project as this could affect quite a few other systems.
I’d also like to explore some sort of scoring system to add some replayability to each level. This might be the classic 3-star system or something more numeric on a leaderboard? I don’t know, but again this likely needs to get built sooner rather than later.
If you want to see the full “road map” for “Where’s My Lunch?” check out the notion page. There’s a list of everything that I’ve planned out so far… in varying detail. It’s a living document and will get updated as the project moves forward.
More Thoughts
But! The real beauty of this project is not how much can be added, but how few major systems need to be created. The game is functional. It just needs to be polished and integrated with Steam.
That’s not to say this is a short or easy project. There is a TON of work to do, but it’s the amount of work and the type of work that is manageable and doable.
So what do you say? Do you have a small game gathering dust? Why not polish that game and release it? Who cares if you make money? Simply publishing a game to steam is a huge accomplishment in and of itself!!
So go blow the dust off your game AND stay tuned to the channel as this project gets started.

Strategy Pattern - Composition over Inheritance
The strategy pattern is a subtle pattern. It’s all about minimizing the duplication of code and decoupling classes. As an added bonus, the strategy pattern can also allow behaviors or algorithms to swapped at runtime without any messy switch statements or long chains of if statements. In the end it doesn’t have a super flashy or exciting outcome. It’s just good coding practice.
With some aspects of the pattern it’s easy to think, “Yeah, but this other way works…” But! The pattern is solid and avoids lots of little issues that can pop up later down the road when your project gets bigger.
Before we jump into the pattern lets first look at the problem it solves.
Inheritance Is Not Always Awesome
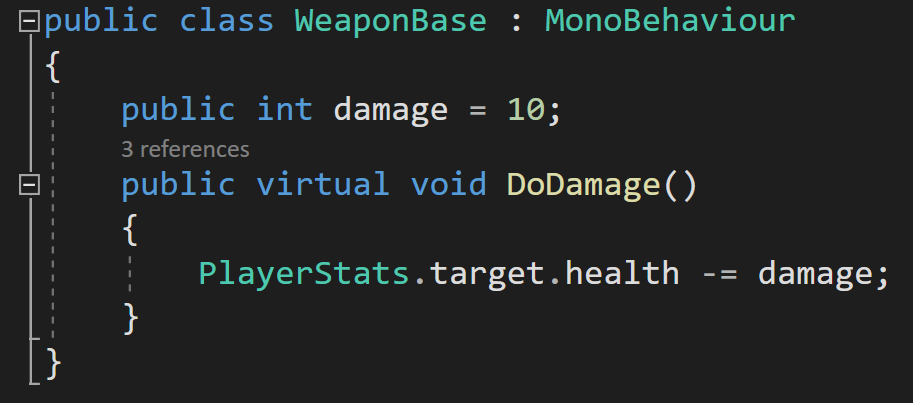
Let’s imagine you’re making a game based around weapons, or at least has a lot of them in your game. It would seem reasonable to create a “Weapon Base” class that other weapons can inherit from. This base class can contain basic stats and functions that can be used or overridden by sub-classes.
For example, we may have a DoDamage function that gets called every time a weapon is used. The function might simply reduce the health of the player’s target.
This is all reasonable.
Going a step further, let's imagine that we want to create 3 fire-based weapons that will all inherit from the WeaponBase and on top of reducing the targets health will also do some actions specifically for fire damage.
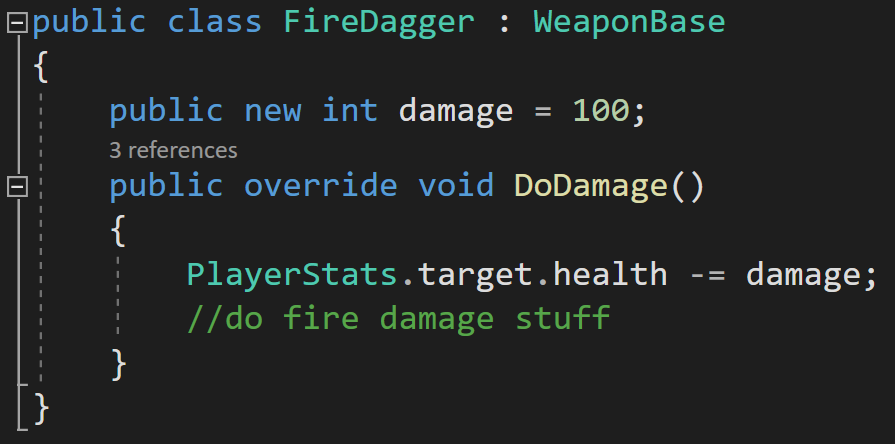
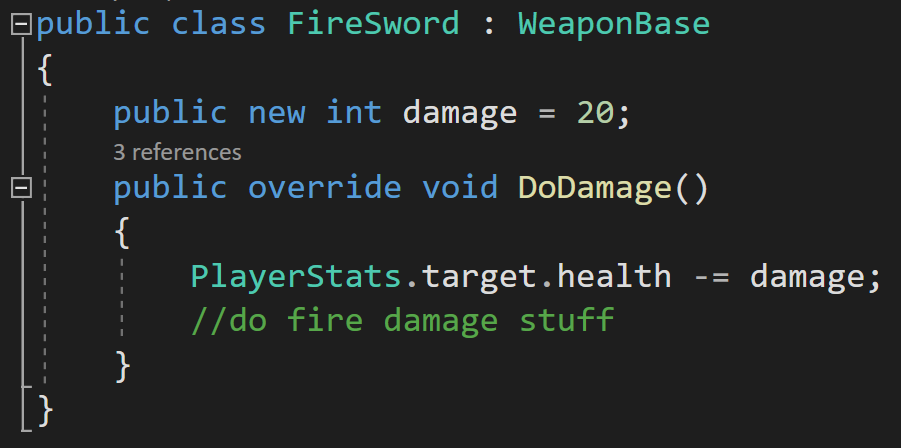

I now have 3 new classes that all have duplicated code. The DoDamage function has the same code from the base class, plus fire damage specific parts. Updating the fire behavior means opening and changing the code in all the every fire weapon class in your project. This isn’t horrible with 3 weapons, but imagine having 20 or 50 or 100 weapons. Yeah, that’s not going to work.
I could also call base.DoDamage, but then all my weapons would be dependent on the base class DoDamage function, which is definitely NOT AWESOME. If the base class function changes, all the inheriting classes change too and that’s not good. That’s not a solid foundation to build on. That’s a way to break your game in a hurry. This coupling between classes is what we want to reduce!
Now you might now argue that you could create a “Fire Weapon” class that inherits from the weapon base class and that all fire weapons inherit from… Which may work, but it is starting to get messy. Imagine now that you want to add ice or poision damage? You’d have to create Ice Weapon and Poison Weapon classes that those new weapons have to inherit from.
Okay, push comes to shove this might still be okay… Ugly, but okay, if the project stays small.
What if you now have a weapon that will do both fire and poison damage? Which class does it inherit from? Fire or Poison? Or do you make a combo class to inherit from? NO! Please don’t.
The strategy pattern can help solve these problems…
Strategy Pattern
The strategy pattern is all about encapsulating or wrapping up a behavior or algorithm in it’s own class. It’s also very closely related to the concept or belief that composition is better than inheritance! The exact details of how we do this are less important than the overall pattern so let’s start with a simple and common way to implement this pattern.

First, we create an interface called “IDoDamage” (you can argue all you want about using “I” to name an interface - I don’t care). This interface will have one function called “DoDamage.”
At this point, you might be thinking, “Okay, we’ll just implement the interface in all our weapons.” And that would be understandable, but it would be a mistake to do that as that would cause lots of duplicate code and not really buy us much in return from just good old inheritance.
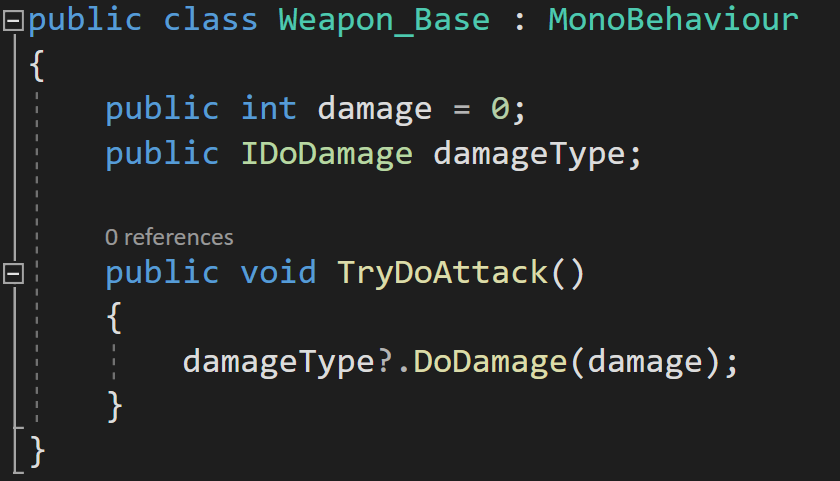
Instead, we are going to create an instance variable of this interface in the Weapon_Base class. This class will also have a function that calls the DoDamage function on the IDoDamage variable.
Why? Good question. This is the crux of the whole pattern.

We can create classes that implement the IDoDamage interface. Each of these classes will have a different damage behavior. This will encapsulate the damage behavior AND make it so that we can change behavior at runtime by a simple assignment - no ugly switch statement or crazy chain of if statements needed.
For example, we can create a “FireDamage” class. This can do all the basic damage bits and most importantly it can then do any fire specific bits - maybe there are events that play sound effects or trigger specific lighting effects.
Then!
We create a new class for each weapon that inherits from Weapon_Base. Rather than hiding variables or overriding functions we use a constructor to set basic variable values AND to set the damageType variable.


While we now have a poop ton of classes, which could be a criticism of the pattern, we have very little duplicated code, and if we need to change the fire damage behavior, it only needs to be changed in one place in our project.
There is a neatness, a tidiness, a cleanliness that just feels good with this implementation. All we are doing is using a constructor to set up the weapon. The entirety of the damage algorithm or behavior is fully encapsulated in another class. While we are still using inheritance, we have decoupled much of our code, and much of the messiness of inheritance isn’t present in our solution.
Adding More Behaviors
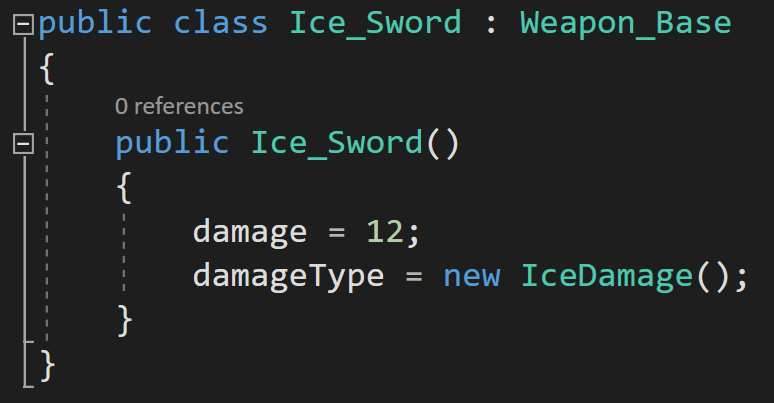
The strategy pattern also works if you want to create other types of damage, such as IceDamage. To implement this style of attack, we need to create new IceDamage and IceSword classes.

Going Abstract
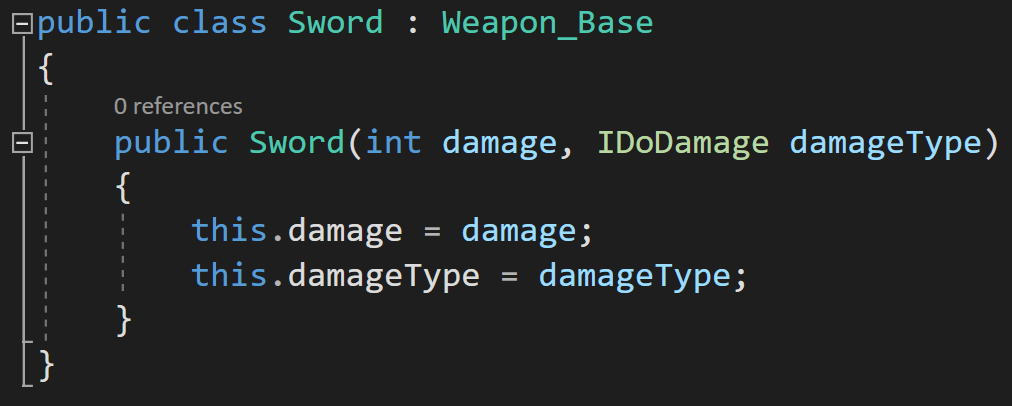
You could go either further and create generic weapons that have their damage and damage type set by a constructor. This could allow generic classes for each weapon type with all the data PLUS the behaviors injected into it.
Changing Behaviors
And I think the real cherry on top is that with the strategy pattern is that it allows easy changing of behaviors at runtime. Sure, you could do that with some if or switch statements. But those tend to be ugly. They break. They’re generally a brittle approach to programming and we can do better.
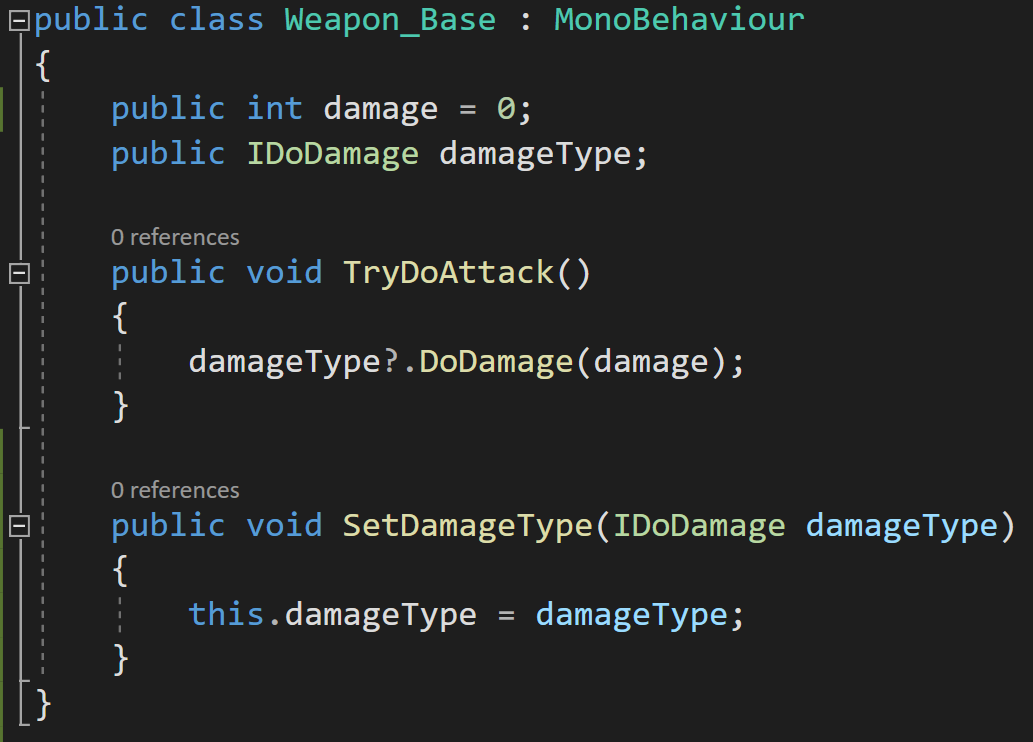
We can add a function to Weapon_Base to allow the damageType variable to be set. This would have the effect of changing behaviors. Something the code on the right.
Yes, I realize I made the variables public, but I don’t like changing values in classes from outside the class without using a function. If this was my project, I’d probably use private variables or maybe a public getter.
With this functionality, a click of a button or the invoking of an event can change the weapon's damage type and thus much of it’s behavior.
If that’s not useful. I’m not sure what is.
Combining Behaviors
What if you really want that fire poison sword? Maybe your game is based around combining behaviors or abilities? Then what?
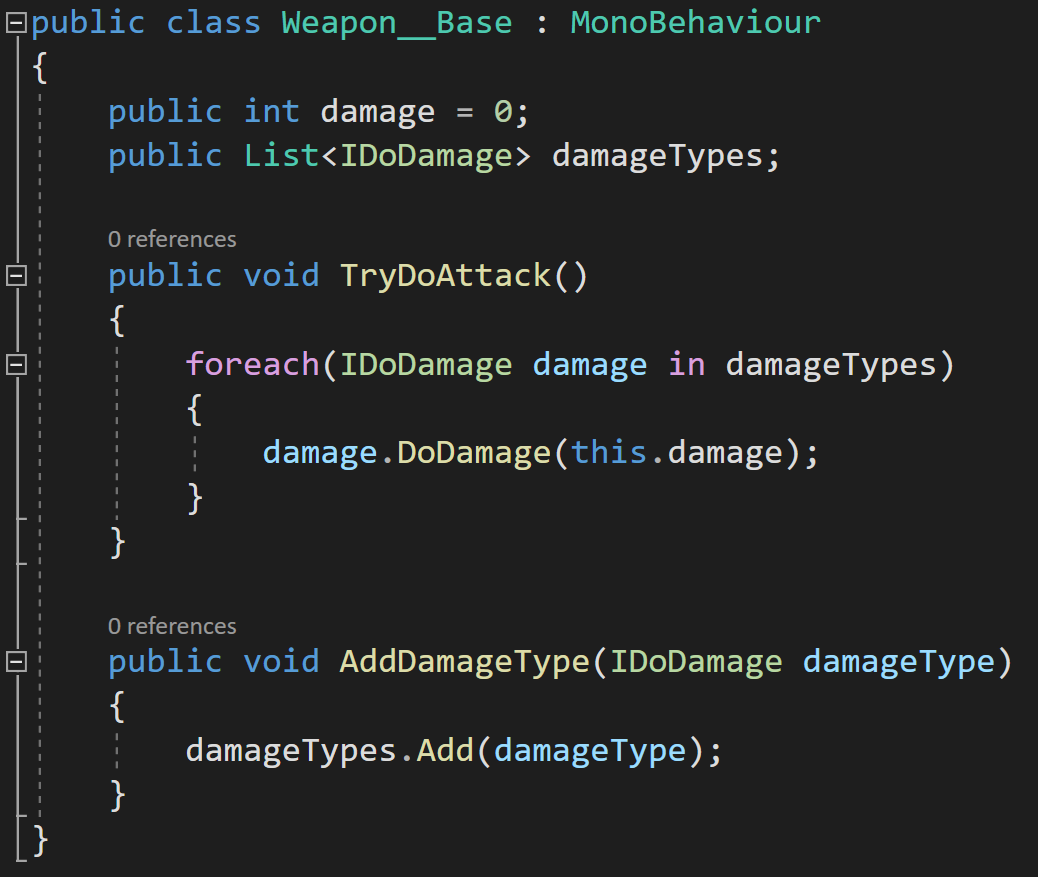
Make a list of IDoDamage values. The code can then iterate through the list and called DoDamage on each item in the list?
I’ll be honest I haven’t tried this but it seems solid and pretty useful.
Other Thoughts
The choice to use an interface in the strategy pattern is not the only choice. You may want to use an abstract class instead so that you can define variables. Personally I like the cleanliness of the interface and then simply injecting any needed data.
I also thought to use scriptable objects. And while I think that would work, I think it’s stretching SOs to a place they don’t fit particularly well. Writing the classes and then creating assets seemed like too many steps and I was struggling to find a situation where that would truly be better. But maybe I’m wrong?
I also wrestled with making the base class a MonoBehaviour or not. For simplicity I kept it as a MonoBehaviour so I could easily attach it to a button (for the video). I think that choice really depends on the use, but my gut say most the time I’d want it to NOT be a MonoBehaviour.
Older Posts
-
January 2026
- Jan 27, 2026 Save and Load Framework Jan 27, 2026
-
April 2024
- Apr 10, 2024 Ready for Steam Next Fest? - Polishing a Steam Page Apr 10, 2024
- Apr 1, 2024 Splitting Vertices - Hard Edges for Low Poly Procedural Generation Apr 1, 2024
-
November 2023
- Nov 18, 2023 Minute 5 to Minute 10 - Completing the Game Loop Nov 18, 2023
-
September 2023
- Sep 13, 2023 Visual Debugging with Gizmos Sep 13, 2023
-
July 2023
- Jul 4, 2023 Easy Mode - Unity's New Input System Jul 4, 2023
-
May 2023
- May 19, 2023 Level Builder - From Pixels to Playable Level May 19, 2023
-
April 2023
- Apr 11, 2023 Input Action in the Inspector - New Input System Apr 11, 2023
-
February 2023
- Feb 26, 2023 Tutorial Hell - Why You're There. How to Get Out. Feb 26, 2023
-
December 2022
- Dec 31, 2022 Upgrade System (Stats Part 2) Dec 31, 2022
-
November 2022
- Nov 10, 2022 Stats in Unity - The Way I Do it Nov 10, 2022
- Nov 5, 2022 State of UI in Unity - UI Toolkit Nov 5, 2022
-
August 2022
- Aug 17, 2022 Knowing When A Coroutine Finishes Aug 17, 2022
-
April 2022
- Apr 23, 2022 Unity Input Event Handlers - Or Adding Juice the Easy Way Apr 23, 2022
-
March 2022
- Mar 15, 2022 *Quitting a Job I Love Mar 15, 2022
-
February 2022
- Feb 8, 2022 Split Screen: New Input System & Cinemachine Feb 8, 2022
-
January 2022
- Jan 24, 2022 (Better) Object Pooling Jan 24, 2022
- Jan 19, 2022 Designing a New Game - My Process Jan 19, 2022
- Jan 16, 2022 Strategy Game Camera: Unity's New Input System Jan 16, 2022
-
December 2021
- Dec 16, 2021 Raycasting - It's mighty useful Dec 16, 2021
-
November 2021
- Nov 22, 2021 Cinemachine. If you’re not. You should. Nov 22, 2021
-
August 2021
- Aug 3, 2021 C# Extension Methods Aug 3, 2021
-
June 2021
- Jun 27, 2021 Changing Action Maps with Unity's "New" Input System Jun 27, 2021
-
May 2021
- May 28, 2021 Unity's New Input System May 28, 2021
- May 8, 2021 Bolt vs. C# - Thoughts with a dash of rant May 8, 2021
-
March 2021
- Mar 10, 2021 Coroutines - Unity & C# Mar 10, 2021
-
January 2021
- Jan 14, 2021 Where's My Lunch? - January Devlog Update Jan 14, 2021
-
December 2020
- Dec 27, 2020 C# Generics and Unity Dec 27, 2020
- Dec 7, 2020 Steam Workshop with Unity and Facepunch Steamworks Dec 7, 2020
-
November 2020
- Nov 27, 2020 Simple Level Save and Load System (Unity Editor) Nov 27, 2020
- Nov 9, 2020 Command Pattern - Encapsulation, Undo and Redo Nov 9, 2020
-
October 2020
- Oct 28, 2020 GJTS - Adding Steamworks API and Uploading Oct 28, 2020
- Oct 9, 2020 Game Jam... Now What? Oct 9, 2020
-
August 2020
- Aug 16, 2020 Strategy Pattern - Composition over Inheritance Aug 16, 2020
-
July 2020
- Jul 24, 2020 Observer Pattern - C# Events Jul 24, 2020
- Jul 15, 2020 Object Pooling Jul 15, 2020
- Jul 3, 2020 Cheat Codes with Unity and C# Jul 3, 2020
-
June 2020
- Jun 16, 2020 The State Pattern Jun 16, 2020
-
August 2019
- Aug 12, 2019 Easy UI Styles for Unity Aug 12, 2019
-
July 2019
- Jul 3, 2019 9th Grade Math to the Rescue Jul 3, 2019
-
June 2019
- Jun 12, 2019 Introducing My Next Game (Video DevLog) Jun 12, 2019
-
May 2019
- May 29, 2019 Programming Challenges May 29, 2019
-
March 2019
- Mar 2, 2019 Something New - Asking "What Can I Learn?" Mar 2, 2019
-
November 2018
- Nov 30, 2018 A Growing Channel and a New Tutorial Series Nov 30, 2018
-
October 2018
- Oct 11, 2018 Procedural Spaceship Generator Oct 11, 2018
-
July 2018
- Jul 11, 2018 Implementing SFX in Unity Jul 11, 2018
-
May 2018
- May 31, 2018 Prototyping Something New May 31, 2018
-
April 2018
- Apr 17, 2018 When to Shelve a Game Project? Apr 17, 2018
-
February 2018
- Feb 9, 2018 State of the Game - Episode 3 Feb 9, 2018
-
December 2017
- Dec 16, 2017 State of the Game - Episode 2 Dec 16, 2017
-
November 2017
- Nov 7, 2017 The Bump From A "Viral" Post Nov 7, 2017
-
October 2017
- Oct 30, 2017 NPC Job System Oct 30, 2017
-
September 2017
- Sep 1, 2017 Resources and Resource Systems Sep 1, 2017
-
August 2017
- Aug 3, 2017 State of the Game - Episode 1 Aug 3, 2017
-
June 2017
- Jun 20, 2017 Resources: Processing, Consumption and Inventory Jun 20, 2017
- Jun 15, 2017 Energy is Everything Jun 15, 2017
-
May 2017
- May 16, 2017 Graphing Script - It's not exciting, but it needed to be made May 16, 2017
- May 2, 2017 Tutorials: Low Poly Snow Shader May 2, 2017
-
April 2017
- Apr 28, 2017 Low Poly Snow Shader Apr 28, 2017
- Apr 21, 2017 Environmental Simulation Part 2 Apr 21, 2017
- Apr 11, 2017 Environmental Simulation Part 1 Apr 11, 2017
-
March 2017
- Mar 24, 2017 Building a Farming Game Loop and Troubles with Ground Water Mar 24, 2017
-
February 2017
- Feb 25, 2017 The Inevitable : FTF PostMortem Feb 25, 2017
-
December 2016
- Dec 7, 2016 Leaving Early Access Dec 7, 2016
-
November 2016
- Nov 28, 2016 Low Poly Renders Nov 28, 2016
- Nov 1, 2016 FTF: Testing New Features Nov 1, 2016
-
October 2016
- Oct 27, 2016 Watchtowers - Predictive Targeting Oct 27, 2016
- Oct 21, 2016 Click to Color Oct 21, 2016
- Oct 19, 2016 Unity Object Swapper Oct 19, 2016
-
September 2016
- Sep 18, 2016 Testing Single Player Combat Sep 18, 2016
-
May 2016
- May 25, 2016 Release Date and First Video Review May 25, 2016
-
March 2016
- Mar 26, 2016 Getting Greenlit on Steam Mar 26, 2016