Dev Log

Steam Workshop with Unity and Facepunch Steamworks
Adding workshop functionality to a game is something I’ve wanted to learn to do for a long while. I dreamt of doing it with my first game and every project since then. There seemed like there were so many sticking points and potential problems. As I see it there are two main problems.
Not only do you have to create the tools to make that content you have to create the framework to handle that content… While that may sound easy, I don’t think it is. At least for most games.
The documentation on how to implement workshop functionality is scarce. Really scarce. At least from my searches. I’ve found almost NOTHING.
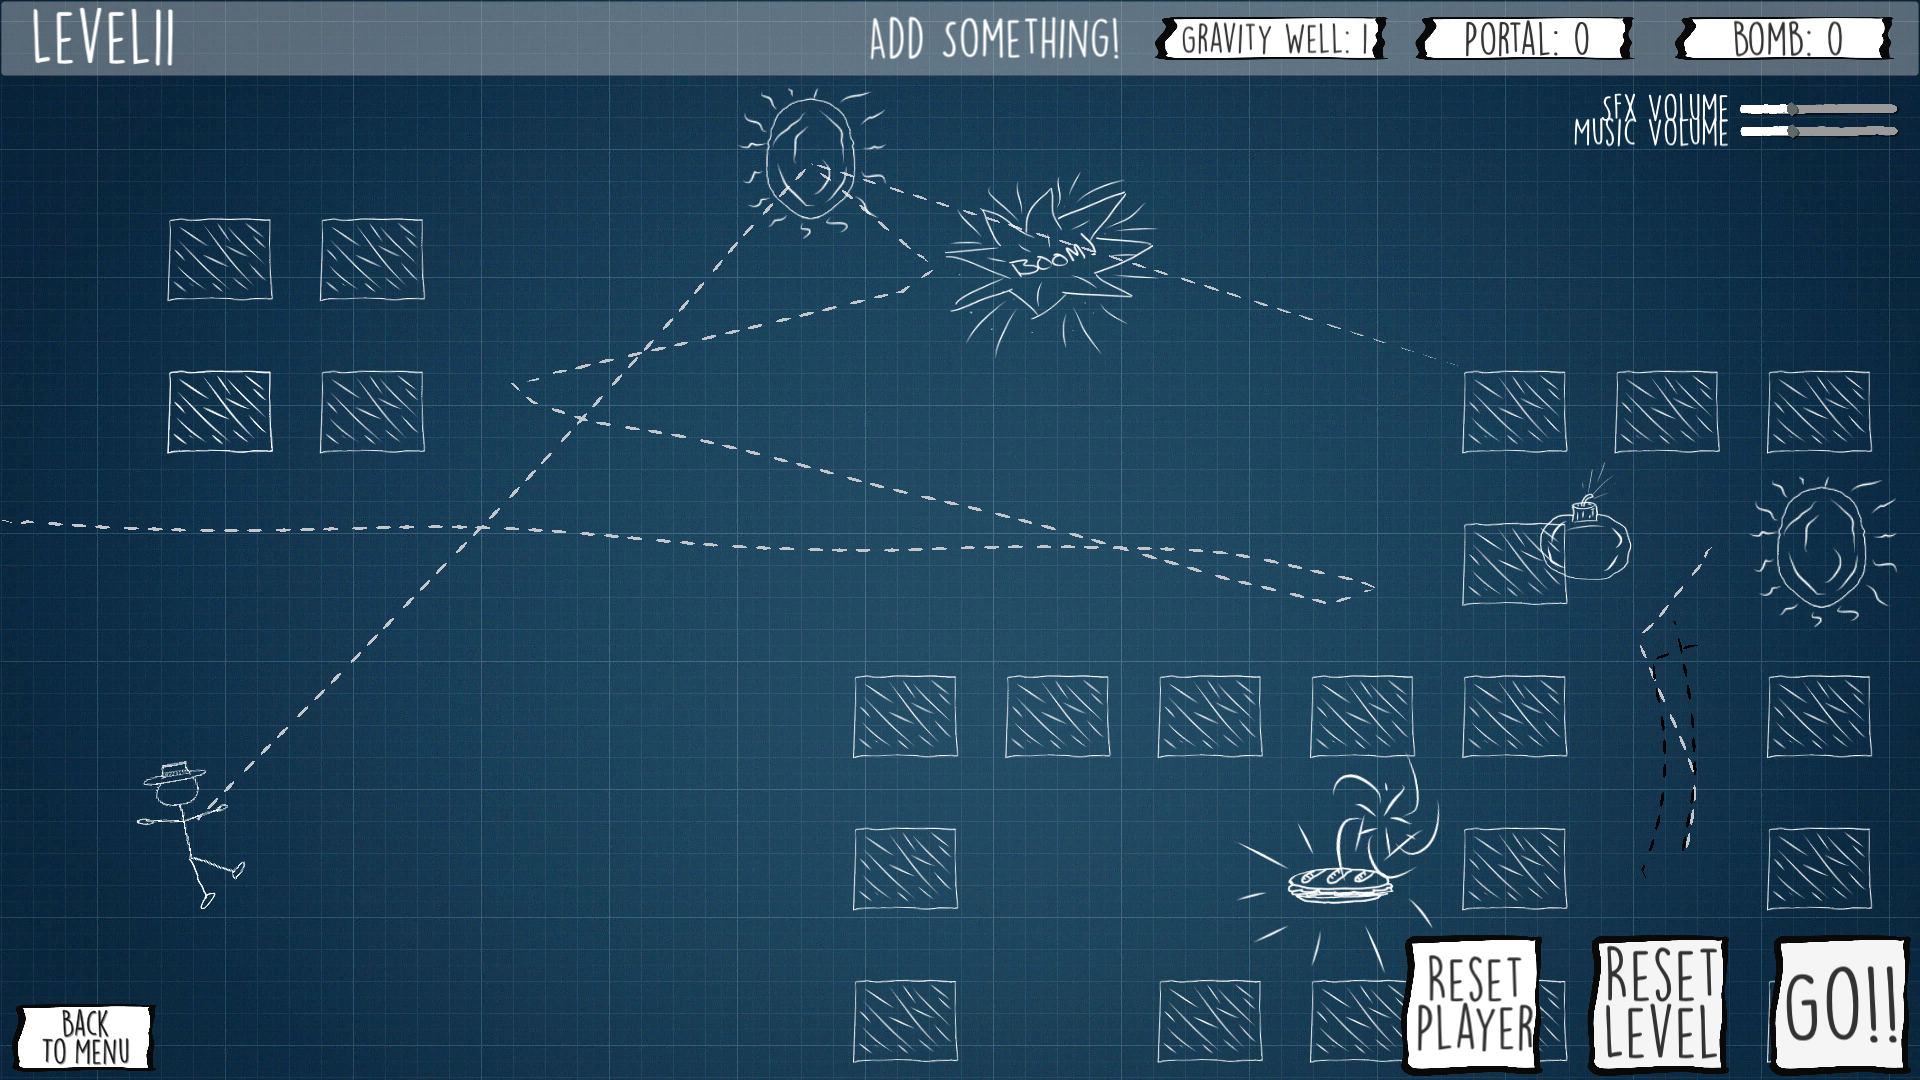
With Where’s My Lunch it was easy to figure out the type of content. Levels!
I already had a sandbox level built into the game, so turning that into a level editor really shouldn’t be too much of a stretch. In my earlier post, I explained how I’m using “Easy Save” to save all the data from levels and store it as an external file. It’s surprisingly simple… even easy. ;)
With the type of content and a simple (singular) external file the first problem is largely solved.
The second problem that of the lack of documentation… Was seemly solved by using Facepunch Steamworks. Well, sort of.
Facepunch, provides some code snippets of how to upload and update a workshop item. It looks pretty simple. And it is, sort of. As always the problems lie in the details. And those details can often depend on your projects needs and structure.
Disclaimer & Goals
The main goal of this post is to give an example of how I implemented the Steam Workshop and not to give a step by step process for you to follow exactly - I actually don’t think it’s even possible since every game is so different.
I’m going to try to talk about big ideas and point out the problems I had along the way. I’ll look at how to upload, download and update your workshop items.
These are things that any and all implementation of the Steam Workshop will need to do - at least I think so.
Now, I’m not going to look at how to handle the data and files that are uploading and downloading inside of your project as that’s almost 100% dependent on the type of files and how they’re being used in the individual project
I’m also sure there are some better ways to do what I’ve done. That’s just the way it is and I’m okay with that. If you know of a better or easier way, leave me a comment, I always love to learn something new!
One last thought. When it comes to topics like this… well… there is only so much hand holding that can be done. If you are just getting started with Unity and C#, to be honest, this probably isn’t something that you should be trying to do until you get more experience.
Setting Up the Backend
There’s a not that NEEDS to get set up in Steamworks, but there are a few things. And! They are not covered in the Facepunch Documentation.


First, we need to enable UGC file transfer, which is done with a single toggle.
Easy.
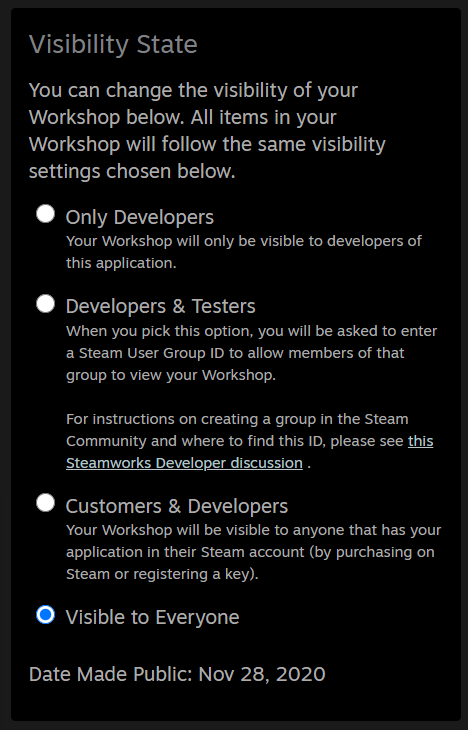
Next, we need to set the visibility state. The default setting will be enough for you, the developer, to upload files, but if you want your audience to be able to test the workshop your going to need to do more work. For early testing I choose the second option, which requires a custom Steam group for your testers. Anyone in that group will automatically have access to the workshop. Which option you choose is, of course, up to you and your project’s needs.
THEN! There is one more important step.
If you are uploading images or larger files you need to enable Steam Cloud and increase the byte quota and number of files per user. In the Steam Developer forums the Valve employees seemed to be in favor of raising the limits far high than expected - which I imagine is to avoid errors and player frustration. I have no idea why the default is so low.
If you don’t change these settings your uploads will fail and there will be no indication that this is the problem. I didn’t hit this snag originally while uploading small save files, but once I added preview images the uploads started failing.
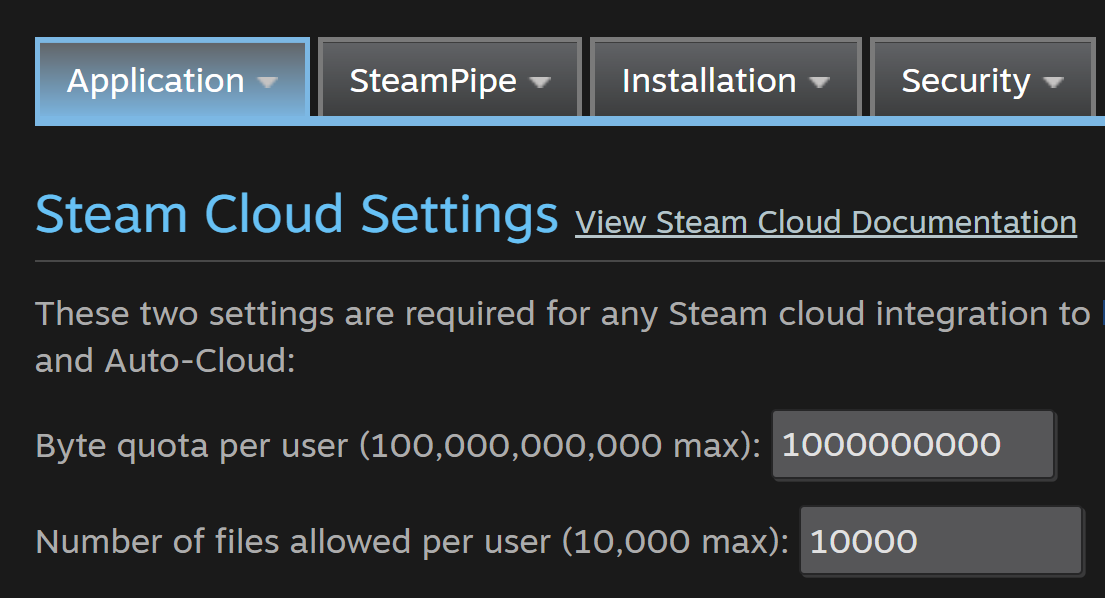
And I spent hours! Hours! Trying to figure out the problem. So yeah. Go change those settings before you go too far.
There are of course other settings but these are the basics that are required.
Uploading!
This is an exciting step. And not a hard one… If it works.
Facepunch and of Steamwork gives almost no indication for the cause of problems if there are any. So yeah. Find some patience and be prepared to spend some time searching for solutions.
The example given by Facepunch is a pretty good start. It’s easy, but with minimal feedback there are a few pitfalls.
Below you can see the upload function that I’m using. I’ve minimized lines that are overly specific to my project.

To upload you will need a path to the folder containing all of the files and assets. For the file preview image you will need a path to the actual file that will be uploaded.

After that the code snippet from Facepunch shows what you want you need to do. There are several parameters or options for the upload, that while not well documented are named well enough to figure out most of them. For my purposes I added a description, a few tags and set the visibility to public. If you don’t set the visibility to public, the upload will succeed, but the it will be set to private by default.
You may also notice that I’ve created a new instance of the Progress Class. For the most part my version was taken straight from Facepunch, with the addition of a few clumsy bits that will provide some visual feedback to the user while their files are uploading.
The uploading process is asynchronous, so after the upload process has been attempted I send a message to the console based on the results. The results, don’t tell you much, beyond whether the upload was a success or not.
I really wish there were more clues to why an upload may have failed…
If the upload did fail, I display a message to the user and then invoke an event to make sure all the systems that might care about a failed upload know it happened.
It takes a few minutes, but assuming the upload is successful, your workshop item will appear on the game’s workshop page.
Pretty sweet and not too hard.
Downloading
The idea behind downloading is to do a search, then based on the results of that search individual workshop items can be queried or downloaded.
Once again, the Facepunch documentation is pretty good and the process of doing a search is fairly straightforward. In my code, I search by tag and then have other optional searches that can be added by the player.
The search also requires a page number. By default I get the first page, but it’s likely you will want additional pages and you will need to handle this in your implementation. In mine I repeat the search and increment the page number when the player scrolls to the bottom of the list.
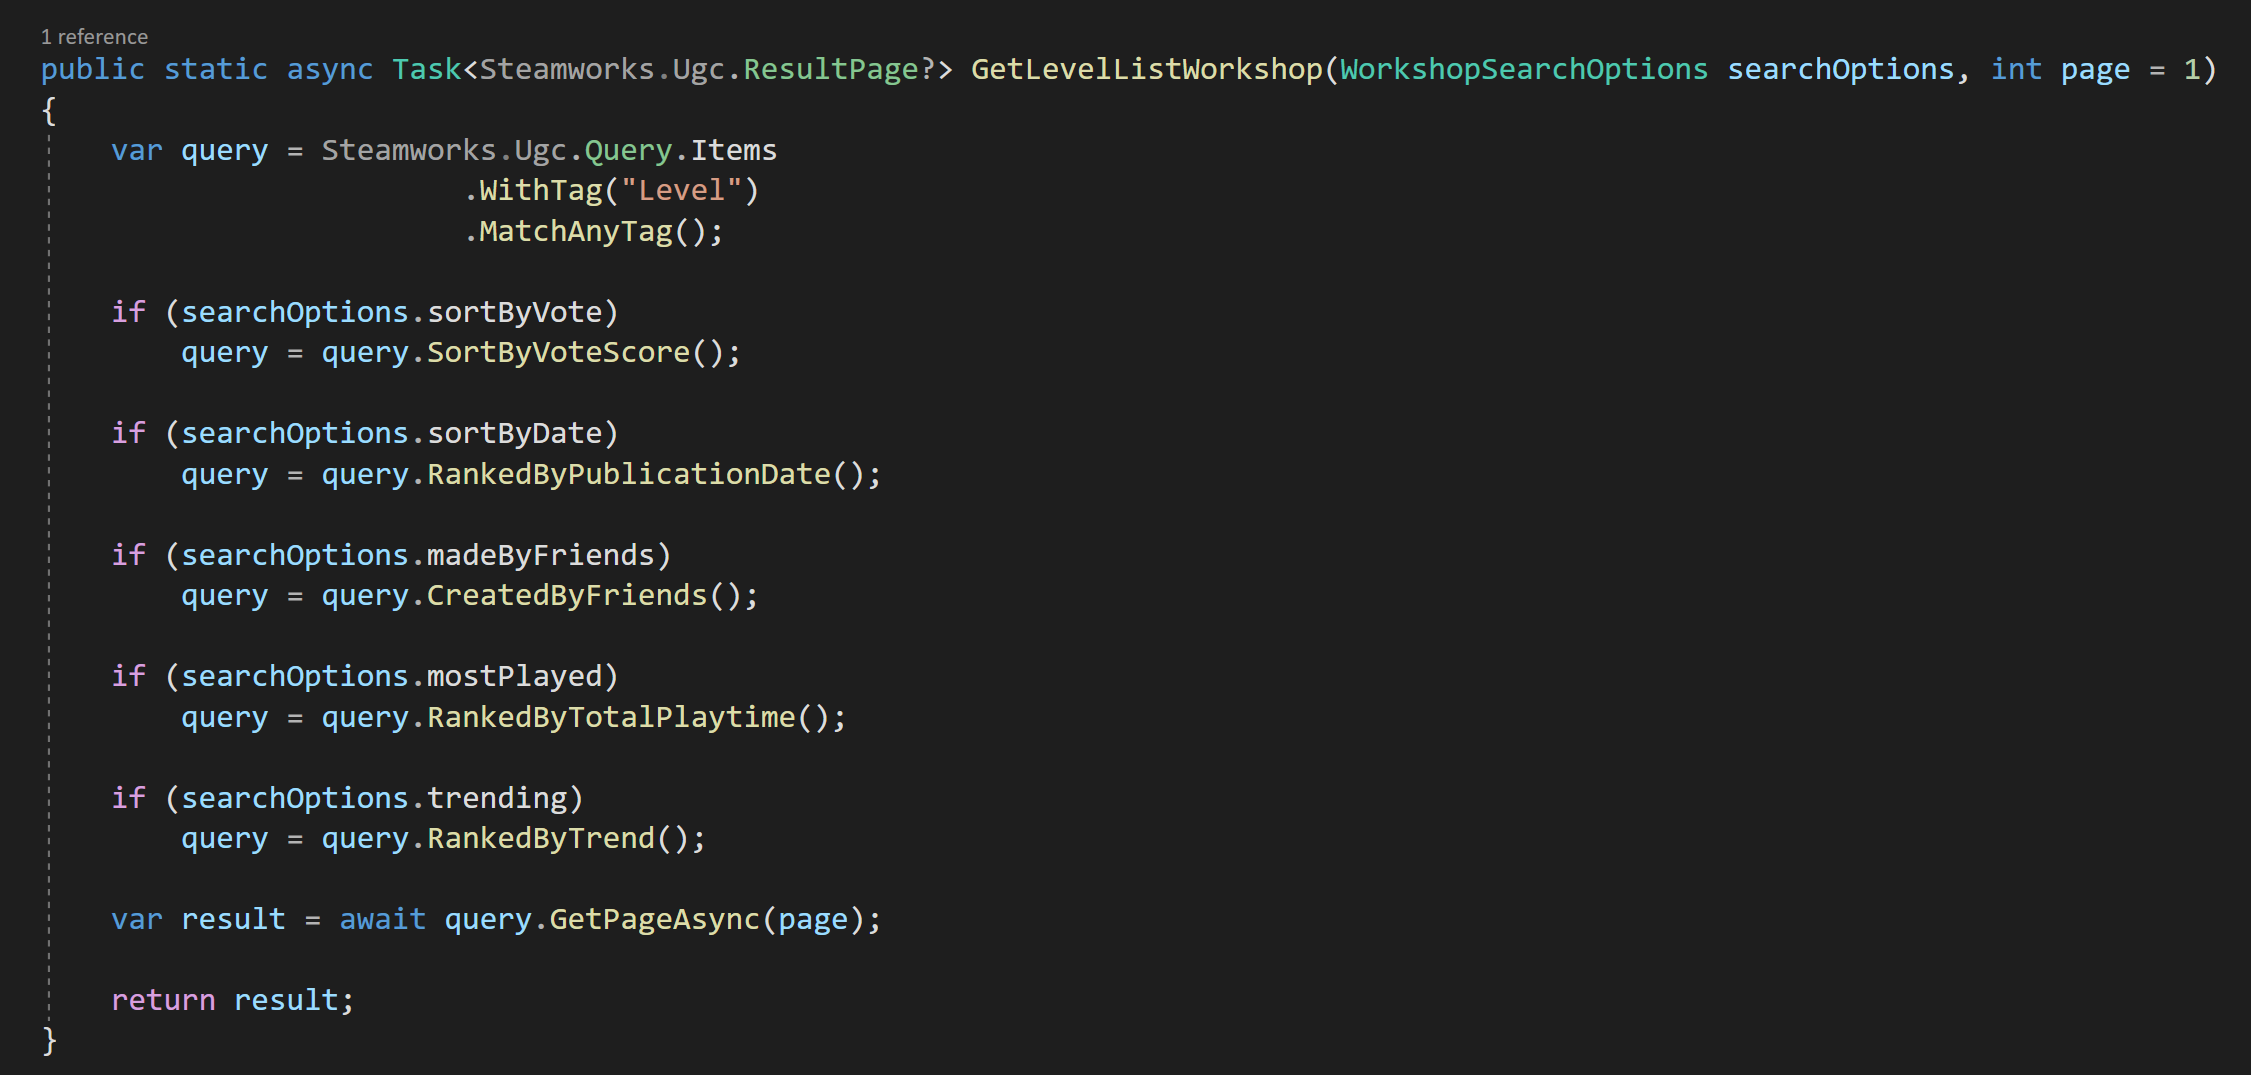

I choose to wrap the search options in a class for convenienceand to reduce the number of input parameters in the class. While I included many of the possible search parameters, I didn’t include all of them but this custom class will allow me to easily add new parameters without breaking the search functions.
Just like the upload process the search process is asynchronousand the results will come back in a short period of time so it must be done in an “async” function and wrapped in a try/catch.
It’s possible that the results are empty and Facepunch provides a “hasValues” property that can be used to ensure or check that the search was successful.


Then the results, if there are any, can be looped through with a foreach loop like so.

Displaying Workshop Item info
How exactly you handle those results is of course up to you. Steamworks.Ugc.Item type gives you access to the title, description, votes by the community, a url to the preview image and a whole lot more. Accessing these properties is straight forward, but once again the handling of those values is very much dependent on your project.
To the right (ish) you can see my user interface for each workshop level. The buttons on the bottom right are contextual and change visibility depending on the status of the item. There are also download and delete buttons that are currently hidden and will appear when they can be used.
The actual downloading of an item is quite simple and easy. Items are downloaded by Steam ID which is readily accessible from the workshop item. The files are downloaded to folder in a Steam library. There location can be found with the “directory” property of the Steamworks UGC Item.

Do note that you are not downloading a Steamworks UGC Item type! You are downloading the same files you uploaded.
This caused some struggles on my end. It was easy for me to think I no longer needed reference to the Steamworks UGC Item and just work with the downloaded files. Once you lose reference to the item there is no (easy) way to find it again from the downloaded files. By losing reference to the item you lose access to lots of metadata that you’re probably going to want.
So tracking or keeping reference to an item is important and many of my functions pass references to items not the saved files. It’s okay if that doesn’t make sense… I think it will once you start implementing your own solution.
To Subscribe or Not To Subscribe?
So maybe I’ll show my ignorance with the Steam Workshop, but I was under the impression that I didn’t need or want to subscribe to each and every level that a user might want to try out. In the API downloading and subscribing are different actions. I couldn’t find anything that said you should do both…
So here’s me saying I think you should do both!
It keeps things simple and is one less “thing” that needs to get checked. There was some snag I hit… to be honest I can’t remember what exactly it was now, but it was going to take a lot of work engineer around not subscribing. So yeah. Just do it. It’s easy and personally I don’t see a downside for the player.
Updating Workshop Items
The last big hurdle with the workshop was updating items... Once again, the actual updating is pretty straight forward and is very similar to the uploading. The biggest difference here is that rather than create a new community file we are passing in the Steam ID of the item which allows Steamworks to update the files.

The one big snag I hit was that the update will fail IF the file has not changed. There’s no indication that this is the problem, the files just won’t upload or update. Which makes sense but leads me to the next issue…
In WML players can locally save a level and don’t have to upload it. This makes sense to me on a lot of levels and I’d venture a guess it’s how most games do it too. But this means that there could be a local version and the downloaded workshop version in different folders… On top of that there’s no easy way to compare those files or know if one exists and the other doesn’t. It seemed to get messy in a hurry.
So if a player makes changes to a level, which version should it save to?
Hmm. Maybe this is obvious, but I definitely needed to think about it for a good while.
I came to the conclusion that changes should always be made to the local versions. And those local versions would need to get pushed to the workshop. This means if a user downloads someone else’s item then before they can edit it a local version is saved.

It’s also unclear to me whether Steam itself checks ownership, so I created an internal check of the item ownership before updating. If the original item is not owned by the current user the files are uploaded to the workshop as a new item. If the original is owned by the player the files update. This leaves out the edge case of the owner wanting to upload the files as a new item, but I’m okay with that.
Deleting Items

It’s quite possible that users will want to delete an item that they’ve uploaded - this is especially true if you are doing some testing with the workshop. And it’s once again very easy. One function call with the Steam ID and it’ll get removed.
The process does take some time and could cause some issues if the user refreshes the search as the item seems to be partially still there for up to a minute or two. For WML, I have the imperfect solution of turning off the UI object when a level is deleted. This gives the user some indication that the deletion is happening, but if they refresh the search I don’t have a system in place (yet) to not show the partial and confusing results.
Conclusion
In the big scheme of things that’s really not that complicated. The amount of code needed to upload, download and update files is actually quite small. The bulk of my code is handling the UI or controlling the input and output of these functions - I’m happy to share those bits, but they are highly dependenton the game and I’m not sure they are particularly useful. But I could be wrong.
Simple Level Save and Load System (Unity Editor)
One of the best things about game jams is the creativity that they require or even force. With such little time to make a game the developer has to get creative to save time. In my case with “Where’s My Lunch?” creating levels was a big bottleneck!
Creating individual scenes for each level was out of the question and frankly, I’m not convinced it would be a good plan even if I had more time. What happens if I need to change the UI? What if I want to redesign the layout? Sure I could use prefabs, but how much easier would it be to just have one scene and then load in the parts for different levels? No juggling scenes. No “scene manager.” Just simple data files with all the needed info for a given scene.
Yes! That’s the way I want to do it.
And that’s how the level save and load system for “Where’s My Lunch?” was created. Now to be SUPER CLEAR, the basic setup does NOT save data during runtime. Not even close. This can only save data in the editor. But! It can load data both in the editor and during runtime. Which for my purposes made it pretty perfect and I suspect pretty perfect for lots of projects.
Looking for a save/load system that works at run time? Stay with me. I use the asset “Easy Save” to convert my system rather painlessly to do just that!
The overarching idea is that the scene is made up of various gameObjects (duh!). The code on each object stays the same from level to level and the only real difference between levels is the positioning and the number of objects…
Which I think maybe true of an awful lot of games.
The Big Idea

So all the system needs to do is record the position and the type of object. The data for each object then gets stored in a list. This list can be easily accessed to load the level whenever we need it. If that list then gets stored on a scriptable object we’ll get a nice project asset for each level in the game.
Pretty simple and pretty slick!
Or at least I think so.
Finding and Saving Objects
To keep things easy I created a monobehavior that can go on every scene object that needs to be saved or loaded. The class has just one field, which is an enum that identifies what type of object it is. This enum will be used by the loading function to locate the correct prefab.

Then all that needs to happen is to search the scene for that type of object and we get a list (array) of objects to be saved. This all happens in the “Level Manager” class. Or specifically in the “Save Level” function.
Do note that this function is never called because I’m using Odin Inspector to create buttons that can be used from the editor. If you haven’t heard of Odin (full disclosure, I work for them) it’s a pretty amazing tool and in this case, is saving me a lot of time by not having to create a custom inspector script!
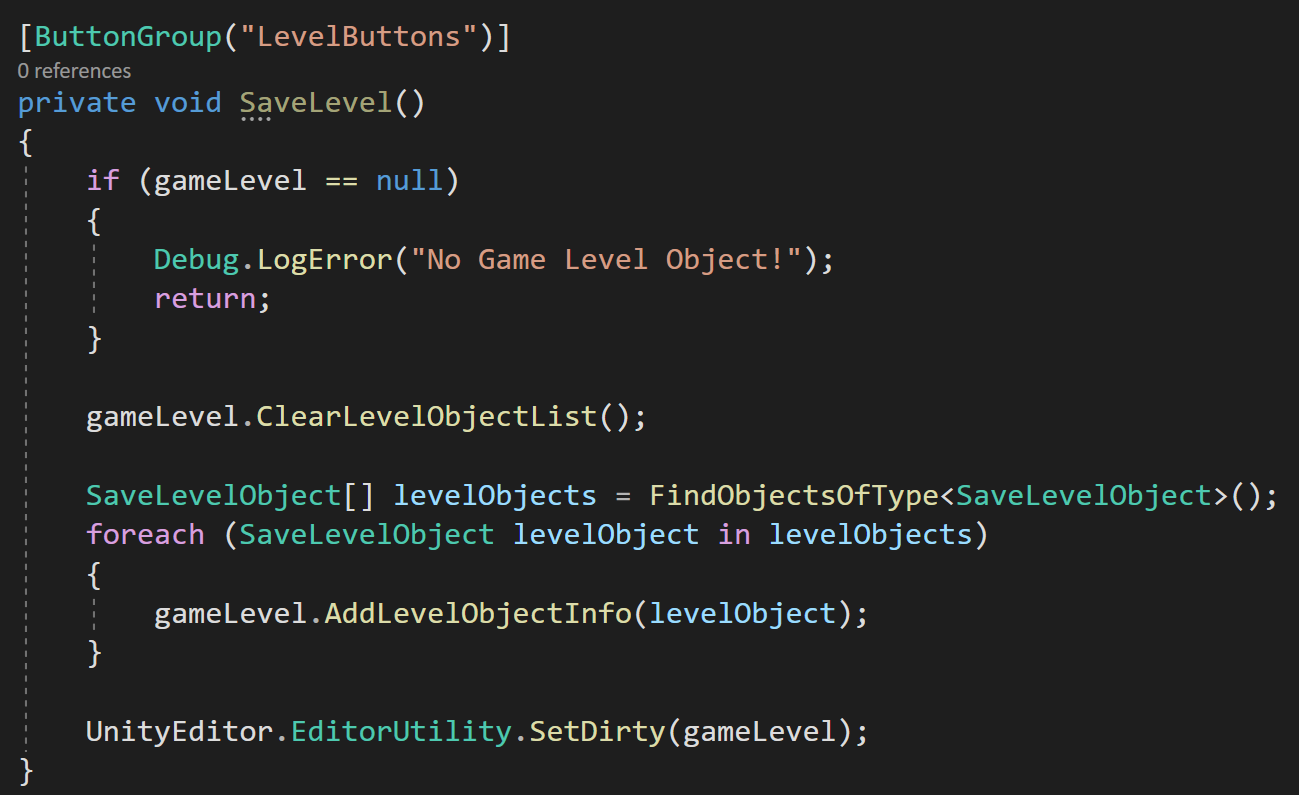
The save level function from the “level Manager”
If you don’t have Odin and don’t want to create a custom inspector you can always use the old trick of using a boolean and checking the value of the boolean in the update function. Use this in combination with the “Execute In Edit Mode” attribute and you can get similar albeit clumsier functionality.
It’s also worth noting that In the “Save Level” function we clear the level before saving it. This ensures that we only save one copy of the level and don’t duplicate objects in our list.
After that, it’s just a matter of iterating through the list (array) of Save Level Objects and adding them to the list on the current game level.
Storing Objects
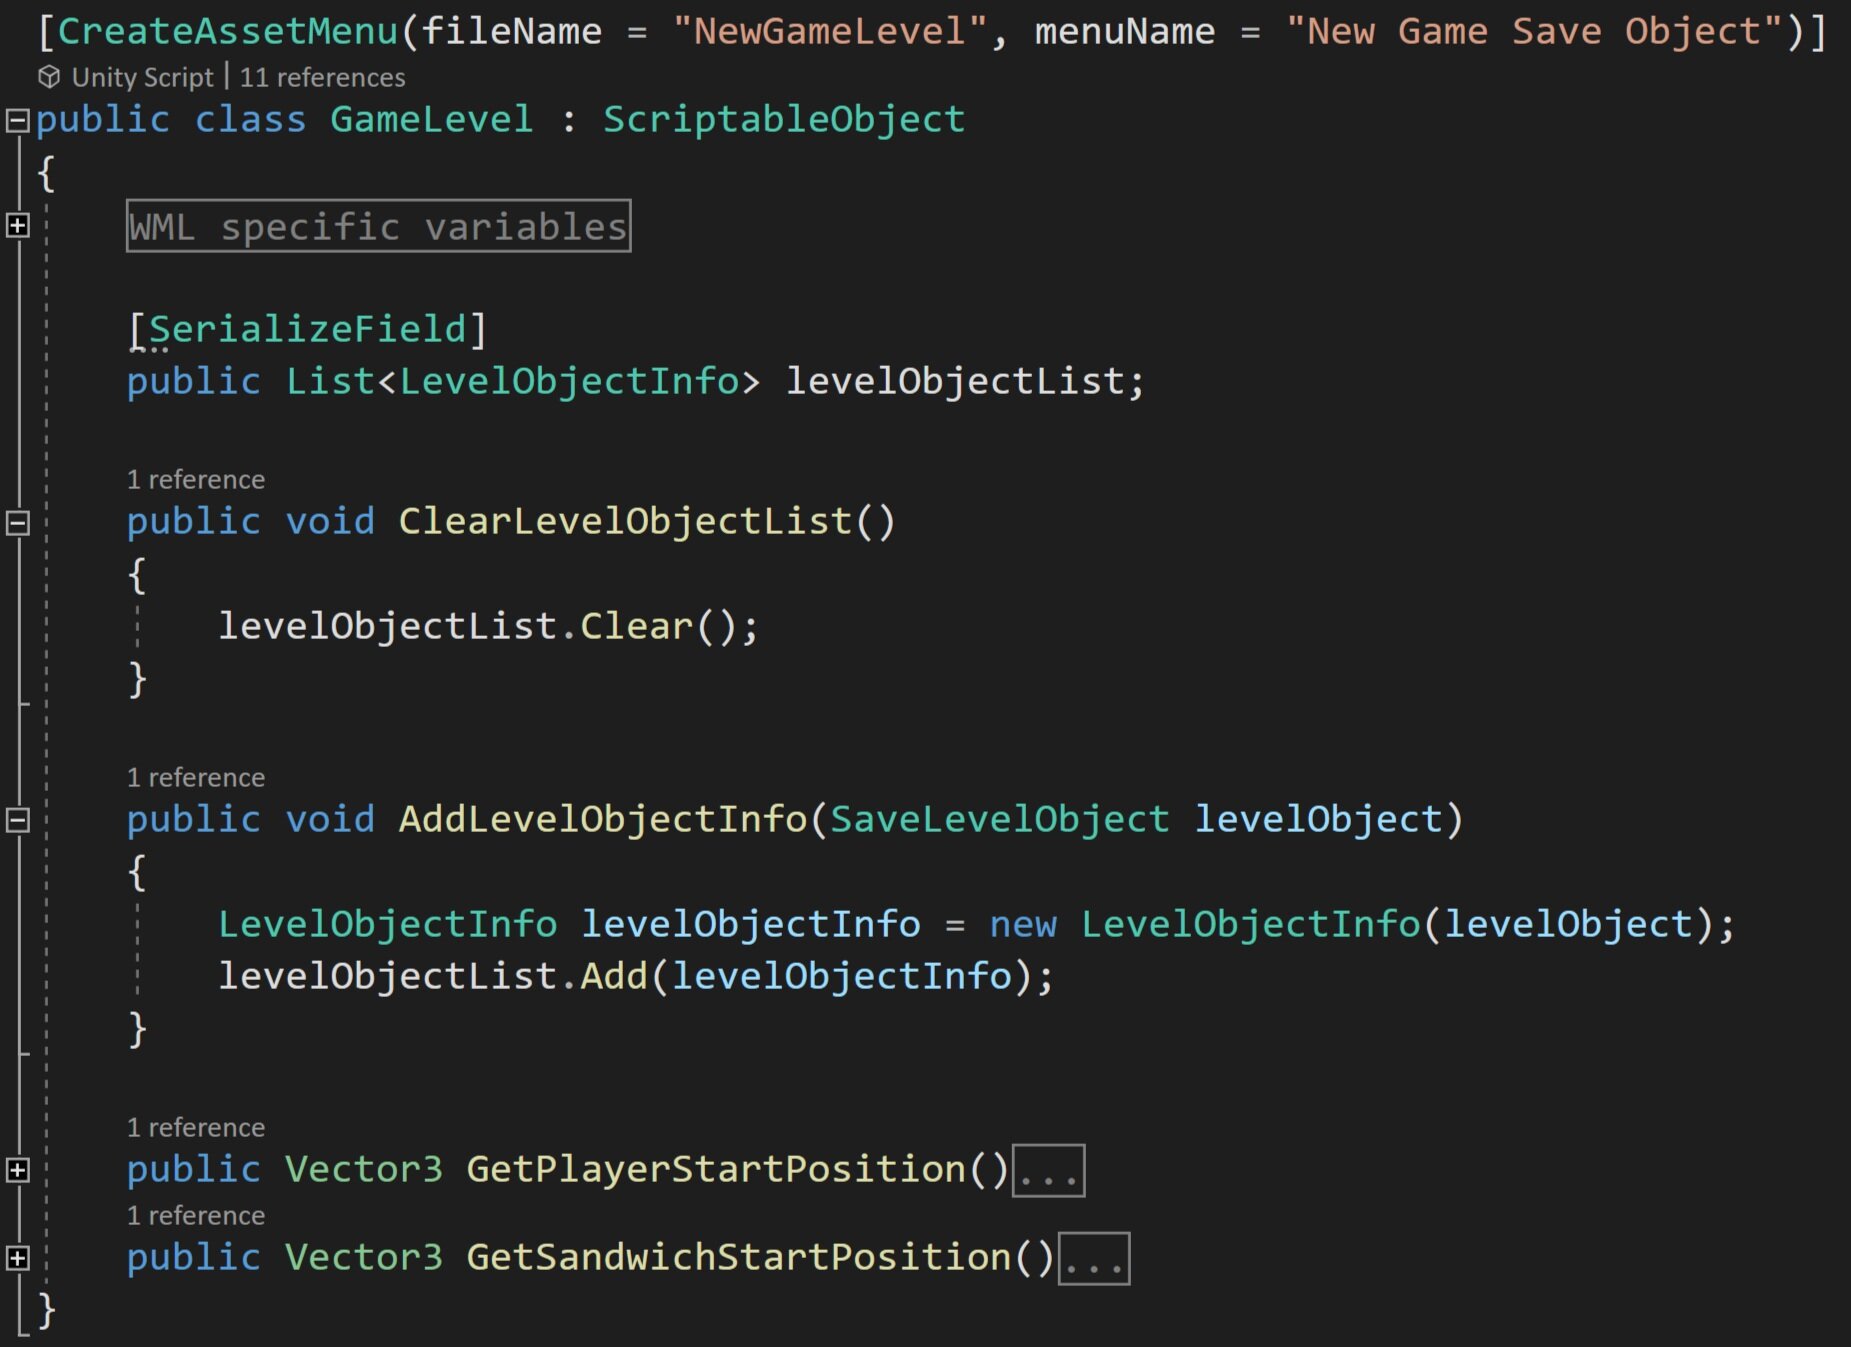
Once the objects have been found we need a place to keep them. And that happens in the “Game Level” class.
The Game Level class is a scriptable object which means that the Game Level objects will be project assets and that makes them easy to handle in so many ways.
If you aren’t familiar with SO’s check out this video I made for the Odin channel. It’s pretty good if I don’t say so myself.
The game level object is pretty simple. It has a list of “level object info” that will contain an enum of the object type and the position of that object.
There are also two important functions. The first clears the list of objects, this was used in the “Save Level” function on the level manager. The second is to add a level object. This creates a new level object, injects all the needed data to the class constructor and finally adds the level object to the list of level objects.

The last two additional functions are specific to WML and just provide an easy way to get the position of the sandwich and the player.
If we take a look at the “Level Object Info” class, we’ll see a constructor that takes in the “Save Level Object” (which is a monobehavior) and stores the needed information. Do note that there is some special handling of the portal or teleporter - this is due to the structure of the prefab and that the portals come in pairs that are parented to a third “portal pair” object.
Also note that the Level Object Info class is NOT a monobehavior. This class exists only in the list on the scriptable object.
Loading Objects

Up to this point, things aren’t too complicated. Sure there are a handful of similarly named classes and you could definitely criticize my naming, but the big idea isn’t too tough to understand. And when it comes to loading the objects, it’s still not too bad but there are a few additional complications.
The biggest issue is to link or connect the object type with a prefab. To do this I wanted a strongly typed connection, not some janky switch statement or block of if statements that are based on the wall objects being the third prefab in a list and the bomb is fifth…
No to that on so many levels! That will 100% for sure break.
It’s going to take a little effort to make this work.
I created yet another class that will contain the enum for the type of object and a reference to the corresponding prefab. This class is the “Save Level Prefab” class.
You can see a list of this type above in the Level Manager. This list will hold references to the prefab that corresponds to the level object type.
You can populate this list manually or (again) if you have Odin Inspector you can use some of their magic to populate it automatically, but I’m going to skip that part for the sake of clarity as it doesn’t really add to the overall concept.

So at this point, we have a list that connects the “level object type” to a correct prefab. All we still need to do in order to load the level is to it iterate through the list of “level object info” and instantiate the prefabs.
So, in the “Load Current Level” function we double check that the current level isn’t null, clear the current level (i.e. the scene), and then iterate through the list of level object info that is saved on the scriptable object. For each level object info, we then iterate through the list of save level prefabs to get the corresponding prefab.
Now, there is certainly some inefficiency to this method. I think creating a dictionary might be a better idea - since dictionaries are faster at lookup than lists. The dictionary could use the “level object type” enum as a key and the object prefabs as the value. The hitch to this plan is that dictionaries are serialized by Unity. However! Dictionaries can be serialized with Odin Inspector which means you can add prefabs in the inspector ;) I might make this change down the road, but for now, the inefficiency isn’t a problem as a few extra milliseconds to load a level won’t be noticed and levels might at worst have a couple of hundred objects. So if it’s not broken I’m not going to break it.
Also using an object pooling solution could also improve performance, but once again this is happening once we level and not while the player is trying to do anything so a small lag spike isn’t currently an issue I need to design around. If it does become an issue, it should be easy to bolt on a system.

Extra bits
You may have noticed that there are two other functions in the level manager. A load level function and a clear level function.
The first is a public function and can be called to change the “current level” and then load that new current level. Nothing too fancy.
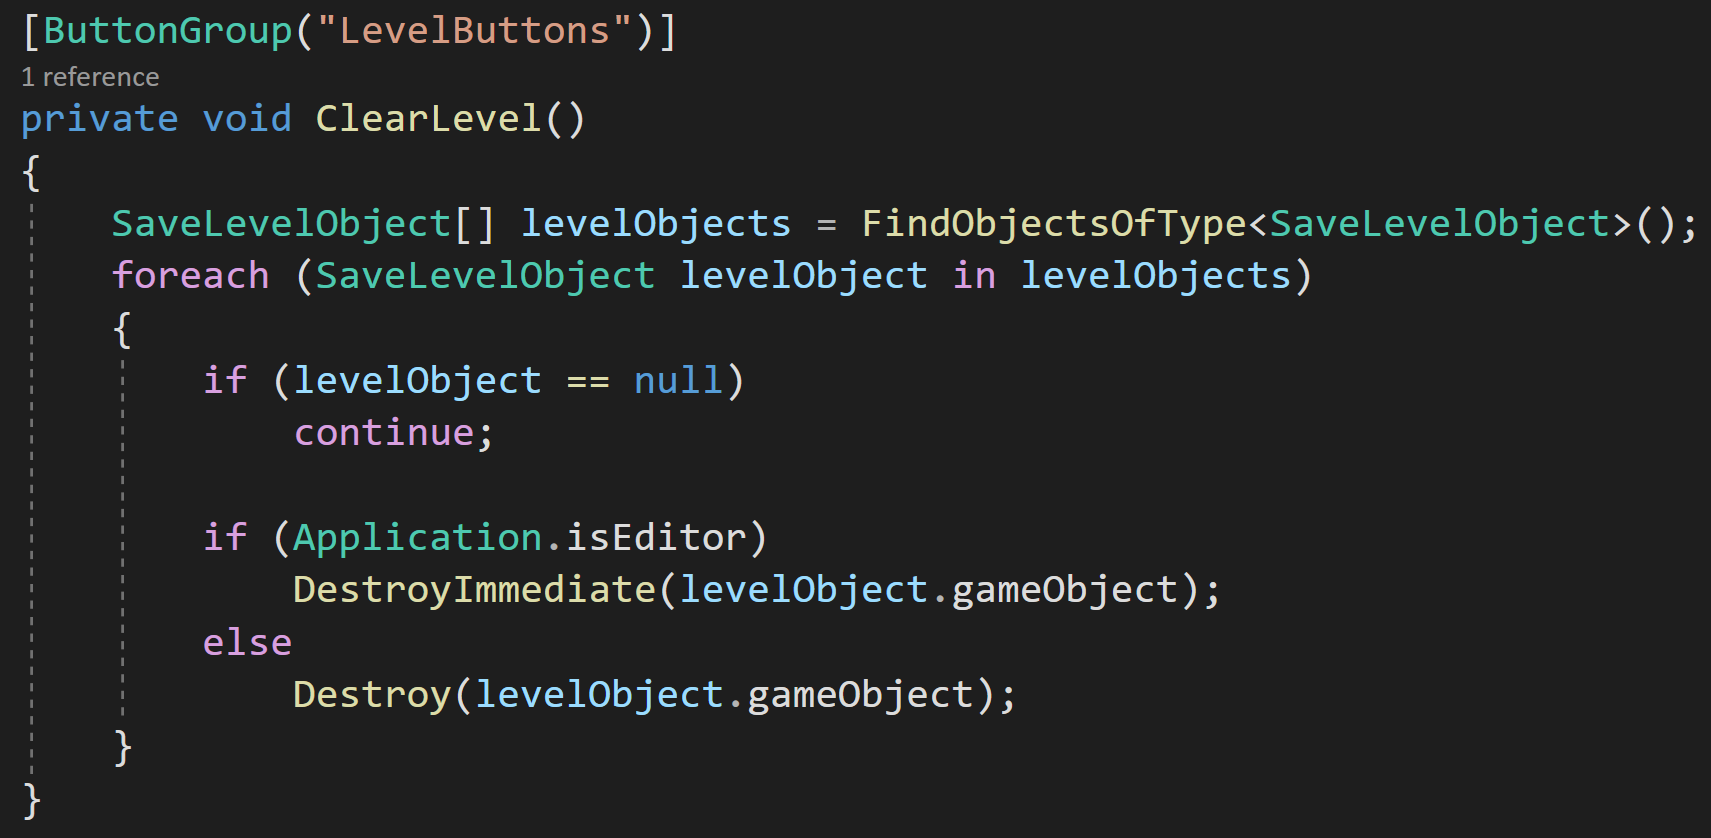
And the second simply clears the current level by iterating through all the Save Level Objects in the scene and destroying them.
Runtime Save = Easy Save
The system as is works really well. This is if you are doing all your saving and loading in the editor - which for the game jam I was doing exactly that.
But I want to go further than that. I want to allow players to design and share levels via the Steam Workshop. This means I need a way to save data at runtime and scriptable objects can’t do that - they can appear to, but trust me they won’t work.
I purchased Easy Save from the asset store a few years back and while it might be overkill for this project - it’s really easy to use and saves all the data to an external file AND will work at runtime so it’s ticking all the boxes.
Custom Types are easily added to Easy Save which allows all of the fields of a class to be saved. Data is saved by type and with a key to look it up later. It’s possible to save an entire class, i.e. the Game Level scriptable object, which is going to make things surprisingly easy! Adding custom types is done in the Easy Save editor window.

Notice the 1 line save functionality!!
With that done it’s simply a matter of creating an instance of the Game Level scriptable object and populating the fields with the correct data (hidden in the WML specific data region). Then in one line, we can save the Game Level data to a file of our choosing!
Seriously! If that’s not worth the money for Easy Save? I’m honestly not sure what is?
Easy Load
Could it be easier?
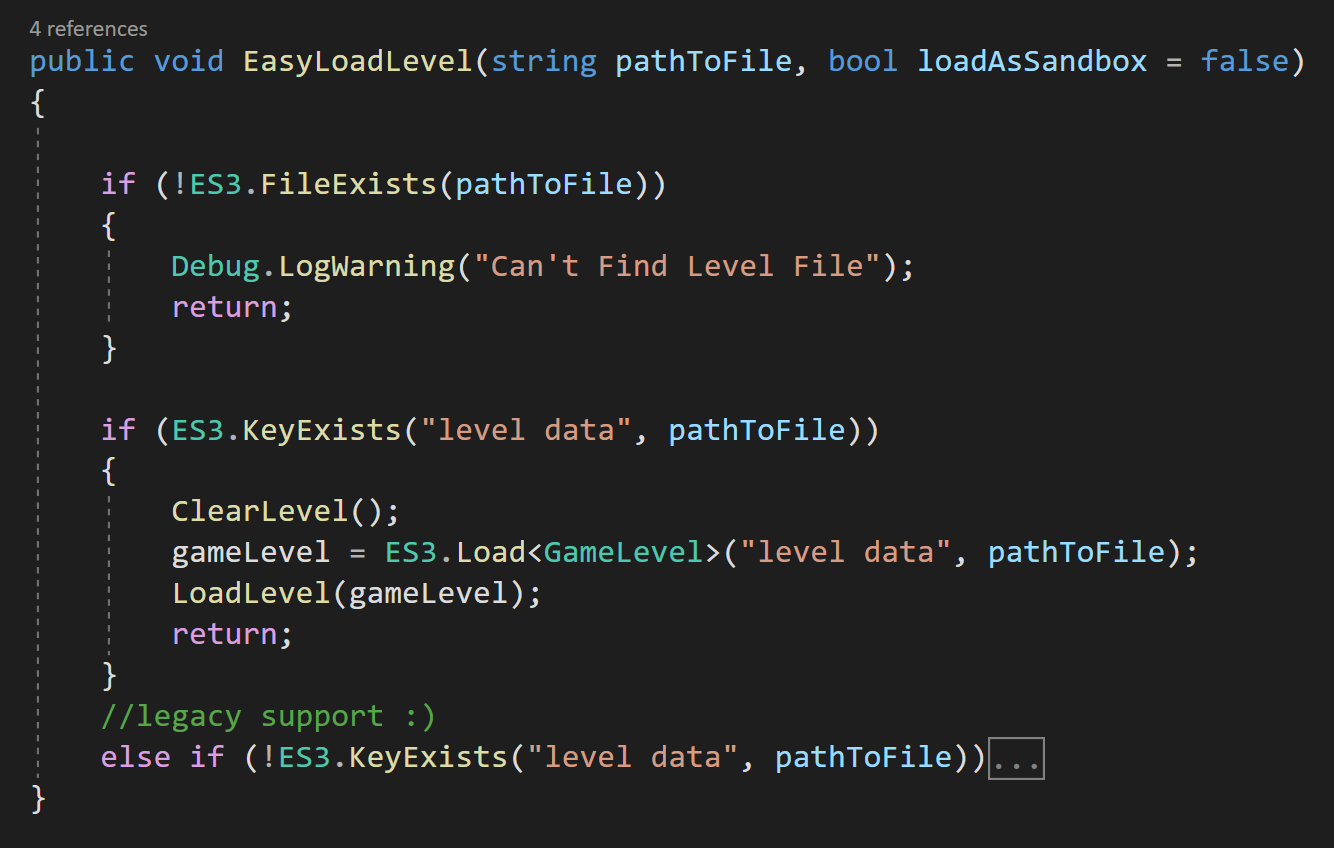
Loading the data back into the game is a slight bit tougher, but still not hard. We need to check that the files exist, if not then we stop what we’re doing.
If the file does exist we check for the “level data” key and if that exists we can clear the level, load the data into the game level object and then simply call the same “Load Level” function we did before.
Note: The last line of the function is for legacy support since I made some significant changes to the save system and there are a few levels already on the Steam Workshop ;)

Command Pattern - Encapsulation, Undo and Redo
Programming folks (otherwise known as “programmers”) often talk about encapsulation - which can be a very power concept and tool that can save plenty frustration and prevent bugs as a project grows large.
The idea of encapsulation is that a class or a system has everything it needs to function INSIDE of itself - it doesn’t need to reach out for references and is not dependent on other classes or systems to function. Encapsulation decouples classes and systems. The coupling of systems or classes should generally be avoided to keep your project stable and robust as it grows and has features added.
The command pattern is all about sending information, or a command, to an object. In the case of the command pattern the command itself is encapsulated! The sender and the receiver of the command are not necessarily encapsulated, but rather the command itself is.
This means that all the information needed to execute that command is wrapped up inside a command class. What this means is the object executing the command doesn’t need any external references - all it needs to do is tell the command to do its thing and the command is fully independent and decoupled from other systems!
While this requires some framework and intentionally to create - it can be very useful. It means that commands can be added to a list or queue, run immediately, or run at any later time. This adds or allows significant functionality that would be difficult to achieve with just direct function calls.
This makes it great for asynchronous applications - one example might be a turn-based strategy game where a sequence of commands is created one at a time and then all the commands, or a select number of commands, can be run when it is that object’s turn.
The command pattern can also be used to “easily” create of an undo system - which depending on your project might be helpful or even crucial.
For this post (video), we’re going to start simple. Just using the command pattern to collect commands in a list and execute them over a short time interval. We’ll then add in the ability to undo and redo commands. This will result in some messy code, but we’ll finish up the post by wrapping all that messiness into a “command handler” class - which ends up pretty clean and tidy due to the encapsulation of the commands.
The Code Begins!
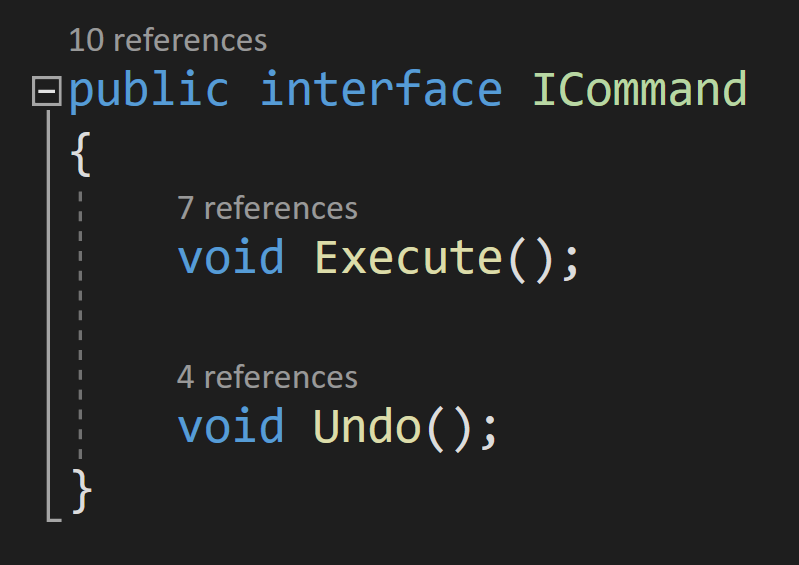
The Command Interface
Again, the core idea of the command pattern is to encapsulate the command in an object. To do that we first need to create an interface that will have two functions. The first function is the “execute” or “do” function. This will contain all the code for the command to complete its action.
The second function is an “undo” function - which will need to have code that reverses or undoes whatever happens in the execute function.
Exactly what the undo function looks like is 100% dependent on what the command is doing.
With the interface complete, we then need to create classes for the actual commands.
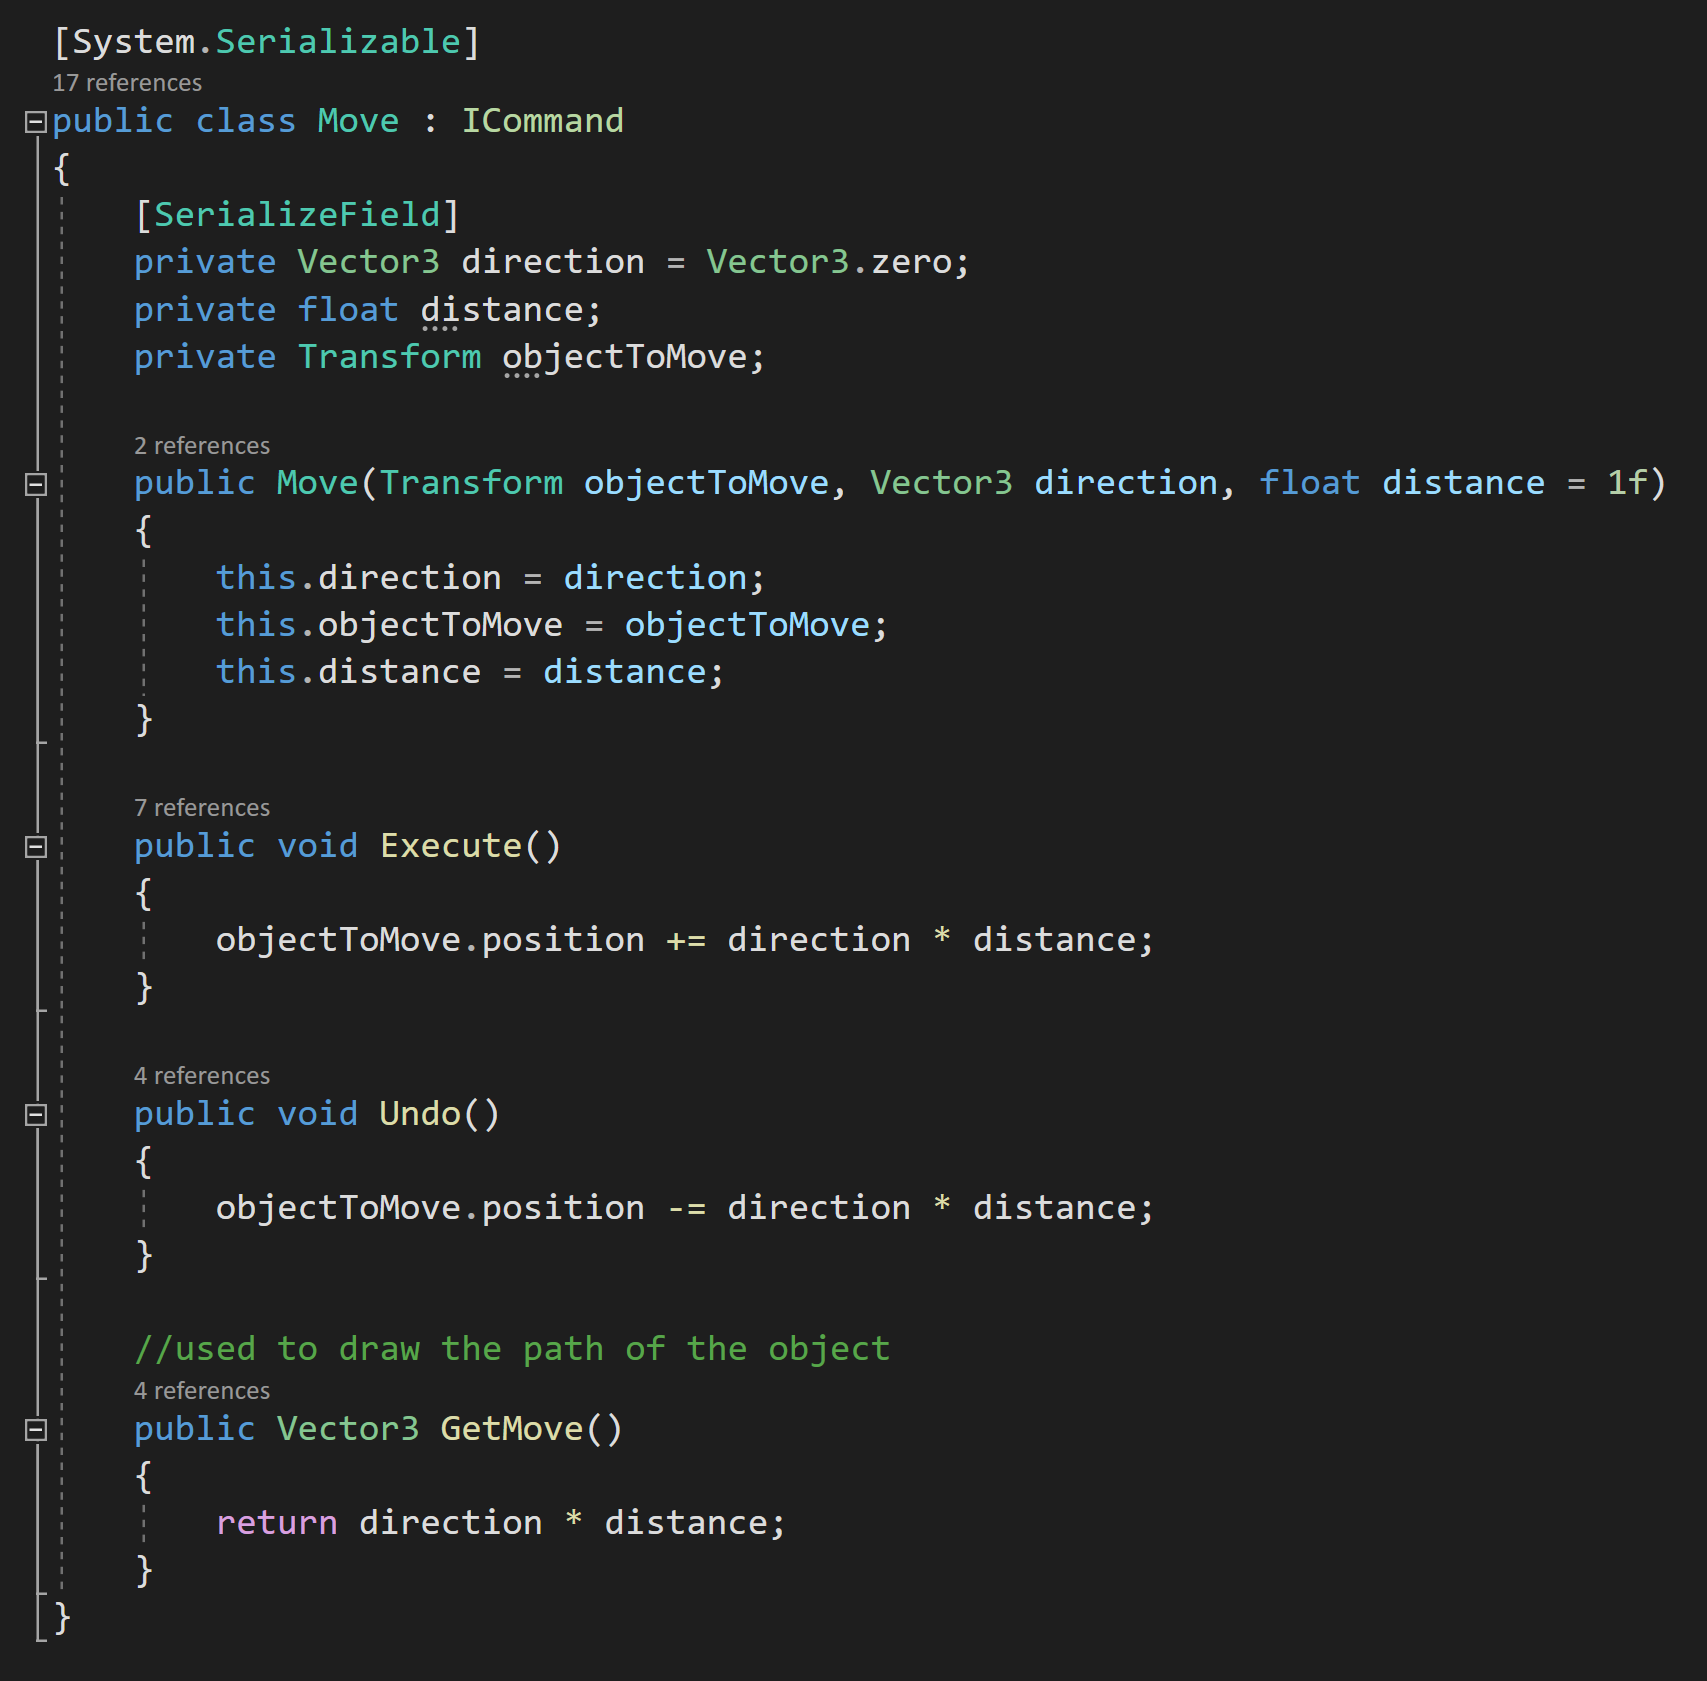
The Move Command - Which Implements the Command Interface
For the purposes of this video, I’m just going to create one command which is a “move command.” This class will of course need to implement the command interface.
In the move class, we need three variables. The first is the direction to move, the second is the distance to move and the third is the transform that will be moving. All three of these variables are private and will have their values set in a constructor.
By doing this, the command instance will have all the information and references that it will need to execute the move command.
This is pretty clever in its simplicity. It’s also pretty clean!
The Execute and Undo functions are fairly straight forward in that they change the position of the transform. The execute moves the transform in one direction and the undo moves it in the opposite direction.
Simple and tidy. Just the way I like it.
I’ve also included a “get move” function that is used in order to draw the path taken by the object - this certainly isn’t the only way to do it. It’s not particularly clean, but it gets the job done and it’s not the focus of this video. For the most part I will be ignoring the path drawing functionality as it’s tangential at best to the command pattern.
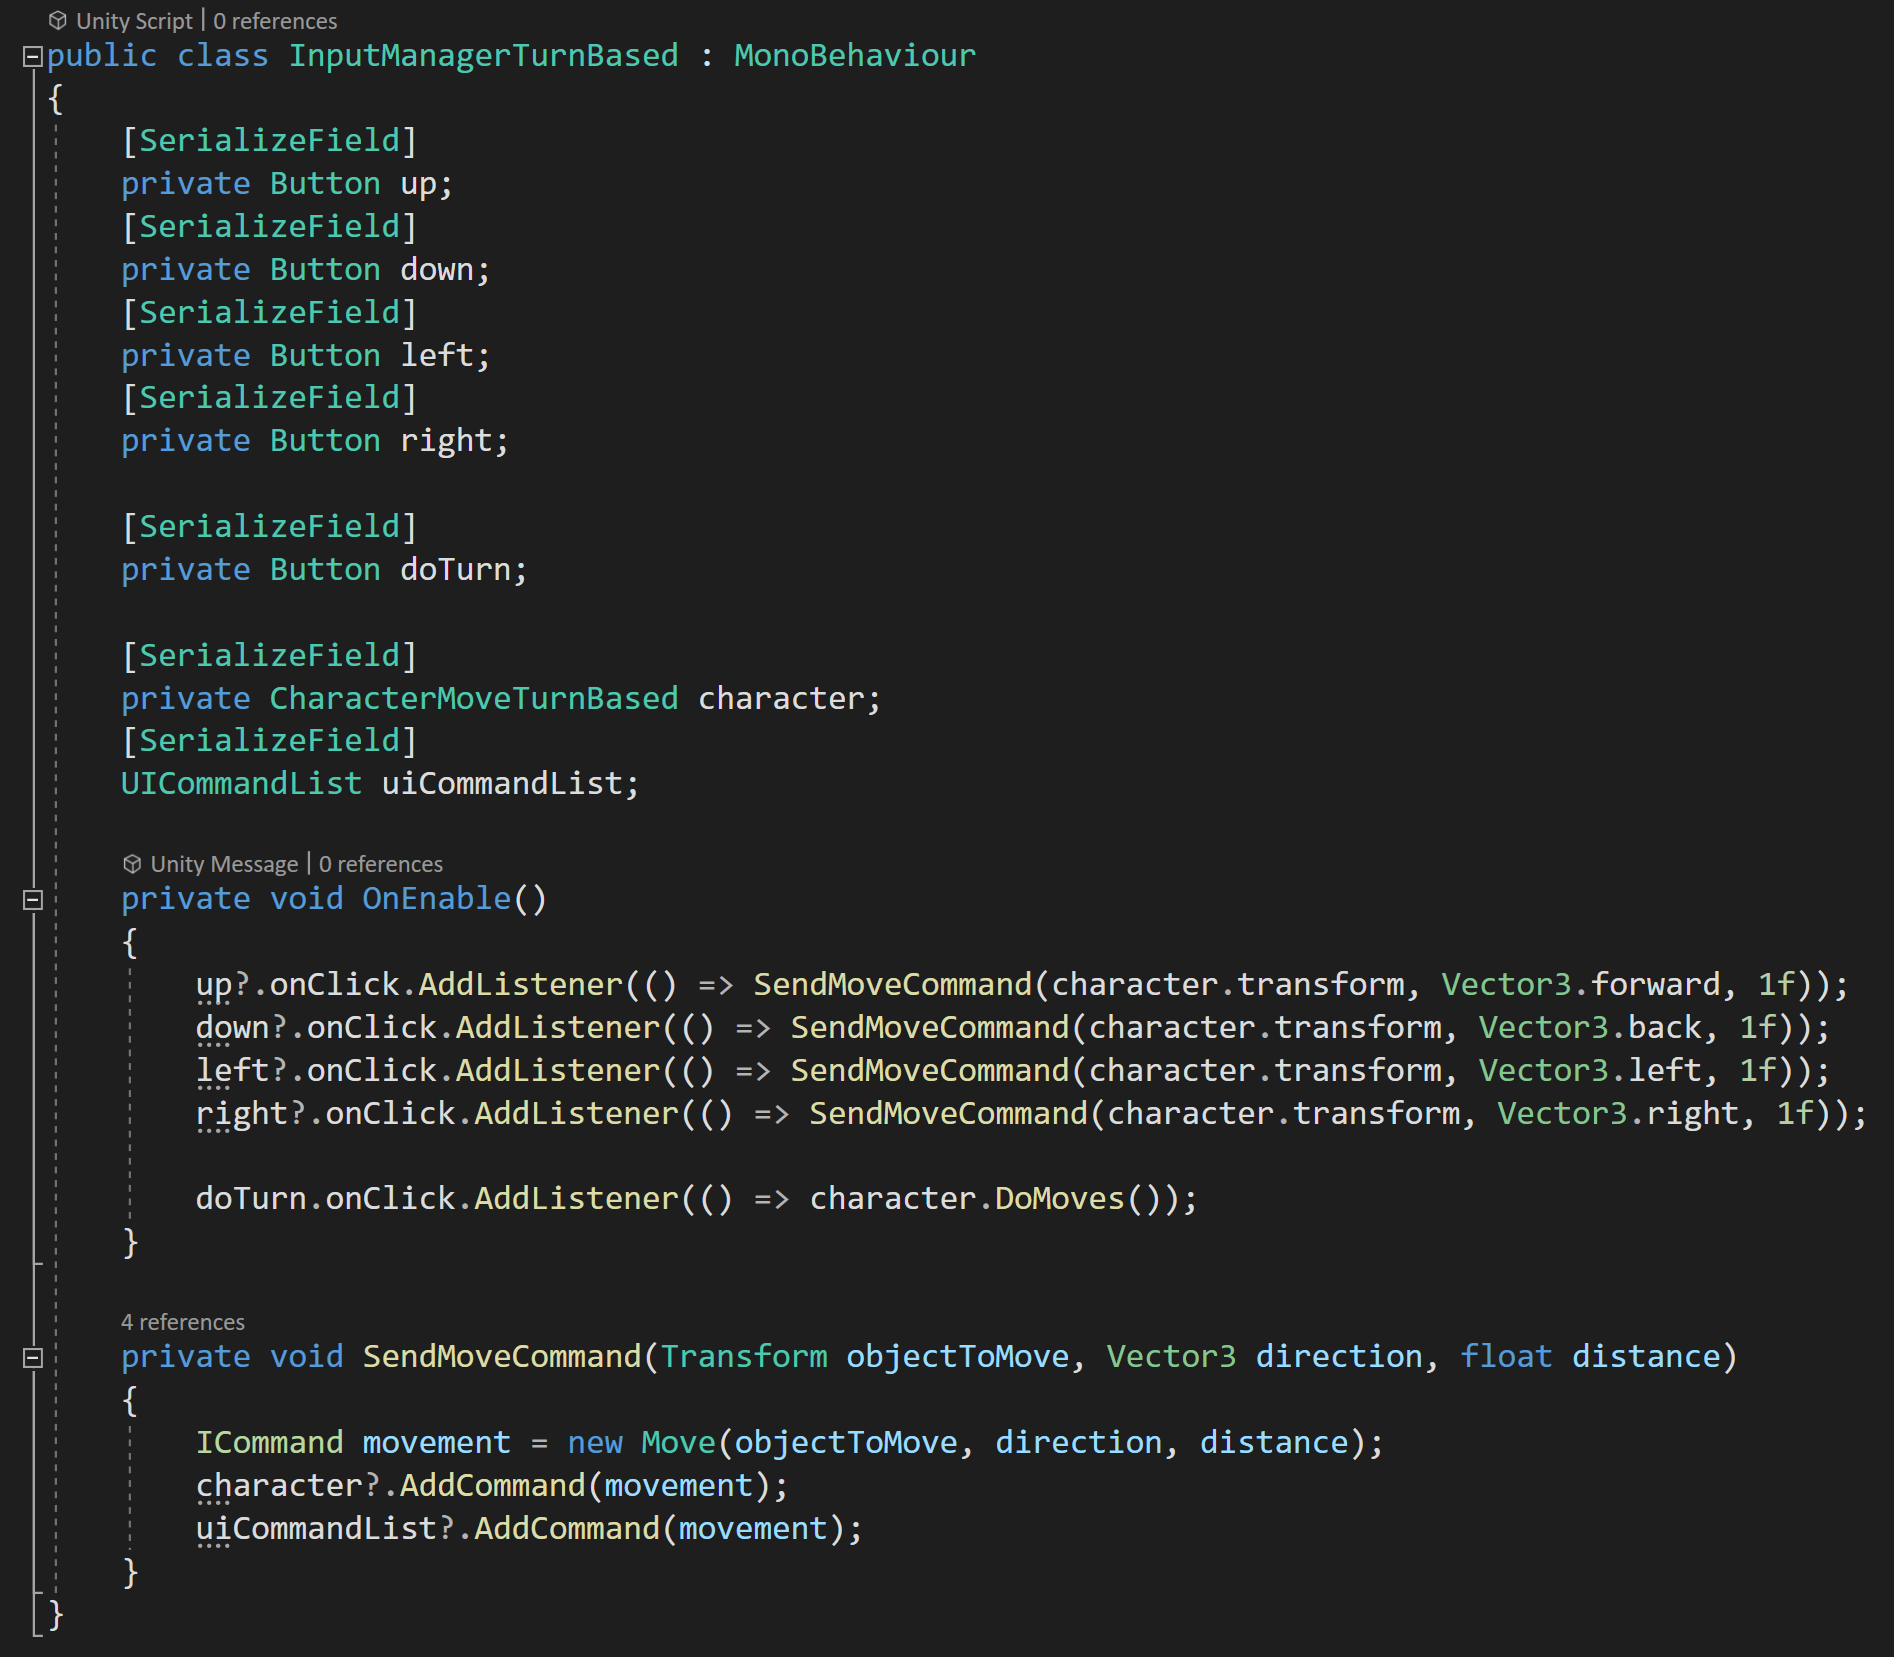
turn Based Input Manager
To control the object and issue the commands, I’ve created a few UI buttons. These are connected into a basic “input manager.”
In the start function a listener is added to each button. The direction buttons all call a “send move command” function. While the “do turn” button will call a function on the player object that will execute the list of commands.
How exactly the input is gathered, of course doesn’t matter, but the “send move command” is crucial and does a few important things.
This function takes in the transform to be moved, in this case the player object’s transform, the direction to move as well as the distance to move. The function then creates a new instance of the move command and send the command to the character controller.
For my example it also adds the command to a UI element that displays the commands on the screen.
A better approach to sending out these commands would probably be to use the Observer pattern or in other words use events… but I didn’t want to go too far astray from the command pattern and complicate the main idea. If you aren’t familiar with the observer pattern or events - definitely go check out that video it’s easily one of my favorite and most used patterns.

Turn Based Character Controller
In our character move class, there is a list of move commands that each incoming command will be stored in. You can see this happening in the “add command” function.
In general, the list could hold types of ICommand, but in order for my path drawing to work I needed to constrain the list to the more specific type.
For simplicity I’m not showing the code that does the path drawing, but if you want to see that you can check out the full code.
There is then a “Do Moves” function that will be called by pressing the “do turn” button. This function calls a coroutine that iterates through the command list and calls “execute” on a command and then waits a short time before looping through to the next command.
And that’s pretty much it for a basic implementation of the command pattern. You just wrap up the commands which contain everything that needs to happen and ship it off to a list for storage so it can be executed when needed.
Again, pretty simple, nice and tidy.
Adding Undo
So let’s look at how an “undo” system might work. The command interface and the move command class remain the exact same. No changes needed at all.
The input manager is functionally the same, but now has an option for an undo button. This new button will call a public “undo” function on the character controller - again not the cleanest implementation and an event would likely be better.
The big difference comes in the character controller script. Here I’ll modify the behavior by now having the player object move in real time as the buttons are pressed. This isn’t necessary for the undo function to work, but I think it makes it easier to demonstrate the undo functionality.
In order for the player object to move in real time, we simply need to execute an incoming command whenever that new command is added.
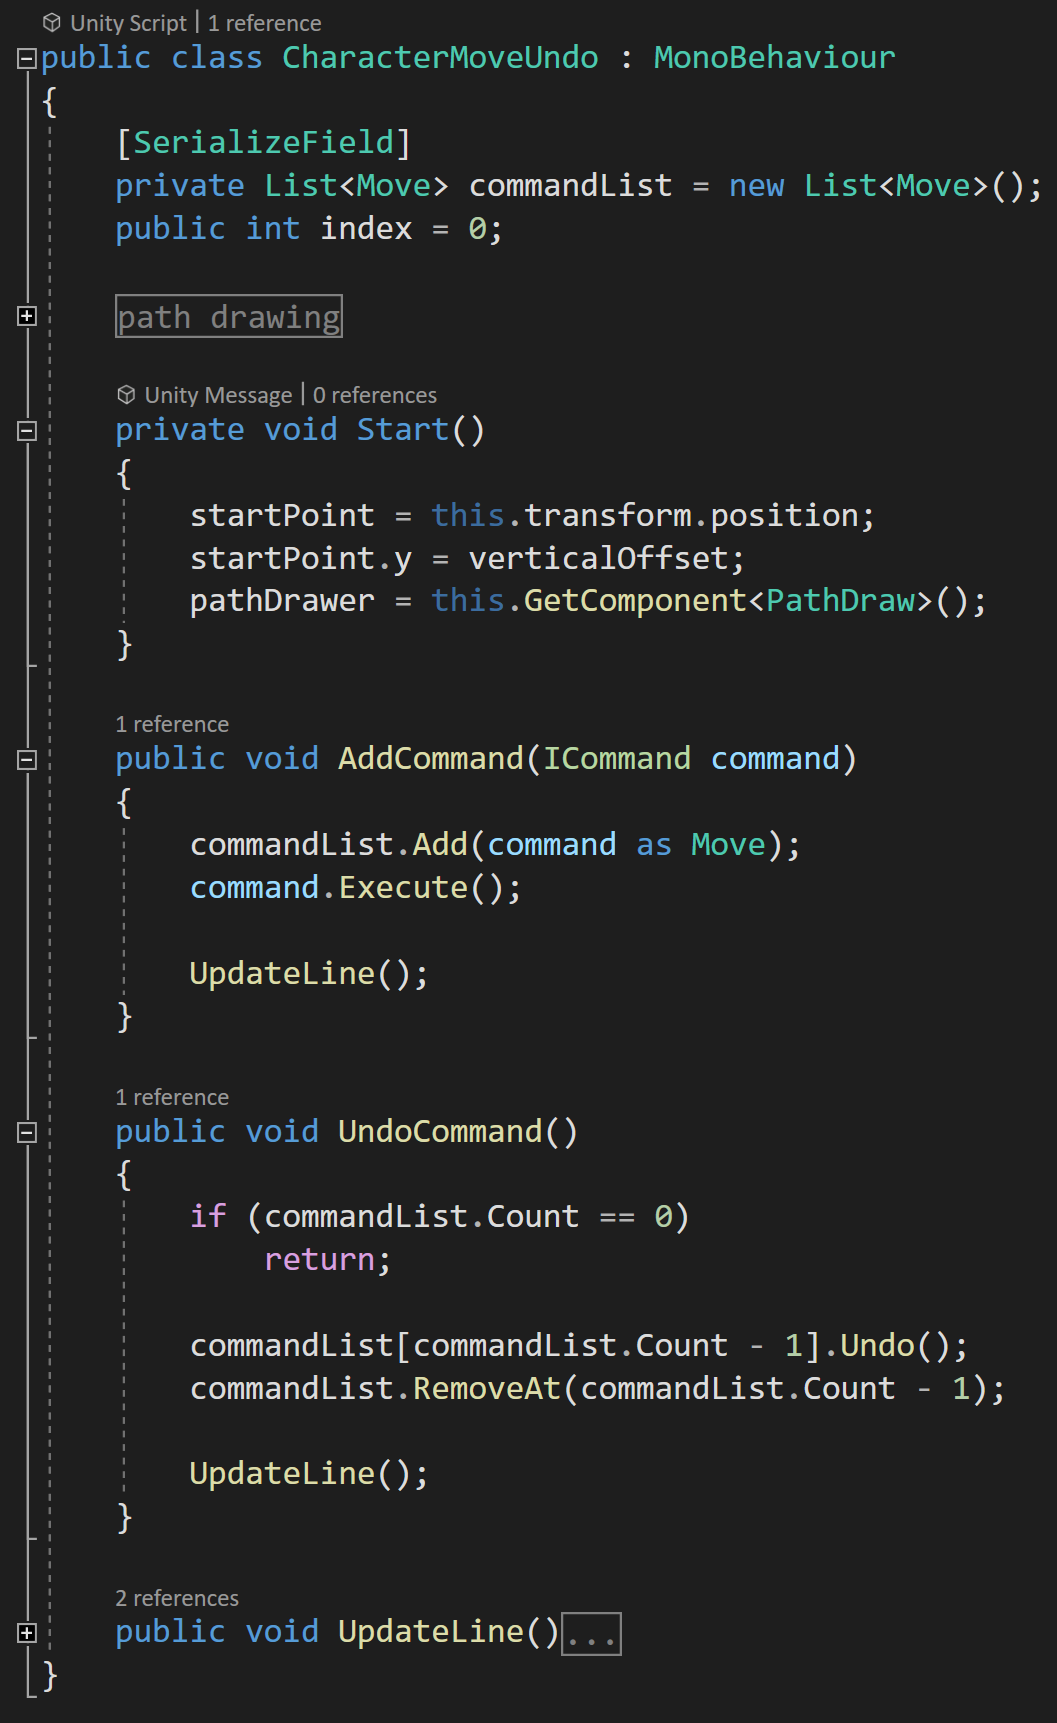
Real time Character Controller with Undo
New to the class is the “undo command” function. This function first checks that there is a command to “undo” by checking the number of commands in the command list, then calls “undo” on the last command in the list and then removes that command from the list.
Tis is super simple! All thanks to the command interface!
When I first saw this I was surprised and even a bit shocked how easy this could be. Now of course if the command is more complex than the move command the writing and testing of the undo function will be more difficult and more time consuming.
BUT!
The interface makes it easy to call that undo function and the inclusion or encapsulation of all the values and references provides a solid framework to create undo functionality.
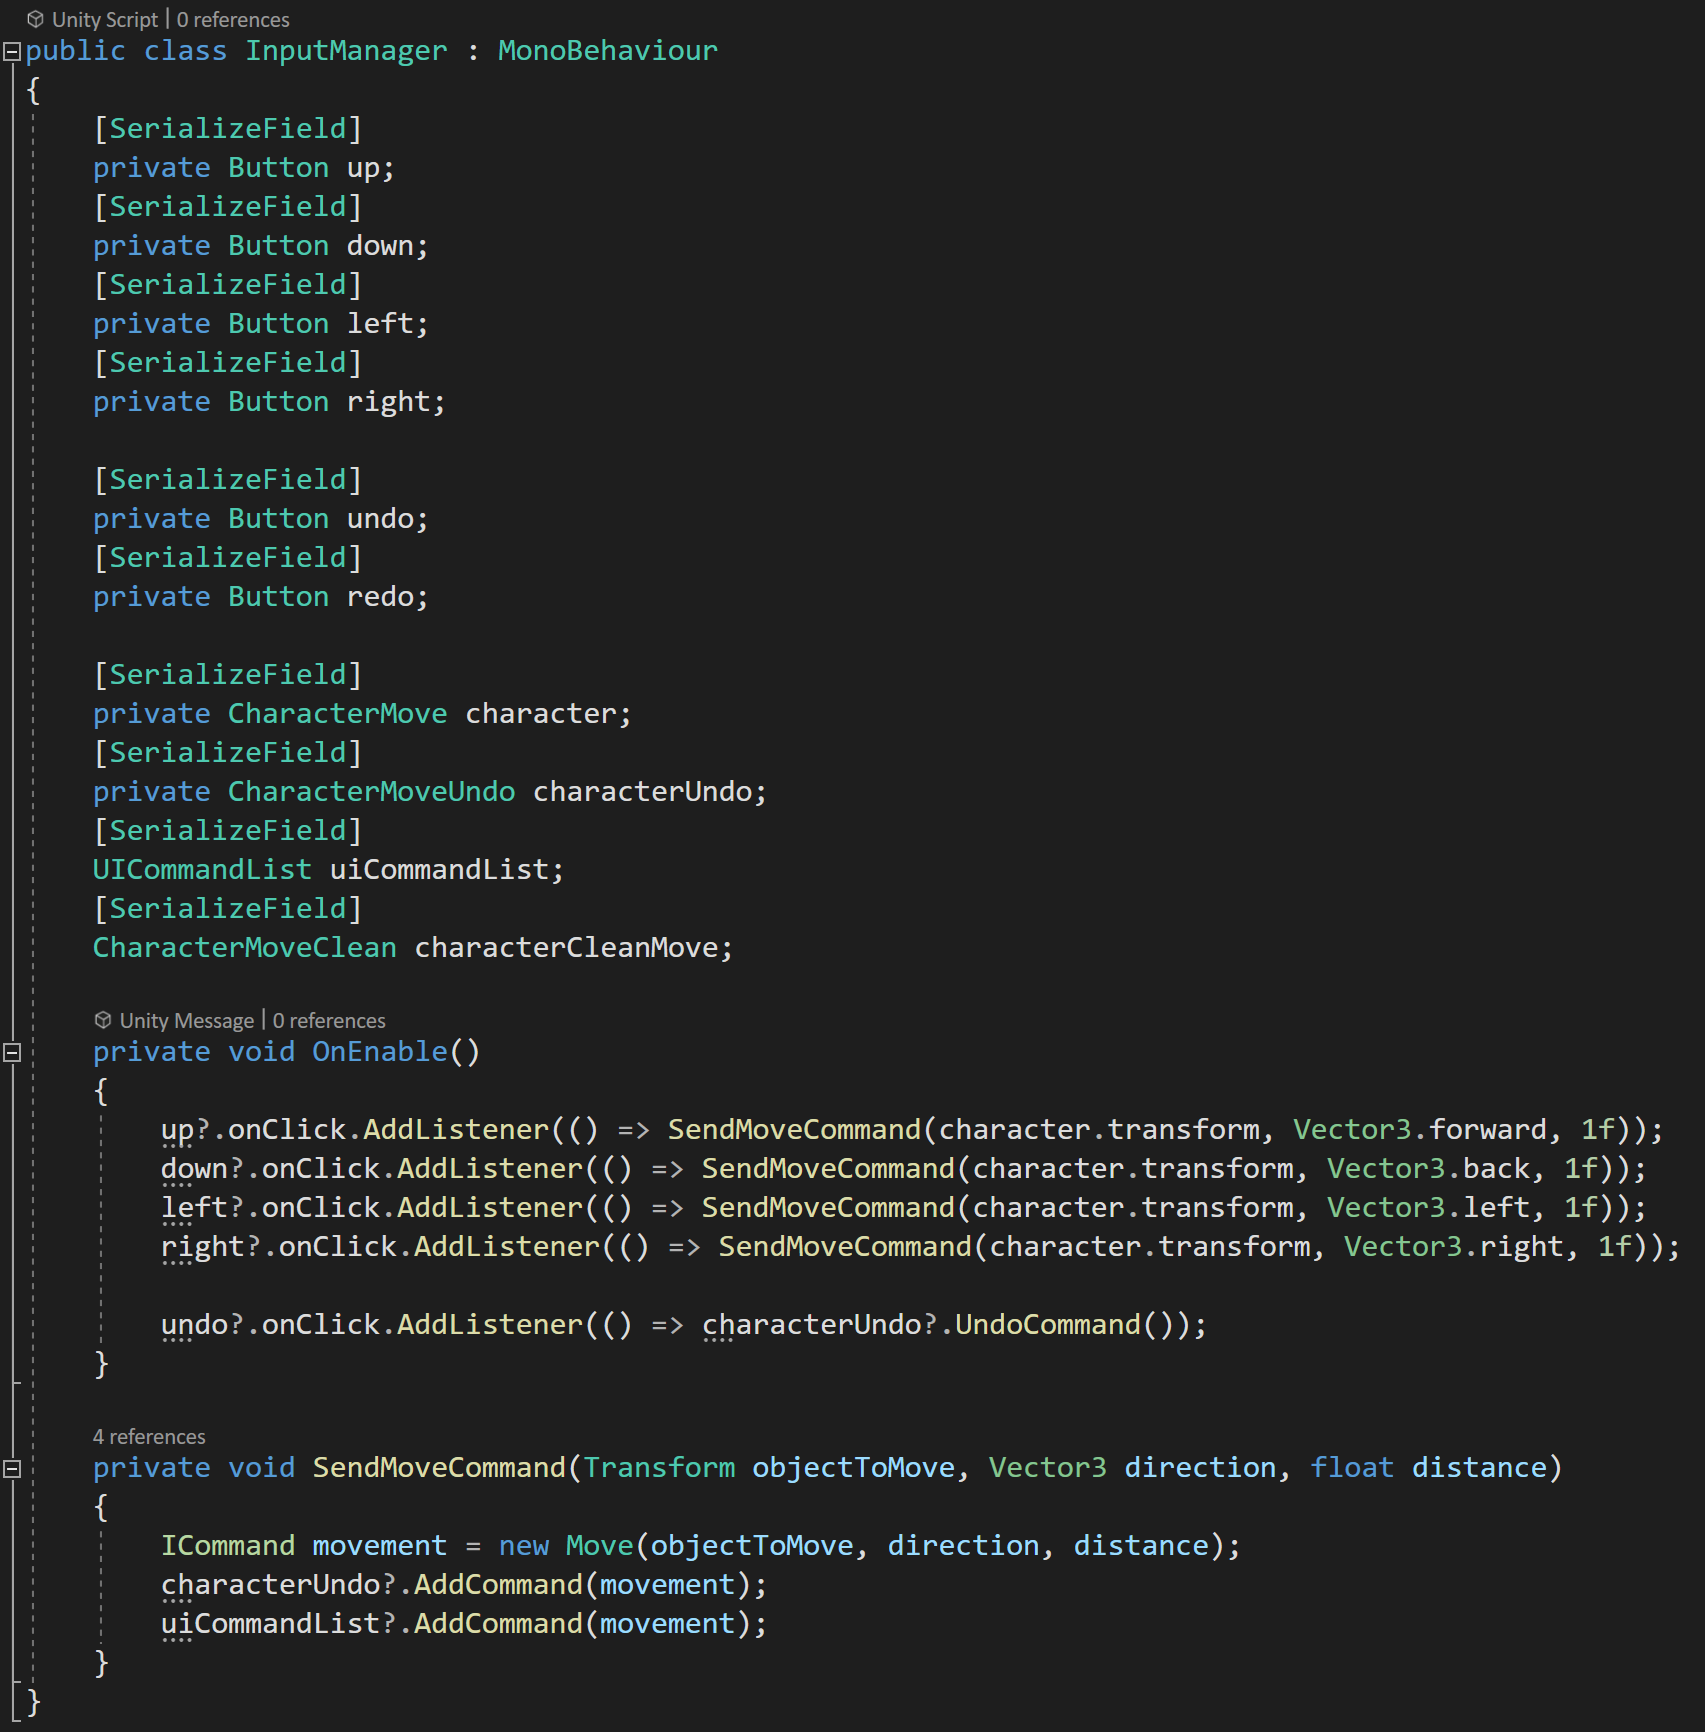
Redo…
For many games this may be enough, but if you want to also implement a “redo” functionality things are going to get a bit messier - or at least the way I did it. All the changes are made on the character controller. The commands stay the same and the only change to the input manager is to add the redo button and connect it to a redo function on the character controller.

Character with Undo and Redo
For a redo system, we could simply not remove commands from the command list and then execute them again when a redo button is pressed. Essentially just working our way up and down the list of commands...
But! And there is a but.
If some commands are undone and then new commands are added this will cause problems as those new commands would just get added to the end of the command list…
SO!
We need to modify our lists and keep track of which command on the list we currently executing or undoing. So yeah. Sounds simple, and it’s not crazy, but it does get a bit messy.
So the first thing we need to do is add an index variable that can track which command on the list we currently working with.
Each additional command added to the list, the index will increment up one AND with each command undone the index will increment down one. This means we also need to change which command is being undone to correlate with the index and not just the length of the command list.
With that all done we now need to add a few lines to our “add command” function. We need to check and see if our index is at the end of the list - meaning we’ve undone some commands and are now adding a new command.
If it’s not then we need to remove all the commands between our current index and the end of the list by using the “remove range” function.
With this complete, we should be able to add commands, undo some of them and add more commands without screwing anything up. If we were to test this, on the surface we haven’t gained new functionality, but it does mean we can now add a “Redo Command” function.
This function is actually fairly simple, we do some checks to make sure we won’t get a null command or get an out of range error. And then we simply execute the command that correlates to the value of the index.
Once again, the interface with the execute and undo functions makes this surprisingly simple - minus the tracking of the index.
But!
It’s So Ugly!
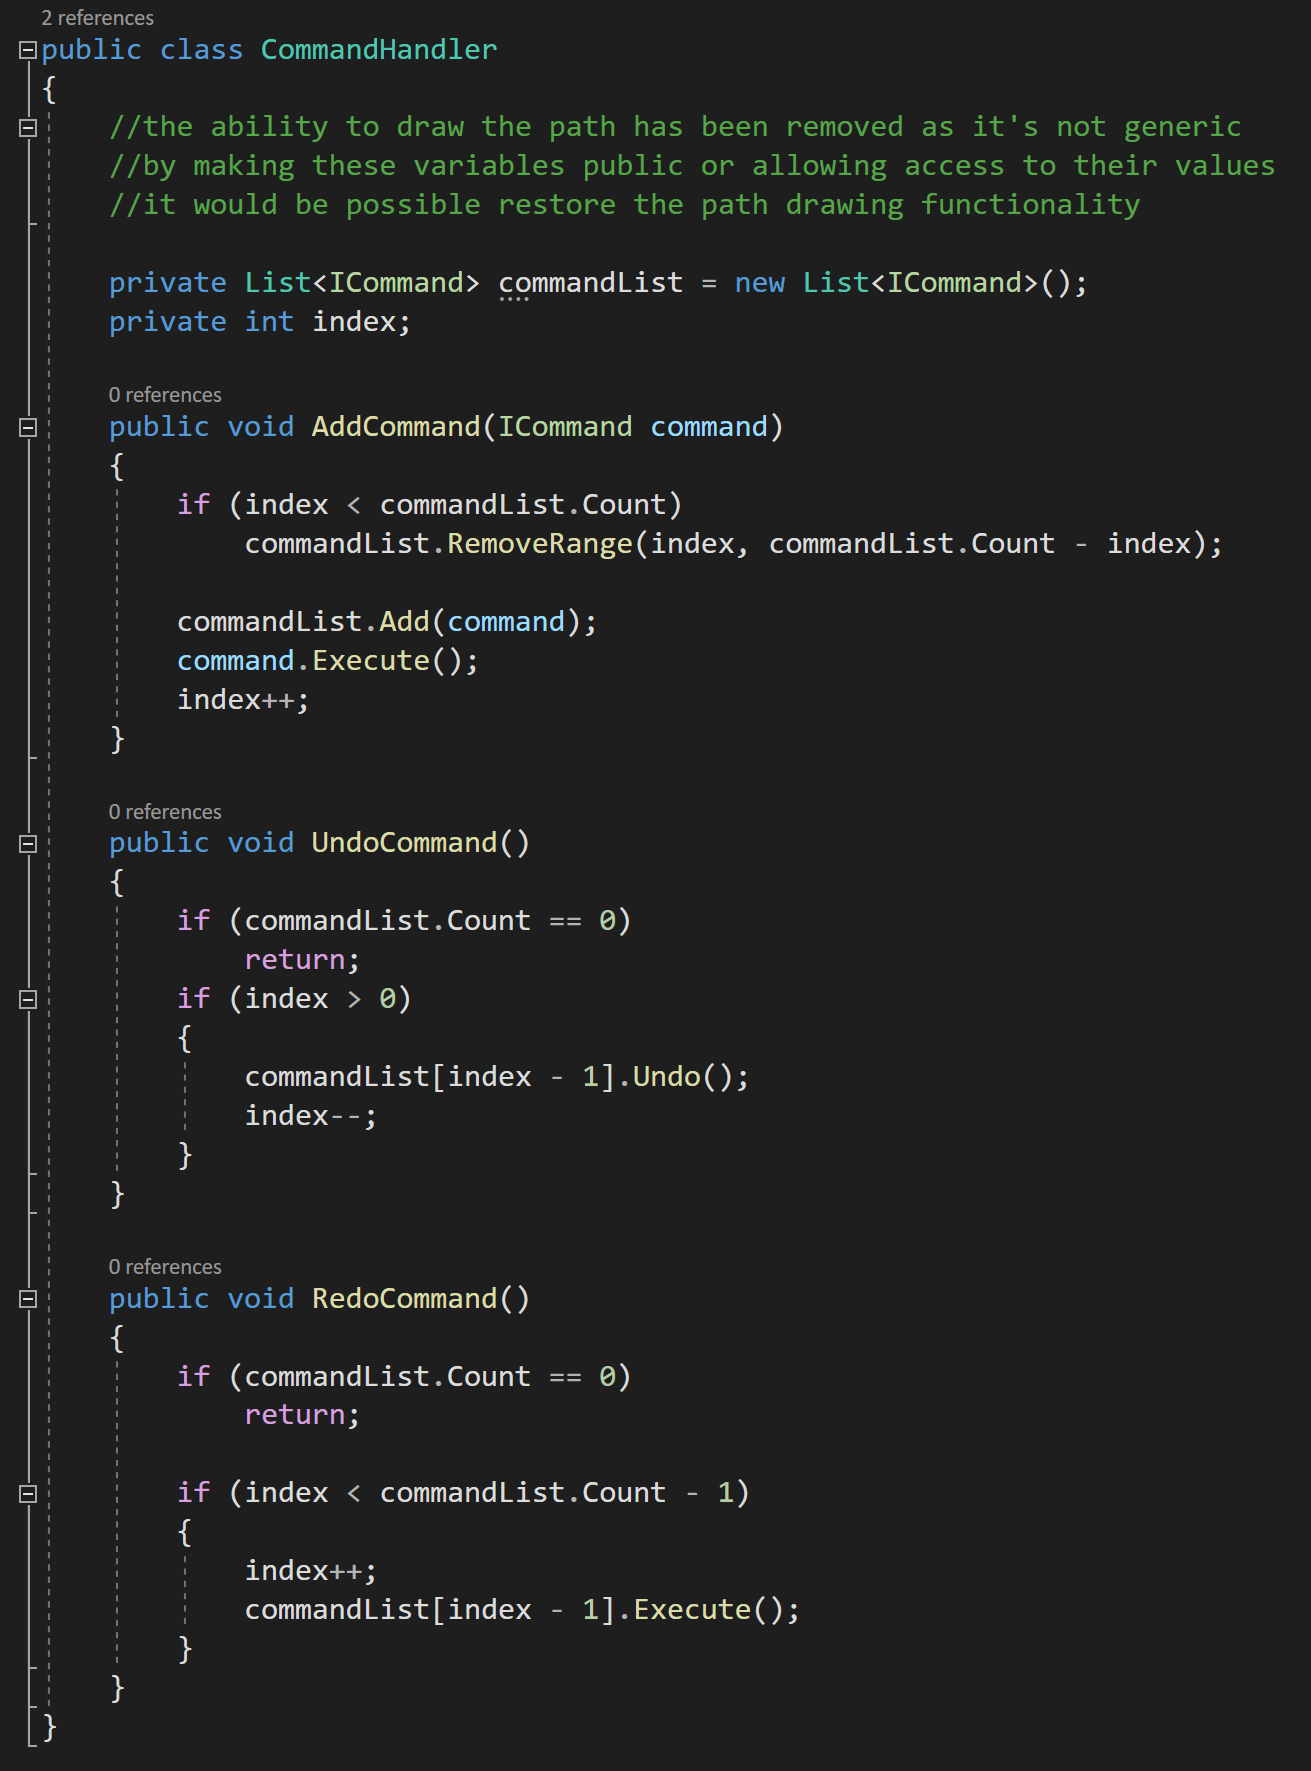
Command Handler Class
There is still some overall ugliness to this solution. I don’t like that this code is in my player controller… The AddCommand, UndoCommand and RedoCommand have NOTHING to do with the player controller they could and should be general and usable with ANY command. This code is generic and should be reusable.
Remember the whole point of the command pattern was to encapsulate the command… so these functions and the list of commands could be just about anywhere.
So is no need for all this code to be in the player controller AND if you were making a game with multiple types of objects that could all receive commands it would be a pain, and more importantly error prone, to repeat this code in multiple classes.
So let’s extract the command code and stick it into a command handler class.

Super Clean!!!
This class contains the list of commands, the index as well as the functions to add, undo and redo commands. Then in the player controller script, we simply need an instance of the command handler class.
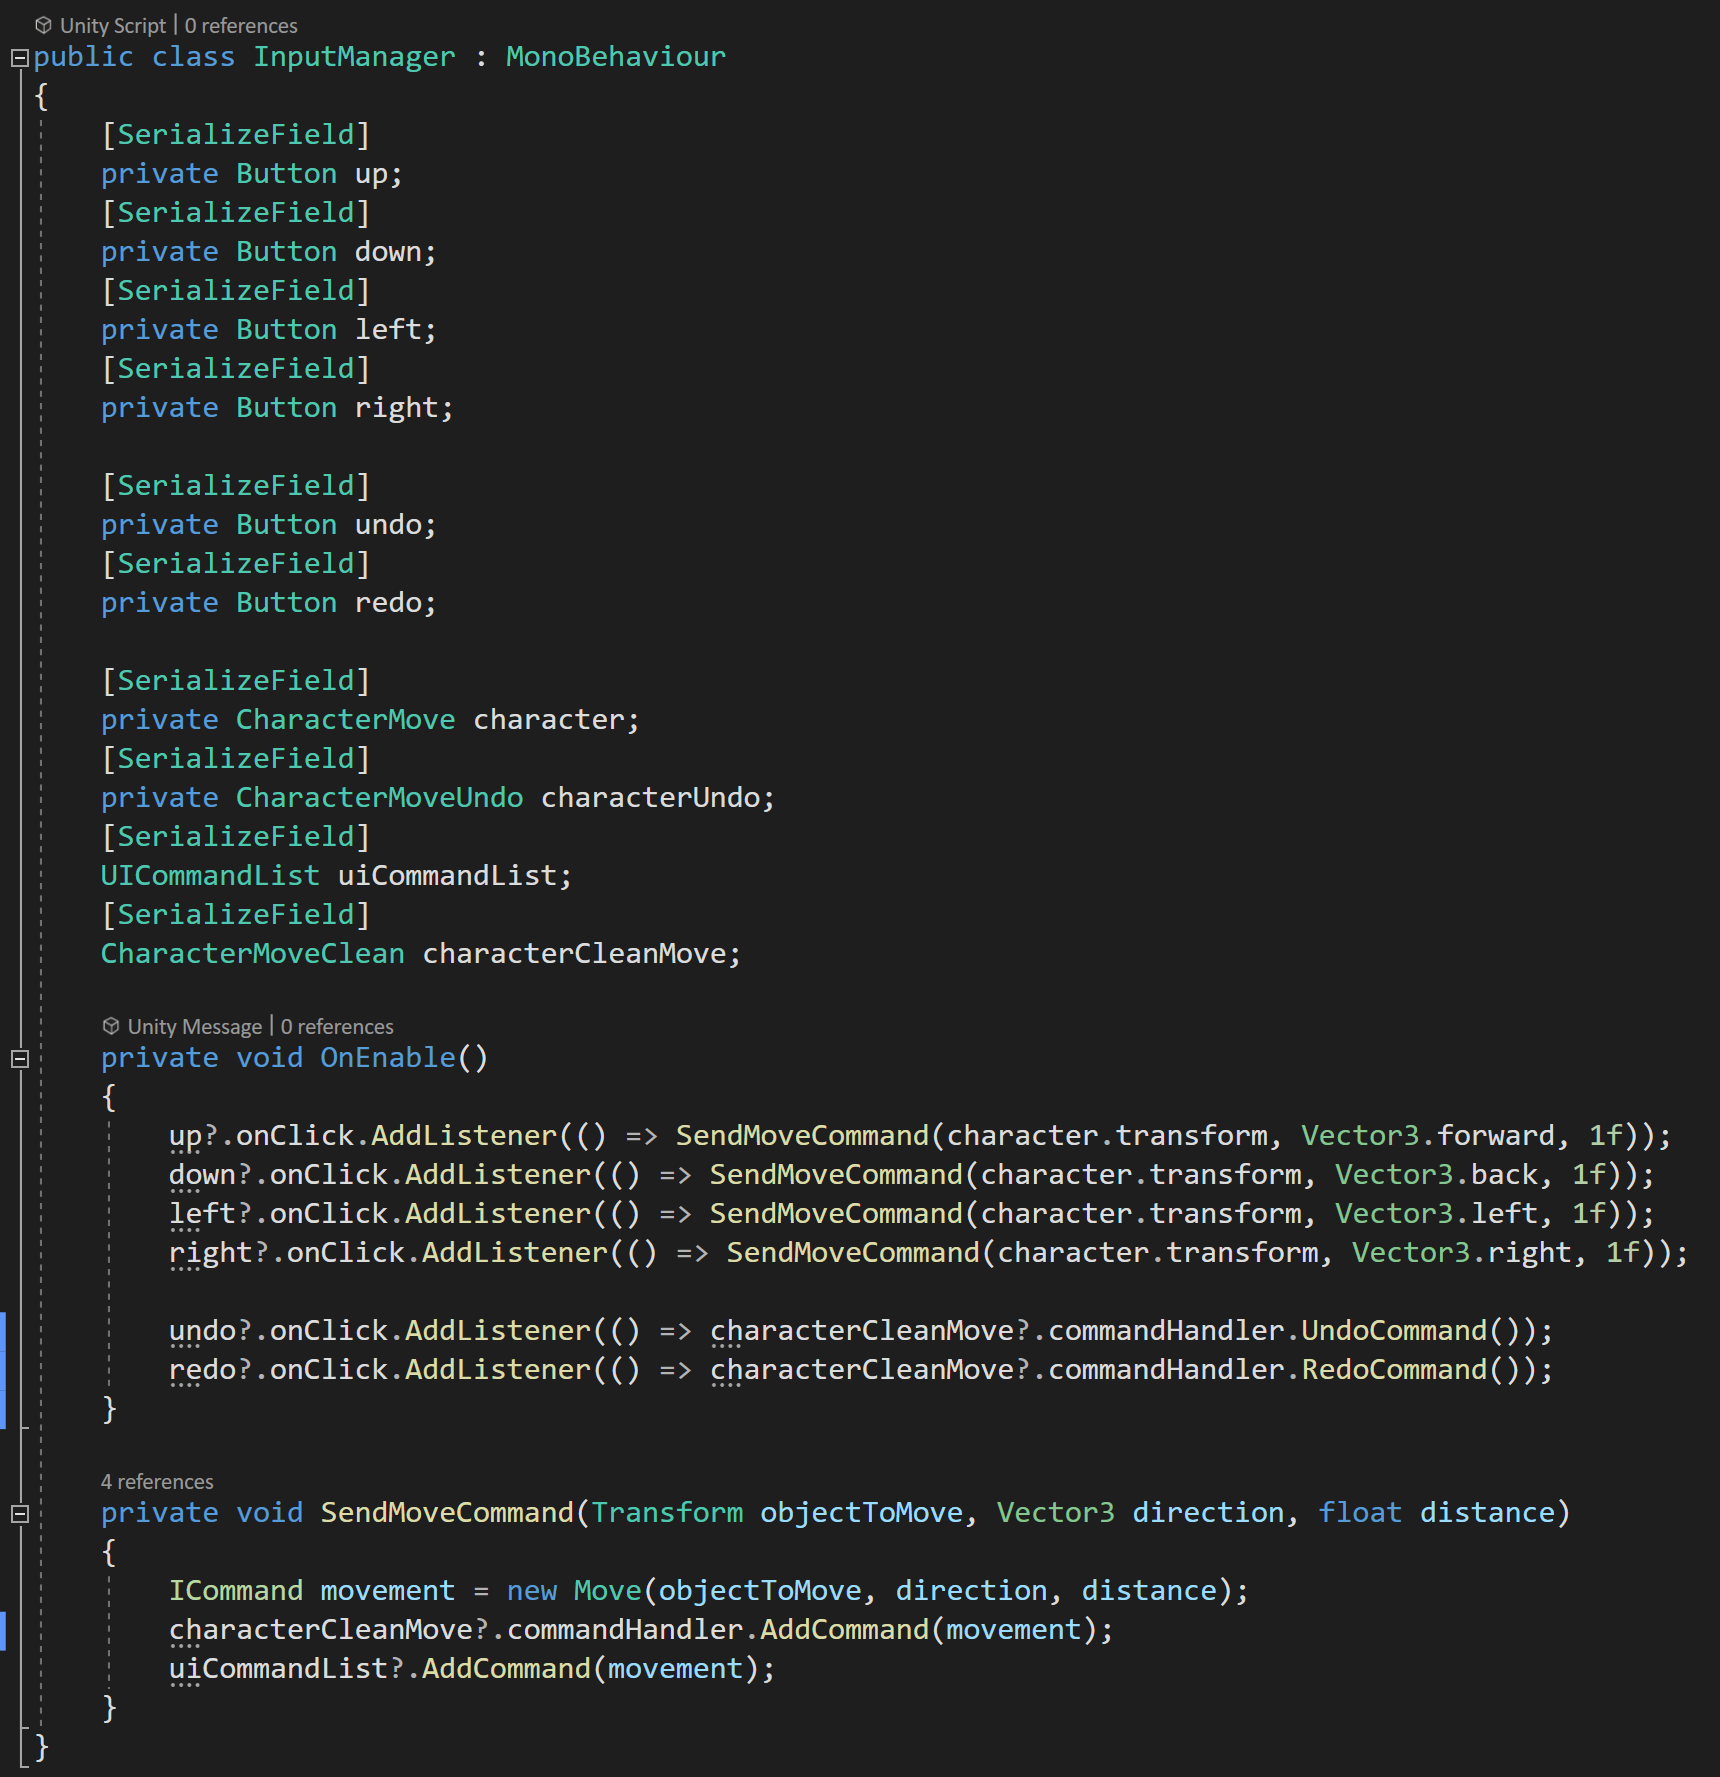
Final Input Manager
The final tweak is to reroute our buttons in the input listener to call functions on the command handler.
If we take a step back, what we have is really clean and surprisingly generic.
Yes, we do have a lot of classes, but that is often a trade off with our programming patterns and I think cleanliness of the implementation more than makes up for the extra classes.
Due note that this implementation does lose our ability to easily draw the path of the player, but with some cleverness, especially if commands are sent with events, this can be gotten around without too much work.
A few last thoughts…
Like many patterns it’s not the exact implementation that is important, but rather the large idea and framework. While I used direct function calls, I think using events i.e. the observer pattern could be more generic and more powerful.
The command pattern may result in commands being created and destroyed with some frequency. Which can create unneeded garbage collection. While not a problem with my simple example, it would be possible to implement an object pooling solution to use with the commands if performance is crucial or if you just want to squeeze out a few more FPS out of your game.
Code
GitHub Link: https://github.com/onewheelstudio/Programming-Patterns
Older Posts
-
January 2026
- Jan 27, 2026 Save and Load Framework Jan 27, 2026
-
April 2024
- Apr 10, 2024 Ready for Steam Next Fest? - Polishing a Steam Page Apr 10, 2024
- Apr 1, 2024 Splitting Vertices - Hard Edges for Low Poly Procedural Generation Apr 1, 2024
-
November 2023
- Nov 18, 2023 Minute 5 to Minute 10 - Completing the Game Loop Nov 18, 2023
-
September 2023
- Sep 13, 2023 Visual Debugging with Gizmos Sep 13, 2023
-
July 2023
- Jul 4, 2023 Easy Mode - Unity's New Input System Jul 4, 2023
-
May 2023
- May 19, 2023 Level Builder - From Pixels to Playable Level May 19, 2023
-
April 2023
- Apr 11, 2023 Input Action in the Inspector - New Input System Apr 11, 2023
-
February 2023
- Feb 26, 2023 Tutorial Hell - Why You're There. How to Get Out. Feb 26, 2023
-
December 2022
- Dec 31, 2022 Upgrade System (Stats Part 2) Dec 31, 2022
-
November 2022
- Nov 10, 2022 Stats in Unity - The Way I Do it Nov 10, 2022
- Nov 5, 2022 State of UI in Unity - UI Toolkit Nov 5, 2022
-
August 2022
- Aug 17, 2022 Knowing When A Coroutine Finishes Aug 17, 2022
-
April 2022
- Apr 23, 2022 Unity Input Event Handlers - Or Adding Juice the Easy Way Apr 23, 2022
-
March 2022
- Mar 15, 2022 *Quitting a Job I Love Mar 15, 2022
-
February 2022
- Feb 8, 2022 Split Screen: New Input System & Cinemachine Feb 8, 2022
-
January 2022
- Jan 24, 2022 (Better) Object Pooling Jan 24, 2022
- Jan 19, 2022 Designing a New Game - My Process Jan 19, 2022
- Jan 16, 2022 Strategy Game Camera: Unity's New Input System Jan 16, 2022
-
December 2021
- Dec 16, 2021 Raycasting - It's mighty useful Dec 16, 2021
-
November 2021
- Nov 22, 2021 Cinemachine. If you’re not. You should. Nov 22, 2021
-
August 2021
- Aug 3, 2021 C# Extension Methods Aug 3, 2021
-
June 2021
- Jun 27, 2021 Changing Action Maps with Unity's "New" Input System Jun 27, 2021
-
May 2021
- May 28, 2021 Unity's New Input System May 28, 2021
- May 8, 2021 Bolt vs. C# - Thoughts with a dash of rant May 8, 2021
-
March 2021
- Mar 10, 2021 Coroutines - Unity & C# Mar 10, 2021
-
January 2021
- Jan 14, 2021 Where's My Lunch? - January Devlog Update Jan 14, 2021
-
December 2020
- Dec 27, 2020 C# Generics and Unity Dec 27, 2020
- Dec 7, 2020 Steam Workshop with Unity and Facepunch Steamworks Dec 7, 2020
-
November 2020
- Nov 27, 2020 Simple Level Save and Load System (Unity Editor) Nov 27, 2020
- Nov 9, 2020 Command Pattern - Encapsulation, Undo and Redo Nov 9, 2020
-
October 2020
- Oct 28, 2020 GJTS - Adding Steamworks API and Uploading Oct 28, 2020
- Oct 9, 2020 Game Jam... Now What? Oct 9, 2020
-
August 2020
- Aug 16, 2020 Strategy Pattern - Composition over Inheritance Aug 16, 2020
-
July 2020
- Jul 24, 2020 Observer Pattern - C# Events Jul 24, 2020
- Jul 15, 2020 Object Pooling Jul 15, 2020
- Jul 3, 2020 Cheat Codes with Unity and C# Jul 3, 2020
-
June 2020
- Jun 16, 2020 The State Pattern Jun 16, 2020
-
August 2019
- Aug 12, 2019 Easy UI Styles for Unity Aug 12, 2019
-
July 2019
- Jul 3, 2019 9th Grade Math to the Rescue Jul 3, 2019
-
June 2019
- Jun 12, 2019 Introducing My Next Game (Video DevLog) Jun 12, 2019
-
May 2019
- May 29, 2019 Programming Challenges May 29, 2019
-
March 2019
- Mar 2, 2019 Something New - Asking "What Can I Learn?" Mar 2, 2019
-
November 2018
- Nov 30, 2018 A Growing Channel and a New Tutorial Series Nov 30, 2018
-
October 2018
- Oct 11, 2018 Procedural Spaceship Generator Oct 11, 2018
-
July 2018
- Jul 11, 2018 Implementing SFX in Unity Jul 11, 2018
-
May 2018
- May 31, 2018 Prototyping Something New May 31, 2018
-
April 2018
- Apr 17, 2018 When to Shelve a Game Project? Apr 17, 2018
-
February 2018
- Feb 9, 2018 State of the Game - Episode 3 Feb 9, 2018
-
December 2017
- Dec 16, 2017 State of the Game - Episode 2 Dec 16, 2017
-
November 2017
- Nov 7, 2017 The Bump From A "Viral" Post Nov 7, 2017
-
October 2017
- Oct 30, 2017 NPC Job System Oct 30, 2017
-
September 2017
- Sep 1, 2017 Resources and Resource Systems Sep 1, 2017
-
August 2017
- Aug 3, 2017 State of the Game - Episode 1 Aug 3, 2017
-
June 2017
- Jun 20, 2017 Resources: Processing, Consumption and Inventory Jun 20, 2017
- Jun 15, 2017 Energy is Everything Jun 15, 2017
-
May 2017
- May 16, 2017 Graphing Script - It's not exciting, but it needed to be made May 16, 2017
- May 2, 2017 Tutorials: Low Poly Snow Shader May 2, 2017
-
April 2017
- Apr 28, 2017 Low Poly Snow Shader Apr 28, 2017
- Apr 21, 2017 Environmental Simulation Part 2 Apr 21, 2017
- Apr 11, 2017 Environmental Simulation Part 1 Apr 11, 2017
-
March 2017
- Mar 24, 2017 Building a Farming Game Loop and Troubles with Ground Water Mar 24, 2017
-
February 2017
- Feb 25, 2017 The Inevitable : FTF PostMortem Feb 25, 2017
-
December 2016
- Dec 7, 2016 Leaving Early Access Dec 7, 2016
-
November 2016
- Nov 28, 2016 Low Poly Renders Nov 28, 2016
- Nov 1, 2016 FTF: Testing New Features Nov 1, 2016
-
October 2016
- Oct 27, 2016 Watchtowers - Predictive Targeting Oct 27, 2016
- Oct 21, 2016 Click to Color Oct 21, 2016
- Oct 19, 2016 Unity Object Swapper Oct 19, 2016
-
September 2016
- Sep 18, 2016 Testing Single Player Combat Sep 18, 2016
-
May 2016
- May 25, 2016 Release Date and First Video Review May 25, 2016
-
March 2016
- Mar 26, 2016 Getting Greenlit on Steam Mar 26, 2016