Dev Log

Coroutines - Unity & C#

Do you need to change a value over a few frames? Do you have code that you’d like to run over a set period of time? Or maybe you have a time-consuming process that if run over several frames would make for a better player experience?
Like almost all things there is more than one way to do it, but one of the best and easiest ways to run code or change a value over several frames is to use a coroutine!
But What Is A Coroutine?
Coroutines in many ways can be thought of as a regular function but with a return type of “IEnumerator.” While coroutines can be called just like a normal function, to get the most out of them, we need to use “StartCoroutine” to invoke them.
But what is really different and new with coroutines (and what also allows us to leverage the power of coroutines) is that they require at least one “yield” statement in the body of the coroutine. These yield statements are what give us control of timing and allow the code to be run asynchronously.
It’s worth noting that coroutines are unique to Unity and are not available outside of the game engine. The yield keyword, IEnumerable interface, and the IEnumerator type are however native to C#.
But before we dig in too deep, let’s get one misconception out of the way. Coroutines are not multi-threaded! They are asynchronous multi-tasking but not multi-threaded. C#does offer async functions, which can be multi-threaded, but those are more complex and I’m hopeful it will be the topic of a future video and blog post. If async functions aren’t enough you can go to full-fledged multi-threading, but Unity is not thread-safe and this gets even more complex to implement.
Changing a Numeric Value - Update or Coroutine?

Update method… Not so awesome
So let’s start with a simple example of changing a numeric value over time. To make it easier to see the results, let’s display that value in a UI text element.
We can of course do this with the standard update function and some type of timer, but the implementation isn’t particularly pretty. I’ve got three fields, an if statement, and an update that is going to run every frame that this object is turned on.
While this works, there is a better and cleaner way. Which of course is a coroutine.
Corountines are much Cleaner
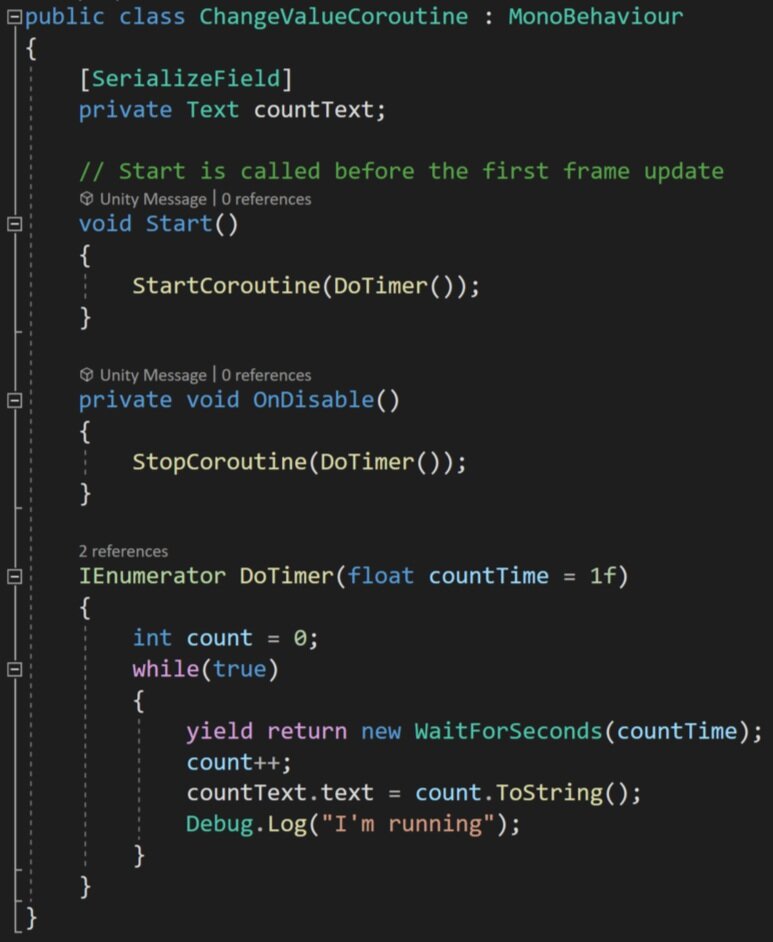
So let’s look at a coroutine that has the same result as the update function. We can see the return type of the coroutine is an IEnumerator. Notice that we can include input parameters and default values for those parameters - just like a regular function. Then inside the coroutine, we can define the count which will be displayed in the text. This variable will live as long as the coroutine is running, so we don’t need a class-wide variable making things a bit cleaner.
And despite personally being scared of using while statements this is a good use of one. Inside the while loop, we encounter our first yield statement. Here we are simply asking the computer to yield and wait for a given number of seconds. This means that the computer will return to the code block that started the coroutine as if the coroutine had been completed and continue running the rest of the program. This is an important detail as some users may expect the calling function to also pause or wait.
THEN! When wait time is up the thread will return to the coroutine and run until it terminates or in this case loops through and encounters another yield statement.
The result, I would argue while not shorter is much cleaner than an update function. Plus the coroutine only runs once per second vs. once per frame and as a result, it will be more performant.
In my personal projects, I’ve replaced update functions with coroutines for functionality that needed to run consistently but not every frame - and it made a dramatic improvement in the performance of the game.
As mentioned earlier, to invoke the coroutine we need to use the command “StartCoroutine.” This function has 2 main overloads. One that takes in a string and the second which takes in the coroutine itself. The string-based method can not take in input parameters and I generally avoid the use of strings, if possible, so I’d recommend the strongly typed overload.
Stopping a Coroutine
If you have a coroutine, especially one that doesn’t automatically terminate, you might also want to stop that coroutine when it’s no longer needed or if some other event occurs and you want to stop the process of the coroutine.
Unlike an update function if the component is turned off the coroutine will not automatically stop. But! If the gameObject with the coroutine is turned off or destroyed the coroutine will stop.
So that’s one way and can certainly work for some applications. But what if you want more control?
You can bring down the hammer and use “StopAllCoroutines” which stops all the coroutines associated with the given component.

Stop a particular coroutine by reference
Personally, I’ve often found this sufficient, but you can also stop individual coroutines with the function “StopCoroutine” and give it a reference to the particular coroutine that you want to stop. This is done by telling it explicitly which coroutine by name OR I recently learned you can cache a reference to a coroutine and use that reference in the stop coroutine function. This method is useful if there is more than one coroutine running at a time - we’ll look at an example of that later.

If you want to ensure that a coroutine stops when a component is disabled, you can call either call stop coroutine or stop all coroutines from an “OnDisable” function.
It’s also worth noting that you can get more than one instance of a coroutine running at a time. This could happen if a coroutine is started in an update function or a while loop. This can cause problems especially if that coroutine, like the one above, never terminates and could quickly kill performance.
A Few Other Examples

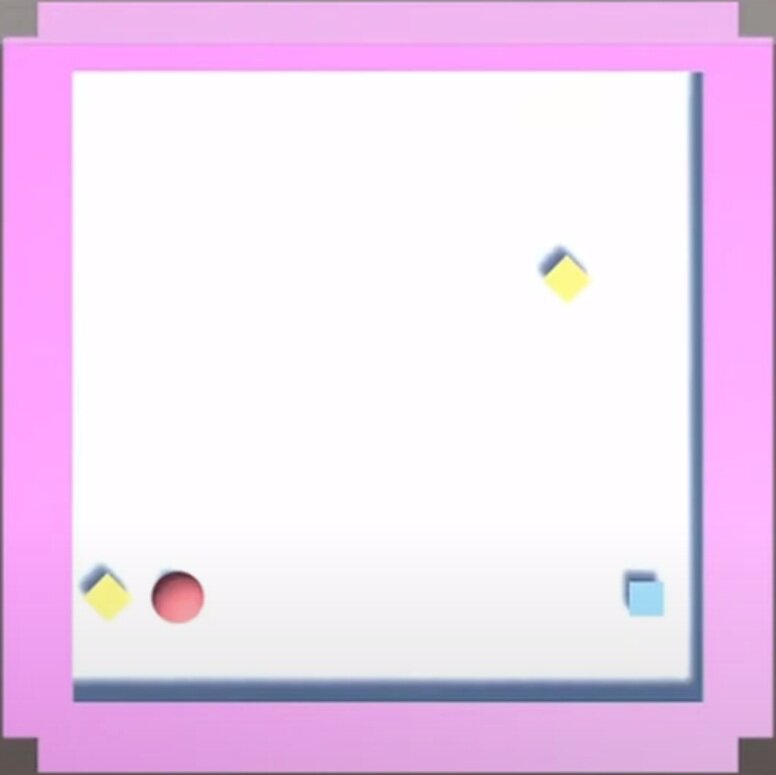
Other uses of coroutines could be simple animations. Such as laying down the tiles of a game board. Using a coroutine may be easier to implement and quicker to adjust than a traditional animation.
The game board effect, shown to the right, actually makes use of two coroutines. The first instantiates a tile in a grid and waits a small amount of time before instantiating the next tile.
The second coroutine is run from a component on each tile. This component caches the start location then moves the object a set amount directly upward and then over several frames lerps the object’s position back to the original or intended position. The result is a floating down-like effect.
Another advantage of using a coroutine over a traditional animation is the reusability of the code. The coroutine can easily be added to any other game object with the parameters of the effect easily modified by adjusting the values in the inspector.

Instantiate the Board Tiles
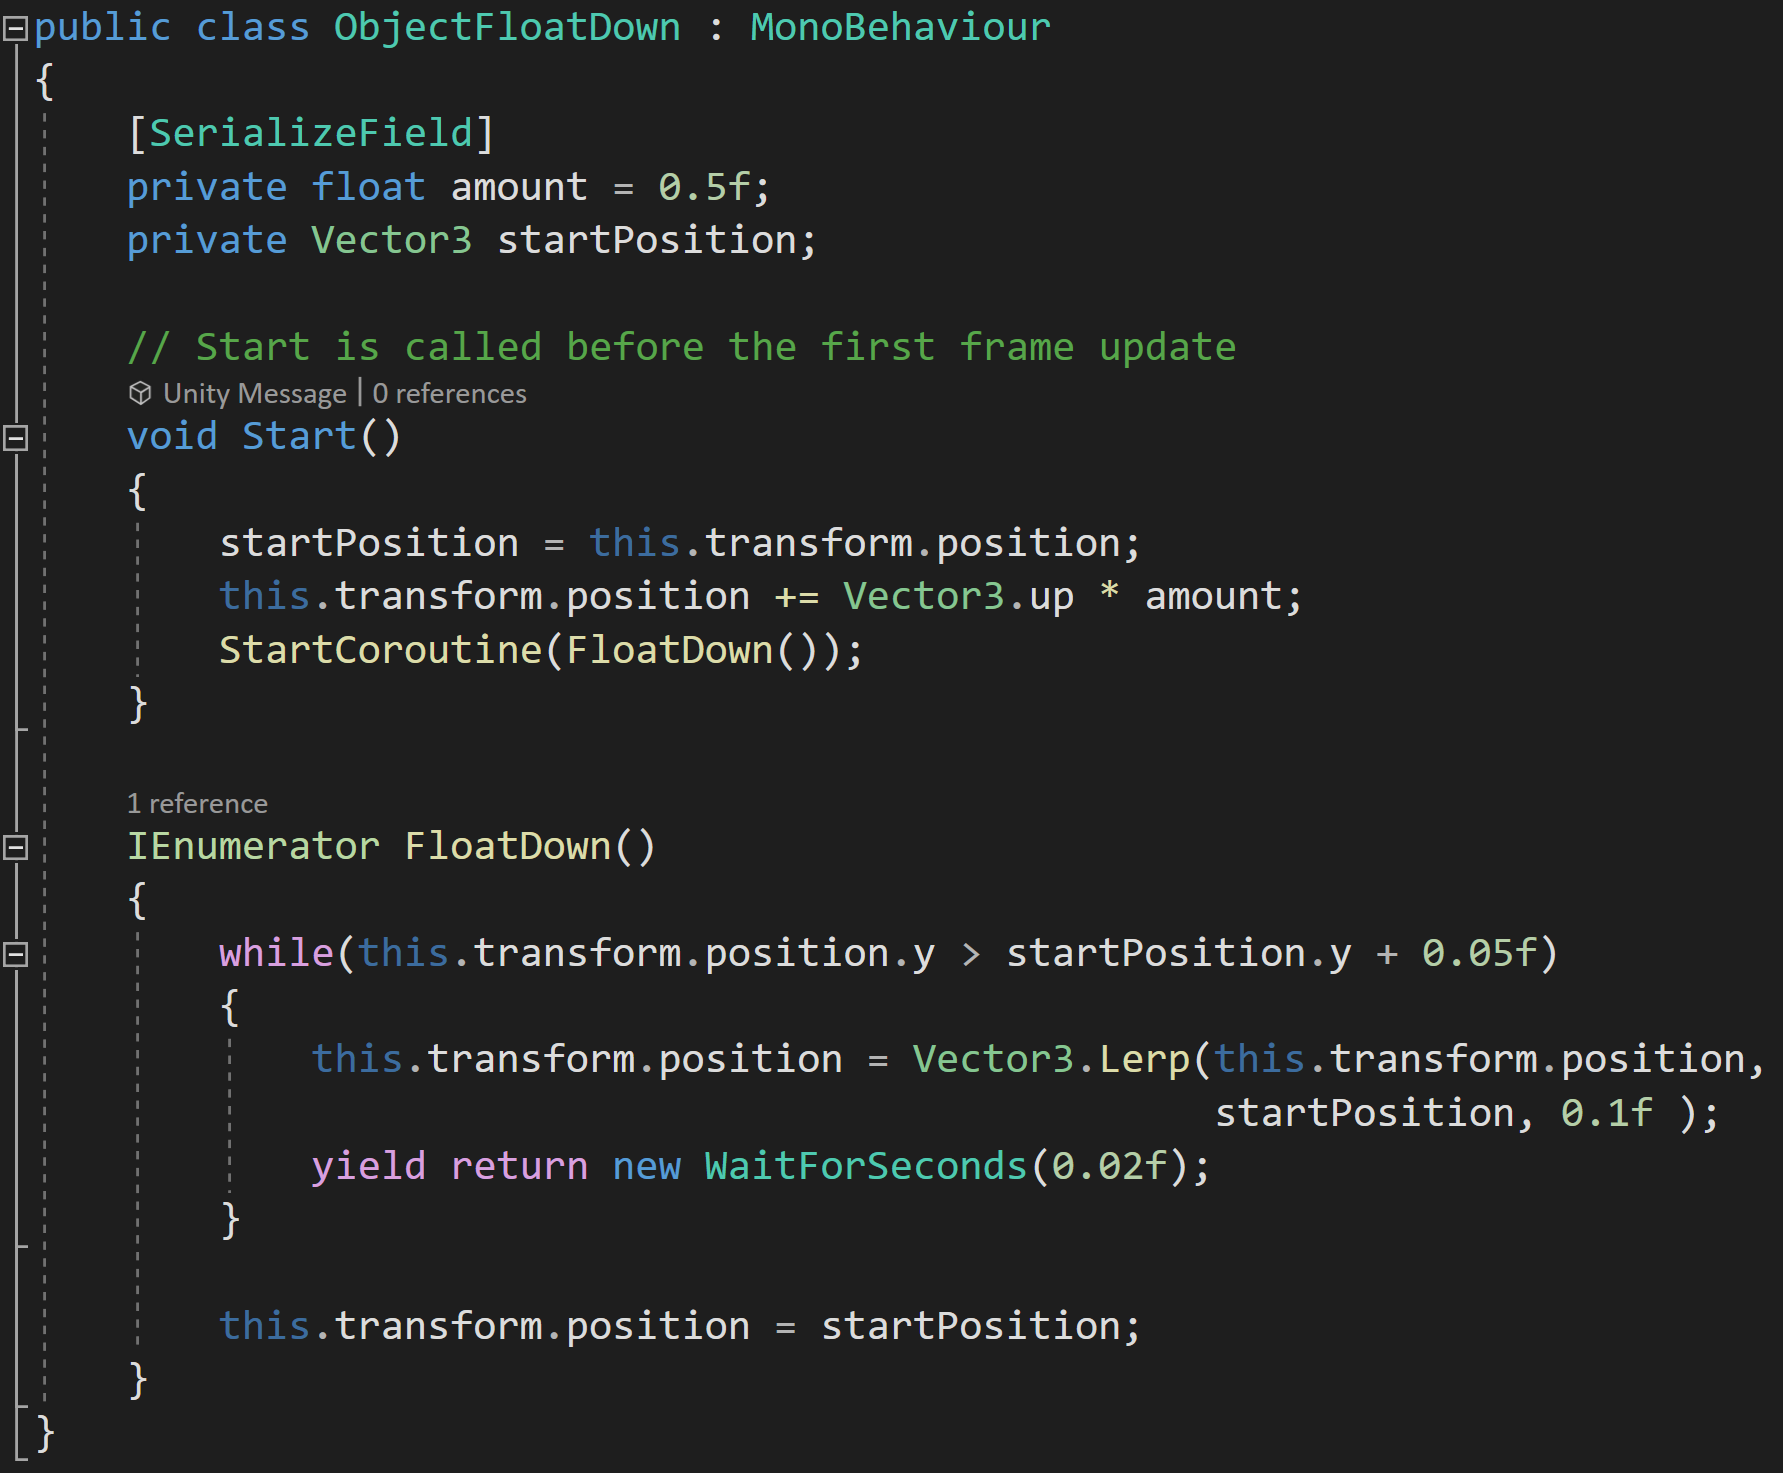
Make those Tiles float down into position
Notice that in the float down code it doesn’t wait for the position to get back to the original location since a lerp will never get to the final value. So if the coroutine ran the while loop until it got to the exact original position the coroutine would never terminate. If the exact position is important the position can be set after exiting the while loop.

Caching and Stopping Coroutines
Coroutines can also be used to easily create smooth movement such as a game piece moving around the board.

But there is a potential snag with this approach. In my case, I’m using a lerp function to calculate where the game piece should move to for the next frame. The problem comes when using a lerp function that operates over several frames. This creates the smooth motion - but in that time the player could click on a different location, which would start another instance of the coroutine, and then both coroutines would be trying to move the game piece to different locations and neither would ever be successful or ever terminate.
This is a waste of resources, but worse than that the player will lose control and not be able to move the game piece.
A simple way to avoid this issue is to cache a reference to the coroutine. This is made easy, as the start coroutine function returns a reference to the started coroutine!
Then all we need to do, before starting a new coroutine is to check if the coroutine variable is null, if it’s not we can stop the previous coroutine before starting the next coroutine.
It’s easy to lose control or lose track of coroutines and caching references is a great way to maintain that control.
Yield Instructions!
The yield instructions are the key addition to coroutines vs. regular functions and there are several options built into Unity. It is possible to create your own custom yield instructions and Unity provides some documentation on how to do that if your project needs a custom implementation.
Maybe the most common yield instruction is “wait for seconds” which pauses the coroutine for a set number of seconds before returning to execute the code. If you are concerned about garbage collection and are using “wait for seconds” frequently with the same amount of time you can create an instance of it in your class. This is useful if you’ve replaced some of your update functions with coroutines and that coroutine will be called frequently while the game is running.
Another common yield statement is to return “null.” This causes Unity to wait until the next frame to continue the corountine which is particularly useful if you want an action to take place overall several frames - such as a simple animation. I’ve used this for computationally heavy tasks that could cause a lag spike if done in one frame. In those cases, I simply converted the function to a coroutine and sprinkled in a few yield return null statements to break it up over several frames.
An equally useful, but I think often forgotten yield statement is “break” which simply ends the execution of a coroutine much like the “return” command does in a traditional function.
“Wait Until” and “Wait While” are similar in function in that they will pause the coroutine until a delegate evaluates as true or while a delegate is true. These could be used to wait a specific number of frames, wait for the player score to equal a given value, or maybe show some dialogue when a player has died three times.
“Wait For End of Frame” is a great way to ensure that the rest of the game code for that frame has completed as well as after cameras and GUI have rendered. Since it is often hard, or impossible, to control what code executes before other code this can be very useful if you need specific code to run after other code is complete.
“Wait for Fixed Update” is pretty self-explanatory and waits for “fixed update” to be called. Unity doesn’t specify if this triggers before, after, or somewhere in the in-between when fixed update functions are getting called.
Wait for “Seconds Real-Time” is very similar to “wait for seconds” but as the name suggests it is done in real-time and is not affected by the scaling of time whereas “wait for seconds” is affected by scaled time.
Other Bits and Details
Many when they get started with Unity and coroutines think that coroutines are multi-threaded but they aren’t. Coroutines are a simple way to multi-task but all the work is still done on the main thread. Mult-threading in Unity is possible with async function or manually managing threads but those are more complex approaches. Multi-tasking with coroutines means the thread can bounce back and forth between tasks before those tasks are complete, but can’t truly do more than one task at once.
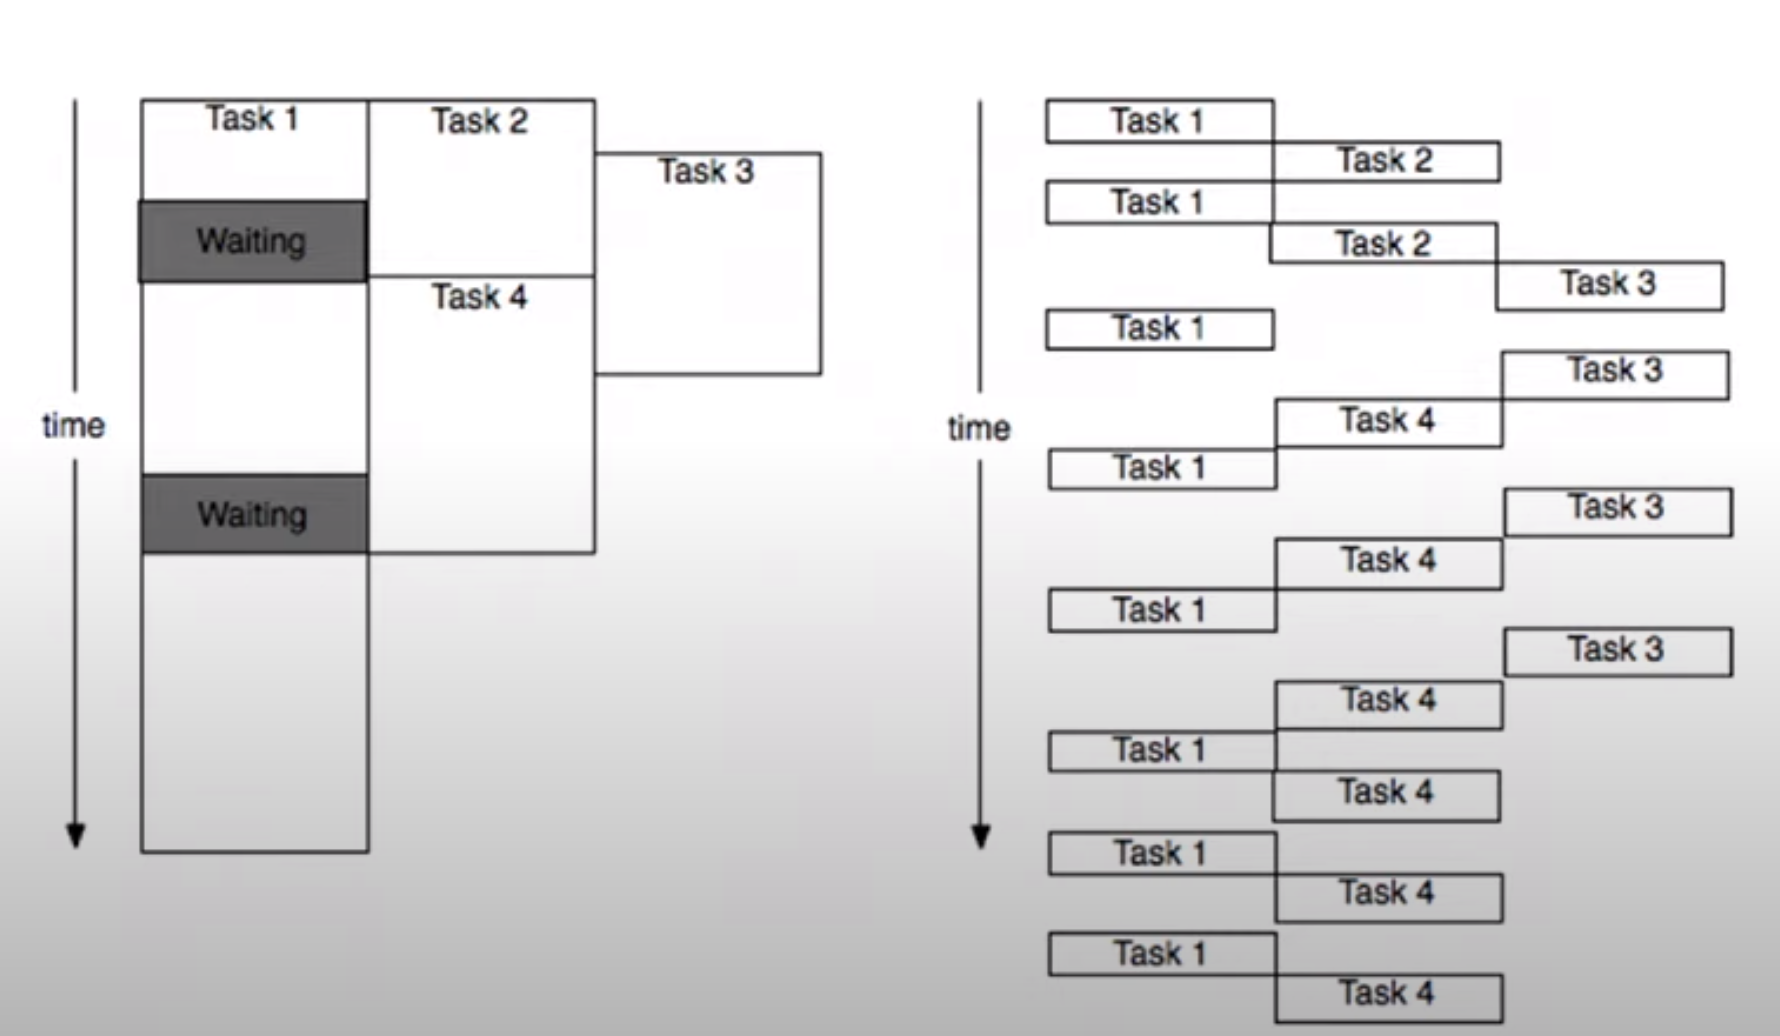
The diagram to the right is stolen from the video Best Practices: Coroutines vs. Async and is is a great visual of real multi-threading on the left and what multi-tasking with coroutines actually does.
While pretty dry, the video does offer some very good information and some more detailed specifics on coroutines.
It’s also worth noting that coroutines do not support return values. If you need to get a value out of the coroutine you’ll need a class-wide variable or some other data structure to save and access the value.

Where's My Lunch? - January Devlog Update

Six months ago the game “Where’s My Lunch?” was born out of the Game Makers Toolkit GameJam. The original game idea was to use bombs to move the player object around the scene to some sort of goal - trying to play on the jam’s theme of “Out of Control.” Nothing too clever, but physics and explosions are generally good fun and it seemed like a good starting point.
Every game or project I’d ever made in Unity was 3D and WML was no different. It started as a 3D game with the simple colored cubes and spheres standing pretending to be game art. It was clumsy and basic but still, it felt like it had some potential.
That first evening, I started to work on the art style. I needed something simple, quick, and hopefully not too hard to look at… After bumping around with a few ideas, I downloaded FireAlpaca and starting drawing stick figures. For the life of me, I can’t remember why… I just did. I tossed on a hat to add a little character and Hank was born and I was on my way to making my first ever 2D game!
Early 3d Prototype
With great input from viewers as I streamed the game’s progress, I added gravity wells and portals to the project to add even more physics-based chaos to the game. With the help of a clumsy but effective save system, I created a dozen playable levels. I was even able to add a sandbox level which was another suggestion from a viewer.

Results out of over 5000 submissions
With time running out on the 48 hour game jam, I did my best to fix a few bugs, pushed a build to Itch, and submitted my efforts to the game jam. I’d spent somewhere in the neighborhood of 20 hours working on the game and I was pretty content with the results.
The game finished in the top 10% of over 5000 games submitted, which while we always dream higher, I have to admit felt pretty darn good. With the results posted, I mentally closed up the project and didn’t intend to come back to it. I’d learned a lot and had some fun. What more was there to do with the game?
Where’s My Lunch?

I still dream of Making this game
Like so many others I’ve had projects come and go. With most not getting finished due to over scoped game ideas and lack of time to make those ideas a reality. This is a lesson I continue to struggle to learn…
A few months after the game jam, the idea came along to polish and publish a small game while making video content along the way. I loved it! It seemed like a perfect project.
I spent much of October and November planning out the project with an eye to keeping the scope small but still adding ideas and topics that might make useful videos and hopefully a more engaging game. I started work on a notion page (which I much prefer to Trello) trying to find the balance between tasks that were too big or too small. And to be honest, I’ve never forced myself to fully plan out a game to this level of detail.
The planning wasn’t particularly fun, I had to actively fight the urge to open Unity and just get to work… I didn’t list absolutely everything that needed to be done, but I got most of it and I think the result was more than worth the effort.
I knew the scope of the game. I knew what I needed to do next. And in some way, I had a contract with myself as to what I was making with clear limits on the project.
All of this had me hopeful that the project will have a different ending than so many of my past projects.
Progress?
With the planning was done it was time for the fun part. Digging into the code!
Most of the early hours spent with the code didn’t make a big difference in the appearance or even the player experience. Much of that early time was spent shoring up the underlying framework, making code more generic and more robust. I wanted to be able to add mechanics and features without breaking the game with each addition. Yes, we’ve all been there. While maybe not the highest standard, I’ve come to judge my own work by what needs to happen to add a new feature, how long that takes, and how much else breaks in the process.
Does adding a new level to the game require rewriting game manager code? Or manually adding a new UI button? Or can I simply add a game level object to a list and the game handles the rest?
What about adding the ability to change the color of an object when the player selects it? Does that break the placement system? Does that result in messy code that will need to be modified for each new game item? Or can it be done by creating a simple, clean and easy to use component that can be added to any and all selectable objects?
Holding myself to this standard and working in a small scoped game has felt really good. It hasn’t always been easy AND importantly I don’t think I could have held myself to that standard during the game jam. There simply wasn’t time.
For example, during the game jam I wanted players to be able to place the portals to solve a level but in order for a portal to work it needs to have a connection to another portal… The simplest solution was to create a prefab that was a parent object with two children portals. This meant when they were added they could already be connected. And while this worked it also created all kinds of messy code to handle this structure. Which meant I had all these “if the object is a portal then do this” statements throughout the code. For me, those lines were red flags that the code wasn’t clean and it was going to need some work.
Fixing that was no small task. Every other game item was a single independent object. Plus, I knew that I wanted to have other objects that could connect like a lever and a gate or a lever and a fan and the last thing I wanted to do was add a bunch more one-off if statements to handle all those special cases.

Player made connections in Orange
My solution was to break the portals down into single unconnected objects and to allow the player to make connections by “drawing” the connection from one portal to another portal. I really like the results, especially in a hand-drawn game, but man, did it cause headaches and break a poop ton of code in the process.
Connecting portals functionally was pretty easy, drawing the lines wasn’t too hard, but updating the lines when one portal is moved or saving and then loading that hand-drawn line… Big ugh!
But! It works.
AND!
The framework doesn’t just work for portals it works for any object. Simply change the number of allowed connections in the inspector for a given prefab and it works! Adding the lever and gate objects required ZERO extra code in the connection system! The fan? Yep. No problem. Piece of cake.
Simply. Fucking. Amazing.
Vertical Slice?
To be honest, I’ve never fully understood the idea of a vertical slice of a game. Maybe that was because my games were too complex and I never got there? I don’t know, but a couple of months ago, it clicked. I understood the idea and why you would make a vertical slice.
Then I heard someone else describe it… And I was back to not being so sure.
So here’s my definition. Maybe it’s right. Maybe it’s not. I’m not sure I actually care because what I did made sense to me, it worked and I’d do it again. To me, a vertical slice means getting all the systems working. Making them general. Making them ready to handle more content. Making them robust and flexible.
For Where’s My Lunch that meant getting the save and load system working, debugging the placement system, making the UI adapt to new game elements without manual work, implementing Steamworks, adding Steam workshop functionality, and a bunch of other bits that I’ve probably forgotten about.
To me, a vertical slice means I can add mechanics and features without breaking the game and those additions are handled gracefully and as automated as possible.
Adding Content
My to-Do List with game content towards the bottom
Maybe it’s surprising, but adding new mechanics is pretty low on my to-do list. As I start to reflect on this project as a whole, this may be one of the bigger things I’ve learned. About the only items lower are tasks such as finalizing the Steam Store, creating a trailer and adding trading cards. Things that rely on adding more content to the game.
So, with the “vertical slice” looking good, I quickly added several new game items that weren’t part of the game jam version. Speed zones, levers, gates, fans, spikes, and balloons with a handful more still on the to-do list. Each game item took two or three hours including the art, building the prefab, and writing the mechanics specific code. Each item gets added to the game by simply dropping in the prefab to a list on a game manager and making sure there is a corresponding value or type of an enum that is used to identify and handle the objects by other classes.
And that is so satisfying!
100% I will revisit and tweak these new objects, but they work! And they didn’t break anything when I added them.
Simply. Fucking. Amazing.
What’s Next?
Analog Level Planning
The hardest part! Designing new levels.
The plan from here on out is to use the level designer that’s built into the game - that level that started as a sandbox playground.
To help make that process easier I’ve added box selection, copy and paste, (very) basic undo functionality, and a handful of other quality of life improvements. My hope is that players will be inspired to create and share levels and the easier those levels are to create the more levels they’ll create.
I also want to add enough levels to keep players busy for a good while. How long? I don’t know. It’s scary to think about how many levels I might need for an hour or two hours or five hours of gameplay…
While the framework is in place and gets more and more bug-free each day, there is still a lot of work to do and a lot that needs to be created.

C# Generics and Unity
Generics are something that can sound scary, look scary, but you are probably already using them - even if your don’t know it.
So let’s talk about them. Let’s try to make them a little less scary and hopefully add another tool to your programmer toolbox.
If you’ve used Unity for any amount of time you’ve likely used the Get Component function. I know when I first saw this I simply accepted the fact that this function required some extra info inside of angle brackets. I didn’t think much about it.
Later I learned to use lists that had a similar requirement. I didn’t question why the type that was being stored in the list needed to be added so differently compared to when creating other objects. It just worked and I went with it.
It turns out that those objects are taking in what’s called a generic argument - that’s what’s inside the angle brackets. This argument is a type and it helps the object know what to do. In terms of the GetComponent function, it tells it which type to look for and with the list, it tells the list what type of thing will be stored inside that list.
Generics are just placeholder types that can be any type or they can also be constrained in various ways. It turns out this is pretty useful.
Why?
Ok. Great. But why would you want to use generics?
Well essentially, they allow us to create code that is more general (even generic) so that it can be used and reused. Generics can help prevent the need for duplicate code - which for me is always a good thing. The less code I have to write, the less code I have to debug, and the faster my project gets finished.
We can see this with the GetComponent function in that it works for ANY and ALL types of monobehaviours. This one function can be used to find all built-in types or types created by a programmer. It would be a real pain if with each new monobehaviour you had to write a custom GetComponent function!
The same is true with lists. They can hold ANY type of object and when you create a new type you don’t have to create a new version of the list class to contain it.
So yeah. Generics can reduce how much code needs to get written and that’s why we use them!
Ok. So Give Me An Example!

I’ve created a simple scene of various shapes. I’ve created some code that will generate a grid of random shapes… but that’s not the important part.
The important part is that I have four classes defined. The first is a basic shape class that the cube, sphere, and capsule class inherit from. Then each of the prefab shapes has the correspondingly named class attached to them.


Not much going on here!
All of these classes are empty and are primarily used to add a type to the prefab. I do this fairly often in my projects as it’s a way to effectively create tagged objects without using the weakly typed tag system built into Unity. I find that it’s an easy and convenient way to get a handle on scene objects in code.
But more to the point! It allows us to leverage generics in C# and Unity.
When the shape objects are instantiated they are all added to a list that holds the type “shape" as a way of keeping track of what’s currently in the scene. Instead of just shapes sitting in a grid, these could be objects in a player’s inventory or maybe a bunch of NPCs that populate a given scene or whatever.

You can imagine 2 more exactly like this… Just with “Capsule” or “Sphere” instead of “Cube”
So let’s imagine you need to find all the cubes in the scene. That’s not too hard you could write a function like the one to the right. We can simply iterate through the list of scene objects and add all the cubes to a new list and then return that list of cubes.
And then if you need to find all the spheres. We can just copy the find cube function and change the type of list we are returning and the type we are trying to match. Done!
And again we can do the same thing with the capsules.
But now we have three functions that do almost the exact same thing and this should be a red flag! We have three chunks of code doing nearly the exact same thing. There must be a better way?
Turns out there is!
Create A Generic Function
The only difference between the three functions we’ve created is the type! The type in the list and the type that we are trying to match when we iterate through the list.

We are doing the same steps for every type. Which is the exact problem that generics solve!

So let’s make a generic function that will work for any type of shape. We do this by adding a generic argument to the function in the form of an identifier between angle brackets after the function name and before any input parameters.
Traditionally the capital letter T has been used for the generic argument, but you can use anything. It’s even possible to add additional generic arguments. They just need to be separated by commas. Some sources will suggest using T, U, and V which will work but doesn’t necessarily allow for easily readable code. Instead, another convention is to start with a capital T and follow it with a descriptor. For example TValue or TKey. Whatever makes sense for your use case.
This generic argument is the type of thing we are using in our function. Which for our case is also the type stored in the list and is the type we are trying to match. So we can simply replace the particular types with the generic type of T.
Do note that we still have the type of “shape” in our function. This is because the list with all the scene objects is storing types of shape so in this case, that type is not generic.
In my example project, I have UI buttons wired up to call this generic function so that cubes, spheres, and capsules can be highlighted in the scene. Each button calls the same function, but with a different generic argument.

The result? We have less code, the same functionality AND the ability to find new shapes if new types are added to our project without having to create significant code for each type of shape.
Generics Constraints
You may have noticed that I snuck in a little extra unexplained code at the top of our generic function. This extra bit is a constraint. By using the keyword “where” we are telling the compiler that there are some limits to the types that T can be. In this case, we are constraining T to be the type Shape or a type that inherits from Shape. We need to do this otherwise the casting of the object to type T would throw an error as the compiler doesn’t know if the types can be converted.

Constraints can be very wide or very narrow. In my experience, constraints to a parent class, monobehaviour, or component are very common and useful.
Without a constraint, the compiler assumes the type is object which while general there are limits to what can be done with a base object.
For example, maybe you need to destroy objects of a given type throughout your scene. This isn’t too hard to do, but a generic function does this really well.
The function “find all objects of type” returns a Unity Engine Object which is too general. If we constrain T to be a component or a monobehaviour we can then get access to the attached gameObject and destroy it.
(Link) You can find more about constraints here.
Another Example

In my personal game project, I often need to check and see if the player clicks on a particular type of object. There are certainly many ways to do this, but for my project, I often just need a true or false value returned if the cursor is hovering over a particular object type.
This is again a perfect use for a generic function. A raycast from the camera to the mouse can return a raycast hit. If that hit isn’t null we can then check to see if the object has a component. Rather than check for a particular component, we can check for a generic type. Note once again we need a constraint and that the generic type needs to be constrained to be a component.
Then to use this function we simply call it like any other function but tell it what type to look for by giving it a generic argument. Not too complex and definitely re-usable.
Static Helper Class
Additionally, many generic functions can also operate as static functions. So to maximize their usefulness, I often place my generic functions in a static class so that they can easily be used throughout the project. This often means even less code duplication!
Generic Classes

So far we’ve looked at generic functions, which I think are by far the most common and most likely use of generics. But we can also make generic classes and even generic interfaces. These operate much the same way that a generic function does.
The image to the right shows a generic class with a single generic argument. It also has a variable of the type T and a function that has an input parameter and a return value of type T. Notice that the type T is defined when the class is created and not with each function. The functions make use of the generic type but do not require a generic argument themselves!
Do note that this class is a monobehaviour and as is Unity will not be able to attach this to a gameObject since the type T is not defined.
However, if an additional class is created that inherits from this generic class and defines the type T then this new additional monobehaviour can be attached to a gameObject and used as a normal monobehaviour.
The uses for generic classes and interfaces highly depend on the project and are not super common. Frankly, it’s difficult to come up with good examples that are reasonably universal.
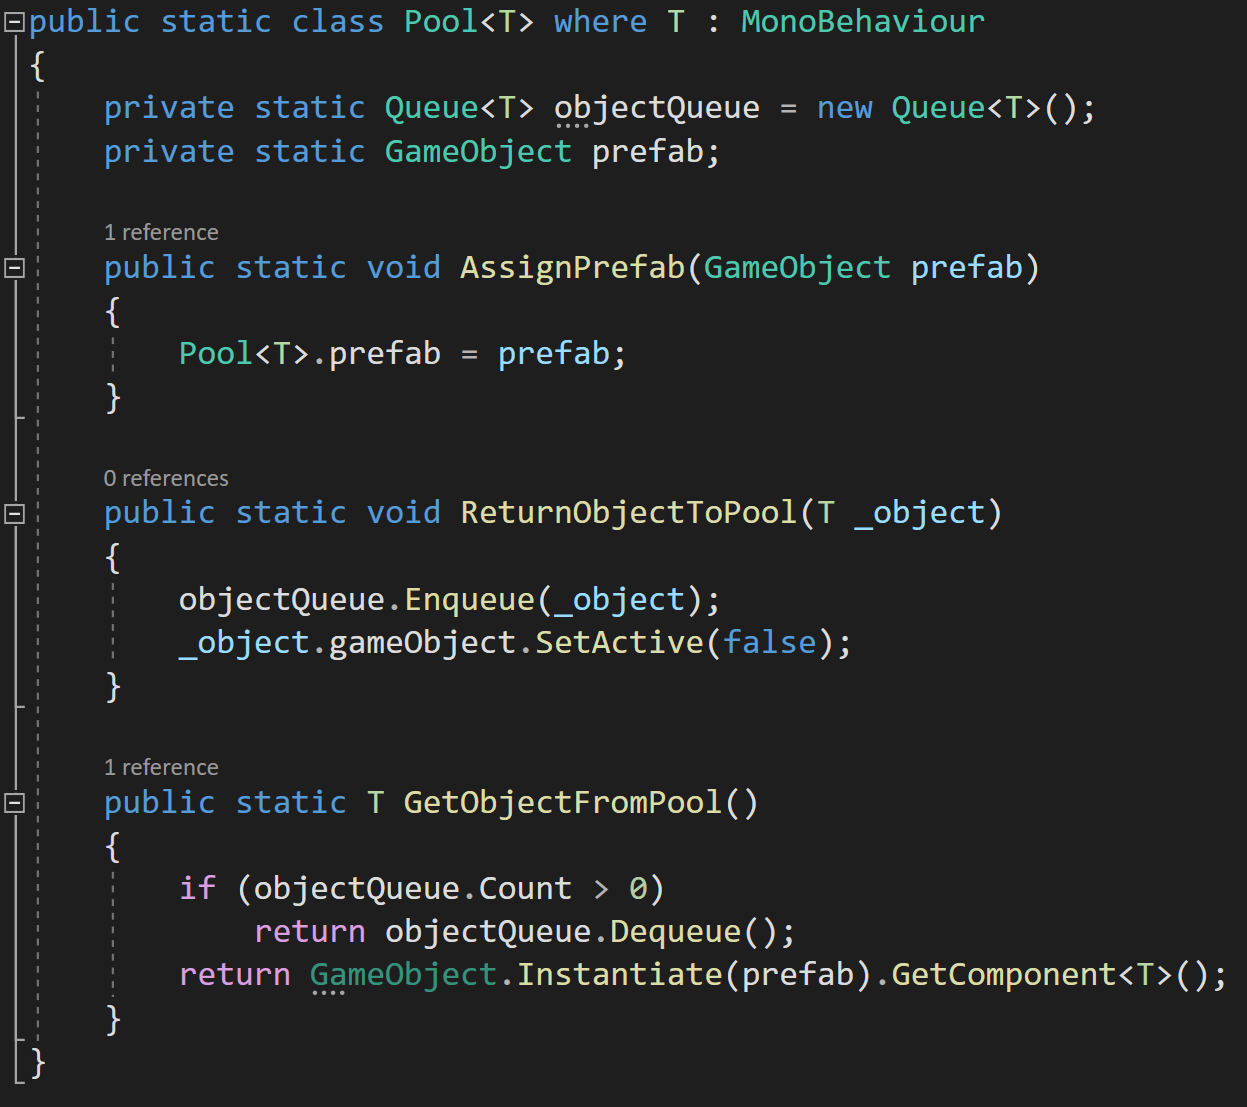
An imperfect example of a generic class might be an object pooling solution where there is a separate pool per type. Inside the pool, there is a queue of type T, a prefab that will get instantiated if there are no objects in the queue plus functions to return objects to the pool as well as get objects from the pool.
The clumsy part here comes from the assigning of the prefab which must be done manually, but this isn’t too high of a price to pay as each pool can be set up in an OnEnable function on some sort of Pool Manager type of object.
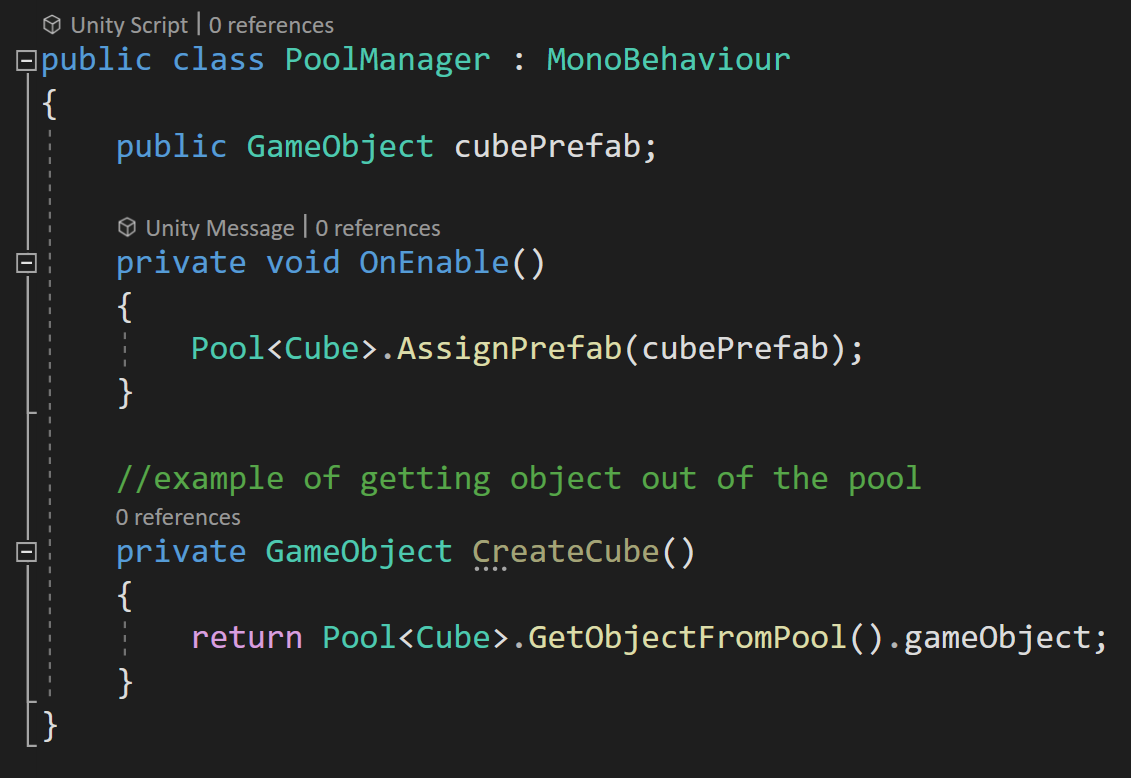
This class is static and is per type which makes it easy to get an instance of a given prefab. In this case, we are equating the type with a prefab which could cause problems or confusion, so just something to be aware of.
Generics vs. Inheritance
It turns out that a lot of what can be done with generics can also be done with inheritance and often a bunch of casting. And it might turn out that generics are not the best solution and using inheritance and casting is a better or simpler solution.
But in general, using generics tends to require less casting, tends to be more type-safe, and in some cases (that you are unlikely to see in Unity) can actually perform better.
(Link) To quote a post from Stack Overflow:
You should use generics when you want only the same functionality applied to various types (Add, Remove, Count) and it will be implemented the same way. Inheritance is when you need the same functionality (GetResponse) but want it to be implemented different ways.
Older Posts
-
January 2026
- Jan 27, 2026 Save and Load Framework Jan 27, 2026
-
April 2024
- Apr 10, 2024 Ready for Steam Next Fest? - Polishing a Steam Page Apr 10, 2024
- Apr 1, 2024 Splitting Vertices - Hard Edges for Low Poly Procedural Generation Apr 1, 2024
-
November 2023
- Nov 18, 2023 Minute 5 to Minute 10 - Completing the Game Loop Nov 18, 2023
-
September 2023
- Sep 13, 2023 Visual Debugging with Gizmos Sep 13, 2023
-
July 2023
- Jul 4, 2023 Easy Mode - Unity's New Input System Jul 4, 2023
-
May 2023
- May 19, 2023 Level Builder - From Pixels to Playable Level May 19, 2023
-
April 2023
- Apr 11, 2023 Input Action in the Inspector - New Input System Apr 11, 2023
-
February 2023
- Feb 26, 2023 Tutorial Hell - Why You're There. How to Get Out. Feb 26, 2023
-
December 2022
- Dec 31, 2022 Upgrade System (Stats Part 2) Dec 31, 2022
-
November 2022
- Nov 10, 2022 Stats in Unity - The Way I Do it Nov 10, 2022
- Nov 5, 2022 State of UI in Unity - UI Toolkit Nov 5, 2022
-
August 2022
- Aug 17, 2022 Knowing When A Coroutine Finishes Aug 17, 2022
-
April 2022
- Apr 23, 2022 Unity Input Event Handlers - Or Adding Juice the Easy Way Apr 23, 2022
-
March 2022
- Mar 15, 2022 *Quitting a Job I Love Mar 15, 2022
-
February 2022
- Feb 8, 2022 Split Screen: New Input System & Cinemachine Feb 8, 2022
-
January 2022
- Jan 24, 2022 (Better) Object Pooling Jan 24, 2022
- Jan 19, 2022 Designing a New Game - My Process Jan 19, 2022
- Jan 16, 2022 Strategy Game Camera: Unity's New Input System Jan 16, 2022
-
December 2021
- Dec 16, 2021 Raycasting - It's mighty useful Dec 16, 2021
-
November 2021
- Nov 22, 2021 Cinemachine. If you’re not. You should. Nov 22, 2021
-
August 2021
- Aug 3, 2021 C# Extension Methods Aug 3, 2021
-
June 2021
- Jun 27, 2021 Changing Action Maps with Unity's "New" Input System Jun 27, 2021
-
May 2021
- May 28, 2021 Unity's New Input System May 28, 2021
- May 8, 2021 Bolt vs. C# - Thoughts with a dash of rant May 8, 2021
-
March 2021
- Mar 10, 2021 Coroutines - Unity & C# Mar 10, 2021
-
January 2021
- Jan 14, 2021 Where's My Lunch? - January Devlog Update Jan 14, 2021
-
December 2020
- Dec 27, 2020 C# Generics and Unity Dec 27, 2020
- Dec 7, 2020 Steam Workshop with Unity and Facepunch Steamworks Dec 7, 2020
-
November 2020
- Nov 27, 2020 Simple Level Save and Load System (Unity Editor) Nov 27, 2020
- Nov 9, 2020 Command Pattern - Encapsulation, Undo and Redo Nov 9, 2020
-
October 2020
- Oct 28, 2020 GJTS - Adding Steamworks API and Uploading Oct 28, 2020
- Oct 9, 2020 Game Jam... Now What? Oct 9, 2020
-
August 2020
- Aug 16, 2020 Strategy Pattern - Composition over Inheritance Aug 16, 2020
-
July 2020
- Jul 24, 2020 Observer Pattern - C# Events Jul 24, 2020
- Jul 15, 2020 Object Pooling Jul 15, 2020
- Jul 3, 2020 Cheat Codes with Unity and C# Jul 3, 2020
-
June 2020
- Jun 16, 2020 The State Pattern Jun 16, 2020
-
August 2019
- Aug 12, 2019 Easy UI Styles for Unity Aug 12, 2019
-
July 2019
- Jul 3, 2019 9th Grade Math to the Rescue Jul 3, 2019
-
June 2019
- Jun 12, 2019 Introducing My Next Game (Video DevLog) Jun 12, 2019
-
May 2019
- May 29, 2019 Programming Challenges May 29, 2019
-
March 2019
- Mar 2, 2019 Something New - Asking "What Can I Learn?" Mar 2, 2019
-
November 2018
- Nov 30, 2018 A Growing Channel and a New Tutorial Series Nov 30, 2018
-
October 2018
- Oct 11, 2018 Procedural Spaceship Generator Oct 11, 2018
-
July 2018
- Jul 11, 2018 Implementing SFX in Unity Jul 11, 2018
-
May 2018
- May 31, 2018 Prototyping Something New May 31, 2018
-
April 2018
- Apr 17, 2018 When to Shelve a Game Project? Apr 17, 2018
-
February 2018
- Feb 9, 2018 State of the Game - Episode 3 Feb 9, 2018
-
December 2017
- Dec 16, 2017 State of the Game - Episode 2 Dec 16, 2017
-
November 2017
- Nov 7, 2017 The Bump From A "Viral" Post Nov 7, 2017
-
October 2017
- Oct 30, 2017 NPC Job System Oct 30, 2017
-
September 2017
- Sep 1, 2017 Resources and Resource Systems Sep 1, 2017
-
August 2017
- Aug 3, 2017 State of the Game - Episode 1 Aug 3, 2017
-
June 2017
- Jun 20, 2017 Resources: Processing, Consumption and Inventory Jun 20, 2017
- Jun 15, 2017 Energy is Everything Jun 15, 2017
-
May 2017
- May 16, 2017 Graphing Script - It's not exciting, but it needed to be made May 16, 2017
- May 2, 2017 Tutorials: Low Poly Snow Shader May 2, 2017
-
April 2017
- Apr 28, 2017 Low Poly Snow Shader Apr 28, 2017
- Apr 21, 2017 Environmental Simulation Part 2 Apr 21, 2017
- Apr 11, 2017 Environmental Simulation Part 1 Apr 11, 2017
-
March 2017
- Mar 24, 2017 Building a Farming Game Loop and Troubles with Ground Water Mar 24, 2017
-
February 2017
- Feb 25, 2017 The Inevitable : FTF PostMortem Feb 25, 2017
-
December 2016
- Dec 7, 2016 Leaving Early Access Dec 7, 2016
-
November 2016
- Nov 28, 2016 Low Poly Renders Nov 28, 2016
- Nov 1, 2016 FTF: Testing New Features Nov 1, 2016
-
October 2016
- Oct 27, 2016 Watchtowers - Predictive Targeting Oct 27, 2016
- Oct 21, 2016 Click to Color Oct 21, 2016
- Oct 19, 2016 Unity Object Swapper Oct 19, 2016
-
September 2016
- Sep 18, 2016 Testing Single Player Combat Sep 18, 2016
-
May 2016
- May 25, 2016 Release Date and First Video Review May 25, 2016
-
March 2016
- Mar 26, 2016 Getting Greenlit on Steam Mar 26, 2016