Dev Log
Level Builder - From Pixels to Playable Level
A while back for a game jam I made a tool that would import a PNG file and use the color data to quickly generate a level. It wasn’t perfect, but it meant I could quickly iterate on a level by erasing a few pixels and adding a few others. It made my game reasonable to build in 48 hours.
Then a few weeks ago a local game developer asked a question that reminded me of that old tool. So I dug it out. Polished it a bit and after sharing the tool, I realized it might make for an interesting video. So here we are…
It looks like Brackeys made a tool like this too. My game jam was 6 months before his video and I think this version might be a bit more general;)
Creating the Image
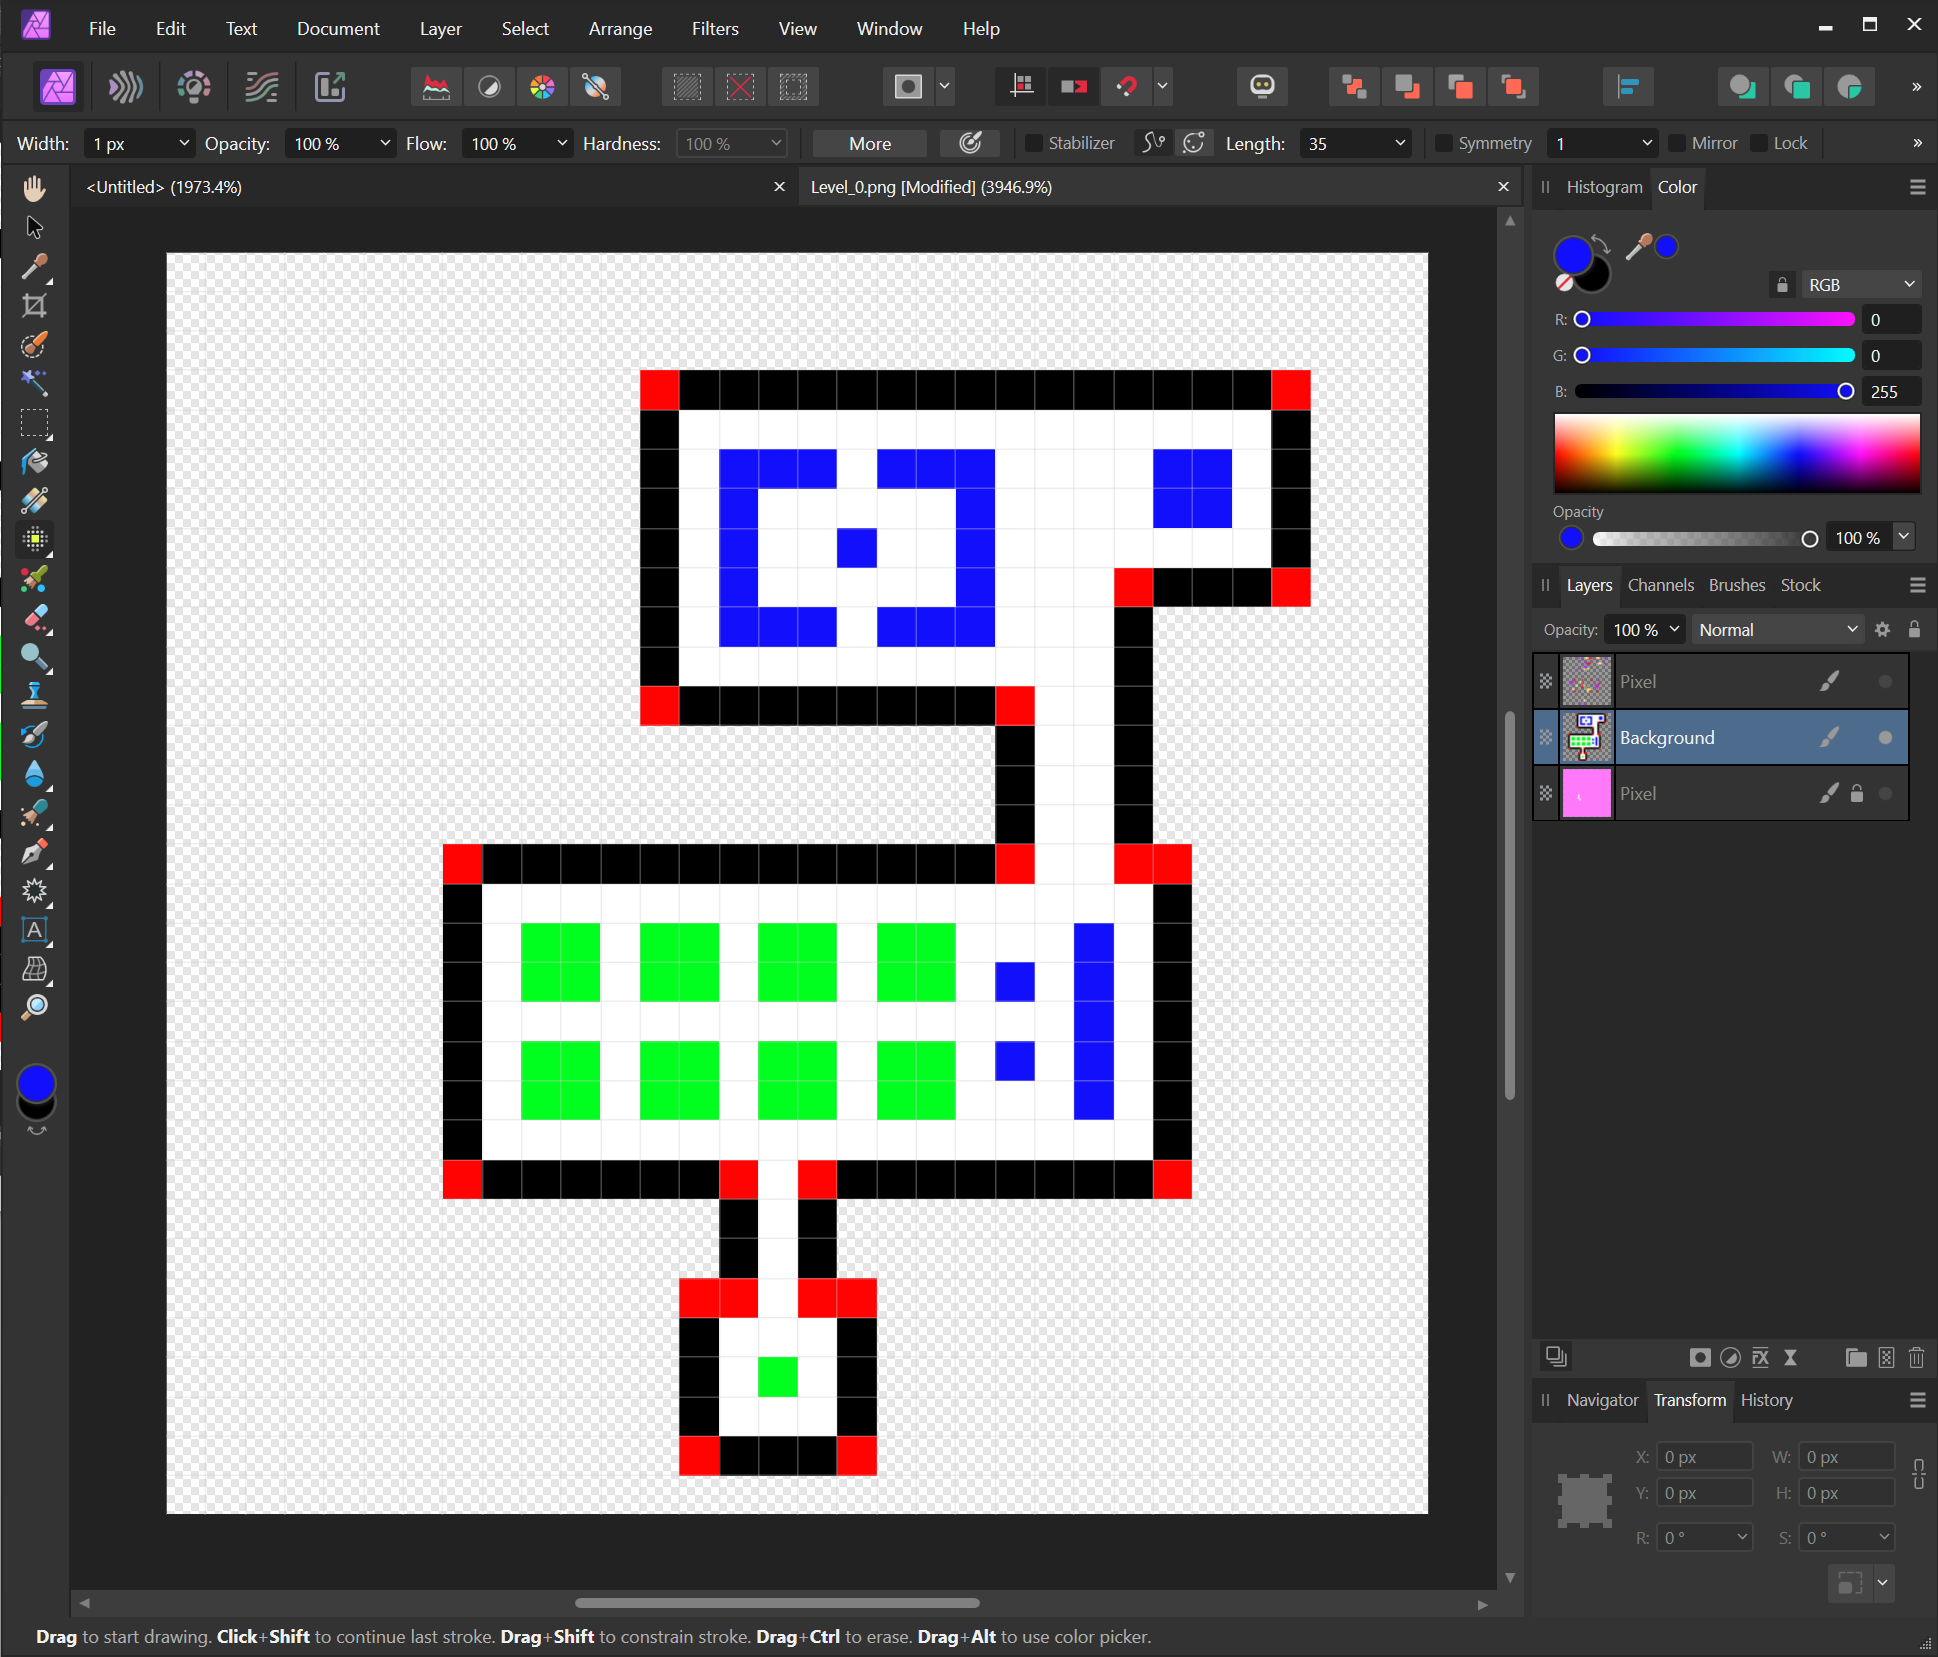
To get started, you’re going to need any image creation tool that can paint individual pixels. Photoshop, GIMP, even MS Paint can make this happen. I personally use Affinity Photo. Like a lot of these tools Affinity Photo has a grid and a pixel painting tool. It can also be really helpful if you can paint to multiple layers. The extra layers can be used to add props or details to a level.
For my system, fully transparent is going to represent an empty location on the level. You can do it with white or black, but transparent seems like a natural choice. Beyond that, you can use any colors you want.
I choose to draw my dungeon walls in black, the floor in white and to keep the code simpler I’ve given the corners a unique color too (red). By giving the corners a color, I don’t have to try to detect them, but that could be done too.
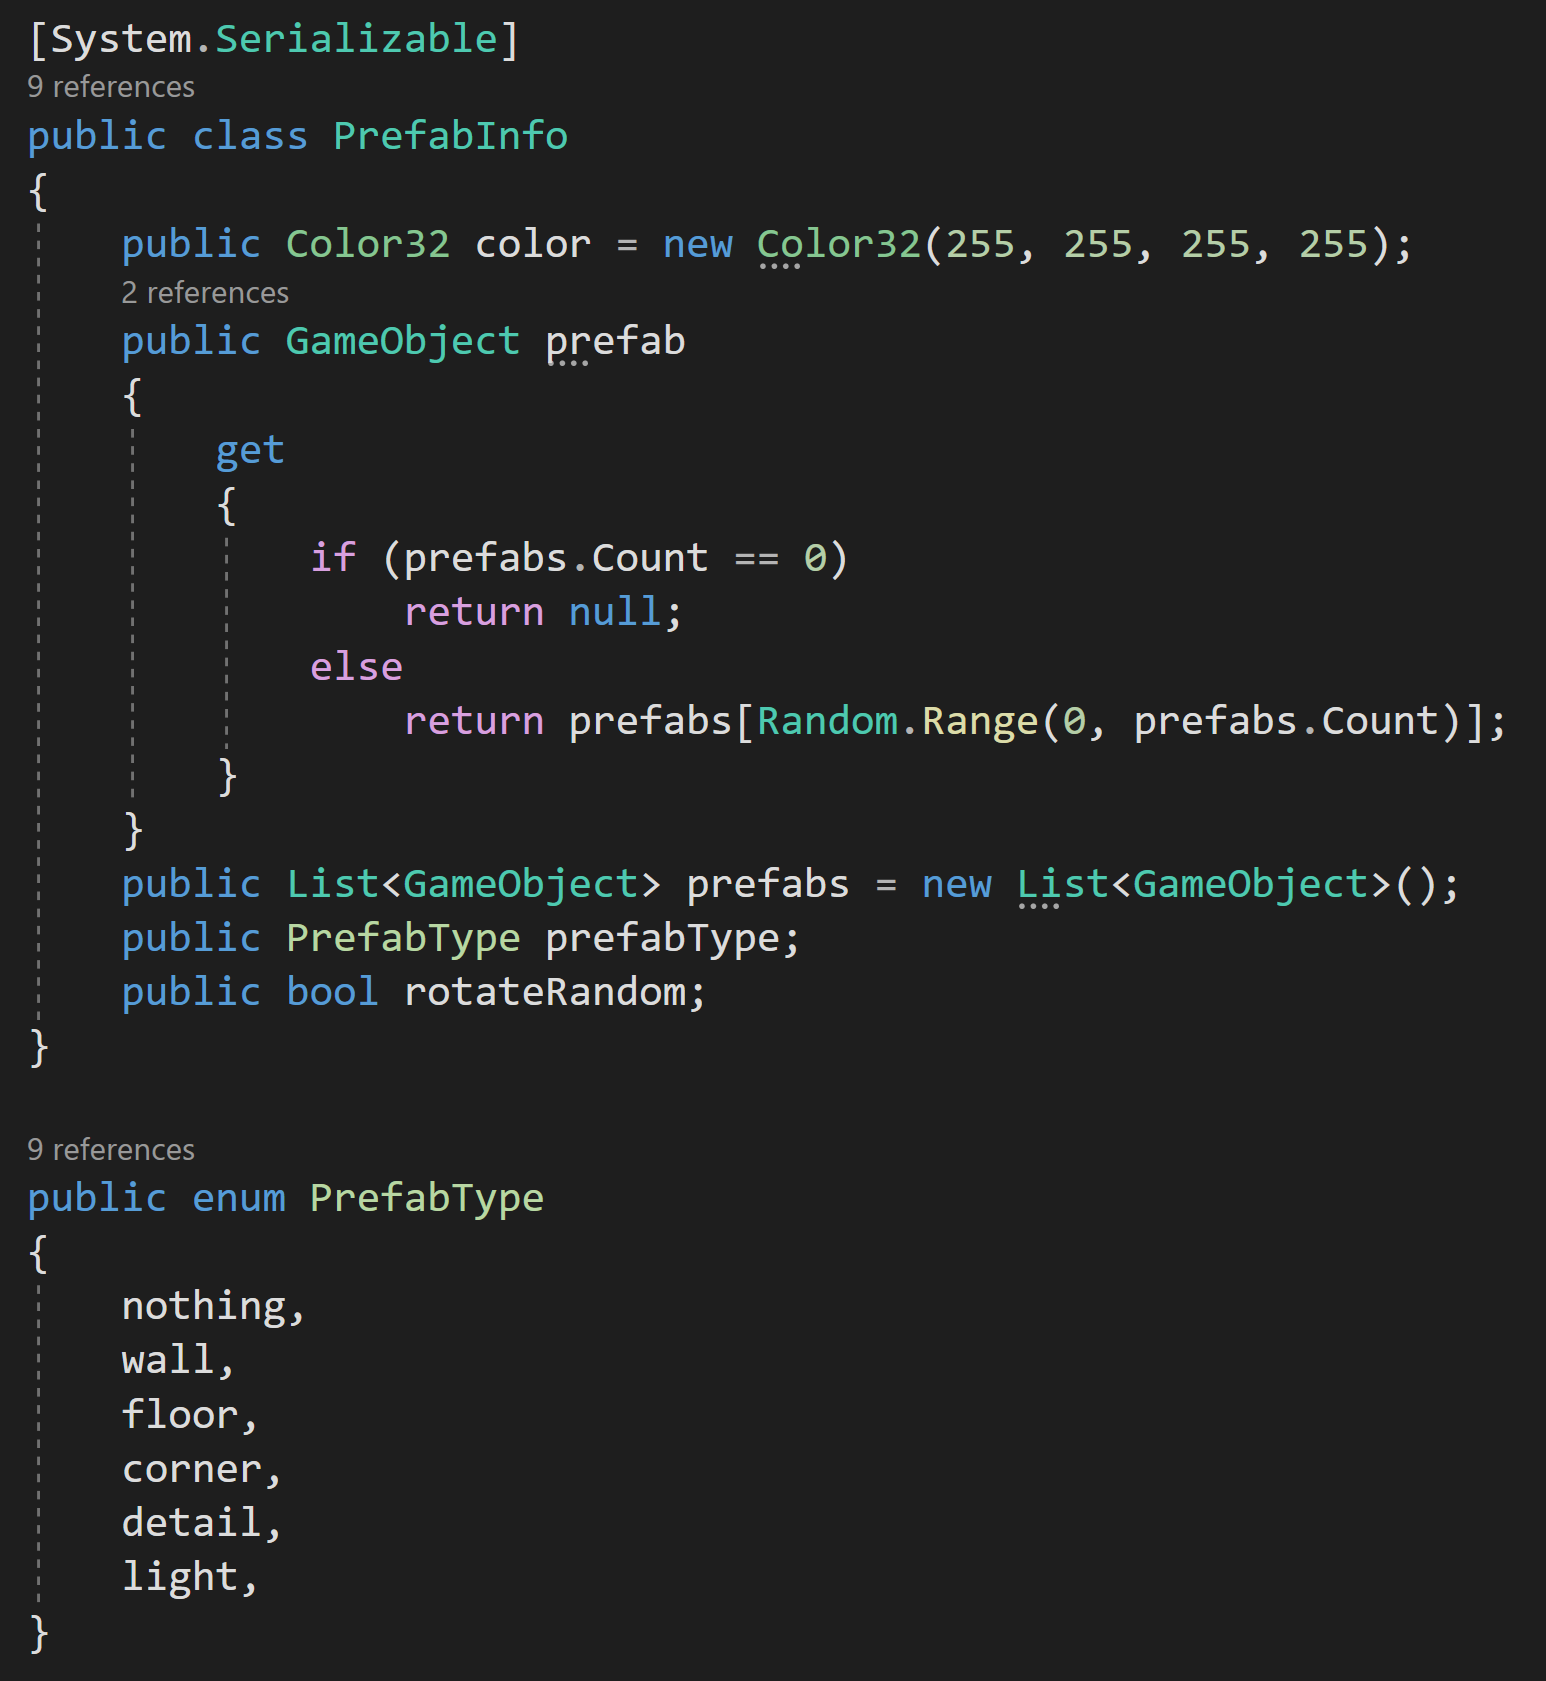
Prefab Info data structure
While that’s enough to build the basic structure, we can handle as many colors as we want, so I’ve gone ahead and added blue and green which we can use to add variation to the dungeon floor with slightly different prefabs.
Basic Data Structure
Each of the colors on our image will represent a different prefab or a prefab randomly chosen from a list. To make that work we need a data structure that holds a reference to the color as well as the prefab or list of prefabs.
Optionally, I’ve added a Prefab type which will allow special handling of the instantiated objects such as rotating to match neighboring tiles. Additionally, a boolean will allow random rotation which is useful for decorative objects.
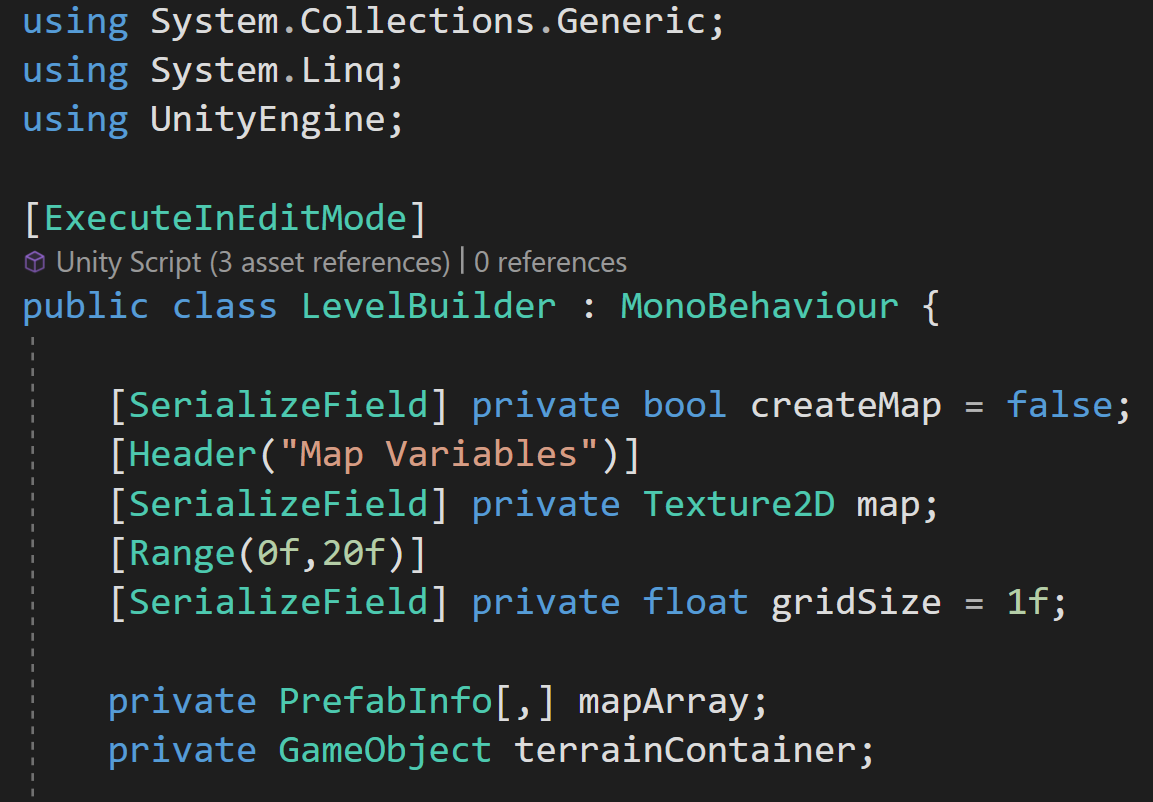
Level Builder Component
With our data structure built, we need our level builder component that will make use of the data.
In the Level Builder class, we’ll need a few variables. The first is a bool that will act as a button (if you have Odin Inspector just use the button attribute). Then we’ve got a Texture2D slot for our image and a float for the grid size. The value of your grid size will depend on the size of your prefab and may take a little fine-tuning. If your objects have gaps between them decrease the grid size or if they overlap then increase the size.
I’d definitely recommend doing your best to use a nice integer-sized prefab! It may be helpful to remember the default Unity cube is 1 unit wide.
Then we have a 2D array of our new data type. This will store all the info to create our level. And finally, we have a gameObject that will be the root object for our instantiated level objects. This will keep things organized and make our lives easier down the road when we want to regenerate a level.
Finding All the Colors

On Validate Function - in the Level Builder class
Next, we can create a list of our new data type. Since we are going to want to add prefabs in the inspector per color, it would be nice if the list would automatically populate when the texture was added or changed. This way we don’t miss a color or have to manually enter all the colors. We can do this in an OnValidate function which gets called by Unity whenever a value in the level builder inspector changes.
Inside the OnValidate function, we check if the map is null, if not we’ll read through all the pixels using map.GetPixels32 - this returns an array of all the pixel colors in the map.

Level Builder Inspector -auto Populated colors
I’m using Color32 instead of Color, to let color comparison be done a bit more easily as we’ll be dealing with integers (bytes) instead of floats for the RGBA channels.
If we see a color whose alpha channel is zero, meaning it’s transparent we’ll continue and go to the next pixel. This allows us to use transparency as a way of leaving a blank space in our level.
After that, we’ll use a LINQ statement to check if any of the PrefabInfos in the list have the same color as our current pixel. If there’s no PrefabInfo that has this color, we’ll create a new instance, assign the color and add it to the list.
The result is a nice tidy list with each of the colors in the image listed in the inspector.
This is a massive improvement over my earlier versions of the tool where you’d have put in the colors manually, which was a huge pain and bottleneck in the workflow. Now, you can put any colors you want and you don’t have to worry about copying the color codes from your image editor or vice versa. This should work with any and every 32-bit color. So go nuts.
Reading the Image File
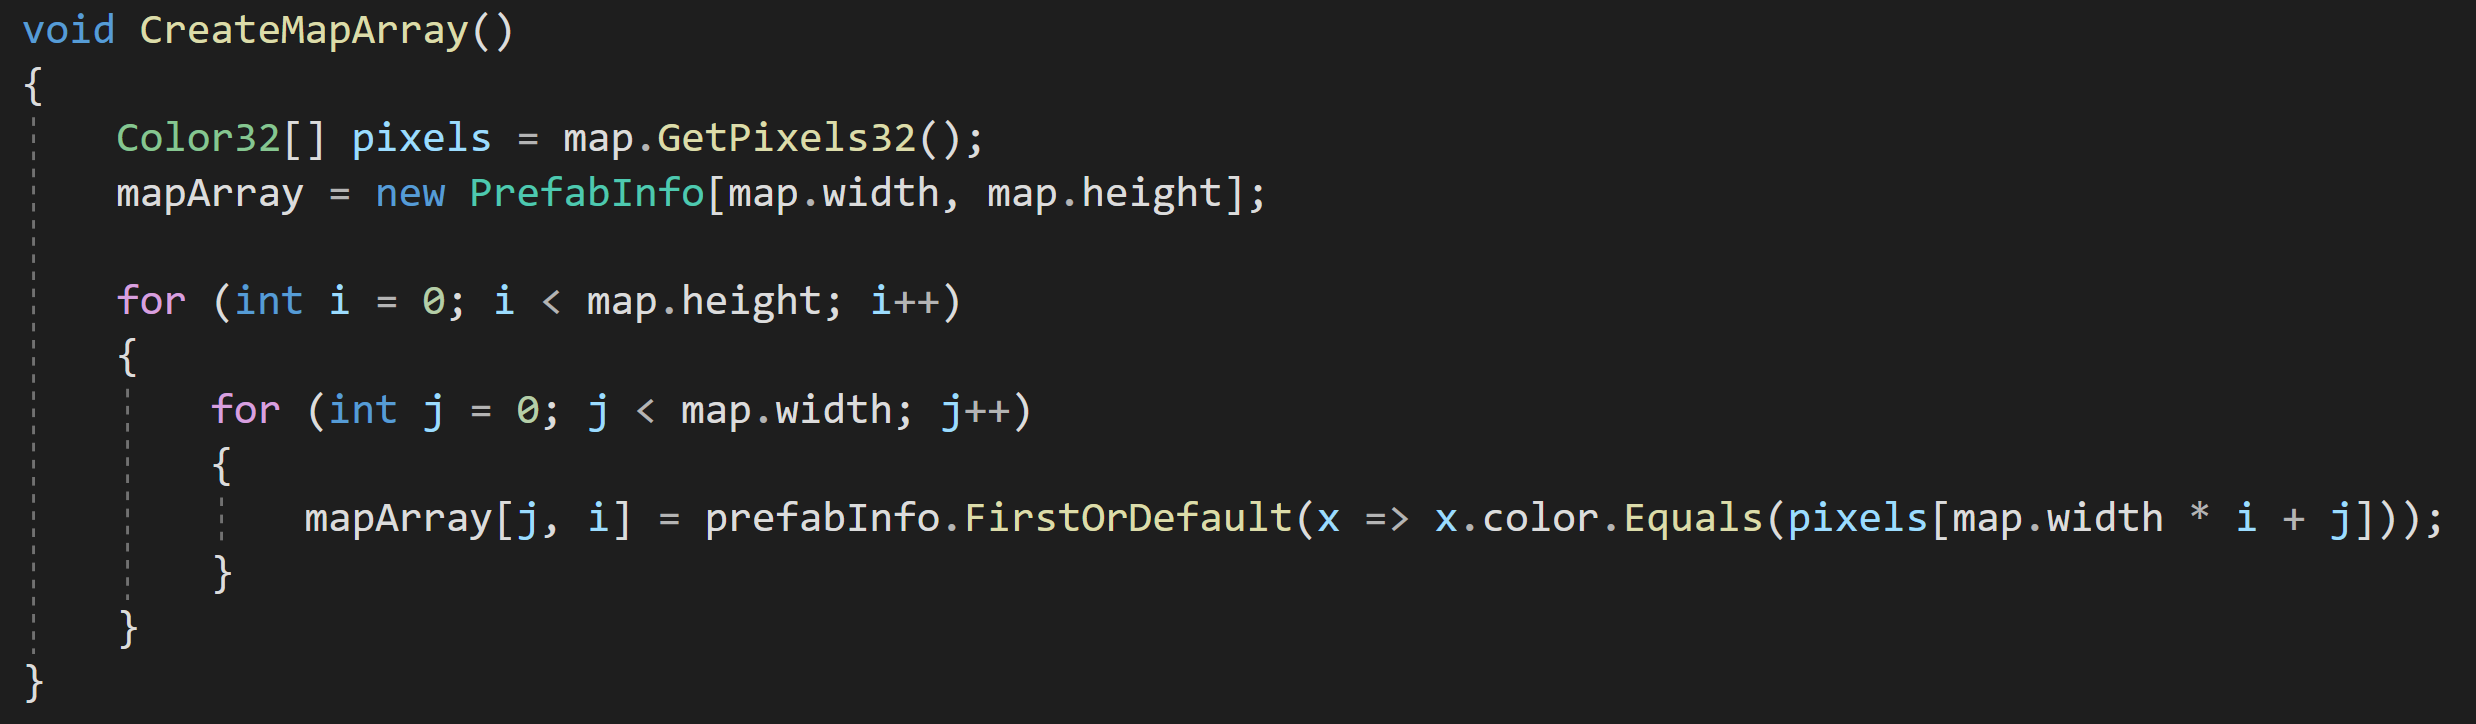
Our next step is to read the pixel data (again) but this time we’re going to generate a more easily used 2D array of PrefabInfos. After getting all the color data, again from GetPixels32, we can initialize our new 2D array to match the image's size - using the image's width and height.
How to get the pixel index from the For Loops
After that, we can use nested for loops to iterate through each location in our 2D array.
For each location, given by the integers i and j, we can get the color in the pixels array at a given location. If that color can be found in our list of PrefabInfo we assign a reference to that PrefabInfo in the 2D array.
There’s a lot going on in that one line of code!
The diagram to the right shows how the pixel index, is calculated from the i and j variables. The “4” in the equation comes from the width of the example. Also worth noting, Unity’s GetPixel function starts with pixel zero in the bottom left corner.
You could do this in the OnValidate function, but that would mean every time you add or remove a prefab to a list or toggle a bool you’d recalculate this array… Instead, I choose to use a little trick to create a button out of a bool.
Creating the Map

With our array of PrefabInfo populated, we can now instantiate our prefabs with a CreateMap function. Here we’ll check if the terrain container is not null and destroy the object if it’s not null. This has the effect of removing the previously generated level. This allows for quicker and easier iteration as the old level objects get cleaned up.
With the terrain container destroyed, we’ll create a new one, give it a name, and set its position. Since I’m doing this in the editor I’m not worried about the performance of creating and destroying objects. If you want to do this at runtime using an Object Pooling solution would be advisable and maybe also using a co-routine to spread the creation out over multiple frames.

Then we get to iterate through are 2D array again. We’ll check to make sure the array isn’t null at the location and if the prefab for the prefab info that location isn’t null. If either is null, we’ll skip to the next element in the array.
If we’re good to go, we grab the prefab from the PrefabInfo to instantiate it. We can use the i and j coordinates along with the grid size to place the prefab at the correct location in the scene.
The next line is one that’s optional, but I’d highly recommend it. That is to name the new object based on its coordinates. This really helps with debugging later on!
After that, we set the parent to our terrain container and if we’ve set the prefab to rotate we can randomly rotate the new instance.
Making It Go
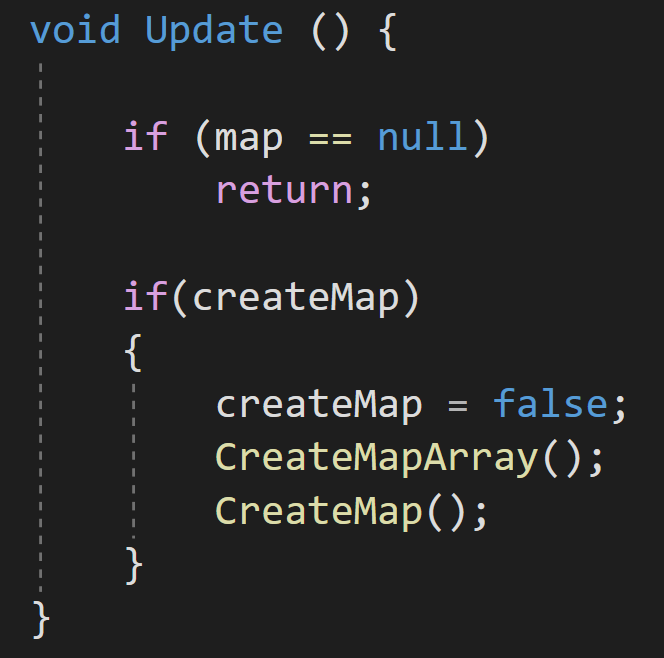
At this point, I’d strongly recommend you do some basic testing. Are there errors? Are the prefabs getting placed correctly? Is the grid size correct? Your level won’t look perfect, but it should be good enough to test and debug.
But to do that you need to be able to call on the functions. If you’re using Odin Inspector you can use a button attribute, but for those who aren’t here’s a little trick that you may or may not know.
On top of our class definition, we can add the attribute ExcuteInEditMode. Check the third image on this post. This will have the effect of the update function getting called every frame (the editor still has “frames” in edit mode).
Then we can create an update function that checks if the map texture is null if it’s not we’ll check if our boolean toggle is true. If it is then we’ll call our functions and create our level. Really important! We also want to make sure to flip the value of our boolean so we don’t keep creating a map every frame - which would be a pretty good way to make Unity run really slow.
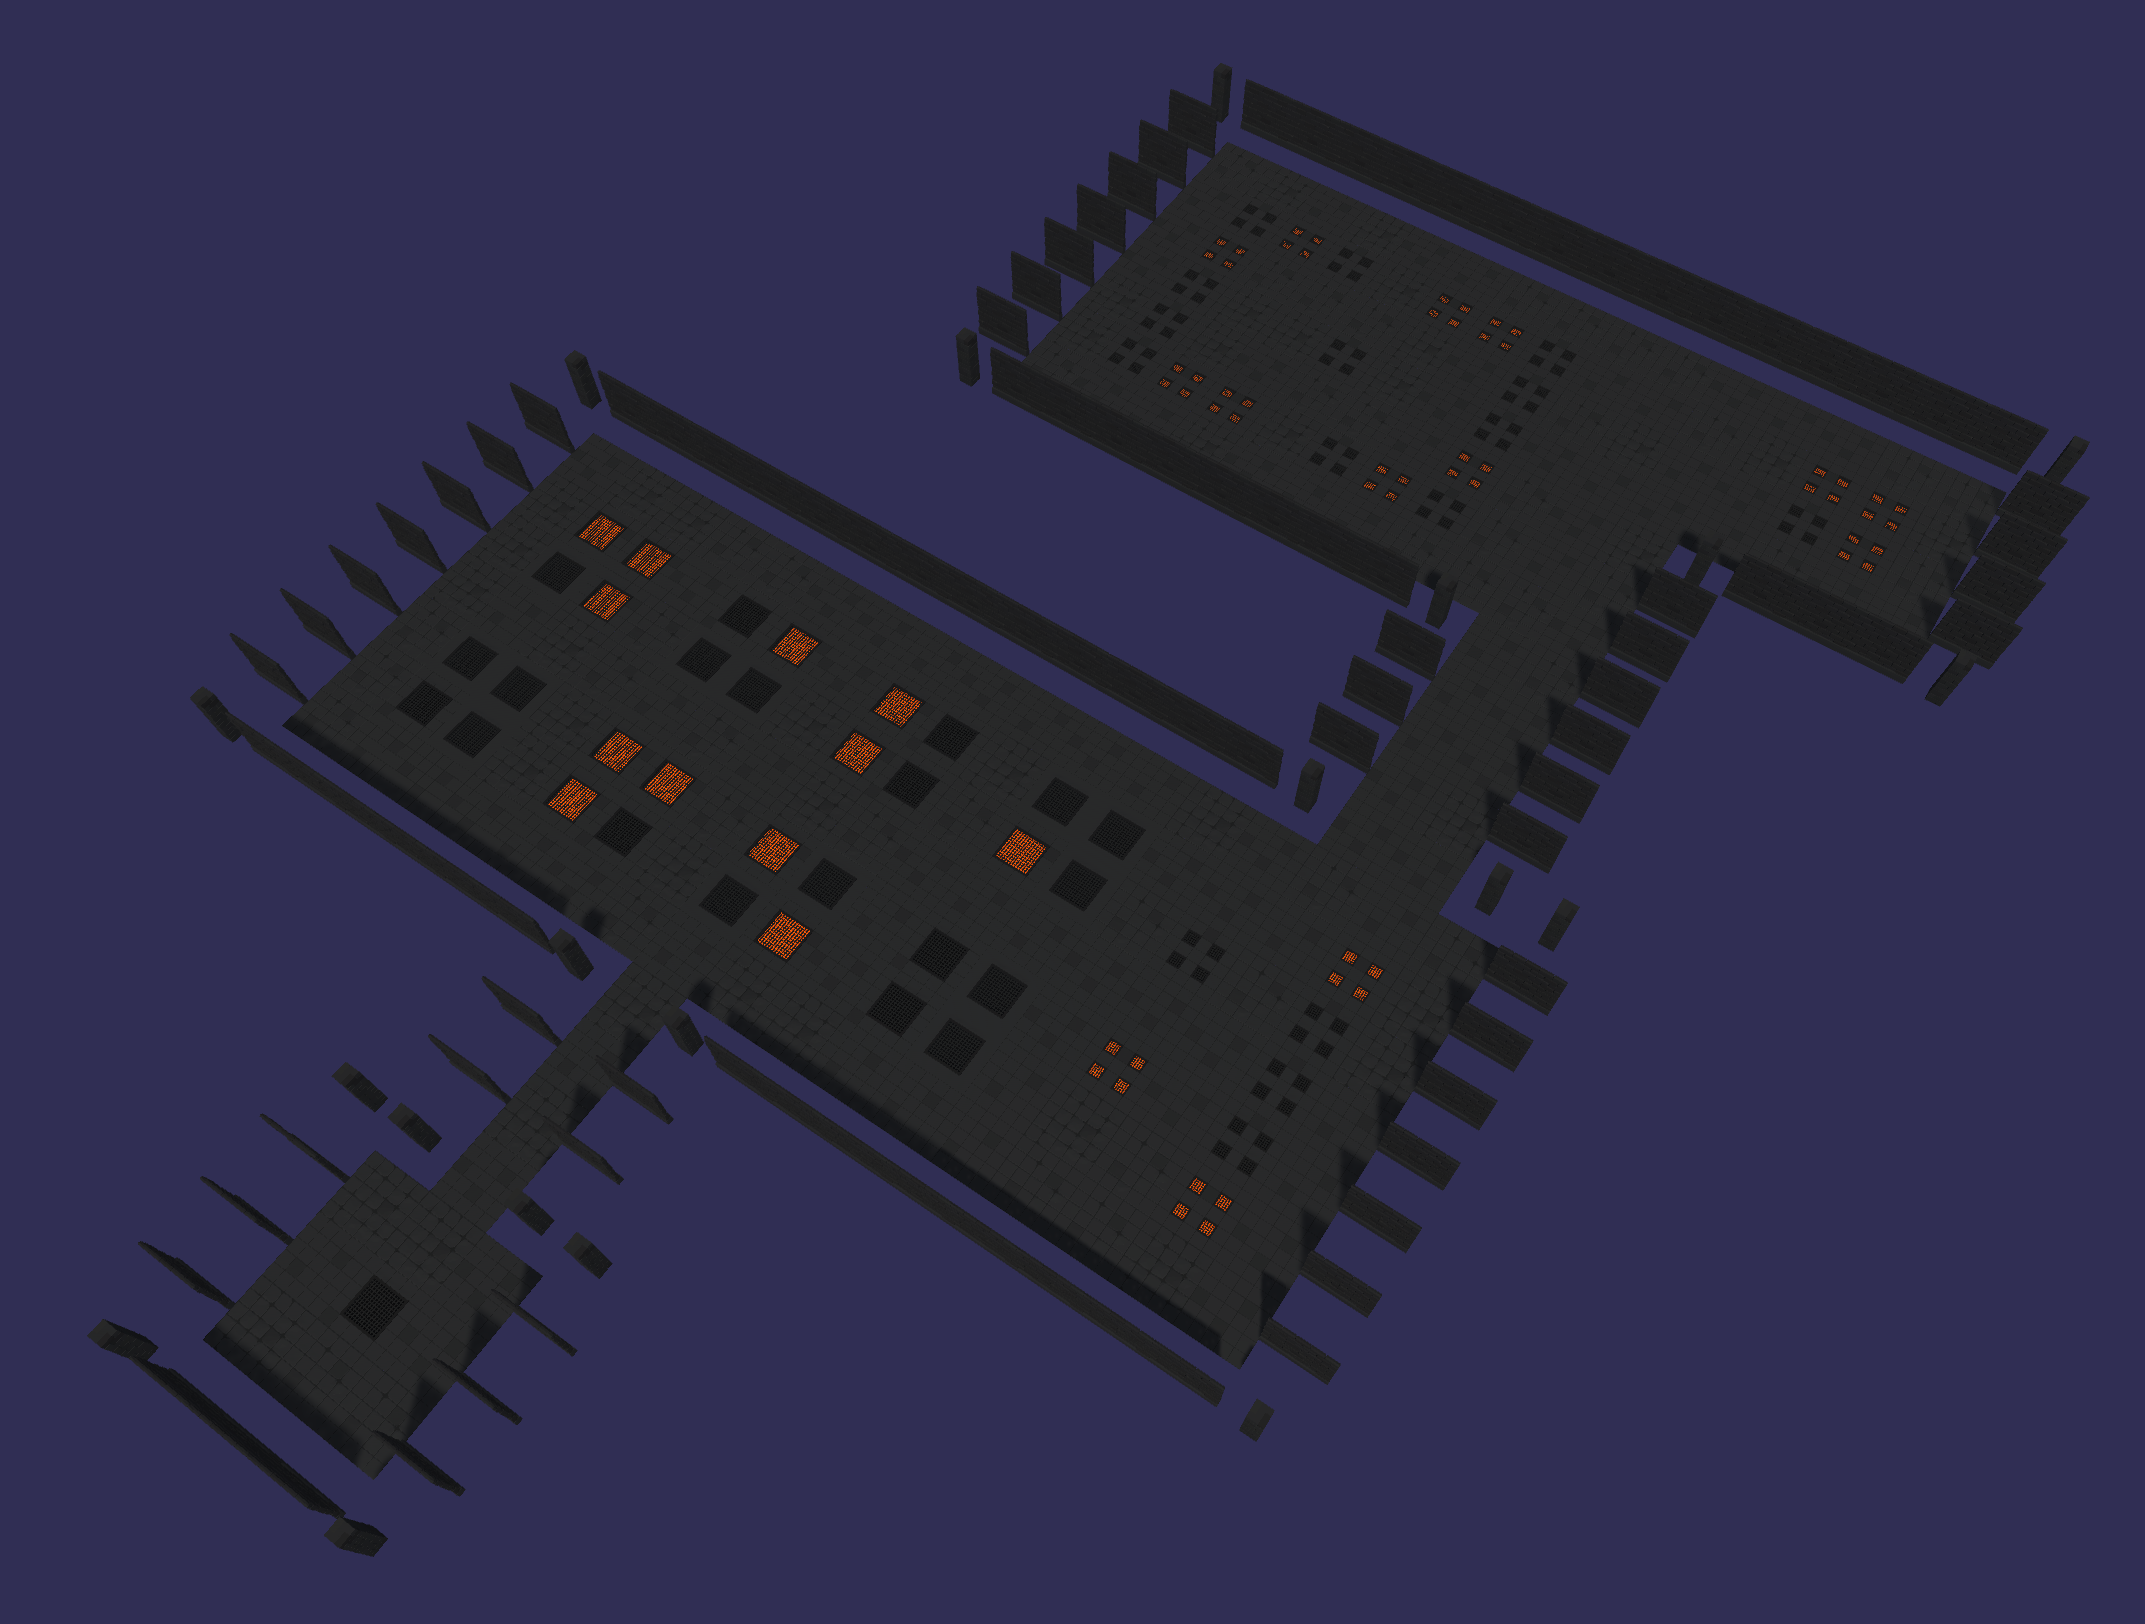
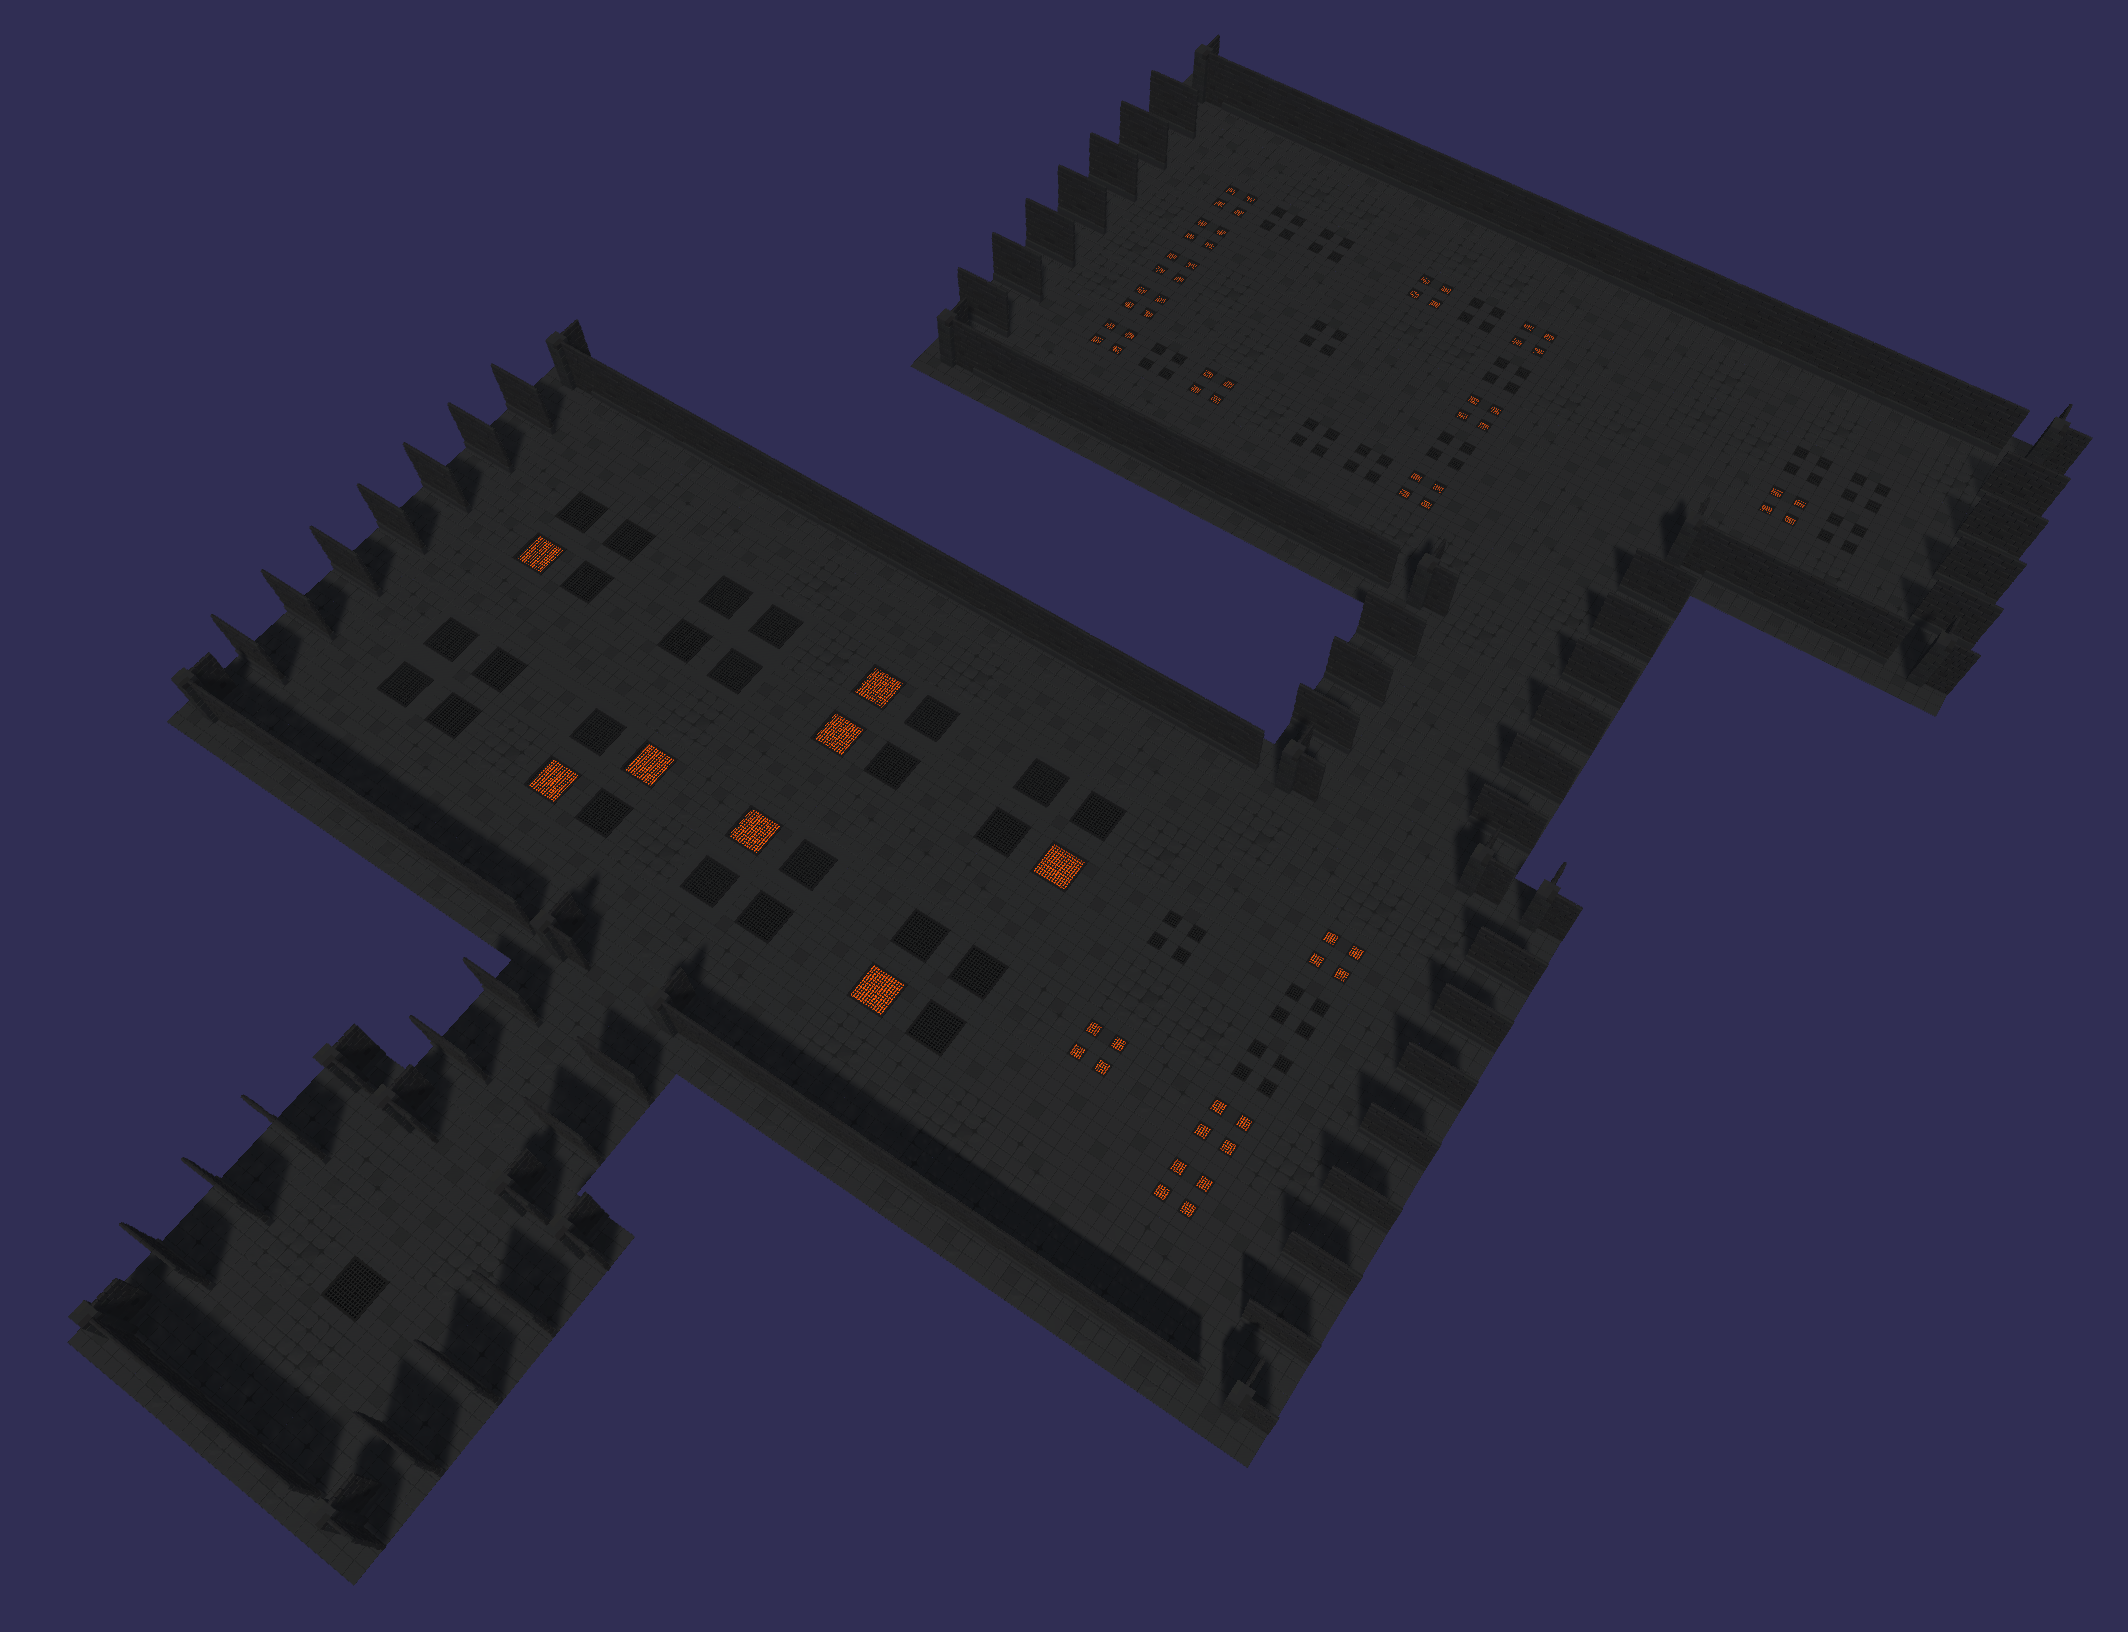
Prefab Examples - Dungeon
Depending on your prefabs and what you’re building all the work above may be all you need, but if you’re building something like a dungeon you’re liking finding that the corners don’t line up or the walls are facing the wrong direction. And that’s where the function TileSpecialHandling comes in. EVERYTHING that goes into that function will depend on your prefabs. So before I show some examples of what you can do with that function let me show you what my prefabs look like.
I’m using the “Low Poly Dungeons” asset by Just Create. There is a free version as well that I think has all you need to follow along. Just Create has kindly given me a lot of their assets to use in various videos.
The assets in this pack are great but don’t necessarily fit a grid out of the box. If I use them as is, I get a result like the image to the right. There are gaps between the floor and the walls and the pillars that are placed in the corners don’t touch the walls. Not to mention that some of the walls aren’t rotated in the correct direction.
We’ll fix the rotation in a bit. For now, the gaps are an easy fix.
Instead of using the built-in prefabs, I created an empty object and then set the walls (and pillars) as children of the empty. Then I could add a floor to both the walls and the pillars. In addition, the pillars also got two half walls to complete a “corner”.

Wall prefab with floor
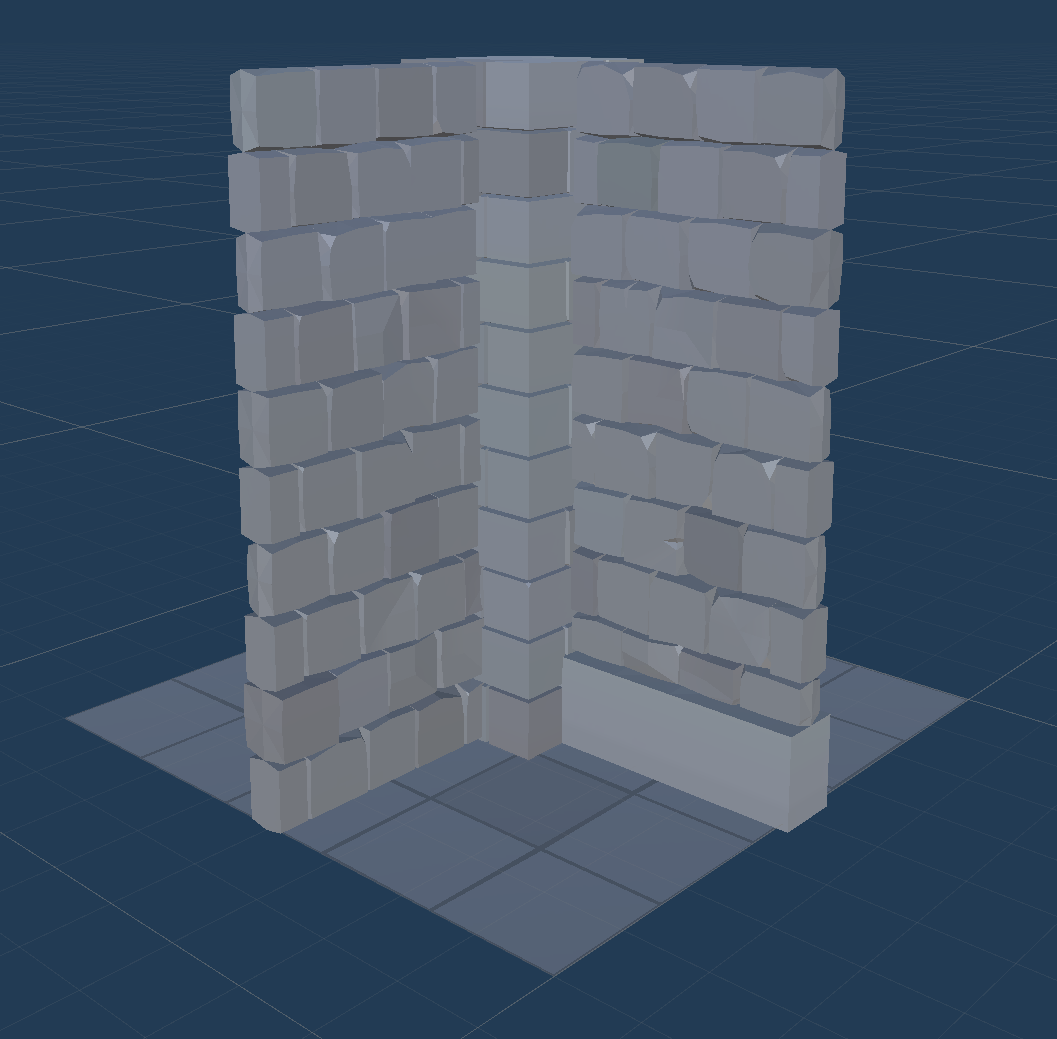
Pillar with floor and two half walls.
When creating prefabs, it’s important to make sure the children are centered around the origin of the parent and still fit your grid size.
With these changes, my dungeon is starting to look a bit better.
Special Handling

The TileSpecialHandling function does exactly what it says. It will let us deal with each type, as defined by the enum, in a unique way. This can allow us to rotate walls and corners or any other number of things you might need for your specific project.
The function takes in the coordinates of the tiles, the prefab info as well as a reference to the gameObject itself.
A switch statement then calls unique functions for each type of tile. I’ll show my examples, but this is definitely where your code is going to diverge from mine as your project, your prefabs, and your goals are different.
Rotating Walls

Getting the walls facing the right direction depends on what’s around the walls. So while not too tricky, it is easy to get lost in the details and all the indices.
The big picture idea is we are trying to determine where the floor tile is and rotate the wall to face that direction. We look to the neighboring tiles by adding or subtracting one to a coordinate in the map array and check the enum at that position. If we find a floor we rotate accordingly. Again depending on your prefabs or exact setup, this may take some guessing and checking.
In this case, we only need to check 3 of our 4 neighbors, since if the unchecked neighbor is a floor then the wall is already facing the correct direction.
I’ve also thrown in a null check in the case that a prefabInfo was not assigned to that location. In my example I never got to the edges of the map, if you might, you will need to put in some additional checks to make sure that the coordinates are valid for the map array. Or just leave a ring of transparent pixels around the outside.
Rotating Corners


This is a bit trickier. With a corner, we need to find two nearby walls or corners. Depending on the orientation of those walls and corners we rotate the object. So a bit more complex but not too bad.
When debugging this type of function I’ve found the naming of the tile objects particularly valuable. More than a few times I thought I was checking one object and was in fact checking another.
To make this a bit easier and keep the code looking clean, I’ve added an extension function to determine if a neighbor is either a wall or a corner. Nothing too fancy, just keeps the if statements a lot simpler and easier to read.
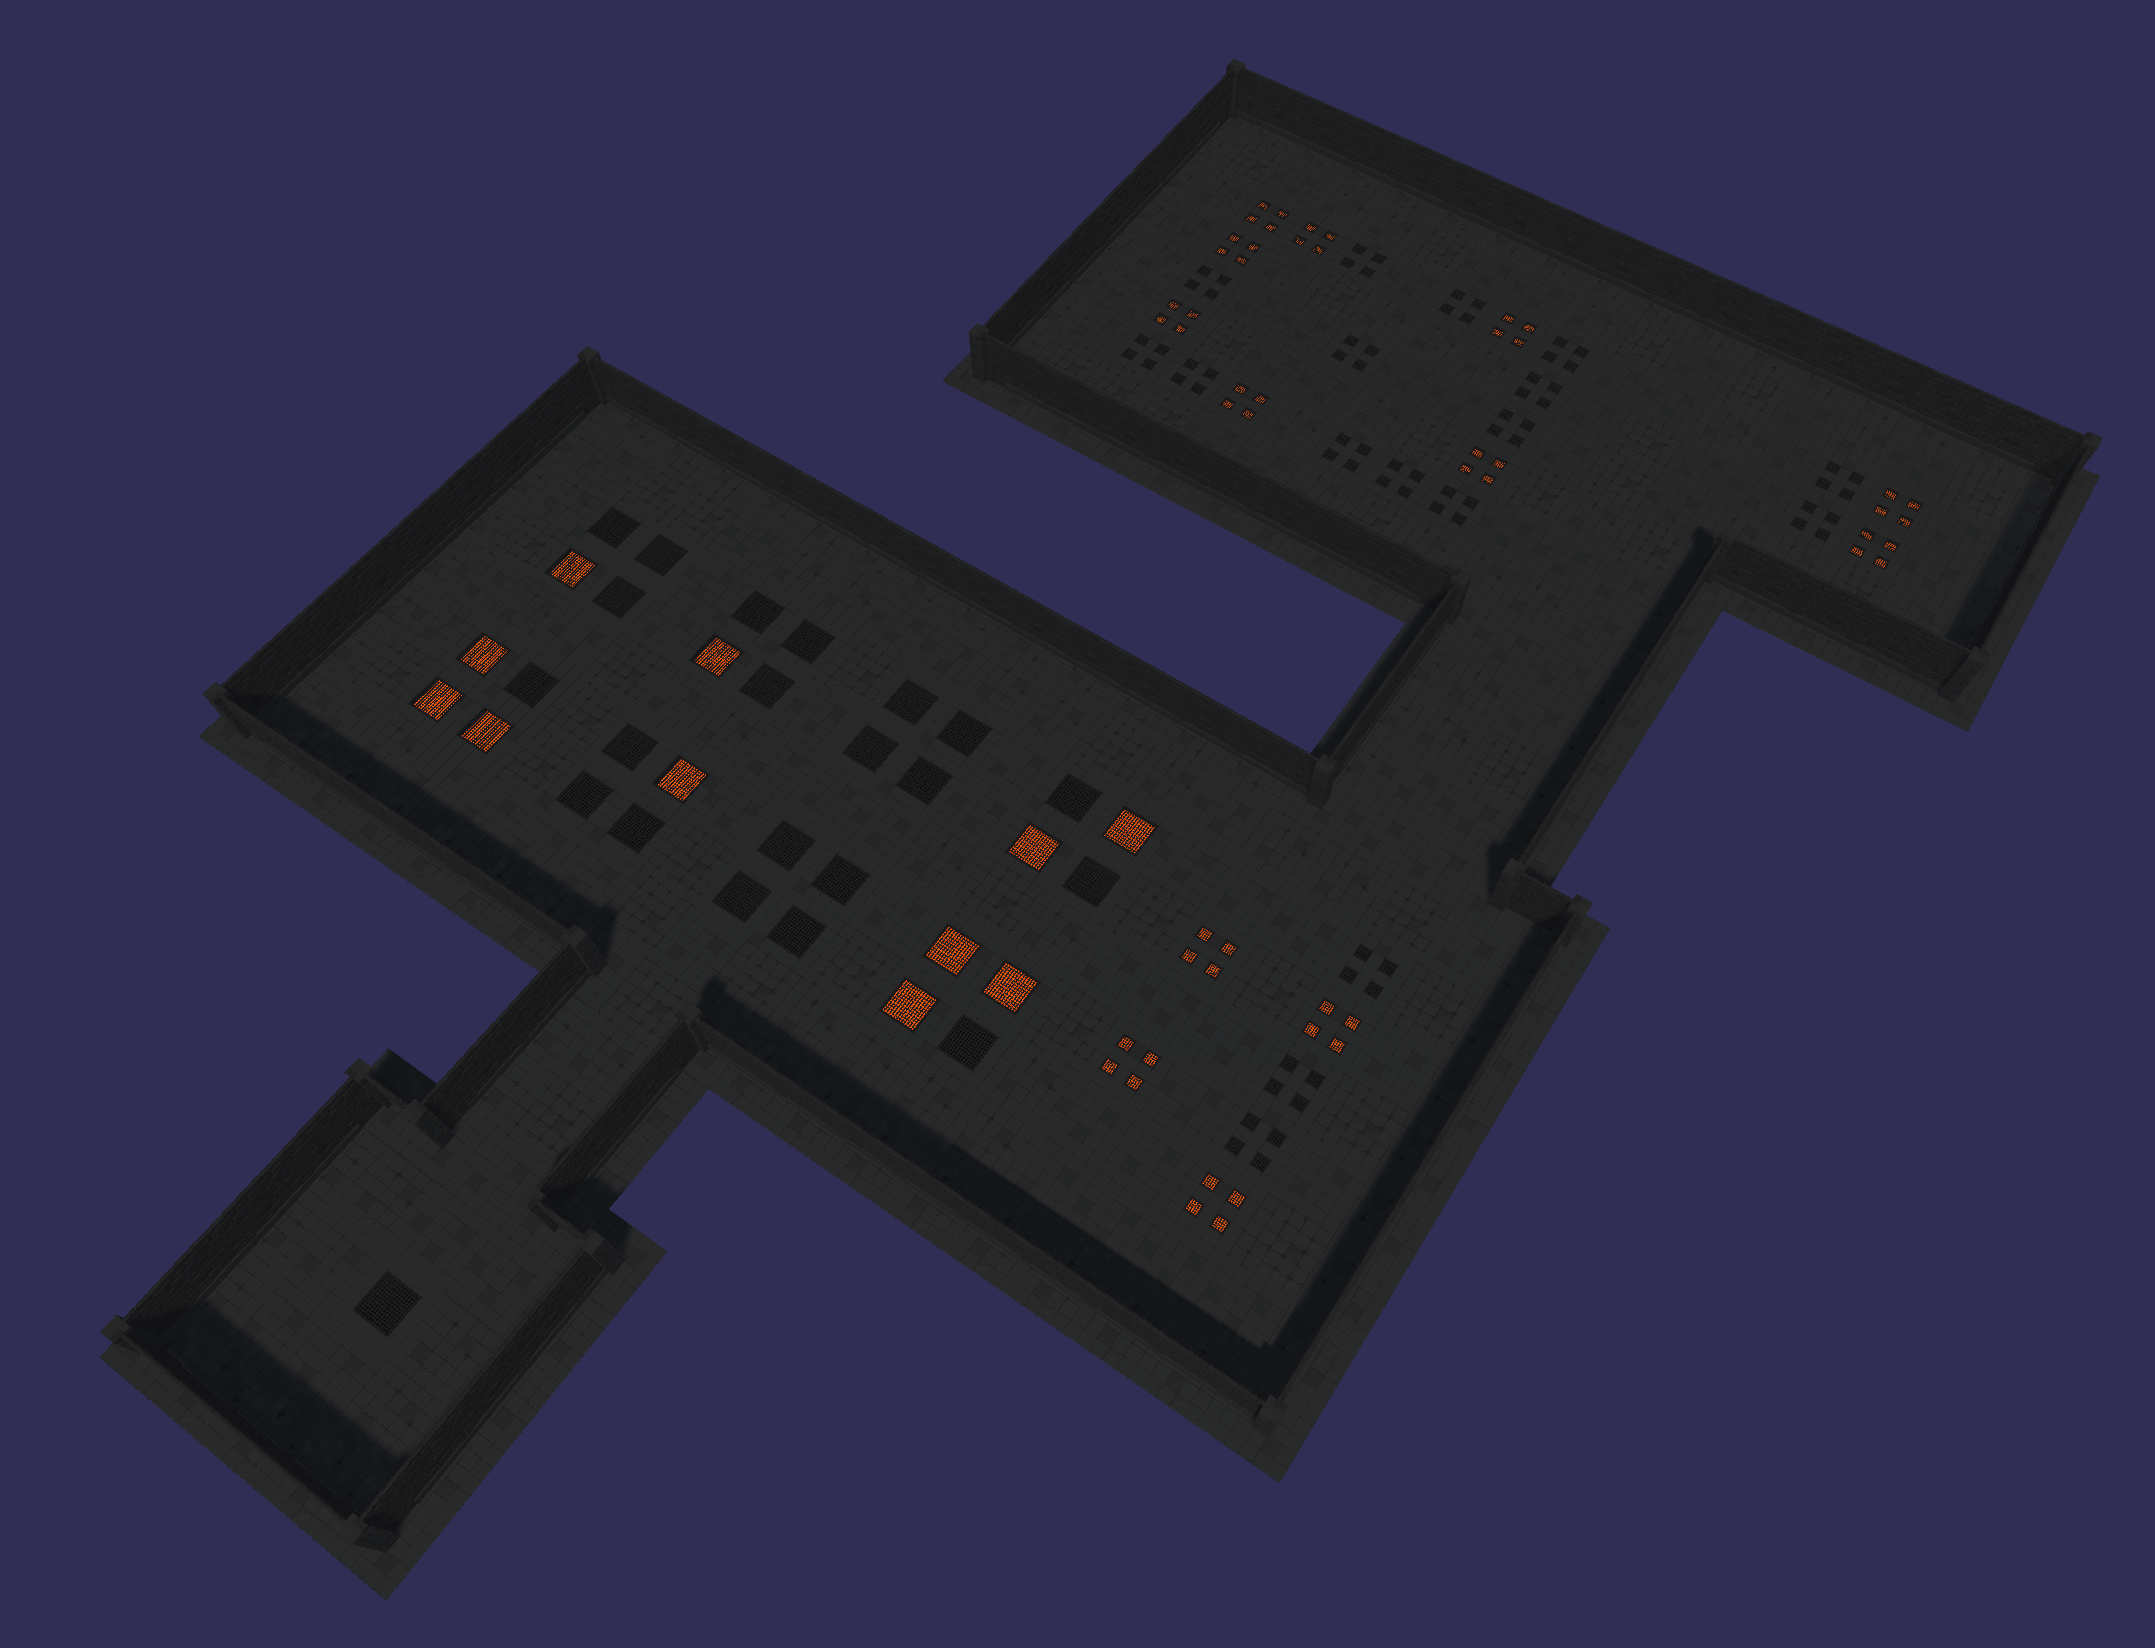
With the walls and corners rotated our dungeon is looking much better.

Rotating Lights
I figured lights would make for better video eye candy and it’s something that most developers are going to want to put in their game.
So, I made a light prefab that when located and rotated to match a wall tile at the same location it would sit on the wall correctly.
You could place and rotate lights with the same pixel map for the walls and floors, but I think there’s a good argument for having details like lights and other props on a second map. I did this by adding a second (transparent) layer on my map. This allowed me to easily line up the lights (and other details) with the walls and floor. I then export just the new layer as an additional PNG file. I also then added a second instance of the level builder to the scene. This second instance will manage the lights and props.
Second layer to align details with the floor

Addition level builder for details
Since I’ve used a second level builder I don’t (easily) have access to the the map array from the other level builder. This means I can’t use wall and floor data to align my lights. Instead, assuming the walls have already been added, we can make use of Physics.OverLapSphere to detect nearby objects. Then for the sake of ease, although I hate to do it, we can check the names of the objects found, and if there’s a wall we can align the rotation of the light to that of the wall. Or in this case the parent of the wall.

Final Thoughts and Improvements
The goal of this tool is rapid prototyping. It’s really quick to build a pixel map and drop it into the inspector. Even the amount of code you have to write is relatively small. For a game jam or even a commercial game, this tool can save hours and hours of work manually lining up prefabs to create individual levels.
Runtime Use
That said this tool, as is, is designed for use in the editor. It roughs out the level and you’re likely going to want to tweak things manually. But! With some more sophistication and refining of the “special handling” of tiles, this could be used to allow players to create and implement their own levels! A relatively simple in-game editor could allow the player to load a PNG and then assign prefabs to the colors found in the image. A pretty slick way for players to create content for your game!
Make It Better
If I was to use this tool (again) in a project to create levels I would likely modify the code to handle multiple maps within the same instance of the level builder. For example a structural map, a details map, a lighting map, and an enemy map. By using multiple maps within one instance it would mean that your lights could be aware of the floor or walls without having to raycast. Enemies could rotate to not face the walls. Or whatever. It would add more functionality if every map was aware of the other maps and would make the tool that much more powerful. But that kind of customization is highly dependent on the specific project so doesn’t really fit in a tutorial.
2D and Tilemaps
As is, the tool is designed for 3D, but it would work perfectly well with placing 2D sprites. If you are using a tilemap, Unity provides Tilemap.SetTile() which would allow easy addition to an existing tilemap. If you’d be interested in seeing a modification of the tool to use a tilemap let me know - leave a comment or reach out on Discord or YouTube. I might challenge the YT community to get the video 1000 likes or something similar before creating a follow-up video. Who knows.
Input Action in the Inspector - New Input System
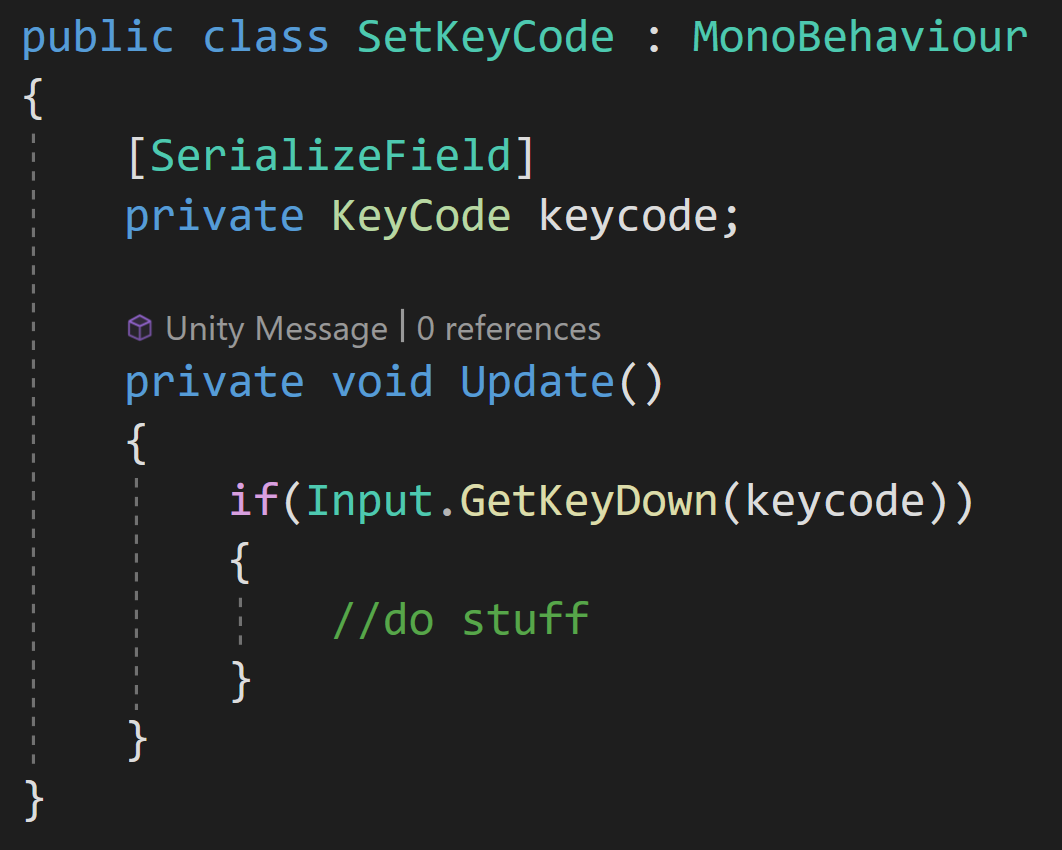
the “old” input system
Setting a key in the inspector with the “old” input system is pretty easy. Create an instance of a keycode and then use it however you like with GetKey, GetKeyDown, or GetKeyUp.
But what if you’re using the “new” input system? Did you know that you can easily assign input actions in the inspector? I didn’t. And until today I never really had a need for that functionality. For things like menus, buttons, or other objects that might make use of a hotkey this is pretty nice to be able to do.
Background
I wanted to add hotkeys to my building menus
I was working on some UI functionality and wanted to add hotkeys to allow the player to open menus. Normal stuff. But all the menus I was working with were the same type - meaning they were using the same component just with different data and children objects. This meant I couldn’t easily program different keys to trigger different menus without making an ugly mess.
You can add an Input Action to your inspector, but this creates or defines a new input action, which isn’t quite what I wanted to do. I wanted to use an input action that I’ve already created in an Input Action Asset.
But, this sparked a memory from my local multiplayer video where a component made by Unity did allow the selection of input actions in the inspector. So I went digging into that old project to see what I could find.
Input Action Reference

Useful, but not what I was looking for.
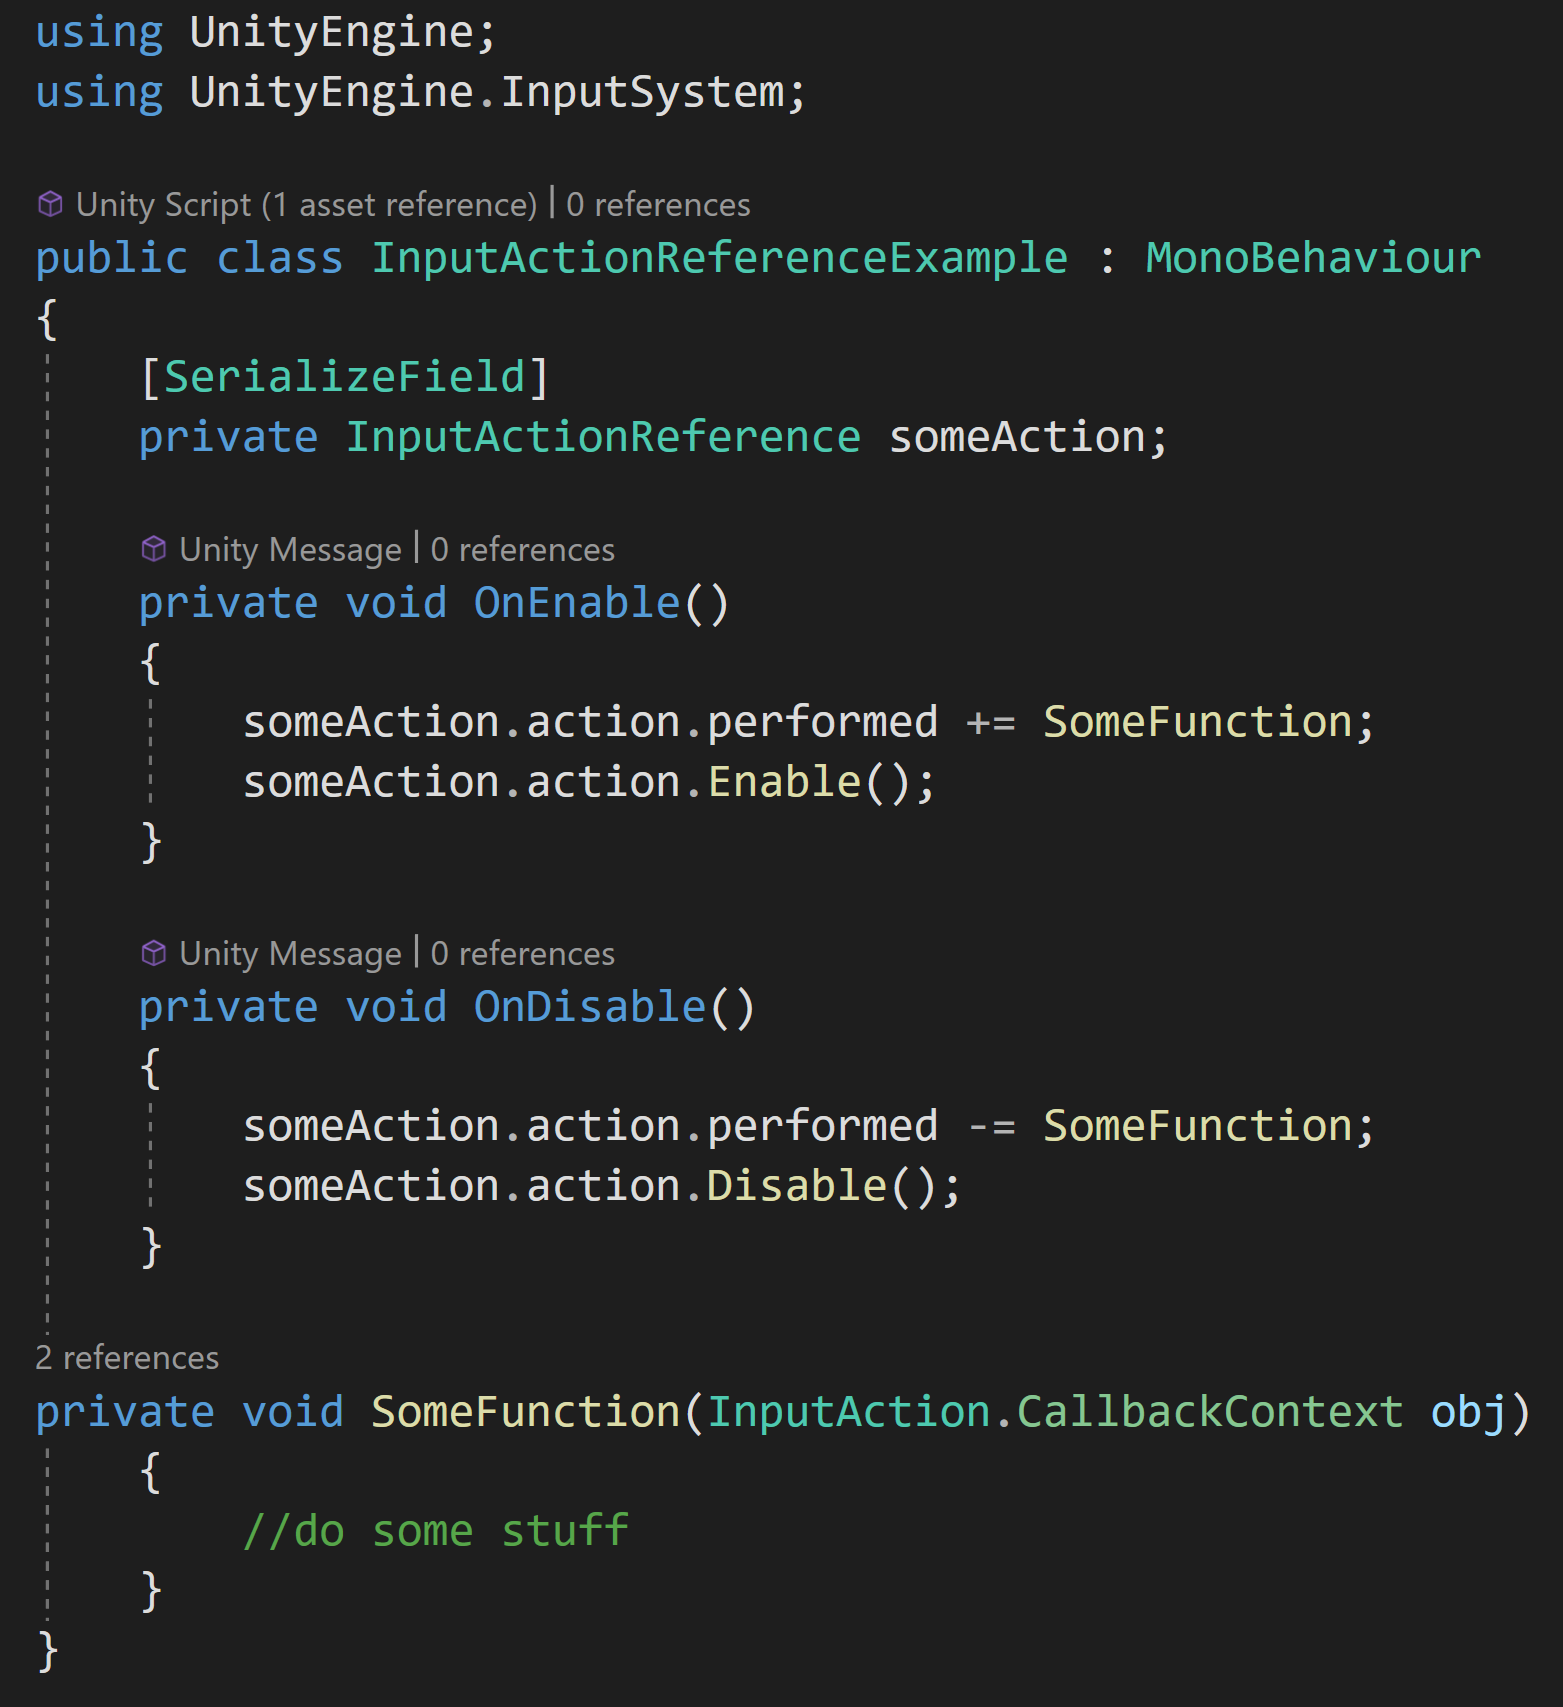
It turns out Unity has an Input Action Reference class that’s built into the new input system. And it’s about as simple as it sounds. All you need to do is create an instance in your class, then in the inspector, you’ll be able to select any of the input actions that you’ve created.
Then, assuming you are using the C# generated class, you can subscribe functions to the various events for the input action just like normal. Just don’t forget to enable the input action.
If you’re looking for more info on the new input system itself or aren’t sure how to create input actions with the input system - this blog post will give you a lot more background.
Final Thoughts

This is what I want!
It’s hard to think how this could be simpler… That said, I’m not sure how this system will work if you allow players to rebind keys. My assumption is that using the Input Action Reference instead of an Input Action will work with rebinding, but maybe not. Beyond that, this seems like one more great tool to have that easily allows extra functionality.
Tutorial Hell - Why You're There. How to Get Out.
TL;DR Your projects are over scoped and you are missing a solid skill foundation. There is no magic step. No magic course. No magic book. Build the foundation of your knowledge and finish lots of small and simple projects to build your skills.
You. Me. And everyone who’s going to read this post. Has over-scoped a project. We have big dreams and amazing ideas, but the projects never get finished. By the third, fourth, or maybe fifth failed project it starts to get pretty discouraging. I’d guess more than half of people give up within a year of watching their first tutorial and almost no one makes it to the point of releasing a complete and polished game.
This can be tormenting and dream-crushing. It’s so easy to get stuck watching one video after another. Feeling like the next one will make it all come together. While never feeling like you’re making progress or never feeling like you can truly create something on your own.
Content creators are rewarded for creating engaging content, not for their viewer’s success. Most content out there is well intended, but most of it is oversimplified and ends up selling the viewer a load of horse shit.
Quickly and easily add multiplayer!
Build an inventory system in under 10 minutes!
By glossing over the difficult bits many viewers get in over their heads thinking they are one step closer to their dream game. What feels helpful turns out to be the opposite. Most videos are about the product and not the process. Teaching a process takes time and patience, but neither of these is rewarded by the algorithms of YouTube or Udemy. The result, especially for beginners, is frustration, maybe giving up or all too often starting a search for the next tutorial.
This is tutorial hell.
It’s easy to feel stuck and I think many or even most folks eventually give up trying to make progress. So here’s my hot take on tutorial hell, why you’re there, and how to get out.
Learn More
The quick, dirty, and admittedly blunt reason you’re in tutorial hell? It’s because you don’t know enough to finish your current project. With the internet and clever thumbnails, learning looks like it would be easy. But it isn’t and good resources to learn are hard to find.
Building a solid foundation of knowledge is hard. My number one recommendation for folks who want to learn Unity is to work through the Create with Code course from Unity.
It’s 30 to 40 hours of work. It’s a real course and it’s free! If you are serious about wanting to make games with Unity this is the best starting place I have seen - hands down. You need to 100% this course. No cheating. No skipping content. If you already know the content covered by a lesson or unit, quickly read the text, skip the videos, but do the projects.
Speaking as a classroom teacher for over 15 years, the challenges are where the learning is really going to happen. This is where you will do more than listen and repeat steps. The challenges will make you think. You might even struggle. And that’s okay. Learning comes from forming new neural pathways in your brain and that’s not easy. So buckle up.
When you do finish Create with Code, I promise, you will be able to create and complete a project of your own. It won’t be an MMO, it won’t be the next mobile hit and it certainly won’t be the next hot e-sports title. But it’ll be YOUR game. And you’ll be fucking proud of it.
Your Project Is Too Big
If you’ve finished Create with Code (or have all the skills from that course) and you’re still finding yourself stuck, then the likely culprit is your projects. It’s not you. It’s not the way you think. It’s your projects. They’re too big and too complex. Getting started with a project is “easier than you think” but finishing those projects is so much harder.
Everyone has a graveyard of incomplete projects. Ideas that lived for a few hours or maybe a few months. And that’s fine. Perfectly normal. Frankly, it’s part of the journey. But I see tutorial hell as the result of biting off too much. Trying to build your dream game too early. Or not having the skills or the team to build that dream game.
But! This doesn’t mean you are giving up on that dream project.
So here’s my advice. Pick ONE mechanic. Running, jumping, shooting, or maybe just clicking. Or be more creative. It doesn’t really matter. Make a game around that singular mechanic and give yourself one month to finish the game. That’s it. No spending money. No 3rd party assets. Use free art if you want, but nothing else that isn’t built into the game engine and of your own creation. And no HDRP or stupid shit like that. Basic. Game.
At the end of the month if your game isn’t done. You designed too big of a game. Regardless you’ve learned something. So you’re done. Close the project. Basta cosi.
Pick a new mechanic. If your scope was wrong last month then adjust. But still no spending money. Zero. If you finished your last project, this time you are going to add more polish. More particles, more SFX, and more overall juice. You still have a month. No more. No less.
This process takes discipline. This is the actual hard part. If you find yourself wanting to add more mechanics and features. Tell yourself to fuck off and get back to work. If you find yourself getting bored, try designing even smaller games and give yourself two weeks or maybe just one week, but you must finish those smaller projects.
The goal is not to make good games. Or fun games. The goal is to learn to finish a game.
Design. Build. Reflect. Repeat. With each new project pick a new mechanic to explore and add to your knowledge base.
As a rough rule of thumb, you should know how to do at least 80% of each new project WITHOUT help or tutorials. That’s not to say you can’t look up documentation or get a quick refresher, but the goal of quick short projects is to learn and build your knowledge not add to your YouTube view history. If there’s too much that you don’t know how to do, then redesign a smaller project.
Finish 3, 4, or maybe 5 small month-long projects and you’ll be surprised at what you now know how to do. This will be easier for some and some will learn faster than others. But everyone will learn. Everyone will get better.
You’re Out
Easier said than done? Absolutely. But it is this simple and that hard. There is no magic trick. No magic tutorial series. No magic book. Build the foundation of your knowledge and build lots of small and simple projects to build your skills.
If you do? You’ll have found your way out of tutorial hell.
You’ve made it further than most! But you’ve still only started.
Moving forward you start designing slightly bigger games. Games that might combine more than one mechanic. Maybe this is the time to buy books, or maybe pay for a course or two. Or maybe this is the time to start learning to make fun games rather than bigger games. But stick to the rule of thumb - know how to build 80% of your next project before you start.
Older Posts
-
January 2026
- Jan 27, 2026 Save and Load Framework Jan 27, 2026
-
April 2024
- Apr 10, 2024 Ready for Steam Next Fest? - Polishing a Steam Page Apr 10, 2024
- Apr 1, 2024 Splitting Vertices - Hard Edges for Low Poly Procedural Generation Apr 1, 2024
-
November 2023
- Nov 18, 2023 Minute 5 to Minute 10 - Completing the Game Loop Nov 18, 2023
-
September 2023
- Sep 13, 2023 Visual Debugging with Gizmos Sep 13, 2023
-
July 2023
- Jul 4, 2023 Easy Mode - Unity's New Input System Jul 4, 2023
-
May 2023
- May 19, 2023 Level Builder - From Pixels to Playable Level May 19, 2023
-
April 2023
- Apr 11, 2023 Input Action in the Inspector - New Input System Apr 11, 2023
-
February 2023
- Feb 26, 2023 Tutorial Hell - Why You're There. How to Get Out. Feb 26, 2023
-
December 2022
- Dec 31, 2022 Upgrade System (Stats Part 2) Dec 31, 2022
-
November 2022
- Nov 10, 2022 Stats in Unity - The Way I Do it Nov 10, 2022
- Nov 5, 2022 State of UI in Unity - UI Toolkit Nov 5, 2022
-
August 2022
- Aug 17, 2022 Knowing When A Coroutine Finishes Aug 17, 2022
-
April 2022
- Apr 23, 2022 Unity Input Event Handlers - Or Adding Juice the Easy Way Apr 23, 2022
-
March 2022
- Mar 15, 2022 *Quitting a Job I Love Mar 15, 2022
-
February 2022
- Feb 8, 2022 Split Screen: New Input System & Cinemachine Feb 8, 2022
-
January 2022
- Jan 24, 2022 (Better) Object Pooling Jan 24, 2022
- Jan 19, 2022 Designing a New Game - My Process Jan 19, 2022
- Jan 16, 2022 Strategy Game Camera: Unity's New Input System Jan 16, 2022
-
December 2021
- Dec 16, 2021 Raycasting - It's mighty useful Dec 16, 2021
-
November 2021
- Nov 22, 2021 Cinemachine. If you’re not. You should. Nov 22, 2021
-
August 2021
- Aug 3, 2021 C# Extension Methods Aug 3, 2021
-
June 2021
- Jun 27, 2021 Changing Action Maps with Unity's "New" Input System Jun 27, 2021
-
May 2021
- May 28, 2021 Unity's New Input System May 28, 2021
- May 8, 2021 Bolt vs. C# - Thoughts with a dash of rant May 8, 2021
-
March 2021
- Mar 10, 2021 Coroutines - Unity & C# Mar 10, 2021
-
January 2021
- Jan 14, 2021 Where's My Lunch? - January Devlog Update Jan 14, 2021
-
December 2020
- Dec 27, 2020 C# Generics and Unity Dec 27, 2020
- Dec 7, 2020 Steam Workshop with Unity and Facepunch Steamworks Dec 7, 2020
-
November 2020
- Nov 27, 2020 Simple Level Save and Load System (Unity Editor) Nov 27, 2020
- Nov 9, 2020 Command Pattern - Encapsulation, Undo and Redo Nov 9, 2020
-
October 2020
- Oct 28, 2020 GJTS - Adding Steamworks API and Uploading Oct 28, 2020
- Oct 9, 2020 Game Jam... Now What? Oct 9, 2020
-
August 2020
- Aug 16, 2020 Strategy Pattern - Composition over Inheritance Aug 16, 2020
-
July 2020
- Jul 24, 2020 Observer Pattern - C# Events Jul 24, 2020
- Jul 15, 2020 Object Pooling Jul 15, 2020
- Jul 3, 2020 Cheat Codes with Unity and C# Jul 3, 2020
-
June 2020
- Jun 16, 2020 The State Pattern Jun 16, 2020
-
August 2019
- Aug 12, 2019 Easy UI Styles for Unity Aug 12, 2019
-
July 2019
- Jul 3, 2019 9th Grade Math to the Rescue Jul 3, 2019
-
June 2019
- Jun 12, 2019 Introducing My Next Game (Video DevLog) Jun 12, 2019
-
May 2019
- May 29, 2019 Programming Challenges May 29, 2019
-
March 2019
- Mar 2, 2019 Something New - Asking "What Can I Learn?" Mar 2, 2019
-
November 2018
- Nov 30, 2018 A Growing Channel and a New Tutorial Series Nov 30, 2018
-
October 2018
- Oct 11, 2018 Procedural Spaceship Generator Oct 11, 2018
-
July 2018
- Jul 11, 2018 Implementing SFX in Unity Jul 11, 2018
-
May 2018
- May 31, 2018 Prototyping Something New May 31, 2018
-
April 2018
- Apr 17, 2018 When to Shelve a Game Project? Apr 17, 2018
-
February 2018
- Feb 9, 2018 State of the Game - Episode 3 Feb 9, 2018
-
December 2017
- Dec 16, 2017 State of the Game - Episode 2 Dec 16, 2017
-
November 2017
- Nov 7, 2017 The Bump From A "Viral" Post Nov 7, 2017
-
October 2017
- Oct 30, 2017 NPC Job System Oct 30, 2017
-
September 2017
- Sep 1, 2017 Resources and Resource Systems Sep 1, 2017
-
August 2017
- Aug 3, 2017 State of the Game - Episode 1 Aug 3, 2017
-
June 2017
- Jun 20, 2017 Resources: Processing, Consumption and Inventory Jun 20, 2017
- Jun 15, 2017 Energy is Everything Jun 15, 2017
-
May 2017
- May 16, 2017 Graphing Script - It's not exciting, but it needed to be made May 16, 2017
- May 2, 2017 Tutorials: Low Poly Snow Shader May 2, 2017
-
April 2017
- Apr 28, 2017 Low Poly Snow Shader Apr 28, 2017
- Apr 21, 2017 Environmental Simulation Part 2 Apr 21, 2017
- Apr 11, 2017 Environmental Simulation Part 1 Apr 11, 2017
-
March 2017
- Mar 24, 2017 Building a Farming Game Loop and Troubles with Ground Water Mar 24, 2017
-
February 2017
- Feb 25, 2017 The Inevitable : FTF PostMortem Feb 25, 2017
-
December 2016
- Dec 7, 2016 Leaving Early Access Dec 7, 2016
-
November 2016
- Nov 28, 2016 Low Poly Renders Nov 28, 2016
- Nov 1, 2016 FTF: Testing New Features Nov 1, 2016
-
October 2016
- Oct 27, 2016 Watchtowers - Predictive Targeting Oct 27, 2016
- Oct 21, 2016 Click to Color Oct 21, 2016
- Oct 19, 2016 Unity Object Swapper Oct 19, 2016
-
September 2016
- Sep 18, 2016 Testing Single Player Combat Sep 18, 2016
-
May 2016
- May 25, 2016 Release Date and First Video Review May 25, 2016
-
March 2016
- Mar 26, 2016 Getting Greenlit on Steam Mar 26, 2016