Dev Log
C# Extension Methods
Time is one of the biggest obstacles to creating games. We spend a lot of time writing code and debugging that code. And it’s not uncommon to find ourselves writing the same code over and over which is tedious and worse it’s error-prone. The less code you have to write and the cleaner that code is the faster you can finish your game!
Extension methods can help you do just that - write less code and cleaner code with fewer bugs. Which again means you can finish your game faster.
Extension methods allow us to directly operate on an instance rather than needing to pass that instance into a method and maybe best of all we can do this with types that we don’t have access to, such as the many of the built-in types in Unity or maybe a type from an asset from the Asset Store. As the name suggests, extension methods allow us to extend and add functionality to any class or struct.

Automatic Conversion isn’t built in
As a side note, in my opinion, learning game development is all about adding tools to your toolbox and extension methods should be one of those tools. So let’s take a look at how they work and why they are better than some other solutions.
Concrete Example
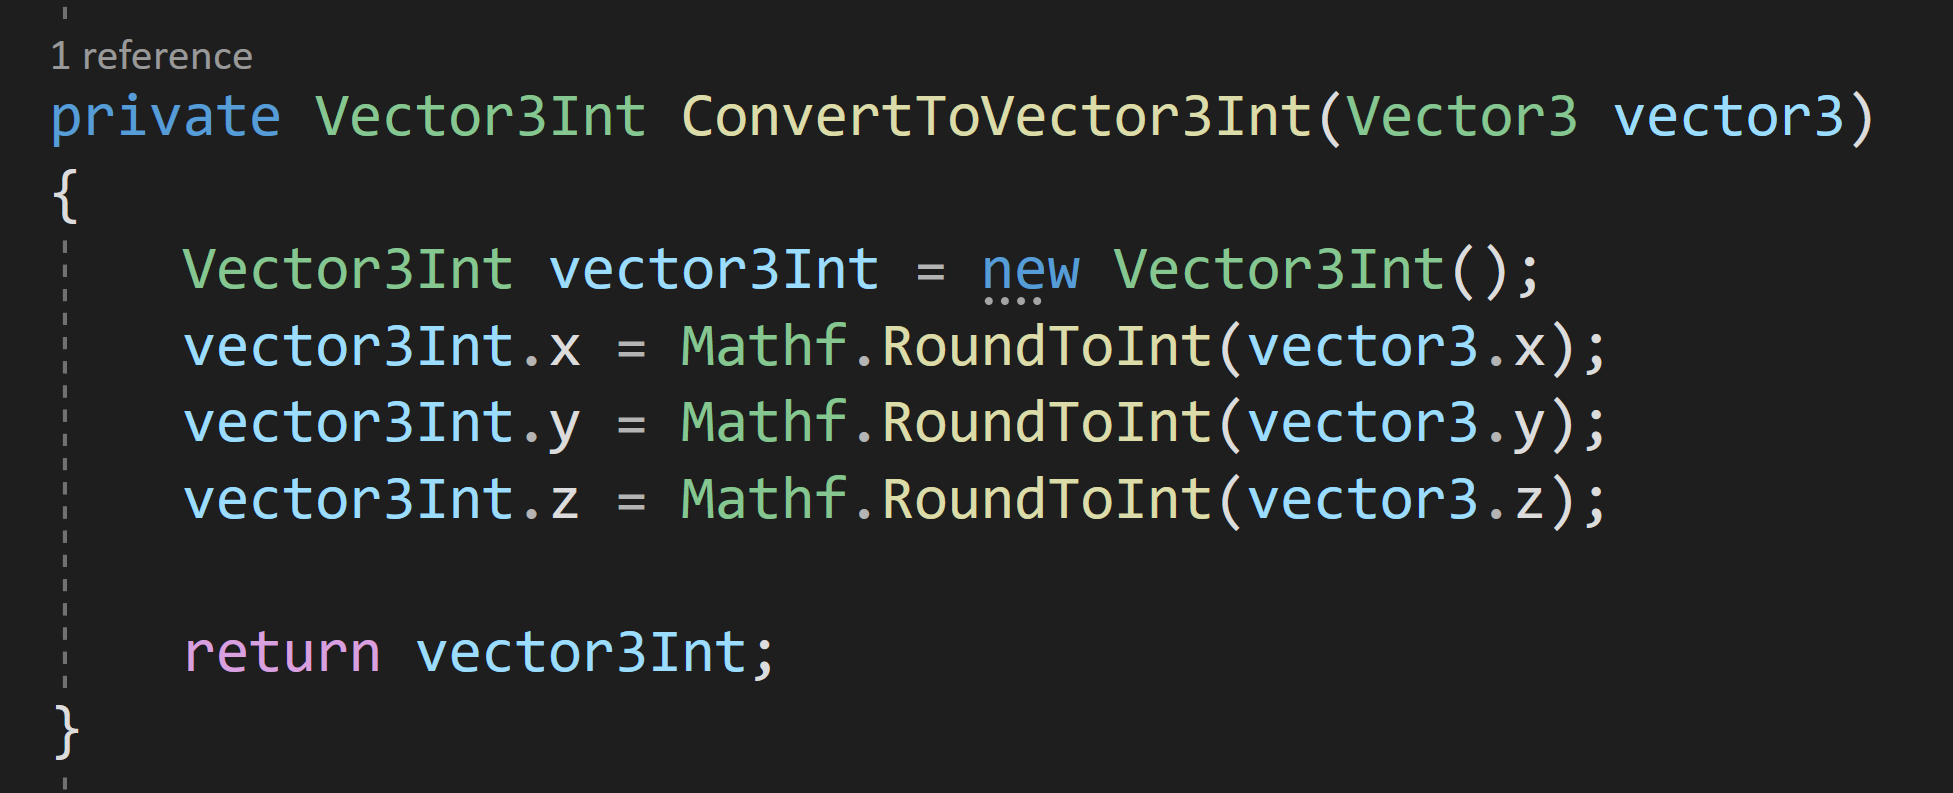
Local function to do the conversion
In a past project, I needed to arrange gameObjects on a grid. The grid lattice was 1 by 1 and set on integer values. The problem, or in reality, the pain point comes from positions in Unity being a Vector3 which is made of 3 floats, not 3 integers.
There is a type Vector3Int and I used that struct to store the position of the objects.
But!

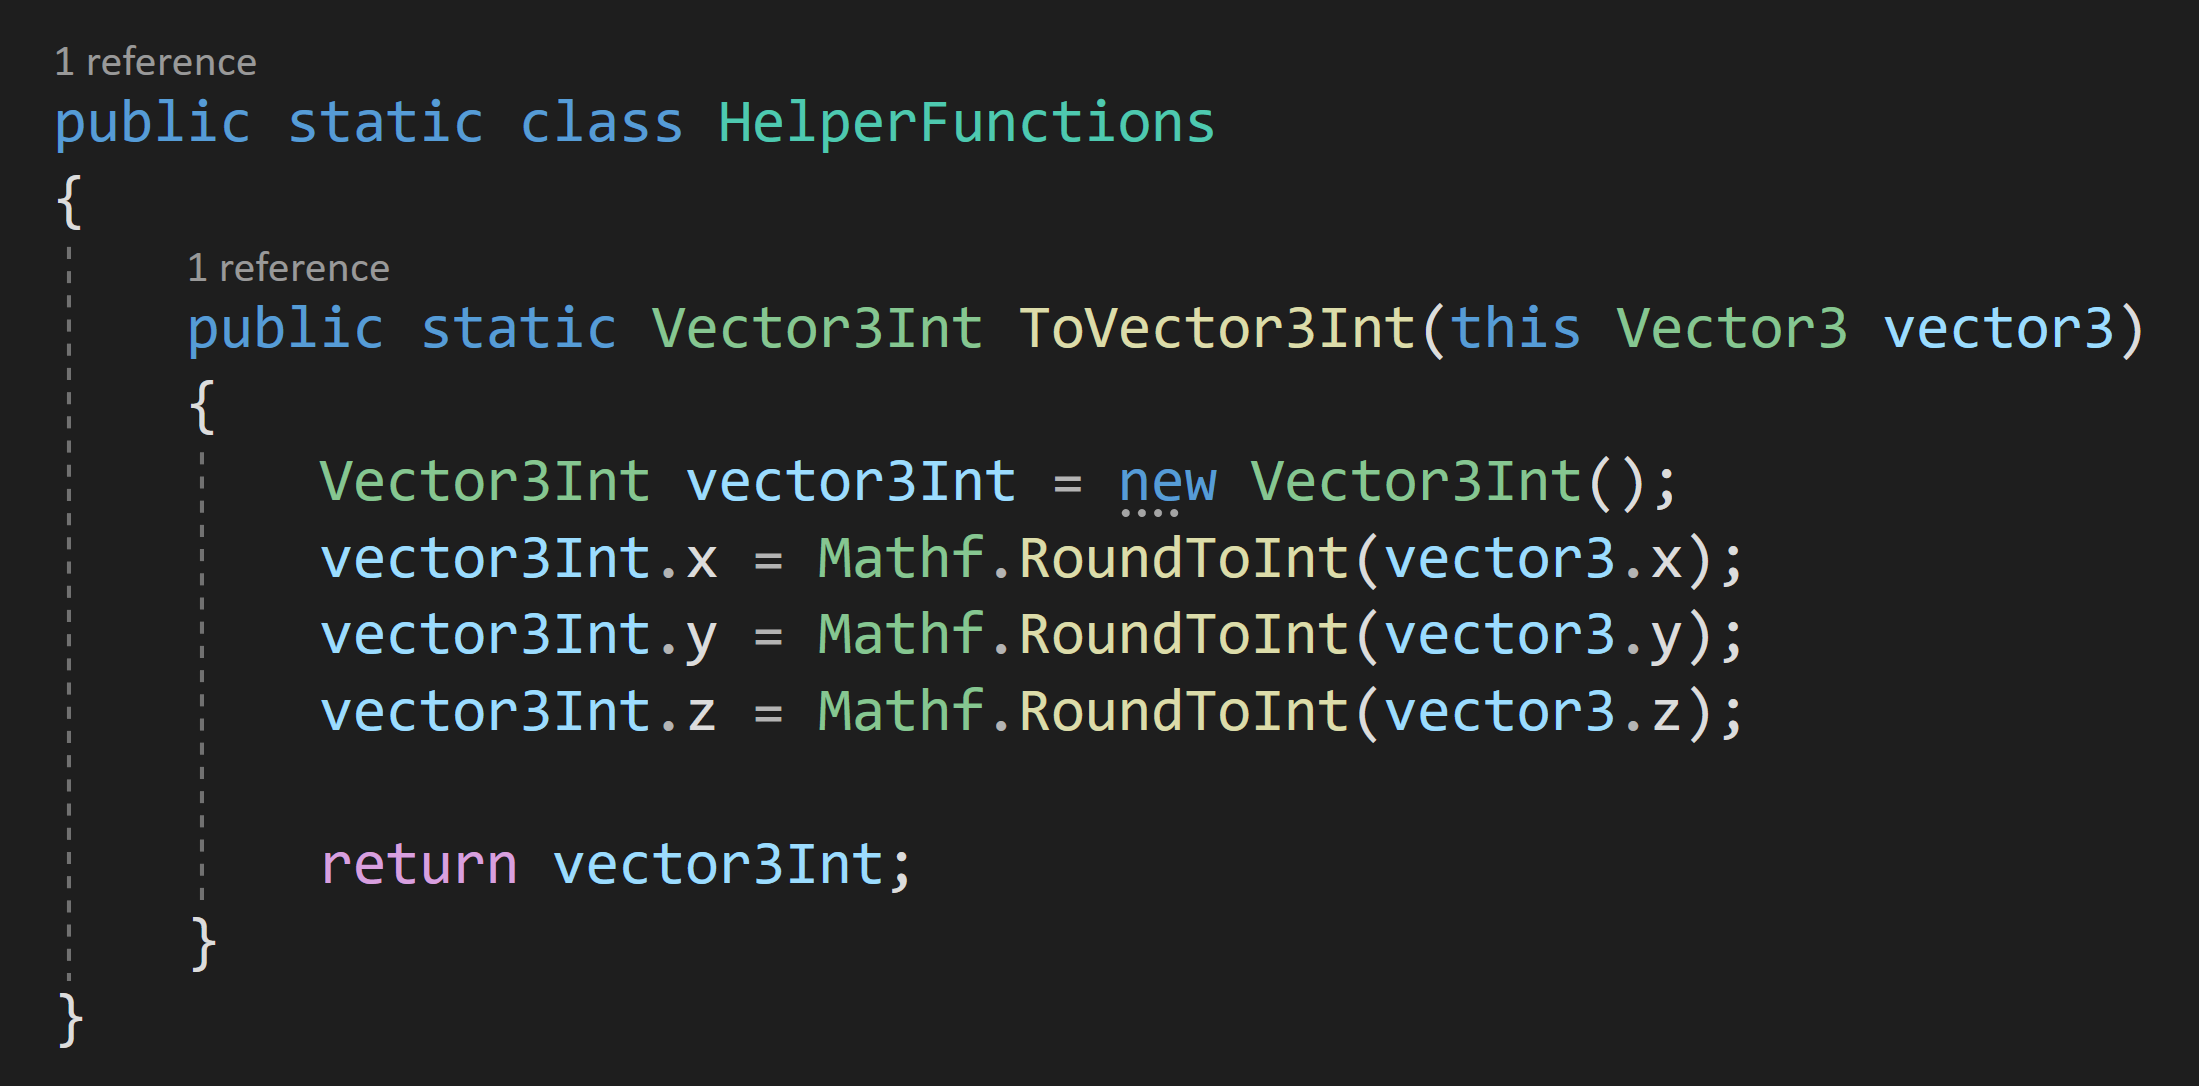
A static helper class with a static function is better, but not the best
Casting from Vector3 to Vector3Int isn’t built into Unity (the other direction is!). And sure, you could create a conversion operator, but that’s the topic of another post.

Helper Class Call
So, when faced with this inconvenience, my first thought, of course, was to write a function that takes in a Vector3, rounds each component and returns a Vector3Int. This works perfectly fine, but that method is inside a particular class which means if I need to do the conversion somewhere else I need to copy the function into that second class. This means I’m duplicating code which generally isn’t a good practice.
Extension method!!!
Ok, fine. The next step is to move the function into a static helper class. I do this type of thing all the time. It’s really helpful. But the result is more code than we need. It’s not A LOT more, but still, it’s more than we need.
If this was my own custom class or struc, I’d just add a public function that could handle the conversion, but I don’t have access to the Vector3 struct. Yet, I have some needed functionality that will be used repeatedly AND I want to type as little as possible while maintaining the readability of the code.
And this situation? This is exactly where extension functions shine!

Extension Method Call
To turn our static function into an extension method, all we need to do is add the keyword “this” to the first input parameter of the static function. And then we can call the extension method as if it was part of the struct. Pretty easy and pretty handy.
Important Notes
It’s important to note that with extension functions the type that you are extending needs to be the first input parameter in the function. Also, our static extension method needs to be inside a static class. Miss one of these steps and it won’t work correctly.
More Examples
So let’s look at some more examples of what you could do with extension methods. These of course are highly dependent on your game and what you need to do, but maybe these will spark some ideas and creativity.
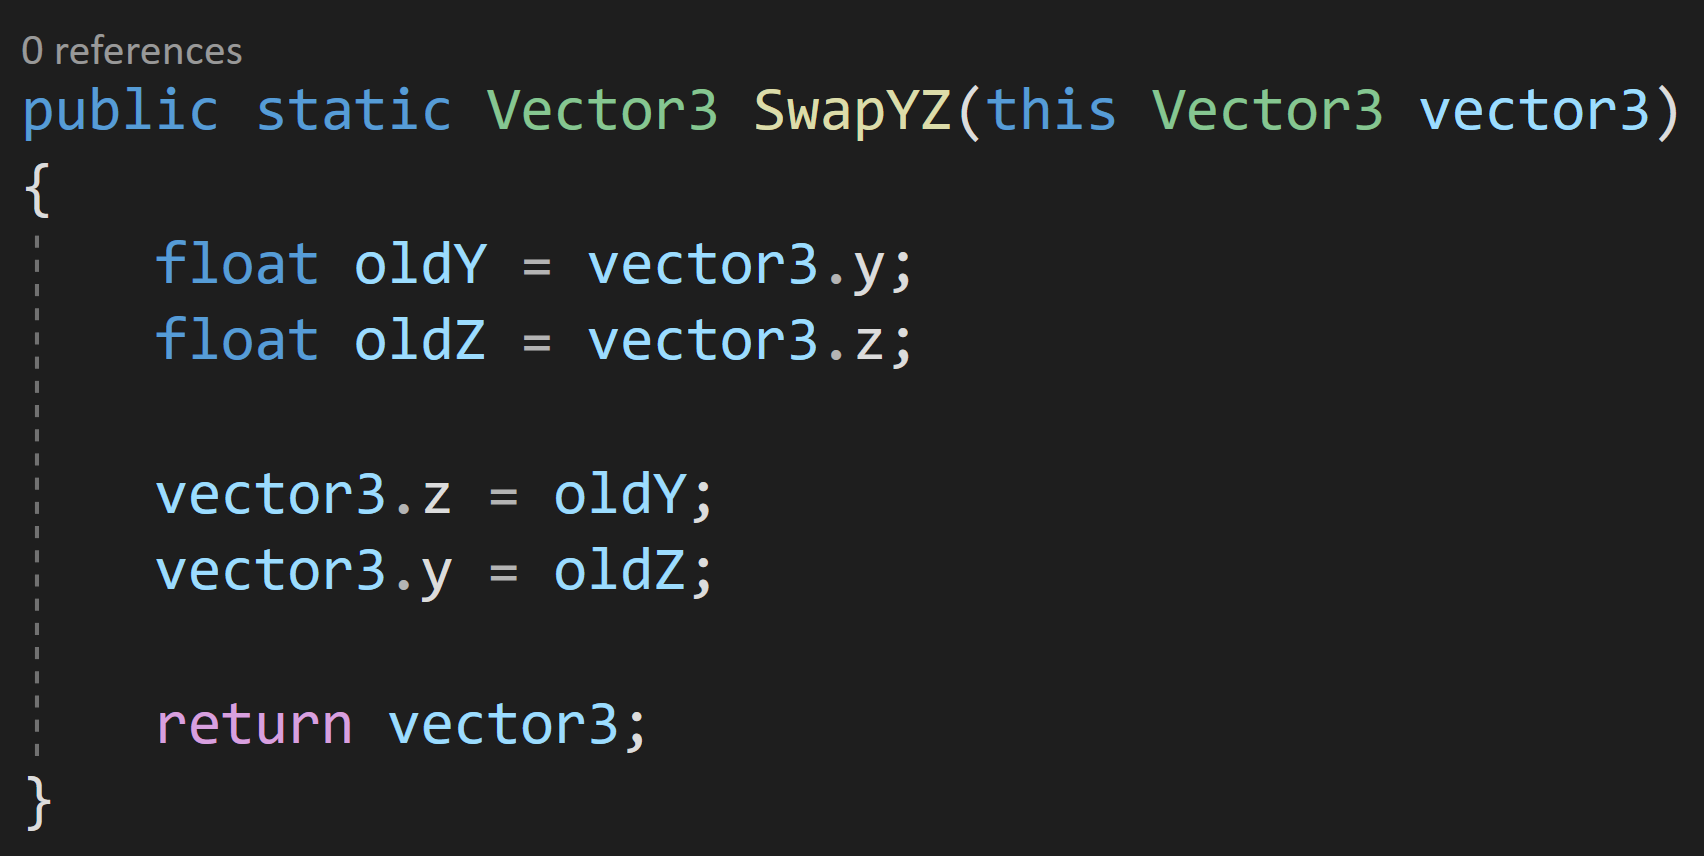
Need to swap the Y and Z values of a Vector3. No problem!

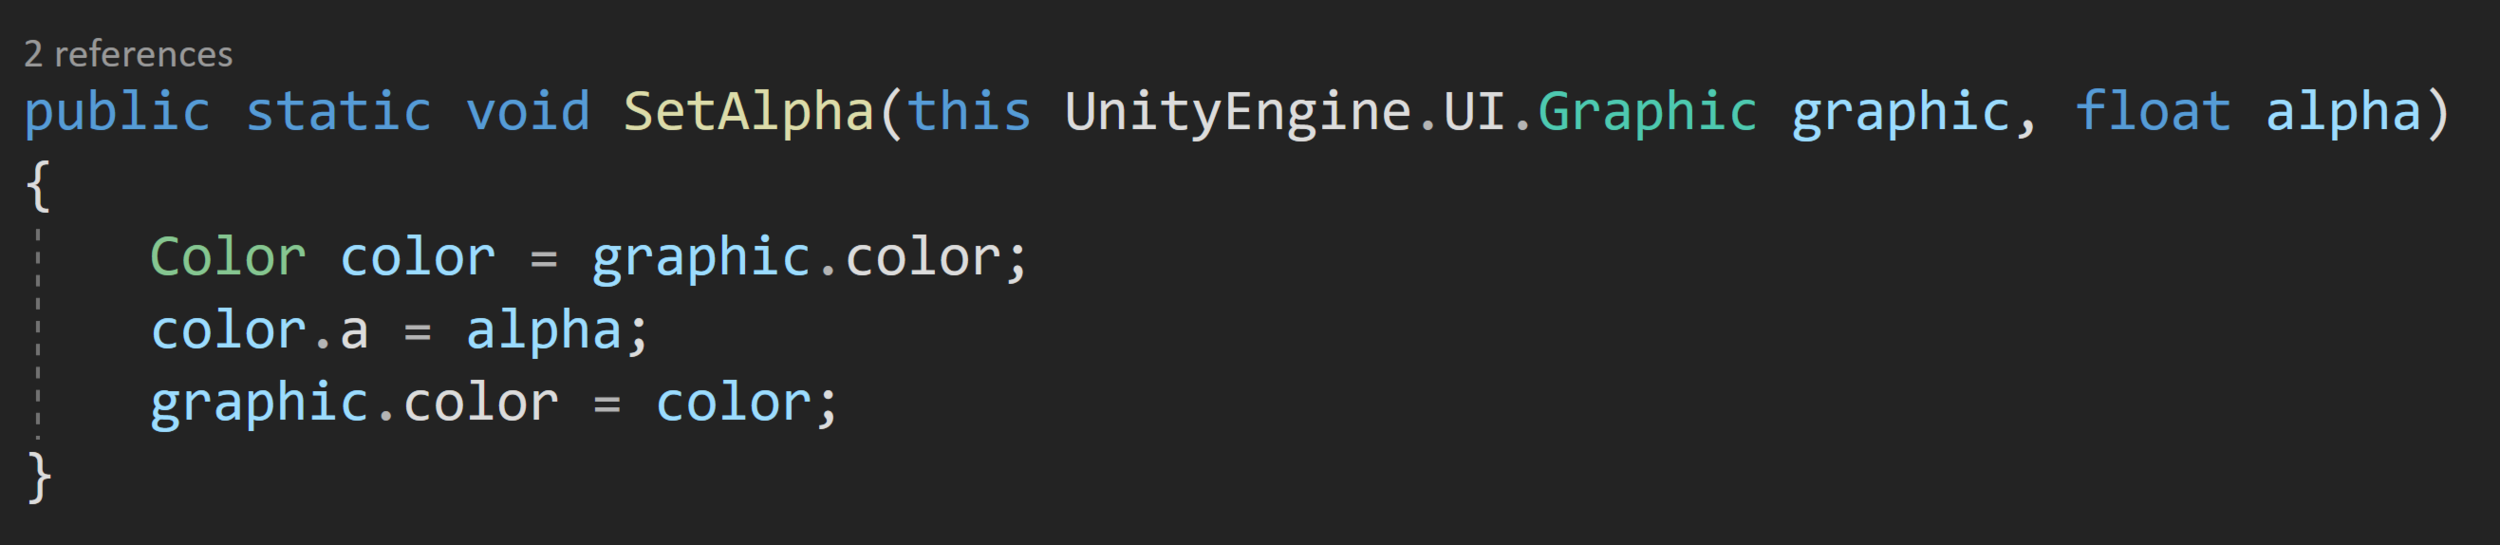
Maybe you need to set the alpha of a sprite in a sprite renderer. Yep. We can do that.
Reset a transform? Locally? Globally? Piece of cake.


Extension methods also work with inheritance. For example, most Unity UGUI components inherit from UnityEngine.UI.Graphic which contains the color information. So once again it would be easy to create an extension method to change the alpha for nearly every UGUI element.

Now taking another step down the tunnel of abstraction extension methods also work with generics. If you are scared of generics or have no idea what I’m talking about check out my earlier video on the topic.
Either way, let’s imagine you have a list and you want every other element in that list (or some other sorting). One way, and of course not the only way, to do that filtering would be with a generic extension method like so.


That’s it! They’re pretty simple and easy to use, but I’d argue they provide another tool to write simple, cleaner, and more readable code.

Changing Action Maps with Unity's "New" Input System
If you missed my first post (and video) on Unity’s new input system - go check that out. This post will build on what that post explored.
Why Switch Actions Maps?
Yes, I made a really horrible vehicle controller
Action maps define a series of actions that can be contextual.
For example, a 3rd person controller might use one action map, driving a vehicle may use another, and using the UI might use yet another.
With the new input system, it’s easy to control which set of actions (i.e. action map) is active and being used by a player. You can easily toggle off your player’s motion while navigating the UI or prevent the player from casting a spell while riding a horse…
Whatever.
You have more control and the code that gives you that control, while more abstract, is generally far cleaner than it would be with the old input system.
But First, A Problem To Fix
As mentioned in the last post, the simplest implementation of the new input system has each object create an instance of an Input Action Asset. This works great if there is only one object that is reacting to input, but if there is more than one object listening to input (UI, SFX, vehicles, etc) this gets messy. Exponentially more so if you intend on switching action maps as all those objects will need to know which action map is currently in use. Forget one object, and something strange or goofy might start happening - like shooting sound effects while driving a tractor (not that that happened to me - nope, not all).
To be honest, I’m not sure what the best solution for this is. Maybe there is some clever programming pattern - and if there is PLEASE LET ME KNOW - but for now my solution is to fall back and use an input manager.
Why? This allows a single and static instance of the Input Action Asset to be created and accessed by any other class that needs to be aware of player input.
I don’t love this dependence on a manager script, but I think it’s far tidier than trying to keep a bunch of scripts in the scene up to date. The manager stays in charge of enabling and disabling action maps. And! When a map is disabled it won’t invoke events so the scripts that are subscribed to those events will simply have nothing to respond to.
Input Manager

The input manager is pretty simple and straightforward. It has a public static instance of the Input Action Asset and an action that will get called when the action map is changed.
The real magic happens in the last function.
The ToggleActionMap function is again public and static and will be called by scripts that need to toggle the action map (duh!).
Inside the function, we first check to see if the requested action map is already enabled. If it is we don’t need to do anything. However, if it’s not active, we toggle off all action maps by calling Disable on the Input Action Asset itself. This has the same effect as calling Disable on each and every action in the action map.
Next, we invoke the Action Map Changed event. This allows things like the UI to be aware of changes and give the player a visual indication of the change. This could also be used to toggle cameras or SFX depending on the action map activated. This step is optional, but I think will generally prove to be pretty useful.
The final step is to enable the desired action map. And that’s it. We now have the ability to change action maps! Say what you will about the new input system, but that’s mighty clean!
Examples of Implementation
For my use case, the player can change between a normal 3rd person controller and driving a very janky tractor (the jank is in my control code, not the tractor itself). The change to controlling the tractor happens when the player walks near the tractor and enters a trigger surrounding the tractor. The player can then “exit” the tractor by pressing the escape key or the “north” button on a gamepad.
You can see the player and tractor actions maps.
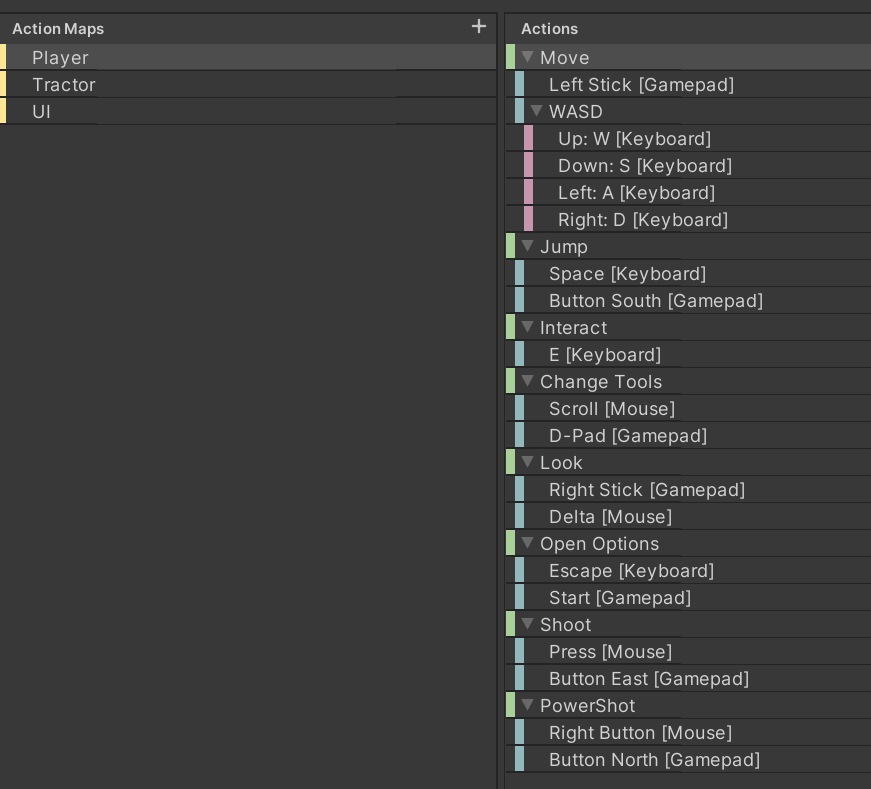
3rd Person “Player” Action Map

Tractor Action Map

Then in the tractor controller class, there are a handful of movement-related variables, but most important is the Input Action variable that will hold a reference to the movement action that is on the tractor action. We get a reference to this Input Action in the OnEnable function by referencing the static instance of the Input Action Asset in the Input Manager class then going through the tractor action map and lastly to the movement action itself.
Also in the OnEnable, we subscribe the ExitTractor function to the “Exit” action. This allows the player to press a button and switch back to the 3rd person controller.
In the OnDisable function, we unsubscribe to prevent any redundancy of calls or errors in the case of the object being turned off or destroyed.
The Exit Tractor function then calls the public static ToggleActionMap function on the Input Manager to change the active action map to the player action map.
Likewise, in the OnTriggerEnter function, the ToggleActionMap is called to activate the tractor action map.
It’s actually pretty simple. Of course, the exact implementation of how and when action maps are changed depends on your game.
Final Thoughts
I don’t love that any class in the game can switch the active action map, but I’m honestly not sure how to get around. The input manager could easily have some filters in the Toggle Action Map function, but that will absolutely depend on the implementation and needs of your game. Or you might be able to come up with some wrapper class that wraps the Input Action Asset and only gives access to the features (likely just the events) that you want to have widely available.
Also, this approach doesn’t directly work for having multiple players since there is only one instance of the Input Action Asset. There would need to be some additional cleverness and that… that I’ll save for another tutorial (maybe).

Unity's New Input System
Version 1.0.2 of the input system was used along with Unity 2020.3
Warning! If you are looking for a quick 5-minute explanation of Unity’s new input system - this isn’t going to be it - and you aren’t going to find one! The new system is more complex than the old system. Especially when it comes to simple things like knowing when the spacebar has been released.
I’m going to do my best to be concise and get folks up and running, but it will take some effort on your part! You will likely need to dive into the admittedly opaque Unity documentation if you have a special use case. It’s just the way it is. Input is a complex topic and Unity has put together a system that can nicely handle that complexity.
So Why Use Unity’s New Input System?
Using Unity’s “NEW” Input system to move, jump, rotate the camera, play SFX, shoot and charge up a power Shot
I’ve got three reasons. Three reasons I’ve stolen, but they are good reasons to use the new Input System.
If you want players to be able to use multiple devices OR you are developing for multiple platforms the new system makes it very very easy to do so. Frankly, I was shocked how easily I could add a gamepad and easily switch back and forth between it and a keyboard.
It’s Event-Based! When an action is started, completed (performed), or canceled an event can be called. While you will still need to “poll” values every frame for things like player or camera motion, button presses for other bits such as jumping or shooting no longer need to clog an update function! While this adds some perceived complexity - especially if you don’t feel comfortable with events - but it is an awesome feature.
Input debug system! Unity provides an input debugger so you can see the exact values, in real-time, of your system’s input. This makes it so much easier to see if a device is recognized and functioning properly. AND! In the case that you do need to do some polling of an input value (think similar to the old system in an update function), it’s much easier to see what buttons are being pressed and what those input values look like.
So yeah! Those are pretty fantastic reasons. The new input system does take some time and patience to learn - doubly so if you are used to the old system, but hopefully, you’ll agree the effort is worth it.
Setting It Up

To get started, you’ll need Unity version 2019.1 or newer and the system is added via the package manager. When importing the system you will likely get a popup with a warning to change a setting. This setting is all about which system Unity will use to get input data from. You can make further changes in Project Settings > Player > Active Input Handling. From there, you can choose to use either the new system, the old system, or both.

If you can’t get the new system to function, this setting would be worth checking.
Next, we need to create a new “Input Actions” asset. This is done like any other asset, by right-clicking in a project folder or using the asset menu. Make sure to give the asset a good name as you’ll be using this name quite often.
With the asset created you can select it and then in the inspector press “edit asset.” This will open a window specific to THIS input action asset.
So if you have more than one input action asset, you will need to open additional windows - there is no way to toggle this window to another asset. Personally, I found this a bit confusing when first getting started as it feels different than other Unity windows and functionality.
Inside the Input Action Window
This is where all the setup happens and there’s a lot going on! There are way more options in this window than could possibly be covered in this video or even several more videos. But! The basics aren’t too complex and I’m going to try and look at some of the more common use cases.

Input Action Asset Window - Including added Actions for Movement and JUmp
On the left, you’ll see a column for “Action Maps.” These are essentially a set of inputs that can be grouped together. Each Input Action asset can have multiple action maps. This can be useful for different control schemes for example if your player can hop in a car or maybe on a horse and the controls will be different. This can also be used for UI controls - so that when a menu is opened the player object stops responding and the controls for a gamepad now navigate through a menu.
To be honest, I haven’t yet figured out a nice clean way to swap action maps but it might be the topic of a future post/video so let me know (comment below) if you are interested in seeing that.
To create a new action map simply press the plus at the top right of the column and give the action map a good name. I’ve called mine “Player.”
The middle column is where our actions get defined. These are not the buttons or keys that will be pressed - those are the bindings - but these are the larger actions that we want the player to be able to do such as move, jump, or shoot.
To get started I’m going to create two actions one for movement and one for jumping.
Each action has an “action type” and a “control type” - you can see these to the right in the image above. These options can easily feel ambiguous or even meaningless as they can seemly have little to no impact on how your game plays - but when you want to really dial in the controls they can be very useful

Actions types come in three flavors value, button and passthrough. The main difference between these three is when they call events and which events get called.
Link: Unity Action Type Documentation
Value Action
The Value action type will call events whenever a value is changed and it will call the events started, performed, and canceled (more on these events later).
The “started” event will get called when the control moves away from the default value - for example, if a gamepad stick moves away from (0,0).
The “performed” event will then get called each time the value changes.
The “canceled” event will get called when the control moves back to the default value - i.e. the gamepad stick going back to (0,0).
This would seem like a good choice for movement. However, the events are only called when the values change, so it won’t get called if the player holds down the W key or keeps the gamepad stick in the same position. That’s not to say it’s not useful, but there are potentially other problems that need to be solved for creating player motion if this action type is used.
Button Action
The button action type will call events based on the state of the button and the interactions assigned to the action itself. The interactions, which we will get to, will define when the performed and canceled events are called. In the end, the Button action type is what you want when events should be called when a button is pressed, released, or held. So far in my experience, this covers the majority of my use cases and is what I’ll be using throughout this tutorial.
PassThrough
The PassThrough action type is very similar to the value action type. It will call the performed event any time the control changes value. BUT! It will not call started or canceled.
The passthrough action also does not do what Unity calls disambiguation - meaning that if two controls are assigned Unity won’t be smart and try to figure out which one to use. If this sounds like something you might need to know about, check out the Unity documentation.
If your head is starting to spin and your getting lost in the details. That’s fair. This system is far more powerful than the old system, but as a trade-off, there are way more bits and pieces to it.
Interactions

Interaction Types
I’m not going to go too deep into the weeds on interactions, but this is where we can refine the behavior a bit more. This is where we can control when the events get invoked. We have options to hold, press (which includes release options), tap, slow tap, and multi-tap. All of these interactions were possible with the old system, but in some cases, they were a bit challenging to realize.
For the most part, I found that interactions are fairly self-explanatory with some potentially confusing nuance between tap and slow tap. The documentation while a bit long does a great job of clarifying some of that nuance.
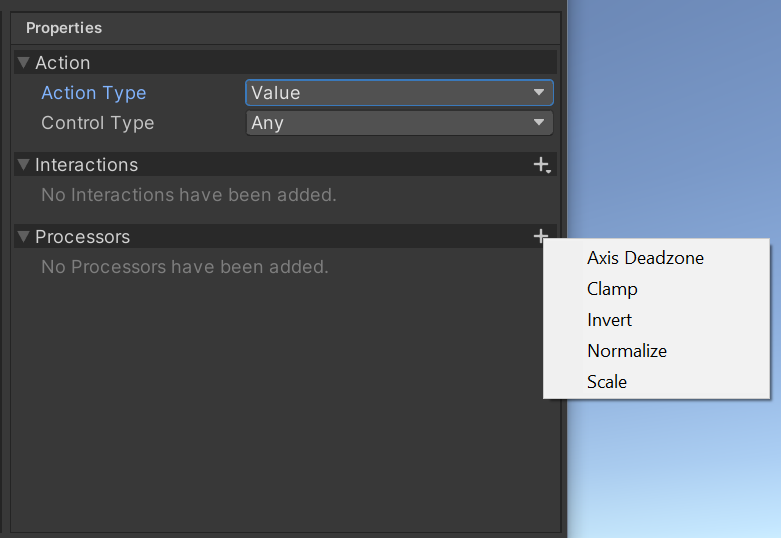
Processor Types
Processors
Sometimes you need or want to make some adjustments to the input values such as scaling or normalizing vectors. Essentially processors allow you to do some math with the input values before events are called and values are sent out. These aren’t terribly complex and are going to be very use case specific.
Link: Unity Documentation on Processors
Adding Bindings
Still with me? Now that we have our actions set up we need to add bindings - these are the actual inputs from the player! Think key presses or gamepad stick movements. I’m going to create bindings for both the keyboard and a gamepad for all the controls. This is a tiny bit more work, but once we get to the code, the inputs will be handled the same which is really powerful!
Movement
The first binding will be for the keyboard to use the WASD keys for movement. We need to add a 2D Vector Composite. To find this option you’ll need to right-click on the movement action. This will automatically add in four new bindings for the four directions.
Composite bindings essentially allow us to combine multiple inputs to mimic a different input device, i.e. using the WASD in the same way as a gamepad stick. You may notice that there is a mode option, but for our use case either digital option will work.
Notice also, that interactions and processors can be assigned to individual bindings allowing more customization! These interaction and processors work the same for bindings as for actions.
Link: Composite Mode Documentation (scroll down just a bit)

Add 2D vector Composite Binding by right Clicking on the Movement Action
With the WASD binding created we then need to assign keys or the input path. We can do this by clicking on what looks like a dropdown next to “path.” If this dropdown is not present click the T button which toggles between the dropdown and typing.
Then you can select the correct key from the list. OR! Press the listen button and then press the button you want for the binding. It couldn’t be much easier.

Add bindings by search or using the “Listen" functionality
The second binding will be for the gamepad. You can simply click on the plus for the movement action and choose “Add Binding.” Selecting this binding you will see options to the right. Once again you can use the “listen” option and move the gamepad stick, but it only allows one direction on the stick. Maybe there’s a way around this but I haven’t found it! So select any direction and we’ll edit the path manually to take in all values from the stick.
Once you have a path, click the T button to manually edit the path. From there we’ll remove the direction-specific part. In my case this will look like <Gamepad>/leftStick with this done you can click the T button again and the path should be just the left stick.
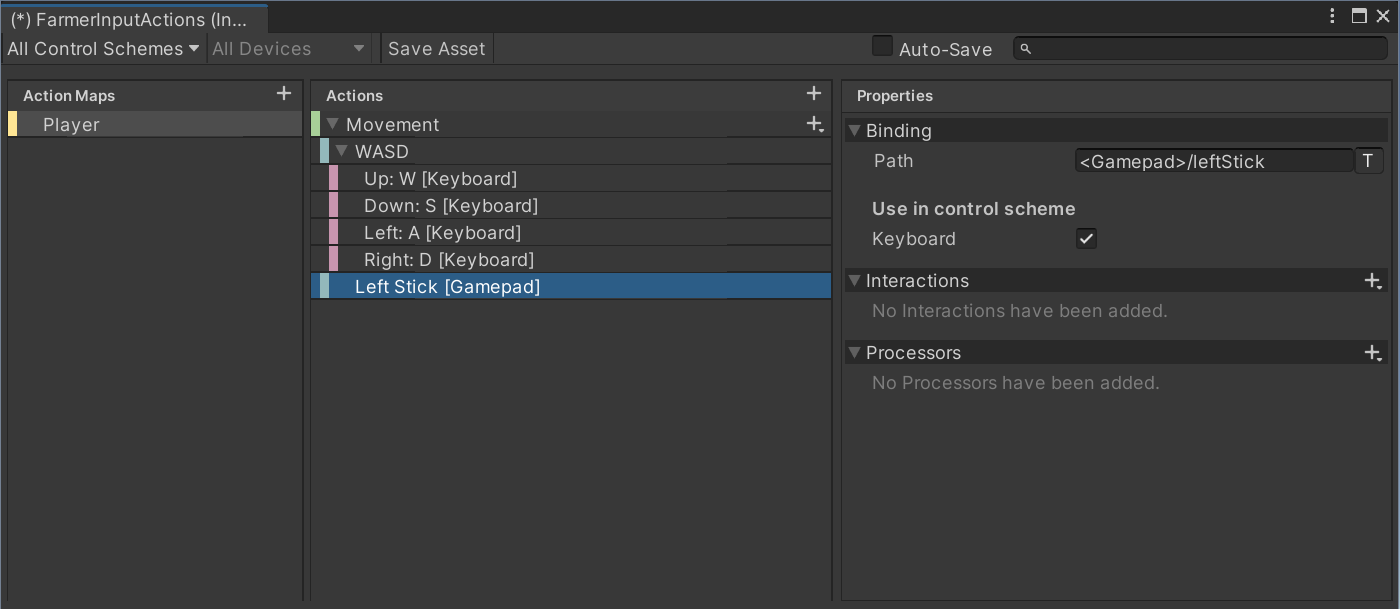
Adding the Left Stick Binding
Jump
I’ll repeat the process of adding bindings for the jump action. Adding in a binding for the spacebar and the “south” button on my gamepad. Unity has been pretty clever here with the gamepad buttons. Rather than give control specific names they have cardinal directions so that the “south” button will work regardless of whether it is an Xbox or Playstation controller.
Now that we have the basic actions and binding implemented. We’re almost ready to get into the code. But first! We need to make sure the asset is saved. At the top right there is a save asset button. This has caught me out a few times, make sure you press it to save changes.
There is also an auto-save feature, which is great until you generate C# code (which will talk about in a minute). In that case, the autosave tends to make the interface laggy and a bit harder to use.
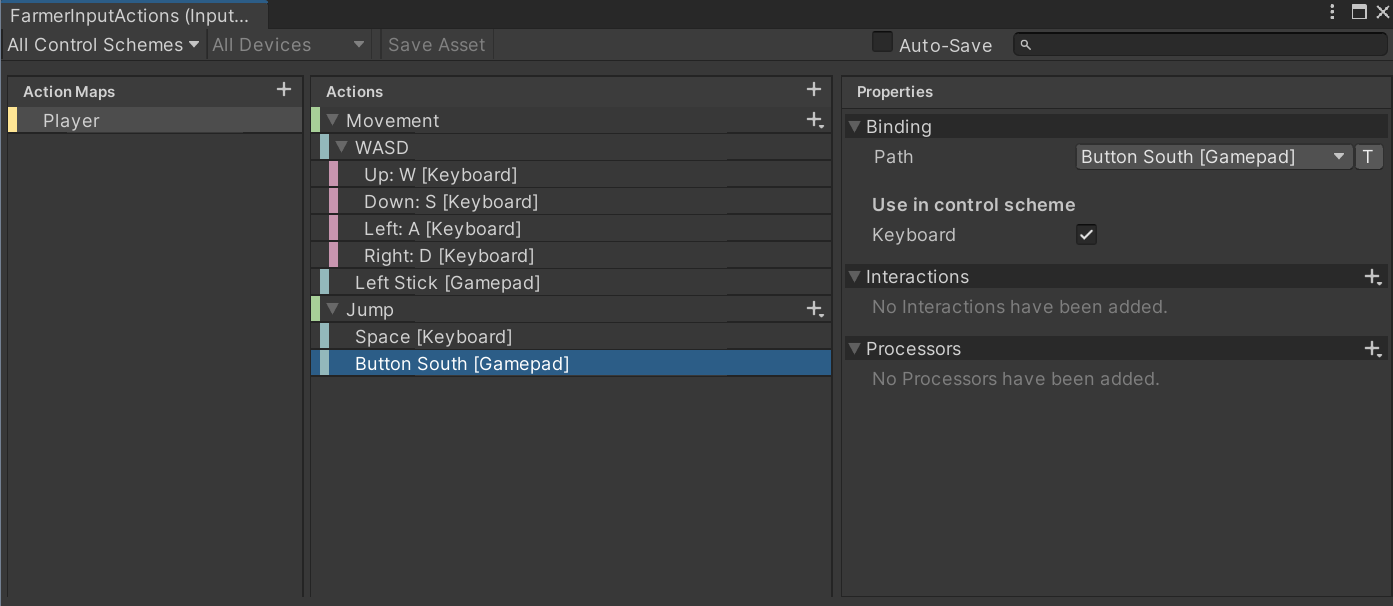
Adding the Jump Binding
Implementation
There is a default player controller that comes with the input system. It has its place, but in my opinion, if you’ve come this far it’s worth digging deeper and learning how to use the input system with your own code. It’s also important to know that the input system can communicate by broadcasting messages, drag and drop Unity Events, or my preferred method C# events.
Video Tutorial: Events, Delegates, and Actions!!!
If you aren’t familiar with events, check out my earlier tutorial. Events aren’t easy to wrap your head around at first but are hugely powerful and frankly are at the core of implementing the new input system.
To get access to the C# events we first need to generate a C# code for the actions we just created.
Thankfully, Unity will do that work for us!
In the project folders, select the Input Action Asset that we created at the beginning. In the inspector, you should see a toggle labeled “Generate C# Class”. Toggle this on and press “apply.”
This should create a new C# script in the same location as the input action asset and with the same name - unless you changed the default settings. You can open it up, but there’s no need to edit it or do any work on it so I’m just going to leave it be.
Custom Class
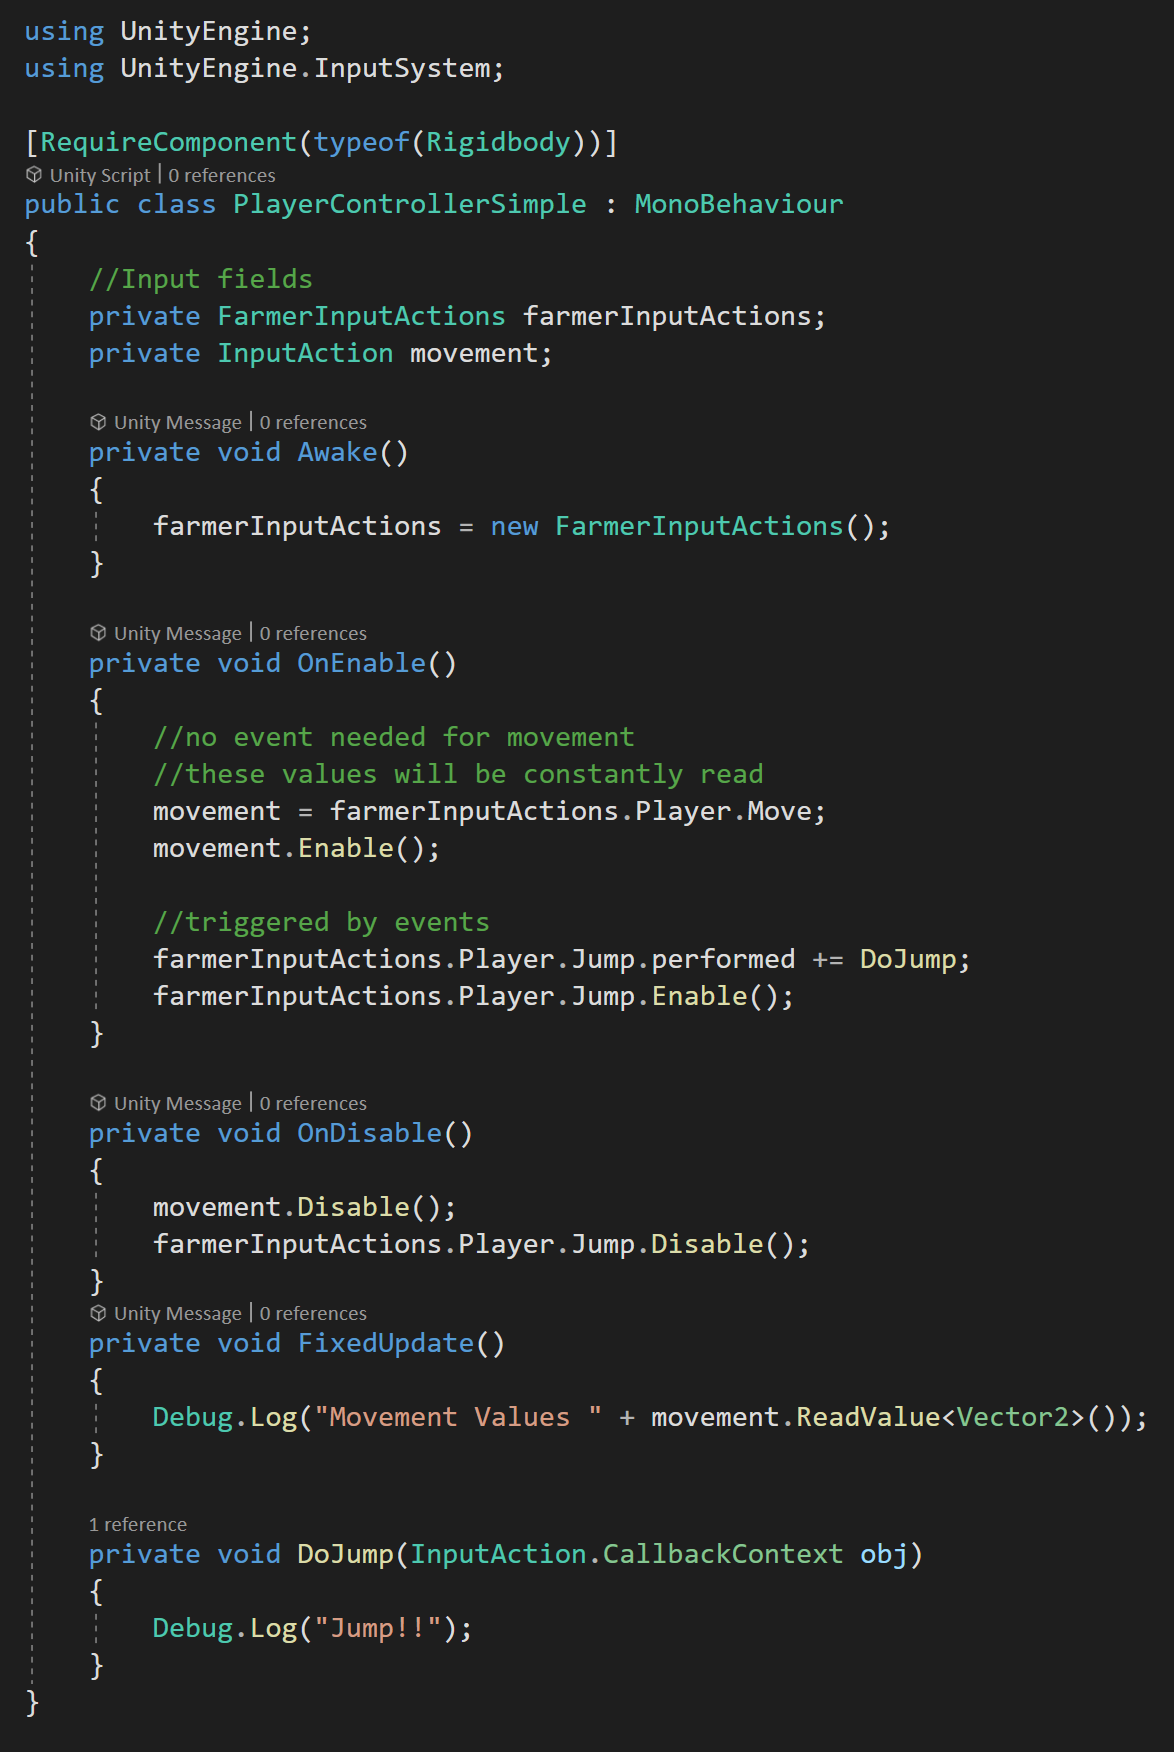
The “Simplest” Implementation of a the New Input System for Player Controller
Next, we’ll need a custom player controller class.
This class will need access to the namespace UnityEngine.InputSystem.
Then we’ll need two new variables. The first is of the type of our newly created Input Action Asset, in my case this is “Farmer Input Actions.” And the second is of type Input Action and will hold a reference to our movement input action.
You can create a variable for each input action and cache a reference to it - I’ve seen many videos choose to do it this way. I have chosen not to do this with most of the input actions to keep the code compact for the purposes of this tutorial - it’s up to you.
Also, for most event trigger actions you don’t need to reference the input action outside of the OnEnable and OnDisable functions. Which for me lessens the need for a cached reference.
Before we start working with the input actions and events. We need to create a new instance of the Input Action Asset.
I’ve chosen to do this in the Awake function. The fact that this player controller class will have its own instance is important! The Input Action Asset is not static or global!
With the instance created, we need to wire up the events and enable the input actions and this is best done in the OnEnable function.
For the movement input action, I’ll cache a reference and you can see that this is accessed through the instance of the Input Action Asset, then the Player action map, and finally the movement action itself. I am choosing to cache this reference because we will need access to it in the fixed update function.
With the reference cached, we need to enable the input action with the “Enable” function. Do note that there is an "enabled” property that is not the same as the “Enable” function. If you forget to call this function, the input action will not work. Like a few other steps, this one caught me out a few times too.
The steps for the jump input action are similar, but in this case, I won’t be caching a reference. Instead, I will be subscribing a function to the performed event on the jump input action. This subscribed function will get called each time the jump key or button is pressed.
There is NO need to constantly check whether the jump button is pressed in an update function! This is one of the great improvements and advantages of the new system. Cleaner code albeit at the cost of a bit more complexity.
To create the jump function you can do it manually, or in Visual Studio, you can right-click and choose “Quick Actions and Refactoring” and then choose “Generate Method.” This will ensure that the input parameter is of the correct type. Then inside the function, we can simply add a debug message to be able to test it.
The next step to the setup is to disable both the movement and jump input actions. This should be done in the OnDisable function. This may not be 100% needed but ensures that the events won’t get called and thus throw errors if the object is disabled. Also note, that I did not unsubscribe. While in most cases this won’t be a problem or throw an error, but if the object is turned on and off the jump function will get called multiple times. This was spotted by a YT viewer (THANKS DAVE).
The final step for testing is to read the movement values in the fixed update function. I’m using fixed update because I’ll use the physics engine to move and control the player the object. Reading the values is pretty straightforward. To keep things simple, I’ll use another debug statement, and to get the values we simply call “Read Value” on the movement input action, give it a generic parameter of the type Vector2 since we have both X and Y values for movement.
Testing

At this point, we can test out our solution to make sure everything is wired up correctly. To do this we simply need to put our new player controller class on a gameObject and go into play mode.
Pressing the WASD keys or moving the gamepad stick should show values in the console. While pressing the spacebar or the south button on the gamepad should display our jump message.
Whew!
If you’re thinking that was a lot of work to display some debug messages your right. It was. But! We have a system that works for both a keyboard and a gamepad AND the code is really quite simple and clean. While the old system was quick to use the keyboard or mouse, adding in a gamepad was a huge pain, not to mention we would need to code both inputs individually.
With the new system, the work is mostly at the front end creating (and understanding) the Input Action Asset. Leaving the implementation in the code much simpler. Which in my opinion is a worthy trade-off.
So What’s Next?
I still want to look at a few more implementations of the new input system, but frankly, this is getting long already. In the intro GIF you may have noticed a lot more functionality than the project currently has. ALL of the extra functionality is based on what I’ve shown already, but I think is worth covering - in another tutorial.
For now, if you want to see my full implementation of the 3rd person controller (minus the camera) you can find it here on PasteBin. I will transition all the project code to GitHub once the series is complete.
Topics I’d still like to look at:
Creating the 3rd Person Controller
Controlling a Cinemachine Camera
Triggering UI and SFX with the new System
Shooting!!
“Charging Up” for a power shot
Player rebinding during playmode
Swapping action maps
UI? Boat? Car?
If you’d like to see one or all of those topics, leave a comment below. They’re only worth doing if folks are interested.
Older Posts
-
January 2026
- Jan 27, 2026 Save and Load Framework Jan 27, 2026
-
April 2024
- Apr 10, 2024 Ready for Steam Next Fest? - Polishing a Steam Page Apr 10, 2024
- Apr 1, 2024 Splitting Vertices - Hard Edges for Low Poly Procedural Generation Apr 1, 2024
-
November 2023
- Nov 18, 2023 Minute 5 to Minute 10 - Completing the Game Loop Nov 18, 2023
-
September 2023
- Sep 13, 2023 Visual Debugging with Gizmos Sep 13, 2023
-
July 2023
- Jul 4, 2023 Easy Mode - Unity's New Input System Jul 4, 2023
-
May 2023
- May 19, 2023 Level Builder - From Pixels to Playable Level May 19, 2023
-
April 2023
- Apr 11, 2023 Input Action in the Inspector - New Input System Apr 11, 2023
-
February 2023
- Feb 26, 2023 Tutorial Hell - Why You're There. How to Get Out. Feb 26, 2023
-
December 2022
- Dec 31, 2022 Upgrade System (Stats Part 2) Dec 31, 2022
-
November 2022
- Nov 10, 2022 Stats in Unity - The Way I Do it Nov 10, 2022
- Nov 5, 2022 State of UI in Unity - UI Toolkit Nov 5, 2022
-
August 2022
- Aug 17, 2022 Knowing When A Coroutine Finishes Aug 17, 2022
-
April 2022
- Apr 23, 2022 Unity Input Event Handlers - Or Adding Juice the Easy Way Apr 23, 2022
-
March 2022
- Mar 15, 2022 *Quitting a Job I Love Mar 15, 2022
-
February 2022
- Feb 8, 2022 Split Screen: New Input System & Cinemachine Feb 8, 2022
-
January 2022
- Jan 24, 2022 (Better) Object Pooling Jan 24, 2022
- Jan 19, 2022 Designing a New Game - My Process Jan 19, 2022
- Jan 16, 2022 Strategy Game Camera: Unity's New Input System Jan 16, 2022
-
December 2021
- Dec 16, 2021 Raycasting - It's mighty useful Dec 16, 2021
-
November 2021
- Nov 22, 2021 Cinemachine. If you’re not. You should. Nov 22, 2021
-
August 2021
- Aug 3, 2021 C# Extension Methods Aug 3, 2021
-
June 2021
- Jun 27, 2021 Changing Action Maps with Unity's "New" Input System Jun 27, 2021
-
May 2021
- May 28, 2021 Unity's New Input System May 28, 2021
- May 8, 2021 Bolt vs. C# - Thoughts with a dash of rant May 8, 2021
-
March 2021
- Mar 10, 2021 Coroutines - Unity & C# Mar 10, 2021
-
January 2021
- Jan 14, 2021 Where's My Lunch? - January Devlog Update Jan 14, 2021
-
December 2020
- Dec 27, 2020 C# Generics and Unity Dec 27, 2020
- Dec 7, 2020 Steam Workshop with Unity and Facepunch Steamworks Dec 7, 2020
-
November 2020
- Nov 27, 2020 Simple Level Save and Load System (Unity Editor) Nov 27, 2020
- Nov 9, 2020 Command Pattern - Encapsulation, Undo and Redo Nov 9, 2020
-
October 2020
- Oct 28, 2020 GJTS - Adding Steamworks API and Uploading Oct 28, 2020
- Oct 9, 2020 Game Jam... Now What? Oct 9, 2020
-
August 2020
- Aug 16, 2020 Strategy Pattern - Composition over Inheritance Aug 16, 2020
-
July 2020
- Jul 24, 2020 Observer Pattern - C# Events Jul 24, 2020
- Jul 15, 2020 Object Pooling Jul 15, 2020
- Jul 3, 2020 Cheat Codes with Unity and C# Jul 3, 2020
-
June 2020
- Jun 16, 2020 The State Pattern Jun 16, 2020
-
August 2019
- Aug 12, 2019 Easy UI Styles for Unity Aug 12, 2019
-
July 2019
- Jul 3, 2019 9th Grade Math to the Rescue Jul 3, 2019
-
June 2019
- Jun 12, 2019 Introducing My Next Game (Video DevLog) Jun 12, 2019
-
May 2019
- May 29, 2019 Programming Challenges May 29, 2019
-
March 2019
- Mar 2, 2019 Something New - Asking "What Can I Learn?" Mar 2, 2019
-
November 2018
- Nov 30, 2018 A Growing Channel and a New Tutorial Series Nov 30, 2018
-
October 2018
- Oct 11, 2018 Procedural Spaceship Generator Oct 11, 2018
-
July 2018
- Jul 11, 2018 Implementing SFX in Unity Jul 11, 2018
-
May 2018
- May 31, 2018 Prototyping Something New May 31, 2018
-
April 2018
- Apr 17, 2018 When to Shelve a Game Project? Apr 17, 2018
-
February 2018
- Feb 9, 2018 State of the Game - Episode 3 Feb 9, 2018
-
December 2017
- Dec 16, 2017 State of the Game - Episode 2 Dec 16, 2017
-
November 2017
- Nov 7, 2017 The Bump From A "Viral" Post Nov 7, 2017
-
October 2017
- Oct 30, 2017 NPC Job System Oct 30, 2017
-
September 2017
- Sep 1, 2017 Resources and Resource Systems Sep 1, 2017
-
August 2017
- Aug 3, 2017 State of the Game - Episode 1 Aug 3, 2017
-
June 2017
- Jun 20, 2017 Resources: Processing, Consumption and Inventory Jun 20, 2017
- Jun 15, 2017 Energy is Everything Jun 15, 2017
-
May 2017
- May 16, 2017 Graphing Script - It's not exciting, but it needed to be made May 16, 2017
- May 2, 2017 Tutorials: Low Poly Snow Shader May 2, 2017
-
April 2017
- Apr 28, 2017 Low Poly Snow Shader Apr 28, 2017
- Apr 21, 2017 Environmental Simulation Part 2 Apr 21, 2017
- Apr 11, 2017 Environmental Simulation Part 1 Apr 11, 2017
-
March 2017
- Mar 24, 2017 Building a Farming Game Loop and Troubles with Ground Water Mar 24, 2017
-
February 2017
- Feb 25, 2017 The Inevitable : FTF PostMortem Feb 25, 2017
-
December 2016
- Dec 7, 2016 Leaving Early Access Dec 7, 2016
-
November 2016
- Nov 28, 2016 Low Poly Renders Nov 28, 2016
- Nov 1, 2016 FTF: Testing New Features Nov 1, 2016
-
October 2016
- Oct 27, 2016 Watchtowers - Predictive Targeting Oct 27, 2016
- Oct 21, 2016 Click to Color Oct 21, 2016
- Oct 19, 2016 Unity Object Swapper Oct 19, 2016
-
September 2016
- Sep 18, 2016 Testing Single Player Combat Sep 18, 2016
-
May 2016
- May 25, 2016 Release Date and First Video Review May 25, 2016
-
March 2016
- Mar 26, 2016 Getting Greenlit on Steam Mar 26, 2016