Designing a New Game - My Process

Some of my projects….

This is my process. It’s been refined over 8+ years of tinkering with Unity, 2 game jams, and 2 games published to Steam.

My goal with this post is just to share. Share what I’ve learned and share how I am designing my next project. My goal is not to suggest that I’ve found the golden ticket. Cause I haven’t. I’m pretty sure the perfect design process does not exist.

So these are my thoughts. These are the questions I ask myself as I stumble along in the process of designing a project. Maybe this post will be helpful. Maybe it won’t. If it feels long-winded. It probably is.

I’ve tried just opening Unity and designing as I go. It didn’t work out well. So again, this is just me sharing.

TL;DR

  • Set a Goal - To Learn? For fun? To sell?

  • Play games as research - Play small games and take notes.

  • Prototypes system - What don’t you know how to build? Is X or Y actually doable or fun?

  • Culling - What takes too long? What’s too hard? What is too complicated?

  • Plan - Do the hard work and plan the game. Big and small mechanics. Art. Major systems.

  • Minimal Viable Product - Not the game just the basics. Is it fun? How long did it take?

  • Build it! - The hardest part. Also the most rewarding.

What Is The Goal?

When starting a new project, I first think about the goal for the project. For me, this is THE key step in designing a project - which is a necessary step to the holy grail of actually FINISHING a project. EVERY other step and decision in the process should reflect back on the goal or should be seen through the lens of that goal. If the design choice doesn’t help to reach the goal, then I need to make a different decision.

Am I making a game to share with friends? Am I creating a tech demo to learn a process or technique? Am I wanting to add to my portfolio of work? What is the time frame? Weeks? Months? Maybe a year or two (scary)?

I want another title in this list!

For this next project, I want to add another game to the OWS Steam library and I’d like to generate some income in the process. I have no dreams of creating the next big hit, but if I could sell 1000 or 10,000 copies - that would be awesome.

I also want to do it somewhat quickly. Ideally, I could have the project done in 6 to 9 months, but 12 to 18 months is more likely with the time I can realistically devote to the project. One thing I do know, is that whatever amount of time I think it’ll take. It’ll likely take double.

Research!

After setting a goal, the next step is research. Always research. And yes. I mean playing games! I look for games that are of a similar scope to what I think I can make. Little games. Games with interesting or unique mechanics. Games made by individuals or MAYBE a team of 2 or 3. As I play I ask myself questions:

What elements do I find fun? What aspects do I not enjoy? Do I want to keep playing? What is making me want to quit? What mechanics or ideas can I steal? What systems do I know or not know how to make? Which systems are complex? What might be easy to add?

Then there are three more questions. These are key and crucial in designing a game and can help to keep the game scope (somewhat) in check. Which in turn is necessary if a game is going to get finished

How did a game developer’s clever design decisions simplify the design? How does a game make something fun without being complex? Why might the developer have made decisions X or Y? What problems did that decision avoid?

These last questions are tough and often have subtle answers. They take thought and intention. Often while designing a game my mind goes towards complexity. Making things bigger and more detailed! Can’t solve problem A? Well, lets bolt-on solution B!

For example, I’ve wanted to make a game where the player can create or build the world. Why not let the player shape the landscape? Add mountains and rivers? Place buildings? Harvest resources? It would be so cool! Right? But it’s a huge time sink. Even worse, it’s complex and could easily be a huge source of bugs.

So a clever solution? I like how I’m calling myself clever. Hex tiles. Yes. Hex tiles. Let the player build the world, but do it on a grid with prefabs. Bam! Same result. Same mechanic. Much simpler solution. It trades a pile of complex code for time spent in Blender designing tiles. Both Zen World and Dorf Romantic are great examples of allowing the player to create the world and doing so without undue complexity.

Navigation can be another tough nut to crack. Issues and bugs pop up all over the place. Units running into each other. Different movement costs. Obstacles. How about navigation in a procedural landscape? Not to mention performance can be an issue with a large number of units.

My “Research” List

Creeper World 4 gets around this in such a simple and elegant way. Have all the units fly in straight lines. Hover. Move. Land. Done.

I am a big believer that constraints can foster creativity. For me, identifying what I can’t do is more important than identifying what I can do.

When I was building Fracture the Flag I wanted the players to be able to claim territory. At first, I wanted to break the map up into regions - something like the Risk map. I struggled with it for a while. One dead end after another. I couldn’t figure out a good solution.

Then I asked, why define the regions? Instead, let the players place flags around the map to claim territory! If a flag gets knocked down the player loses that territory. Want to know if a player can build at position X or Y? They can if it’s close to a flag. So many problems solved. So much simpler and frankly so much more fun.

With research comes a flood of ideas. And it’s crucial to write them down. Grab a notebook. Open a google doc. Or as I recently discovered Google Keep - it’s super lightweight and easy to access on mobile for those ah-ha moments.

I keep track of big picture game ideas as well as smaller mechanics that I find interesting. I don’t limit myself to one idea or things that might nicely fit together. This is the throwing spaghetti at the wall stage of design. I’m throwing it out there and seeing what sticks. Even if, maybe especially if, I get excited about one idea I force myself to think beyond it and come up with multiple concepts and ideas. This is not the time to hyper focus.

At this stage, I also have to bring in a dose of reality. I’m not making an MMO or the next E-Sports tile. I’m dreaming big, but also trying not to waste my time with completely unrealistic dreams. I should probably know how to make at least 70, 80 or maybe 90 percent of the game!

While you’re playing games as “research” support small developers and leave them reviews! Use those reviews to process what you like and what you don’t like. What would you change? What would you keep? What feels good? What would feel better? Those reviews are so crucial to a developer. Yes, even negative ones are helpful.

Prototype Systems - Not The Game

At this point in the process, I get to start scratching the itch to build. Up until now, Unity hasn’t been opened. I’ve had to fight the urge, but it’s been for the best. Until now.

Now I get to prototype systems. Not a game or the game. Just parts of a potential game. This is when I start to explore systems that I haven’t made before or systems I don’t know how to make. I focus on parts that seem tricky or will be core to the game. I want to figure out the viability of an idea or concept.

At this stage, I dive into different research. Not playing games, but watching and reading tutorials and articles. I take notes. Lots of notes. For me, this is like going back to school. I need to learn how other people have created systems or mechanics. Why re-invent the wheel? Sometimes you need to roll your own solution, but why not at least see how other folks have done it first?

If I find a tutorial that feels too complex. I look for another. If that still feels wrong, I start to question the mechanic itself.

Maybe it’s beyond my skill set? Maybe it’s too complex for a guy doing this in his spare time? Or maybe I just need to slow down and read more carefully?

Some prototype Art for a possible Hex tile Game

Understanding and implementing a hex tile system was very much all of the above. Red Blob Games has an excellent guide to hex grids with all the math and examples of code to implement hex grids into your games. It’s not easy. Not even close. But it was fun to learn and with a healthy dose of effort, it’s understandable. (To help cement my understanding, I may do a series of videos on hex grids.)

This stage is also a chance to evaluate systems to see if they could be the basis of a game. I’ve been intrigued by ecosystems and evolution for a long while. Equilinox is a great example of a fairly recent ecosystem-based game made by a single (skilled) individual. Sebastian Lague put together an interesting video on evolution, which was inspired by the Primer videos. All of these made me want to explore the underlying mechanics.

So, I spent a day or two writing code, testing mechanics, and had some fun but ultimately decided it was too fiddly and too hard to base a game on. So I moved on, but it wasn’t a waste of time!

After each prototype is functional, but not polished, I ask myself more questions.

Does the system work? Is the system janky? What parts are missing or still need to be created? Is it too complex or hard to balance? Is there too much content to create? Or maybe it’s just crap?

For me, it’s also important that I’m not trying to integrate different system prototypes (at this point). Not yet. I for sure want to avoid coupling and keep things encapsulated, but I also don’t want to go down a giant rabbit hole. That time may come, but it’s not now. I’m also not trying to polish the prototypes. I want the systems to work and be reasonably robust, but at this point, I don’t even know if the systems will be in a game so I don’t want to waste time.

(Pre-Planning) Let The Culling Begin!

With prototypes of systems built, it’s now time to start chopping out the fluff, the junk, and start to give some shape to a game design. And yes, I start asking more questions.

What are the major systems of the game? What systems are easy or hard to make? Are there still systems I don’t know how to make? What do I still need to learn? What will be the singular core mechanic of the game?

And here’s a crucial question!

What are the time sinks? Even if I know how to do X or Y will it take too long?

3D Models, UI, art, animations, quests, stories, multiplayer, AI…. Basically, everything is a time sink. But!

Which ones play to my strengths? Which ones help me reach my goal? Which ones can I design around or ignore completely? What time sinks can be tossed out and still have a fun game?

Assets I Use

When I start asking these questions it’s easy to fall into the trap of using 3rd party assets to solve my design problems or fill in my lack of knowledge. It’s easy to use too many or use the wrong ones. I need to be very picky about what I use. Doubly so with assets that are used at runtime (as opposed to editor tools). For me, assets need to work out of the box AND work independently. If my 3rd party inventory system needs to talk to my 3rd party quest system which needs to talk to my 3rd party dialogue system I am asking for trouble and I will likely find it.

The asset store is full of shiny objects and rat holes. It’s worth a lot of time to think about what you really need from the asset store.

What you can create on your own? What should you NOT create on your own? What you can design around? Do you really need X or Y?

For me, simple is almost always better. If I do use 3rd party assets, and I do, they need to be part of the prototyping stage. I read the documentation and try to answer as many questions as I can before integrating the asset into my project. If the asset can’t do what I need, then I may have to make hard decisions amount the asset, my design, or even the game as a whole.

I constantly have to remind myself that games aren’t fun because they’re complex. Or at the very least, complexity does not equal fun. What makes games fun is something far more subtle. Complexity is a rat hole. A shiny object.

Deep Breath. Pause. Think.

At this point, I have a rough sketch in my head of the game and it’s easy to get excited and jump into building with both feet. But! I need to stop. Breathe. And think.

Does the game match my goals? Can I actually make the game? Are there mechanics that should be thrown out? Can I simplify the game and still reach my goal? Is this idea truly viable?

Depending on the answers, I might need be to go back and prototype, do more research, or scrap the entire design and start with something a single guy can actually make.

This point is a tipping point. I can slow down and potentially re-design the game or spend the next 6 months discovering my mistakes. Or worse, ignoring my mistakes and wasting even more time as I stick my head in the sand and insist I can build the game. I’ve been there. I’ve done that. And it wasn’t fun.

Now We Plan

Maybe a third of the items on my to do list for Grub Gauntlet

Ha! I bet you thought I was done planning. Not even close. I haven’t even really started.

There are a lot of opinions about the best planning tool. For me, I like Notion. Others like Milanote or just a simple google doc. The tool doesn’t matters, it’s the process. So pick what works for you and don’t spend too much time trying to find the “best” tool. There’s a poop ton of work to do, don’t waste time.

Finding the right level of detail in planning is tough and definitely not a waste of time. I’m not creating some 100+ page Game Design Document. Rather I think of what I'm creating as a to-do list. Big tasks. Small tasks. Medium tasks. I want to plan out all the major systems, all the art, and all the content. This is my chance to think through the game as a whole before sinking 100’s or likely 1000’s of hours into the project.

To some extent, the resulting document forms a contract with myself and helps prevent feature creep. The plan also helps when I’m tired or don’t know what to do next. I can pull up my list and tackle something small or something interesting.

Somewhere in the planning process, I need to decide on a theme or skin for the game. The naming of classes or objects may depend on the theme AND more importantly, some of the mechanics may be easier or harder to implement depending on the theme. For example, Creeper World 4’s flying tanks totally work in the sci-fi-themed world. Not so much if they were flying catapults or swordsmen in a fantasy world. Need to resupply units? Creeper World sends the resources over power lines. Again, way easier than an animated 3D model of a worker using a navigation system to run from point A to point B and back again.

Does the theme match the mechanics? Does it match my skillset? Can I make that style of art? Does the theme help reach the goal? Does the theme simplify mechanics or make them more complex?

Minimum Viable Product (MVP)

Upgrade that

Knowlegde

Finally! Now I get to start building the project structure, writing code, and bringing in some art. But! I’m still not building the game. I’m still testing. I want to get something playable as fast as possible. I need to answer the questions:

Is the game fun? Have I over-scoped the game? Can I actually build it with my current skills and available time?

If I spent 3 months working on an inventory system and all I can do is collect bits on a terrain and sell them to a store. I’ve over-scoped the game. If the game is tedious and not fun then I either need to scrap the game or dig deeper into the design and try to fix it. If the game breaks every time I add something or change a system then I need to rethink the architecture or maybe the scope of the game or upgrade my programming knowledge and skill set.

If I can create the MVP in less than a month and it’s fun then I’m on to something good!

Why so short a time frame? My last project, Grub Gauntlet was created during a 48-hour game jam. I spent roughly 20 hours during that time to essentially create an MVP. It then took another 10 months to release! I figure the MVP is somewhere around 1/10th or 1/20th of the total build time.

It’s way better to lose 1-2 months building, testing, and then decide to scrap the project than to spend 1-2 years building a pile of crap. Or worse! Spend years working only to give up without a finished product.

Can I Build It Now?

This is the part we’re all excited about. Now I get to build, polish, and finish a game. There’s no secret sauce. This part is the hardest. It’s the longest. It’s the most discouraging. It’s also the most rewarding.

If I’ve done my work ahead of time then I should be able to finish my project. And that? That is an amazing feeling!

Strategy Game Camera: Unity's New Input System

I was working on a prototype for a potential new project and I needed a camera controller. I was also using Unity’s “new” input system. And I thought, hey, that could be a good tutorial…

There’s also a written post on the New Input System. Check the navigation to the right.

The goal here is to build a camera controller that could be used in a wide variety of strategy games. And to do it using Unity’s “New” Input System.

The camera controller will include:

  • Horizontal motion

  • Rotation

  • Zoom/elevate mechanic

  • Dragging the world with the mouse

  • Moving when the mouse is near the screen edge

Since I’ll be using the New Input System, you’ll want to be familiar with that before diving too deep into this camera controller. Check either the video or the written blog post.

If you’re just here for the code or want to copy and paste, you can get the code along with the Input Action Asset on GitHub.

Build the Rig

Camera rig Hierarchy

The first step to getting the camera working is to build the camera rig. For my purposes, I choose to keep it simple with an empty base object that will translate and rotate in the horizontal plane plus a child camera object that will move vertically while also zooming in and out.

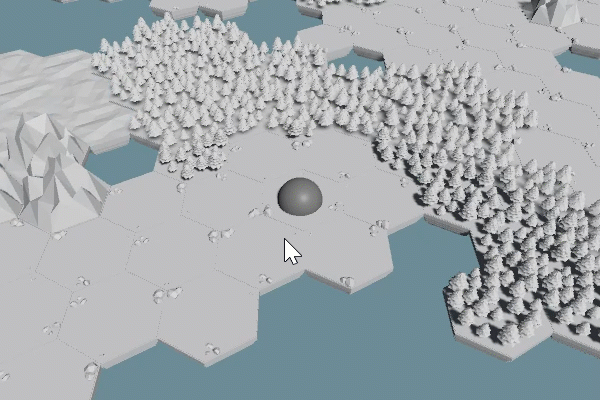
I’d also recommend adding in something like a sphere or cube (remove its collider) at the same position as the empty base object. This gives us an idea of what the camera can see and how and where to position the camera object. It’s just easy debugging and once you’re happy with the camera you can delete the extra object.

Camera object transform settings

For my setup, my base object is positioned on the origin with no rotation or scaling. I’ve placed the camera object at (0, 8.3, -8.8) with no rotation (we’ll have the camera “look at” the target in the code).

For your project, you’ll want to play with the location to help tune the feel of your camera.

Input Settings

Input Action Asset for the Camera Controller

For the camera controller, I used a mix of events and directly polling inputs. Sometimes one is easier to use than another. For many of these inputs, I defined them in an Input Action Asset. For some mouse events, I simply polled the buttons directly. If that doesn’t make sense hopefully it will.

In the Input Action Asset, I created an action map for the camera and three actions - movement, rotate, and elevate. For the movement action I created two bindings to allow the WASD keys and arrows keys to be used. It’s easy, so why not? Also important, both rotate and elevate have their action type set to Vector2.

Importantly the rotate action is using the delta of the mouse position not the actual position. This allows for smooth movement and avoids the camera snapping around in a weird way.

We’ll be making use of the C# events. So make sure to save or have auto-save enabled. We also need to generate the C# code. To do this select the Input Action Asset in your project folders and then in the inspector click the “generate C# class” toggle and press apply.

Variables and More Variables!

Next, we need to create a camera controller script and attach it to the base object of our camera rig. Then inside of a camera controller class we need to create our variables. And there’s a poop ton of them.

The first two variables will be used to cache references for use with the input system.

The camera transform variable will cache a reference to the transform with the camera object - as opposed to the empty object that this class will be attached to.

All of the variables with the BoxGroup attribute will be used to tune the motion of the camera. Rather than going through them one by one… I’m hoping the name of the group and the name of the variable clarifies their approximate purpose.

The camera settings I’m using

The last four variables are all used to track various values between functions. Meaning one function might change a value and a second function will make use of that value. None of these need to have their value set outside of the class.

A couple of other bits: Notice that I’ve also added the UnityEngine.InputSystem namespace. Also, I’m using Odin Inspector to make my inspector a bit prettier and keep it organized. If you don’t have Odin, you should, but you can just delete or ignore the BoxGroup attributes.

Horizontal Motion

I’m going to try and build the controller in chunks with each chunk adding a new mechanic or piece of functionality. This also (roughly) means you can add or not add any of the chunks and the camera controller won’t break.

The first chunk is horizontal motion. It’s also the piece that takes the most setup… So bear with me.

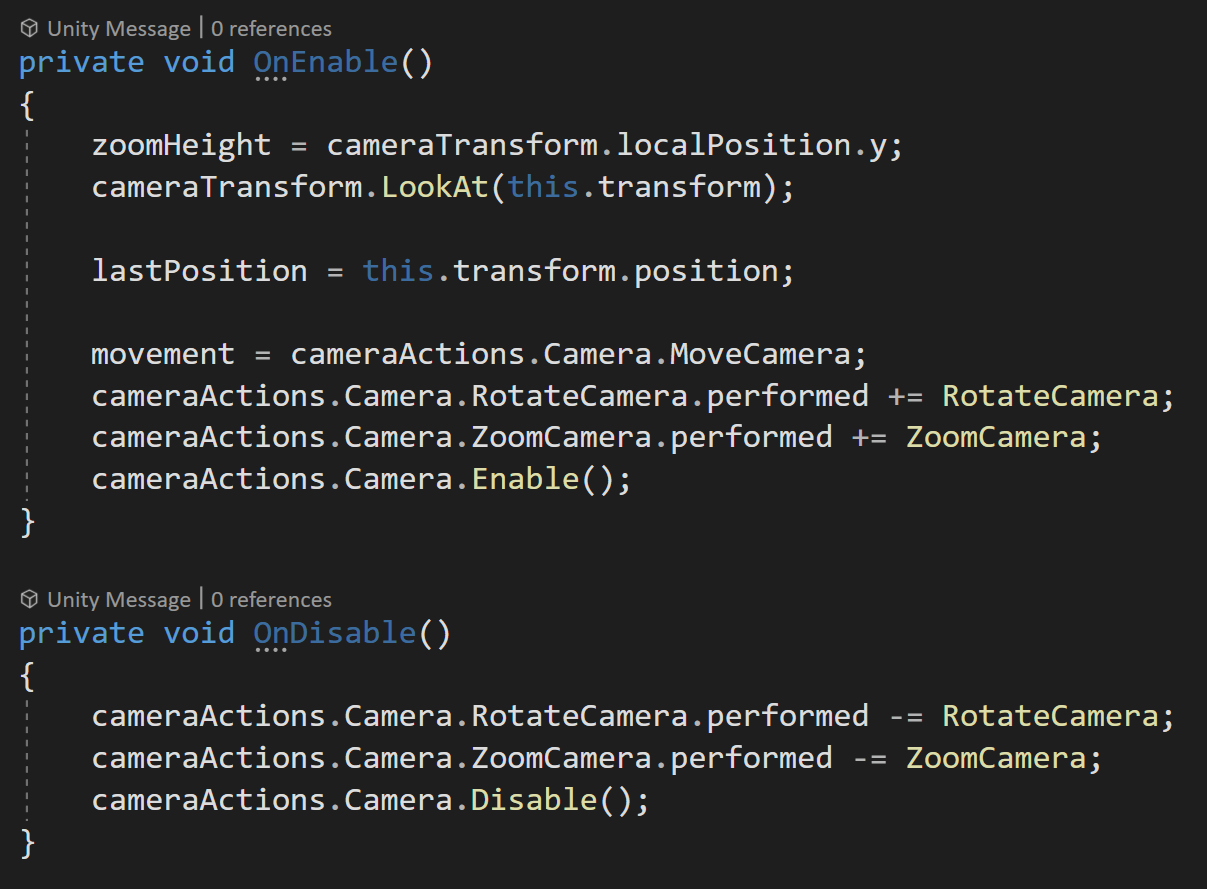
First, we need to set up our Awake, OnEnable, and OnDisable functions.

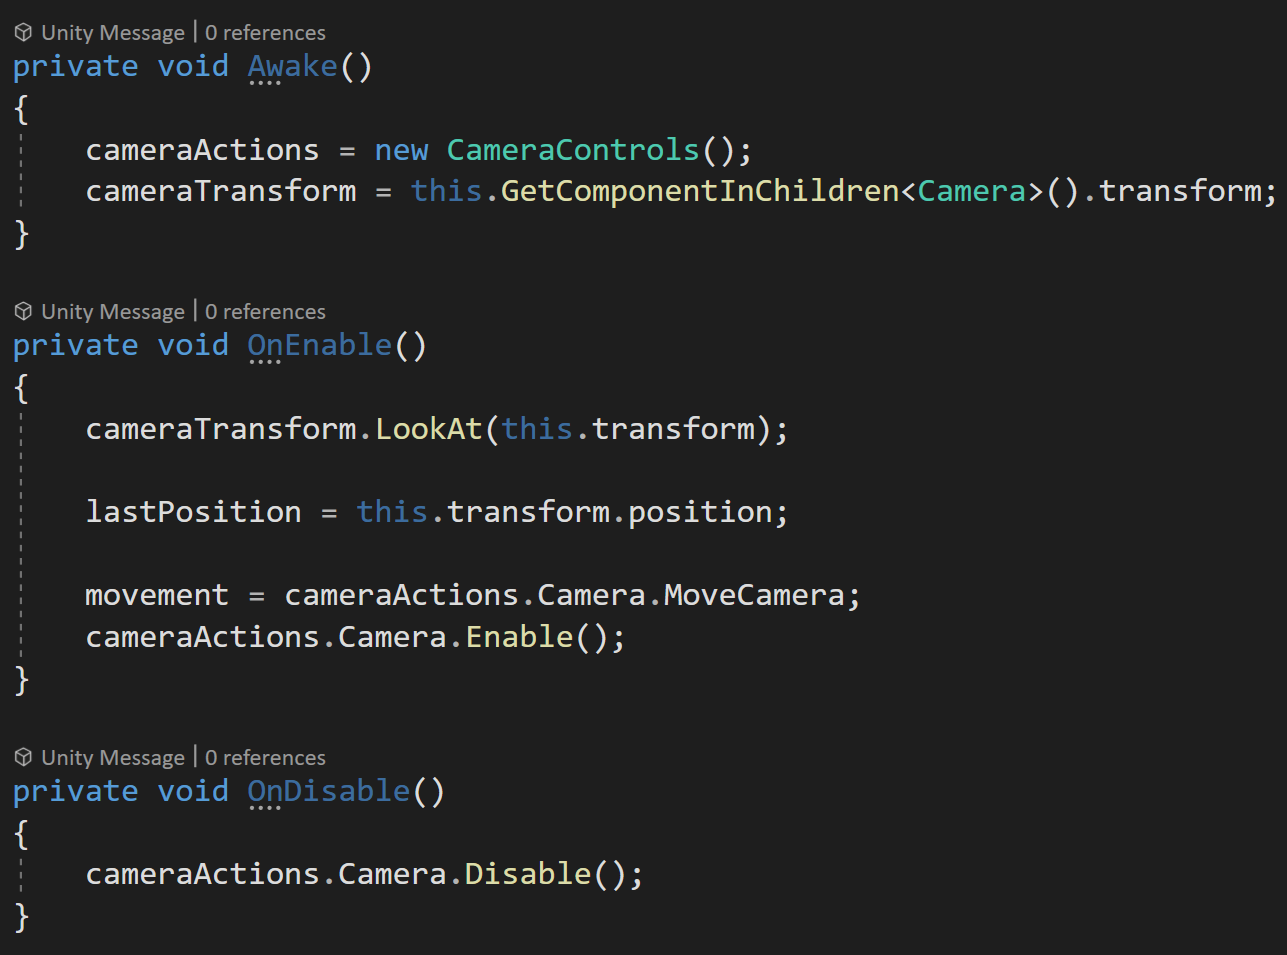
In the Awake function, we need to create an instance of our CameraControls input action asset. While we’re at it we can also grab a reference to the transform of our camera object.

In the OnEnable function, we first need to make sure our camera is looking in the correct direction - we can do this with the LookAt function directed towards the camera rig base object (the same object the code is attached to).

Then we can save the current position to our last position variable - this value will get used to help create smooth motion.

Next, we’ll cache a reference to our MoveCamera action - we’ll be directly polling the values for movement. We also need to call Enable on the Camera action map.

In OnDisable we’ll call Disable on the camera action map to avoid issues and errors in case this object or component gets turned off.

Helper functions to get camera relative directions

Next, we need to create two helper functions. These will return camera relative directions. In particular, we’ll be getting the forward and right directions. These are all we’ll need since the camera rig base will only move in the horizontal plane, we’ll also squash the y value of these vectors to zero for the same reason.

Kind of yucky. But gets the job done.

Admittedly I don’t love the next function. It feels a bit clumsy, but since I’m not using a rigidbody and I want the camera to smoothly speed up and slow down I need a way to calculate and track the velocity (in the horizontal plane). So thus the Update Velocity function.

Nothing too special in the function other than once again squashing the y dimension of the velocity to zero. After calculating the velocity we update the value of the last position for the next frame. This ensures we are calculating the velocity for the frame and not from the start.

The next function is the poorly named Get Keyboard Movement function. This function polls the Camera Movement action to then set the target position.

In order to translate the input into the motion we want we need to be a bit careful. We’ll take the x component of the input and multiply it by the Camera Right function and add that to the y component of the input multiplied by the Camera Forward function. This ensures that the movement is in the horizontal plane and relative to the camera.

We then normalize the resulting vector to keep a uniform length so that the speed will be constant even if multiple keys are pressed (up and right for example).

The last step is to check if the input value’s square magnitude is above a threshold, if it is we add our input value to our target position.

Note that we are NOT moving the object here since eventually there will be multiple ways to move the camera base, we are instead adding the input to a target position vector and our NEXT function will use this target position to actually move the camera base.

If we were okay with herky-jerky movement the next function would be much simpler. If we were using the physics engine (rigidbody) to move the camera it would also be simpler. But I want smooth motion AND I don’t want to tune a rigidbody. So to create smooth ramping up and down of speed we need to do some work. This work will all happen in the Update Base Position function.

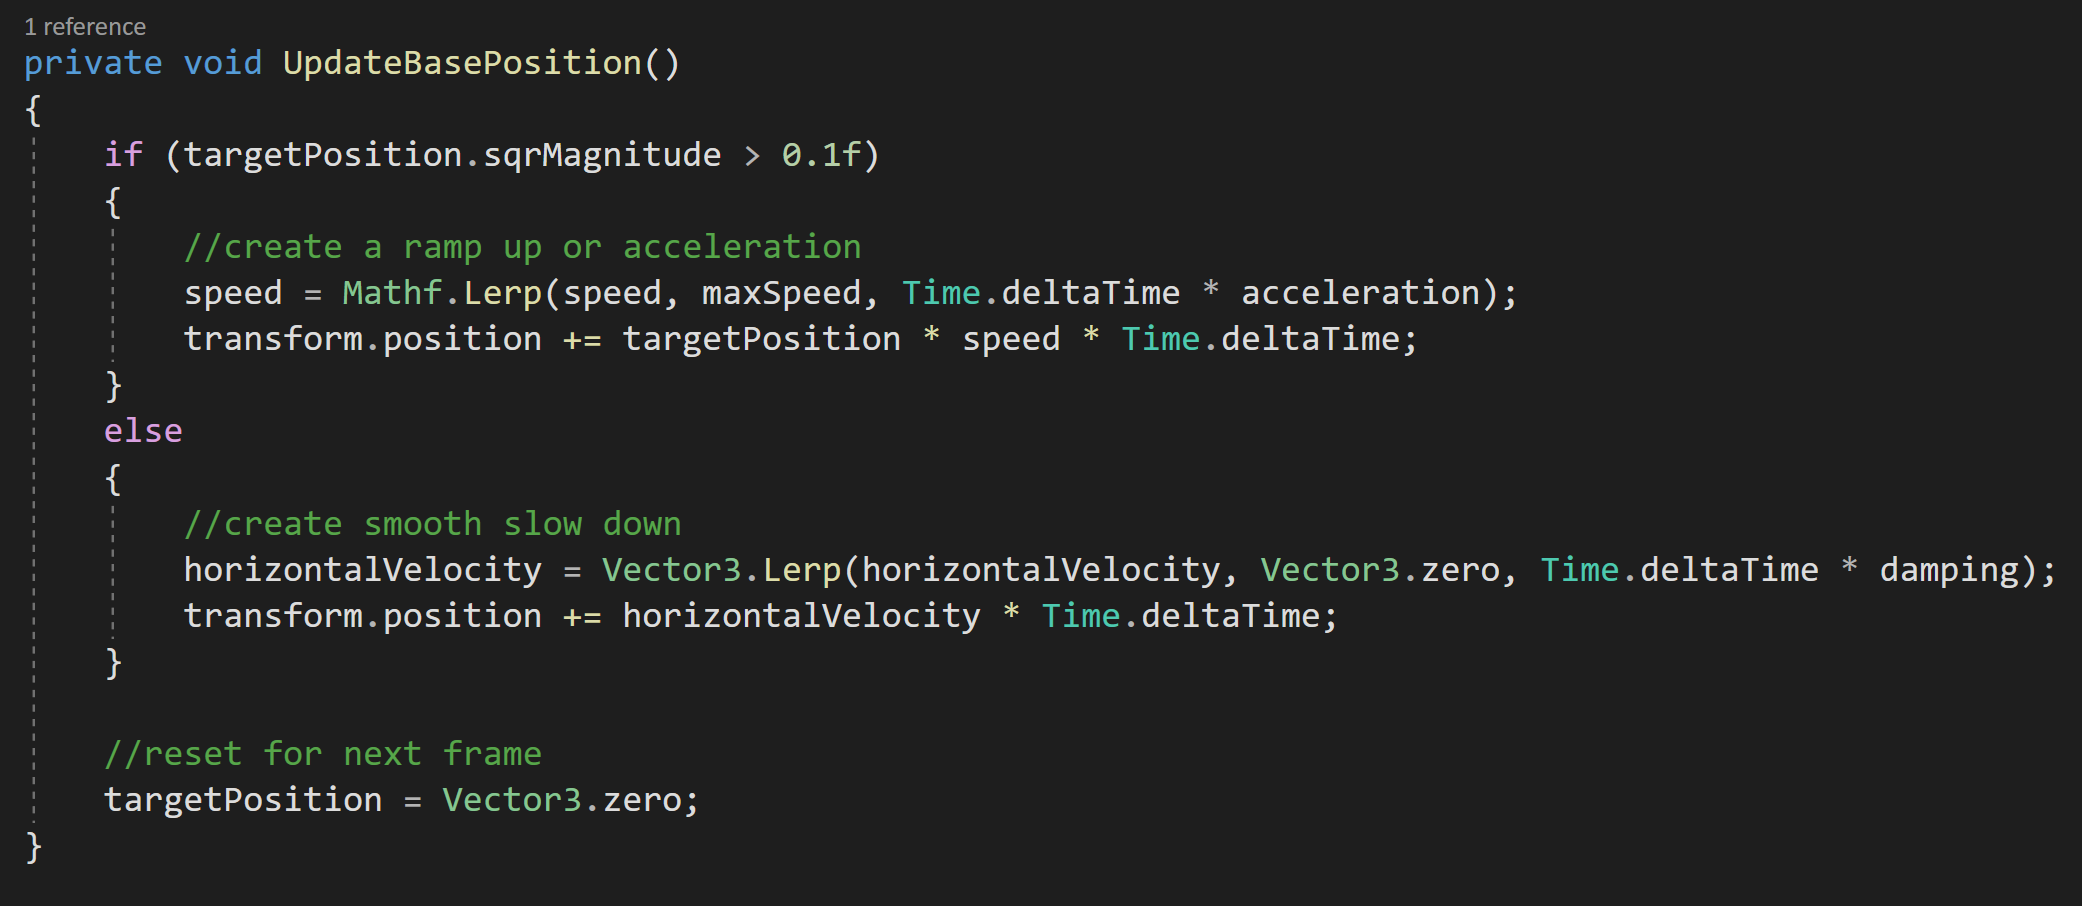
First, we’ll check if the square magnitude of the target position is greater than a threshold value. If it is this means the player is trying to get the camera to move. If that’s the case we’ll lerp our current speed up to the max speed. Note that we’re also multiplying Time Delta Time by our acceleration. The acceleration allows us to tune how quickly our camera gets up to speed.

The use of the threshold value is for two reasons. One so we aren’t comparing a float to zero, i.e. asking if a float equals zero can be problematic. Two, if we were using a game controller joystick even if it’s at rest the input value may not be zero.

Testing the Code so far - Smooth Horizontal Motion

We then add to the transform’s position an amount equal to the target position multiplied by the current camera speed and time delta time.

While they might look different these two lines of code are closely related to the Kinematic equations you may have learned in high school physics.

If the player is not trying to get the camera to move we want the camera to smoothly come to a stop. To do this we want to lerp our horizontal velocity (calculated constantly by the previous function) down to zero. Note rather than using our acceleration to control the rate of the slow down, I’ve used a different variable (damping) to allow separate control.

With the horizontal velocity lerping it’s way towards zero, we then add to the transform’s position a value equal to the horizontal velocity multiplied by time delta time.

The final step is to set the target position to zero to reset for the next frame’s input.

Our last step before we can test our code is to add our last three functions into the update function.

Camera Rotation

Okay. The hardest parts are over. Now we can add functionality reasonably quickly!

So let’s add the ability to rotate the camera. The rotation will be based on the delta or change in the mouse position and will only occur when the middle mouse button is pressed.

We’ll be using an event to trigger our rotation, so our first addition to our code is in our OnEnable and OnDisable functions. Here we’ll subscribe and unsubscribe the (soon to be created) Rotate Camera function to the performed event for the rotate camera action.

If you’re new to the input system, you’ll notice that the Rotate Camera function takes in a Callback Context object. This contains all the information about the action.

Rotating the camera should now be a thing!

Inside the function, we’ll first check if the middle mouse button is pressed. This ensures that the rotation doesn’t occur constantly but only when the button is pressed. For readability more than functionality, we’ll store the x value of the mouse delta and use it in the next line of code.

The last piece is to set the rotation of the transform (base object) and only on the y-axis. This is done using the x value of the mouse delta multiplied by the max rotation speed all added to the current y rotation.

And that’s it. With the event getting invoked there’s no need to add the function to our update function. Nice and easy.

Vertical Camera Motion

With horizontal and rotational motion working it would be nice to move the camera up and down to let the player see more or less of the world. For controlling the “zooming” we’ll be using the mouse scroll wheel.

This motion, I found to be one of the more complicated as there were several bits I wanted to include. I wanted there to be a min and max height for the camera - this keeps the player from zooming too far out or zooming down to nothingness - also while going up and down it feels a bit more natural if the camera gets closer or farther away from what it’s looking at.

This zoom motion is another good use of events so we need need to make a couple of additions to the OnEnable and OnDisable. Just like we did with the rotation we need to subscribe and unsubscribe to the performed event for the zoom camera action. We also need to set the value of zoom height equal to the local y position of the camera - this gives an initial value and prevents the camera from doing wacky things.

Then inside the Zoom Camera function, we’ll cache a reference to the y component of the scroll wheel input and divide by 100 - this scales the value to something more useful (in my opinion).

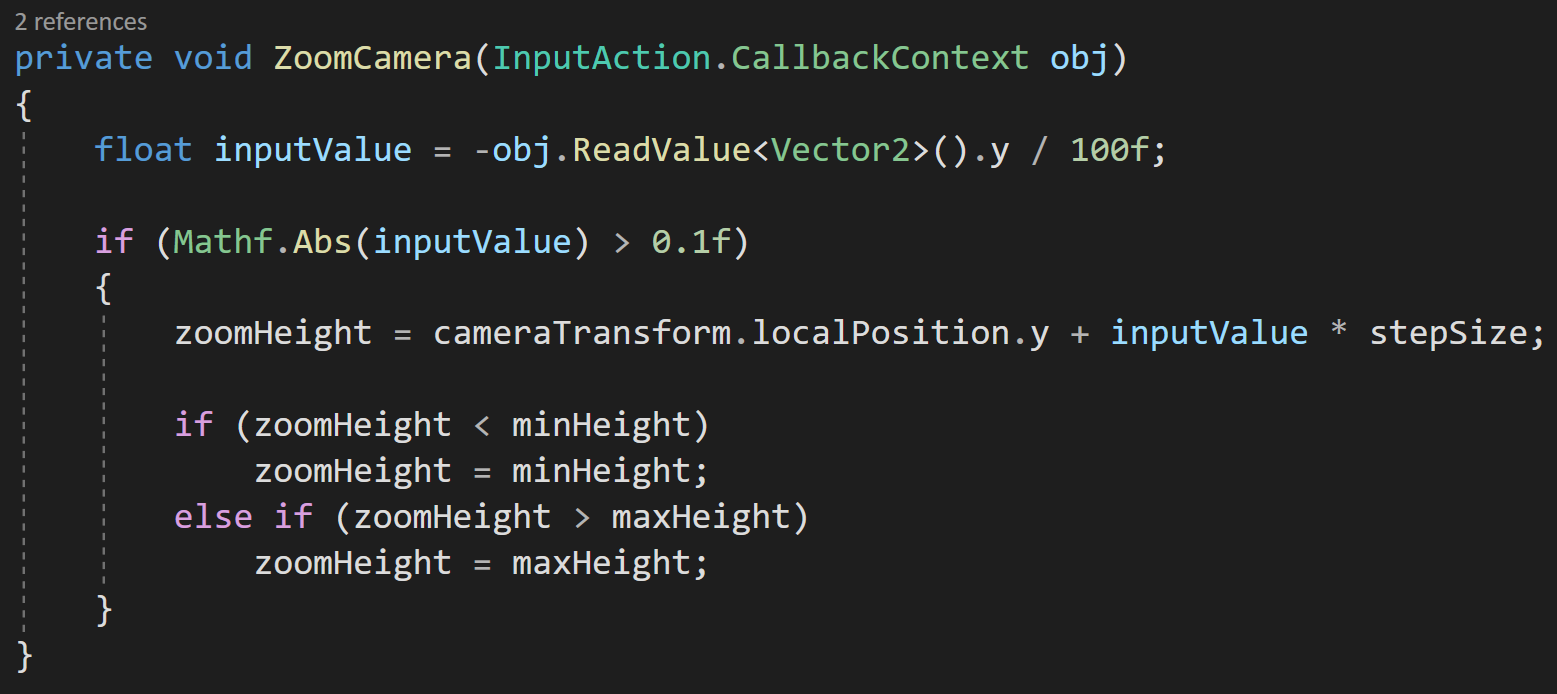
If the absolute value of the input value is greater than a threshold, meaning the player has moved the scroll wheel, we’ll set the zoom height to the local y position plus the input value multiplied by the step size. We then compare the predicted height to the min and max height. If the target height is outside of the allowed limits we set our height to the min or max height respectively.

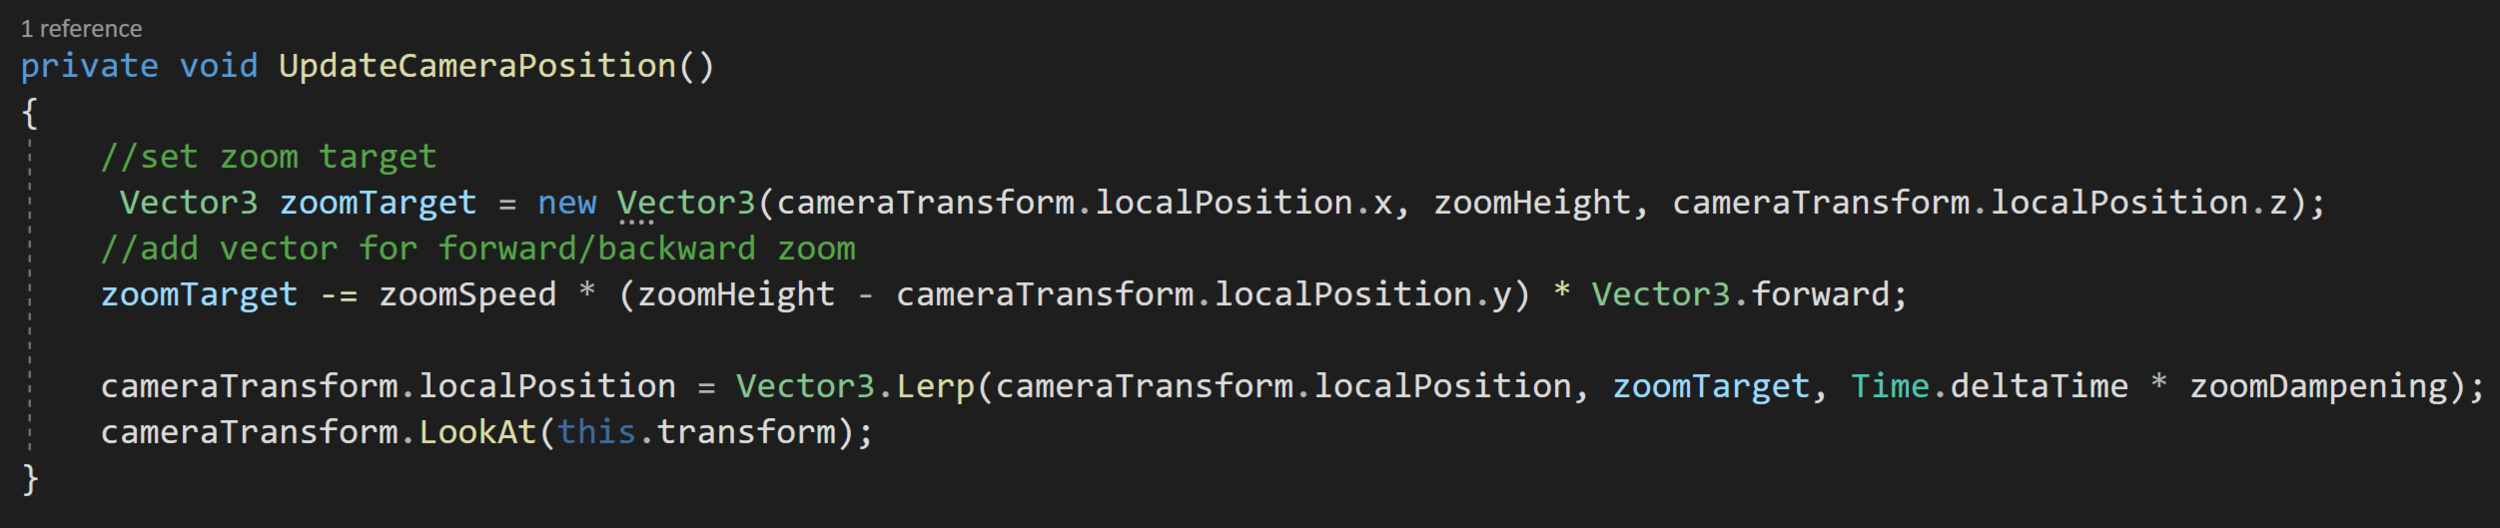
Once again this function isn’t doing the actual moving it’s just setting a target of sorts. The Update Camera Position function will do the actual moving of the camera.

The first step to move the camera is to use the value of the zoom height variable to create a Vector3 target for the camera to move towards.

Zooming in action

The next line is admittedly a bit confusing and is my attempt to create a zoom forward/backward motion while going up and down. Here we subtract a vector from our target location. The subtracted vector is a product of our zoom speed and the difference between the current height and the target height All of which is multiplied by the vector (0, 0, 1). This creates a vector proportional to how much we are moving vertically, but in the camera’s local forward/backward direction.

Our last steps are to lerp the camera’s position from its current position to the target location. We use our zoom damping variable to control the speed of the lerp.

Finally, we also have the camera look at the base to ensure we are still looking in the correct direction.

Before our zoom will work we need to add both functions to our update function.

If you are having weird zooming behavior it’s worth double-checking the initial position of the camera object. My values are shown at the top of the page. In my testing if the x position is not zero, some odd twisting motion occurs.

Mouse at Screen Edges

At this point, we have a pretty functional camera, but there’s still a bit more polish we can add. Many games allow the player to move the camera when the mouse is near the edges of the screen. Personally, I like this when playing games, but I do find it frustrating when working in Unity as the “screen edges” are defined by the game view…

To create this motion with the mouse all we need to do is check if the mouse is near the edge of the screen.

We do this by using Mouse.current.position.ReadValue(). This is very similar to the “old” input system where we could just call Input.MousePosition.

We also need a vector to track the motion that should occur - this allows the mouse to be in the corner and have the camera move in a diagonal direction.

Screen edge motion

Next, we simply check if the mouse x and y positions are less than or great than threshold values. The edge tolerance variable allows fine tuning of how close to the edge the cursor needs to be - in my case I’m using 0.05.

The mouse position is given to us in pixels not in screenspace coordinates so it’s important that we multiply by the screen width and height respectively. Notice that we are again making use of the GetCameraRight and GetCameraForward functions.

The last step inside the function is to add our move direction vector to the target position.

Since we are not using events this function also needs to get added to our update function.

Dragging the World

I stole and adapted the drag functionality from Game Dev Guide.

The last piece of polish I’m adding is the ability to click and drag the world. This makes for very fast motion and generally feels good. However, a note of caution when implementing this. Since we are using a mouse button to drag this can quickly interfere with other player actions such as placing units or buildings. For this reason, I’ve chosen to use the right mouse button for dragging. If you want to use the left mouse button you’ll need to check if you CAN or SHOULD drag - i.e. are you placing an object or doing something else with your left mouse button. In the past I have used a drag handler… so maybe that’s a better route, but it’s not the direction I choose to go at this point.

I should also admit that I stole and adapted much of the dragging code from a Game Dev Guide video which used the old input system.

Since dragging is an every frame type of thing, I’m once again going to directly poll to determine whether the right mouse button is down and to get the current position of the mouse…

This could probably be down with events, but that seems contrived and I’m not sure I really see the benefit. Maybe I’m wrong.

Inside the Drag Camera function, we can first check if the right button is pressed. If it’s not we don’t want to go any further.

If the button is pressed, we’re going to create a plane (I learned about this in the Game Dev Guide video) and a ray from the camera to the mouse cursor. The plane is aligned with the world XZ plane and is facing upward. When creating the plane the first parameter defines the normal and the second defines a point on the plane - which for the non-math nerds is all you need.

Next, we’ll raycast to the plane. So cool. I totally didn’t know this was a thing!

The out variable of distance tells us how far the ray went before it hit the plane, assuming it hit the plane. If it did hit the plane we’re going to do two different things - depending on whether we just started dragging or if we are continuing to drag.

Dragging the world

If the right mouse button was pressed this frame (learned about this thanks to a YouTube comment) we’ll cache the point on the plane that we hit. And we get that point, by using the Get Point function on our ray.

If the right mouse button wasn’t pressed this frame, meaning we are actively dragging, we can update the target position variable with the vector from where dragging started to where it currently is.

The final step is to add the drag function to our update function.

That’s It!

There you go. The basics of a strategy camera for Unity using the New Input System. Hopefully, this gives you a jumping off point to refine and maybe add features to your own camera controller.

Raycasting - It's mighty useful

Converting the examples to use the new input system. Please check the pinned comment on YouTube for some error correction.

What is Raycasting?

Raycasting is a lightweight and performant way to reach out into a scene and see what objects are in a given direction. You can think of it as something like a long stick used to poke and prod around a scene. When something is found, we can get all kinds of info about that object and have access

So… It’s pretty useful and a tool you should have in your game development toolbox.

Three Important Bits

The examples here are all going to be 3D, if you are working on a 2D project the ideas and concepts are nearly identical - with the biggest difference being that the code implementation is a tad different.

It’s also worth noting that the code for all the raycasting in the following examples, except for the jumping example, can be put on any object in the scene, whether that is the player or maybe some form of manager.

The final and really important tidbit is that raycasting is part of the physics engine. This means that for raycasting to hit or find an object, that object needs to have a collider or a trigger on it. I can’t tell you how many hours I’ve spent trying to debug raycasting only to find I forgot to put a collider on an object.

But First! The Basics.

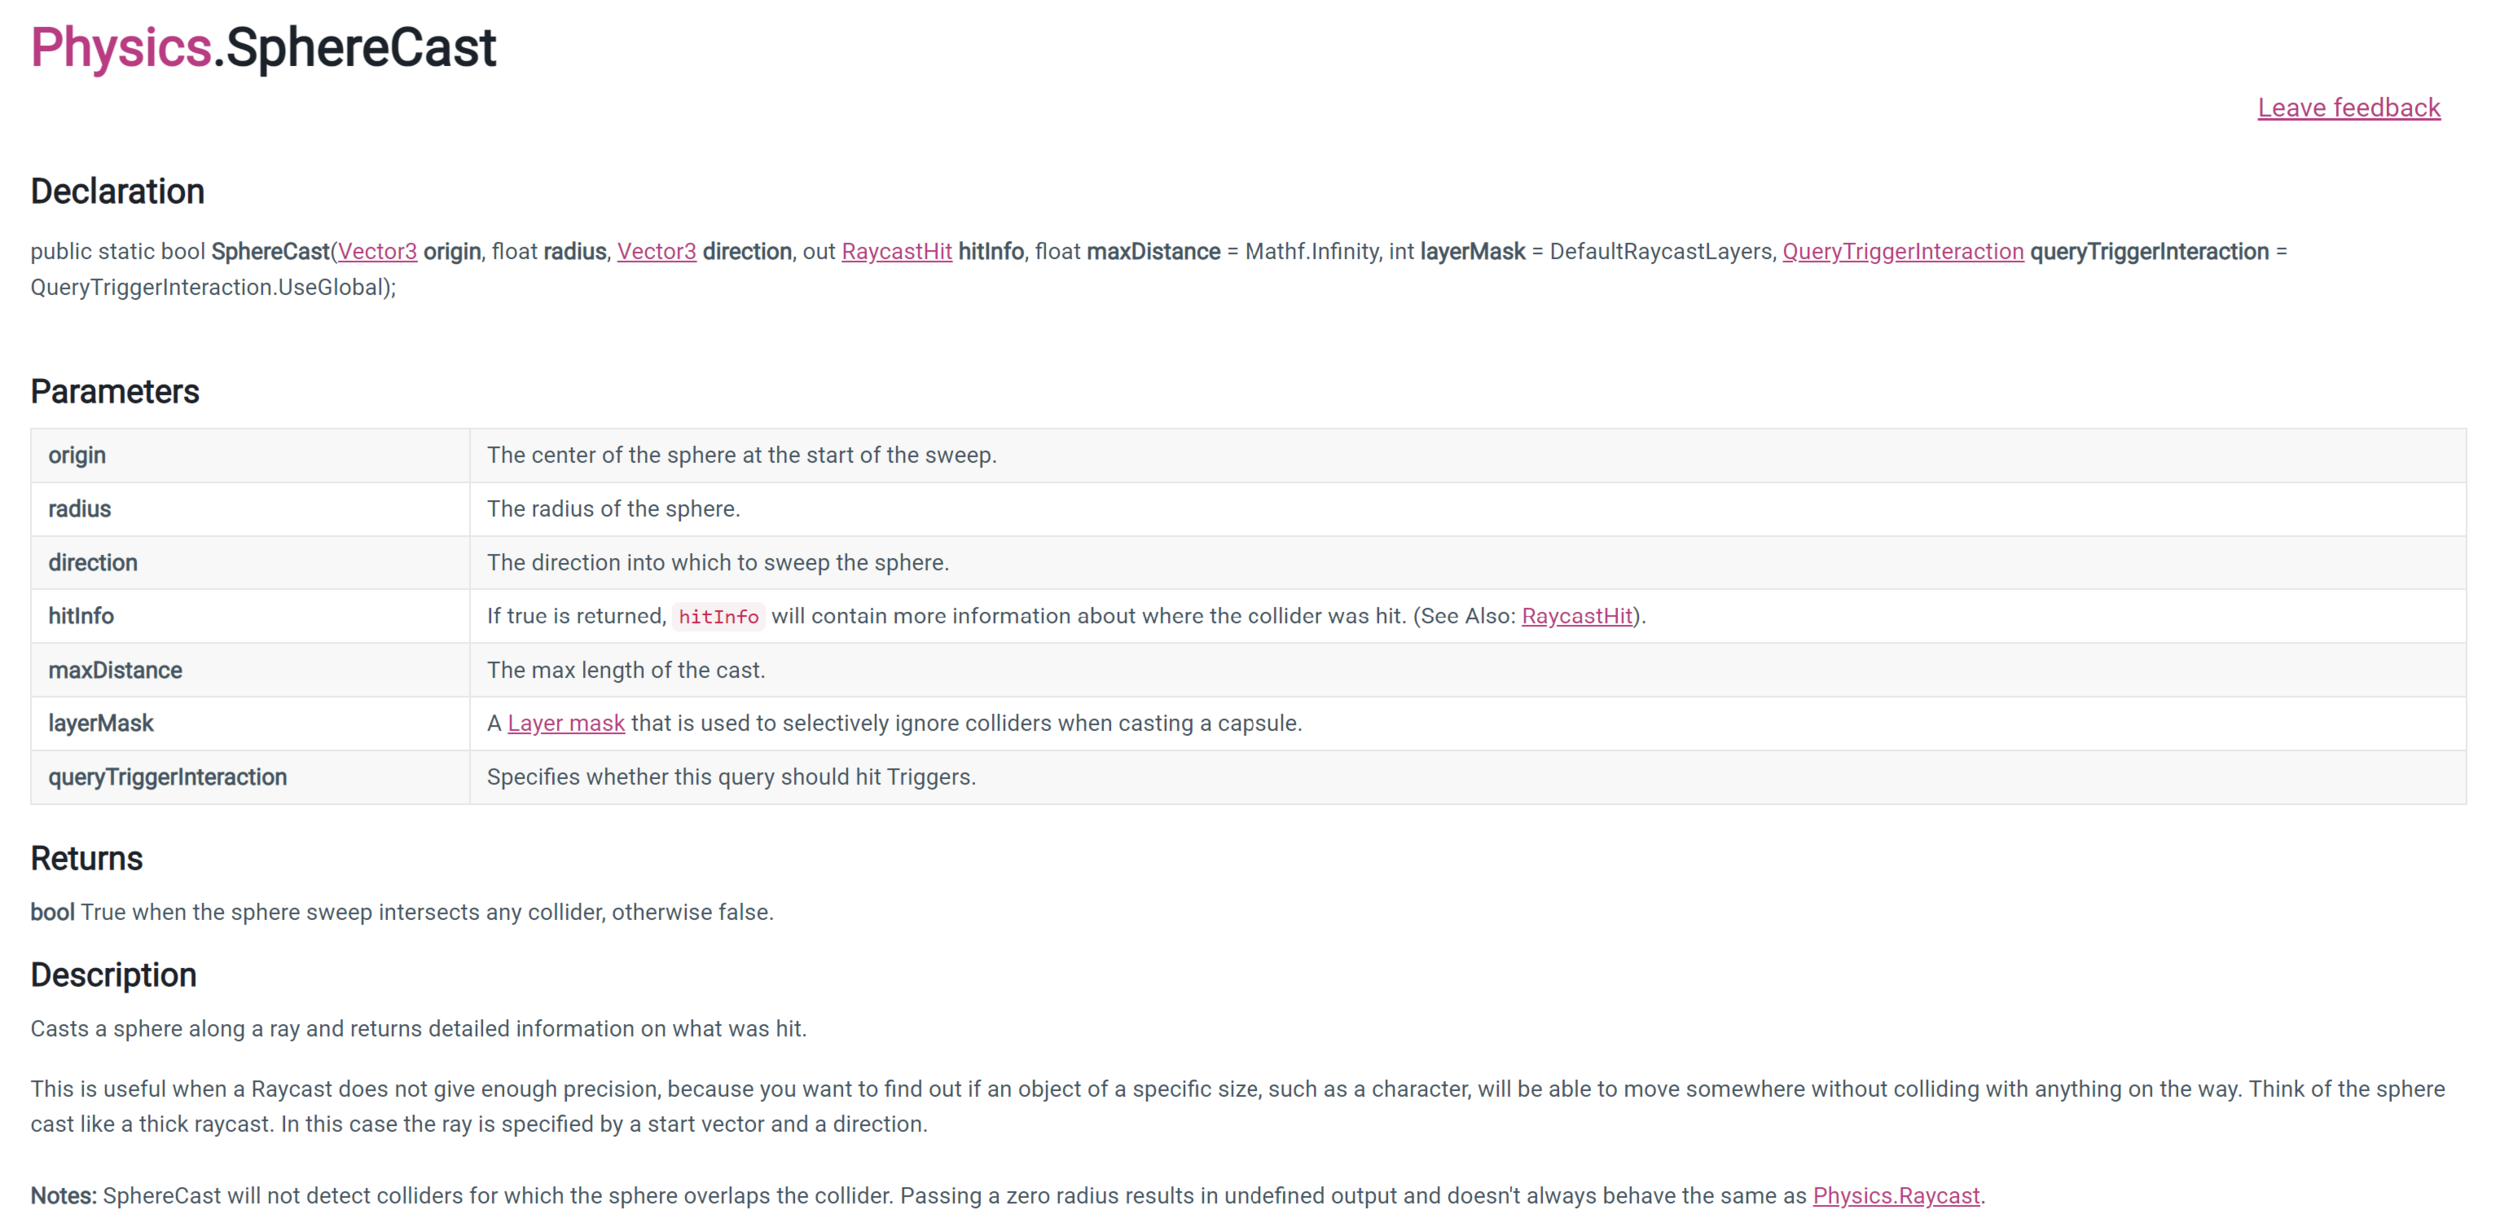
The basics Raycast function

We need to look at the Raycast function itself. The function has a ton of overloads which can be pretty confusing when you’re first getting started.

That said using the function basically breaks down into 5 pieces of information - the first two of which are required in all versions of the function. Those pieces of information are:

  1. A start position.

  2. The direction to send the ray.

  3. A RaycastHit, which contains all the information about the object that was hit.

  4. How far to send the ray.

  5. Which layers can be hit by the raycast.

It’s a lot, but not too bad.

Defining a ray with start positon and the direction (both Vector3)

Raycast using a Ray

Unity does allow us to simplify the input para, just a bit, with the use of a ray. A ray essentially stores the start position and the direction in one container allowing us to reduce the number of input parameters for the raycast function by one.

Notice that we are defining the RaycastHit inline with the use of the keyword out. This effectively creates a local variable with fewer lines of code.


Ok Now Onto Shooting

Creating a ray from the camera through the center of the screen

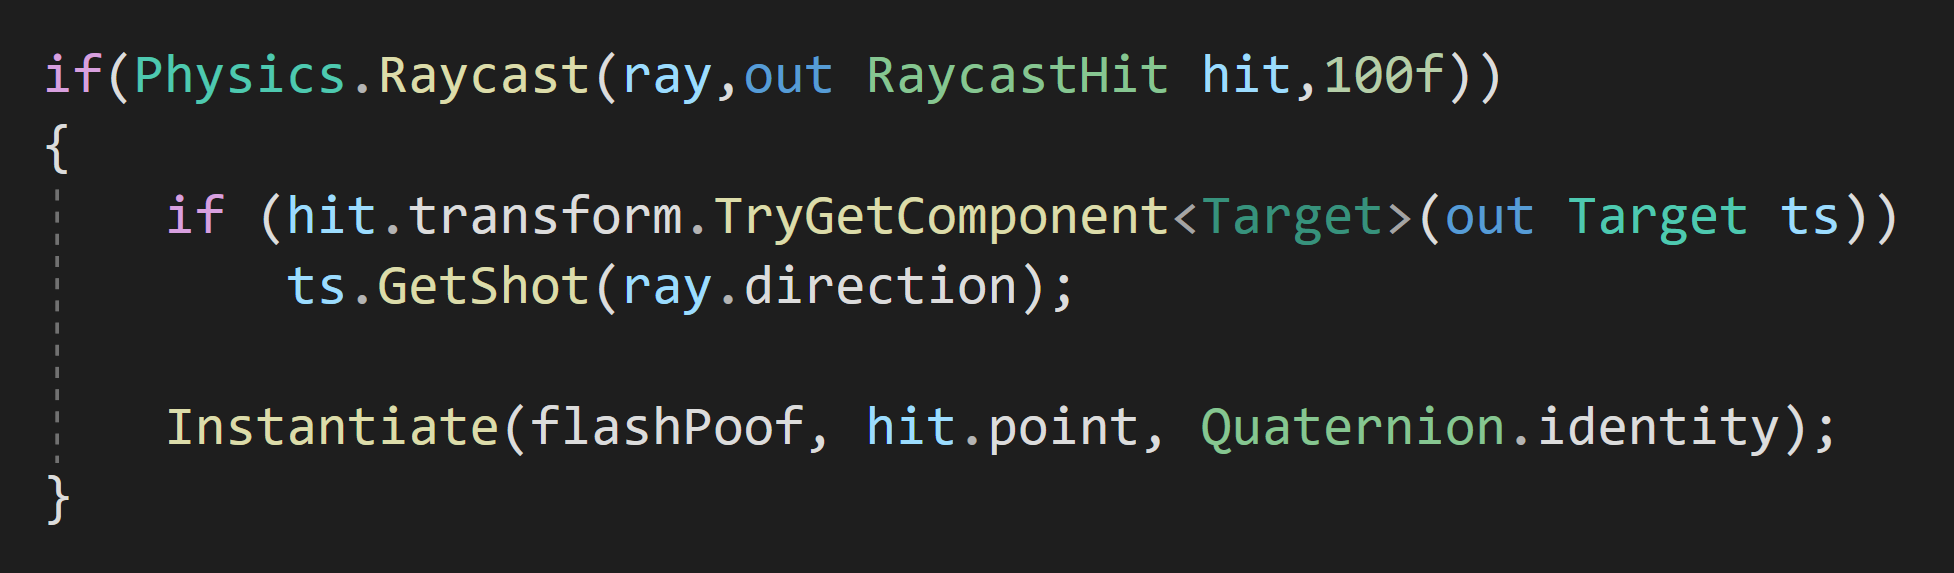
To apply this to first-person shooting, we need a ray that starts at the camera and goes in the camera’s forward direction.

Then since the raycast function returns a boolean, true if it hits something, false if it didn’t, we can wrap the raycast in an if statement.

In this case, we could forgo the distance, but I’ll set it to something reasonable. I will, however, skip the layer mask as I want to be able to shoot at everything in the scene so the layer mask isn’t needed.

When I do hit something I want some player feedback so I’ll instantiate a prefab at the hit point. In my case, the prefab has a particle system, a light, and an audio source just to make shooting a bit more fun.

Okay, but what if we want to do something different when we hit a particular type of target?

There are several ways to do this, the way I chose was to add a script to the target (purple sphere) that has a public “GetShot” function. This function takes in the direction from the ray and then applies a force in that direction plus a little upward force to add some extra juice.

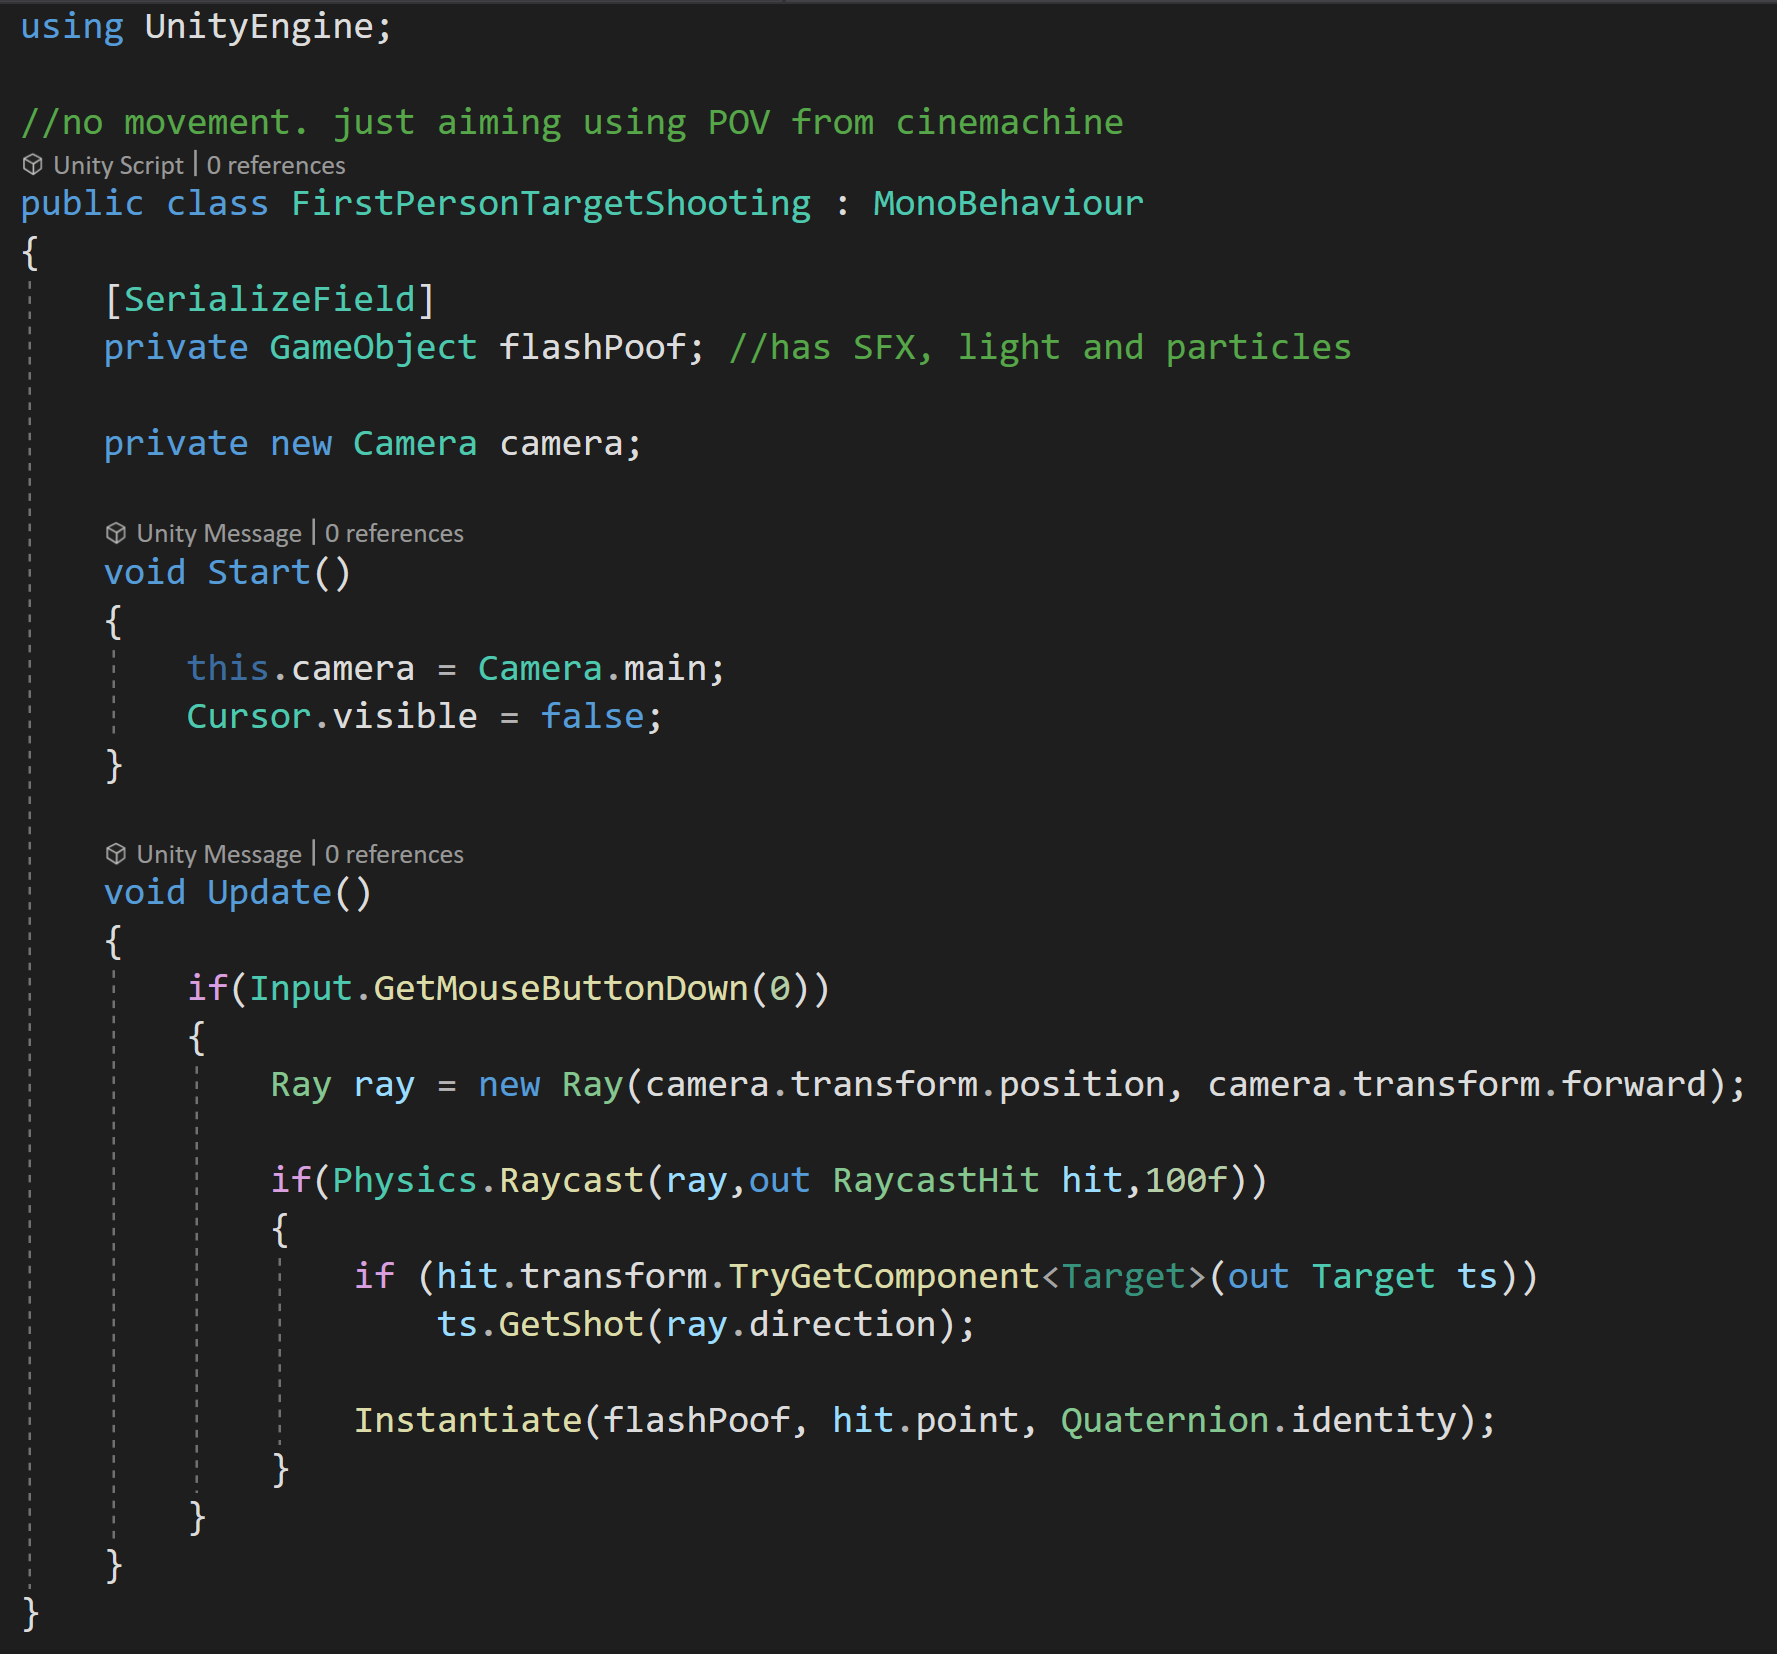
Complete first person shooting example

The unparenting at the end of the GetShot function is to avoid any scaling issues as the spheres are parented to the cubes below them.

Then back to the raycast, we can check if the object we hit has a “Target” component on it. If it does, we call the “GetShot” function and pass in the direction from the ray.

The function getting called could of course be on a player or NPC script and do damage or any other number of things needed for your game.

The RaycastHit gives us access to the object hit and thus all the components on that object so we can do just about anything we need.

But! We still need some way to trigger this raycast and we can do that by wrapping it all in another if statement that checks if the left mouse button was pressed. And all of that can go into our update function so we check every frame.


Selecting Objects

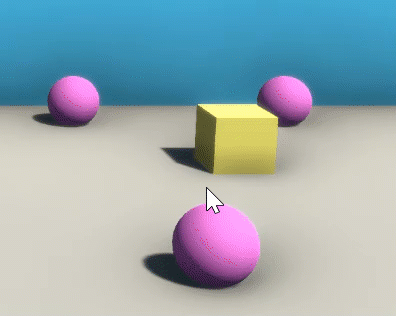
Another common task in games is to click on objects with a mouse and have the object react in some way. As a simple example, we can click on an object to change its color and then have it go back to its original color when we let go of the mouse button.

To do this, We’ll need two extra variables to hold references to a mesh renderer as well as the color of the material on that mesh renderer.

For this example, I am going to use a layer mask. To make use of the layer mask, I’ve created a new layer called “selectable” and changed the layer of all the cubes and spheres in the scene, and left the rest of the objects on the default layer. This will prevent us from clicking on the background and changing its color.

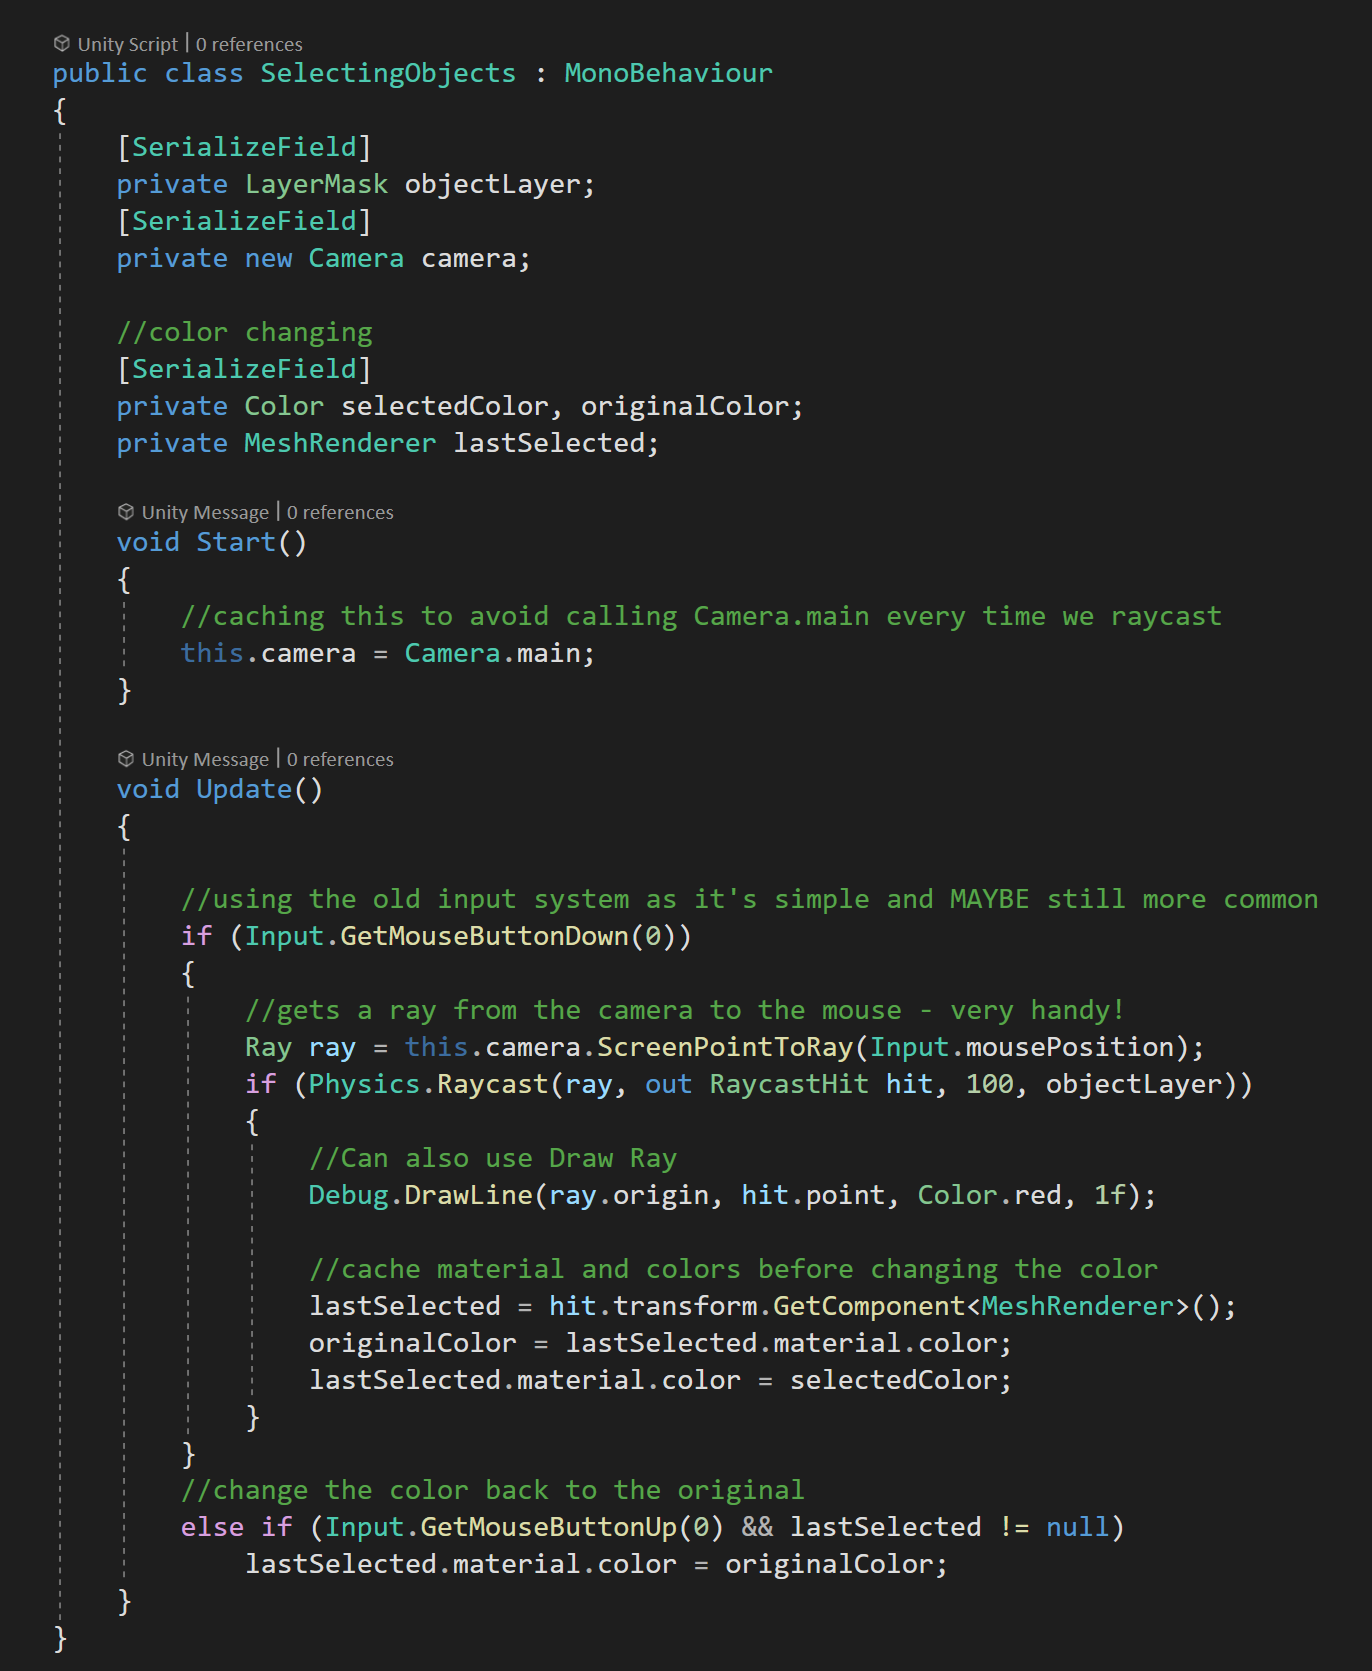
Complete code for Toggling objects color

Then in the script, I created a private serialized field of the type layer mask. Flipping back into Unity the value of the layer mask can be set to “selectable.”

Then if and else if statements check for the left mouse button being pressed and released, respectively.

If the button is pressed we’ll need to raycast and in this case, we need to create a ray from the camera to the mouse position.

Thankfully Unity has given us a nice built function that does this for us!

With our ray created we can add our raycast function, using the created ray, a RaycastHit, a reasonable distance, and our layer mask.

If we hit an object on our selectable layer, we can cache the mesh renderer and the color of the first material. The caching is so when we release the mouse button we can restore the color to the correct material on the correct mesh renderer.

Not too bad.

Notice that I’ve also added the function Debug.DrawLine. When getting started with raycasting it is SUPER easy to get rays going in the wrong direction or maybe not going far enough.

The DrawLine function does just as it says drawing a line from one point to another. There is also a duration parameter, which is how long the line is drawn in seconds which can be particularly helpful when raycasting is only done for one frame at time.


Moving Objects

Now at first glance moving objects seems very similar to selecting objects - raycast to the object and move the object to the hit point. I’ve done this a lot…

The problem is the object comes screaming towards the camera, because the hit point is closer to the camera than the objects center. Probably not what you or your players want to happen.
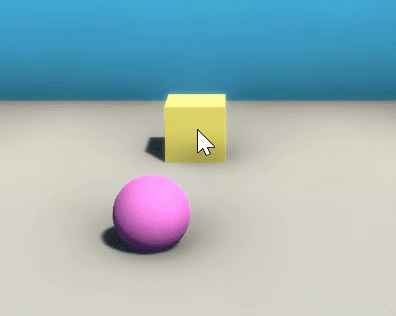
Don’t do this!!

One way around this is to use one raycast to select the object and a second raycast to move the object. Each raycast will use a different layer mask to avoid the flying cube problem.

I’ve added a “ground” layer to the project and assigned it to the plane in the scene. The “selectable” layer is assigned to all the cubes and spheres. The values for the layer masks can again be set in the inspector.

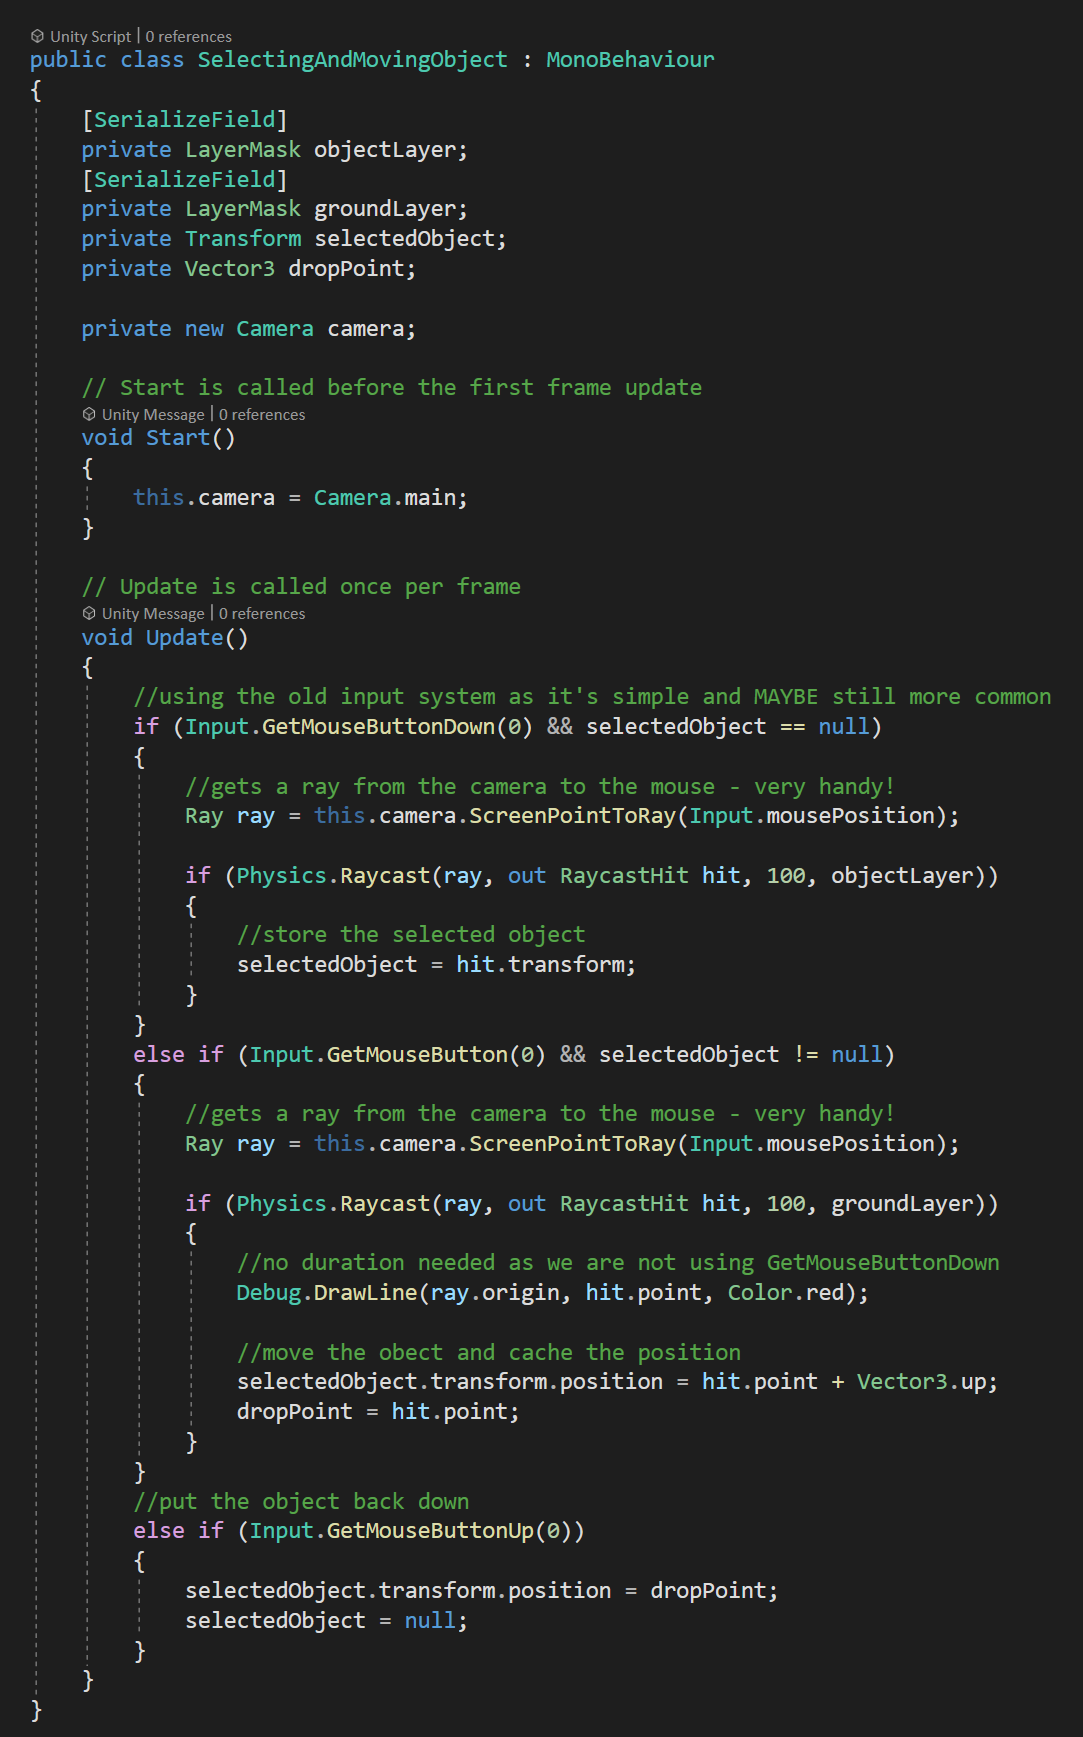
To make this all work, we’re also going to need variables to keep track of the selected object (Transform) and the last point hit by the raycast (Vector3).

To get our selected object, we’ll first check if the left mouse button has been clicked and if the selected object is currently null. If both are true, we’ll use a raycast just like the last example to store a reference to the transform of the object we clicked on.

Note the use of the “object” layer mask in the raycast function.

Our second raycast happens when the left mouse button is held down AND the selected object is NOT null. Just like the first raycast this one goes from the camera to the mouse, but it makes use of the second layer mask, which allows the ray to go through the selected object and hit the ground.

We now move the selected object to the point hit by the ray cast, plus for just for fun, we move it up a bit as well. This lets us drag the object around.

If we left it like this and let go of the mouse button the object would stay levitated above the ground. So instead, when the mouse button comes up we can set the position to the last point hit by the raycast as well as setting the selectedObject variable to null - allowing us to select a new object.


Jumping

The last example I want to go over in any depth is jumping, which can be easily extended to other platforming needs like detecting a wall or a slope or the edge of a platform - I’d strongly suggest checking out Sebastian Lague’s series on creating a 2D platformer if you want to see raycasting put to serious use not mention a pretty good character controller for a 2D game!

For this example, I’ve created a variable to store the rigidbody and I’ve cached a reference to that rigidbody in the start function.

For basic jumping, generally, the player needs to be on the ground in order to jump. You could use a trigger combined with OnTriggerEnter and OnTriggerExit to track if the player is touching the ground, but that’s clumsy and has limitations.

Instead, we can do a simple short raycast directly down from the player object to check and see if we’re near the ground. Once again this makes use of layer mask and in this case only casts to the ground layer.

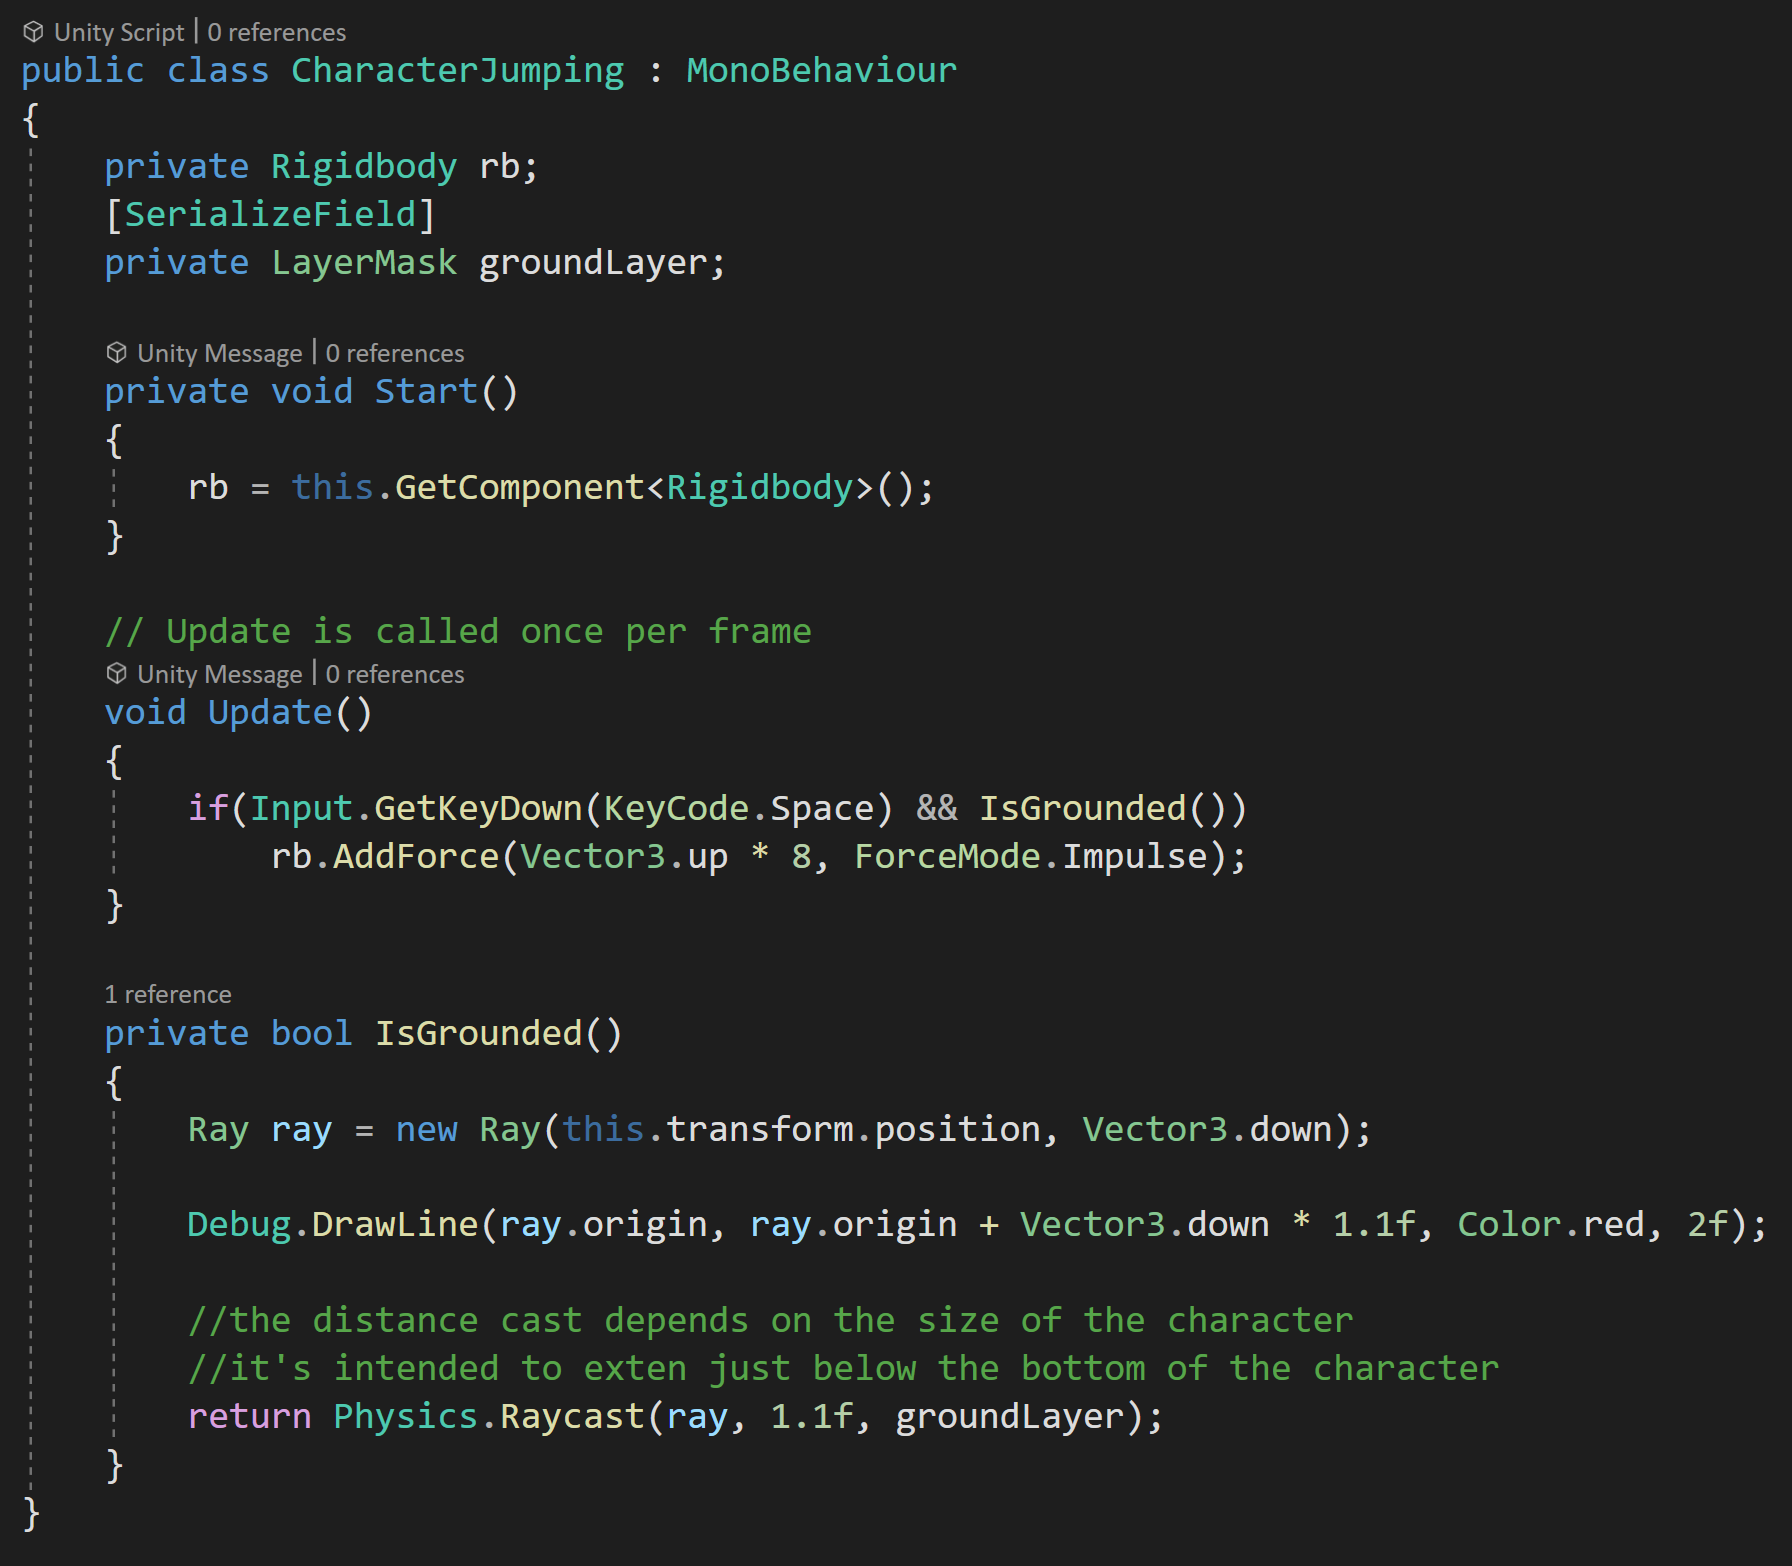
Full code for jumping

I’ve wrapped the raycast into a separate function that returns the boolean from the raycast. The ray itself goes from the center of the player character in the down direction. The raycast distance is set to 1.1 since the player object (a capsule) is 2 meters high and I want the raycast to extend just beyond the object. If the raycast extends too far, the ground can be detected when the player is off the ground and the player will be able to jump while in the air.

I’ve also added in a Debug.DrawLine function to be able to double-check that the ray is in the correct place and reaching outside the player object.

Then in the update function, we check if the spacebar is pressed along with whether the player is on the ground. If both are true we apply force to the rigidbody and it the the player jumps.


RaycastHit

The real star of the raycasting show is the RaycastHit variable.

It’s how we get a handle on the object the raycast found and there’s a decent amount of information that it can give us. In all the examples above we made use of “point” to get the exact coordinates of the hit. For me this is what I’m using 9 times out of 10 or even more when I raycast.

We can also get access to the normal of the surface we hit, which among other things could be useful if you want something to ricochet off a surface or if you want to have a placed object sit flat on a surface.

The RaycastHit can also return the distance from the ray’s origin to the hit point as well as the rigidbody that was hit (if there was one).

If you want to get really fancy you can also access bits about the geometry and the textures at the hit point.


Other Things Worth Knowing

So there’s 4 examples of common uses of raycasting, but there are a few other bits of info that could be good to know too.

There is an additional input for raycasting which is Physics.queriesHitTriggers. Be default this parameter is true and if its true raycasts will hit triggers. If it’s false the raycast will skip triggers. This could be helpful for raycasting to NPCs that have a collider on their body, but also have a larger trigger surrounding them to detect nearby objects.

Next useful bit. If you don’t set a distance for a raycast, Unity will default to an infinite distance - whatever infinity means to a computer… There could be several reasons not to allow the ray to go to infinity - the jump example is one of those.

A very non precise or accurate way of measures performance

Raycasting can get a bad rap for performance. The truth is it’s pretty lightweight.

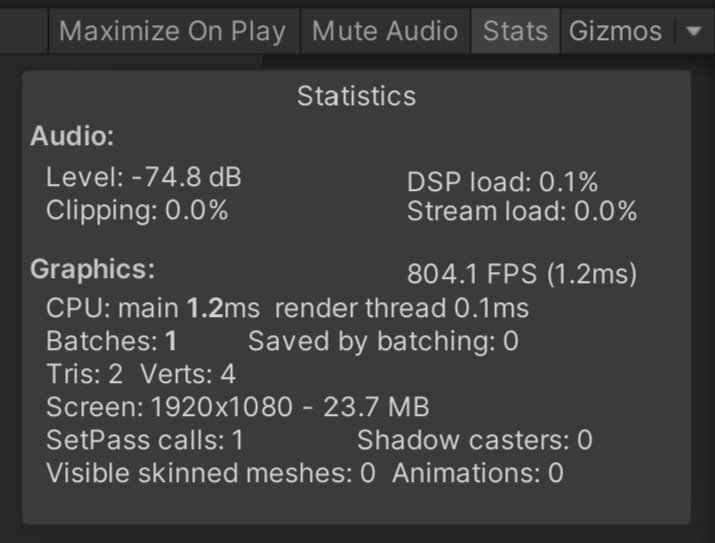
I created a simple example that raycasts between 1 and 1000 times per frame. In an empty scene on my computer with 1 raycast I saw over 5000 fps. With a 1000 raycasts per FRAME I saw 800 fps. More importantly, but no more precisely measured, the main thread only took a 1.0 ms hit when going from 1 raycast to 1000 raycasts which isn’t insignificant, but it’s also not game-breaking. So if you are doing 10 or 20 raycasts or even 100 raycasts per frame it’s probably not something you need to worry about.

1 Raycast per Frame

1000 Raycasts per Frame

Also worth knowing about, is the RaycastAll function. Which will return all objects the ray intersects, not just the first object. Definitely useful in the right situation.

Lastly, there are other types of “casting” not just raycasting. There is line casting, box casting, and sphere casting. All of which use their respective geometric shape and check for colliders and triggers in their path. Again useful in the right situation - but beyond the scope of this tutorial.

Cinemachine. If you’re not. You should.

So full disclosure! This isn’t intended to be the easy one-off tutorial showing you how to make a particular thing. I want to get there, but this isn’t it. Instead, this is an intro. An overview.

If you’re looking for “How do I make an MMO RPG RTS 2nd Person Camera” this isn’t the tutorial for you. But! I learned a ton while researching Cinemachine (i.e. reading the documentation and experimenting) and I figured if I learned a ton then it might be worth sharing. Maybe I’m right. Maybe I’m not.

Cinemachine. What is it? What does it do?

Cinemachine setup in the a Unity scene

Cinemachine is a Unity asset that quickly and easily creates high-functioning camera controllers without the need (but with the option) to write custom code. In just a matter of minutes, you can add Cinemachine to your project, drop in the needed prefabs and components and you’ll have a functioning 2D or 3D camera!

It really is that simple.

But!

If you’re like me you may have just fumbled your way through using Cinemachine and never really dug into what it can do, how it works, or the real capabilities of the asset. This leaves a lot of potential functionality undiscovered and unused.

Like I said above, this tutorial is going to be a bit different, many other tutorials cover the flashy bits or just a particular camera type, this post will attempt to be a brief overview of all the features that Cinemachine has to offer. Future posts will take a look at more specific use cases such as cameras for a 2D platformer, 3rd person games, or functionality useful for cutscenes and trailers.

If there’s a particular camera type, game type, or functionality you’d like to see leave a comment down below.

How do you get Cinemachine?

Cinemachine in the PAckage Manager

Cinemachine used to be a paid asset on the asset store and as I remember it, it was one of the first assets that Unity purchased and made free for all of its users! Nowadays it takes just a few clicks and a bit of patience with the Unity package manager to add Cinemachine to your project. Piece of cake.

The Setup

Once you’ve added Cinemachine to your project the next step is to add a Cinemachine Brain to your Unity Camera. The brain must be on the same object as the Unity camera component since it functions as the communication link between the Unity camera and any of the Cinemachine Virtual Cameras that are in the scene. The brain also controls the cut or blend from one virtual camera to another - pretty handy when creating a cut scene or recording footage for a trailer. Additionally, the brain is also able to fire events when the shot changes like when a virtual camera goes live - once again particularly useful for trailers and cutscenes.

Cinemachine Brain

Cinemachine does not add more camera components to your scene, but instead makes use of so-called “virtual cameras.” These virtual cameras control the position and rotation of the Unity camera - you can think of a virtual camera as a camera controller, not an actual camera component. There are several types of Cinemachine Virtual Cameras each with a different purpose and different use. It is also possible to program your own Virtual Camera or extend one of the existing virtual cameras. For most of us, the stock cameras should be just fine and do everything we need with just a bit of tweaking and fine-tuning.

Cinemachine offers several prefabs or presets for virtual camera objects - you can find them all in the Cinemachine menu. Or if you prefer you can always build your own by adding components to gameObjects - the same way everything else in Unity gets put together.

As I did my research, I was surprised at the breadth of functionality, so at the risk of being boring, let’s quickly walk through the functionality of each Cinemachine prefab.

Virtual Cameras

Bare Bones Basic Virtual Camera inspector

The Virtual Camera is the barebones base virtual camera component slapped onto a gameObject with no significant default values. Other virtual cameras use this component (or extend it) but with different presets or default values to create specific functionality.

The Freelook Camera provides an out-of-the-box and ready-to-go 3rd person camera. Its most notable feature is the rigs that allow you to control and adjust where the camera is allowed to go relative to the player character or more specifically the Look At target. If you’re itching to build a 3rd person controller - check out my earlier video using the new input system and Cinemachine.

The 2D Camera is pretty much what it sounds like and is the virtual camera to use for typical 2D games. Settings like softzone, deadzone and look ahead time are really easy to dial in and get a good feeling camera super quick. This is a camera I intend to look at more in-depth in a future tutorial.

The Dolly Camera will follow along on a track that can be easily created in the scene view. You can also add a Cart component to an object and just like the dolly camera, the cart will follow a track. These can be useful to create moving objects (cart) or move a (dolly) camera through a scene on a set path. Great for cutscenes or footage for a trailer.

“Composite” Cameras

The word “composite” is my word. The prefabs below use a controlling script for multiple children cameras and don’t function the same as a single virtual camera. Instead, they’re a composite of different objects and multiple different virtual cameras.

Some of these composite cameras are easier to set up than others. I found the Blend List camera 100% easy and intuitive. Whereas the Clear Shot camera? I got it working but only by tinkering with settings that I didn’t think I’d need to adjust. The 10 minutes spent tinkering is still orders of magnitude quicker than trying to create my own system!!

The Blend List Camera allows you to create a list of cameras and blend from one camera to another after a set amount of time. This would be super powerful for recording footage for a trailer.

Blend List Camera

The State-Driven Camera is designed to blend between cameras based on the state of an animator. So when an animator transitions, from say running to idle, you might switch to a different virtual camera that has different settings for damping or a different look-ahead time. Talk about adding some polish!

The ClearShot Camera can be used to set up multiple cameras and then have Cinemachine choose the camera that has the best shot of the target. This could be useful in complex scenes with moving objects to ensure that the target is always seen or at least is seen the best that it can be seen. This has similar functionality to the Blend List Camera, but doesn’t need to have timings hard coded.

The Target Group Camera component can act as a “Look At” target for a virtual camera. This component ensures that a list of transforms (assigned on the Target Group Camera component) stays in view by moving the camera accordingly.

Out of the Box settings with Group Target - Doing its best to keep the 3 cars in the viewport

The Mixing Camera is used to set the position and rotation of a Unity camera based on the weights of its children's cameras. This can be used in combination with animating the weights of the virtual cameras to move the Unity camera through a scene. I think of this as creating a bunch of waypoints and then lerping from one waypoint to the next. Other properties besides position and rotation are mixed.

Ok. That’s a lot. Take a break. Get a drink of water, because that’s the prefabs, and there’s still a lot more to come!

Shared Camera Settings

There are a few settings that are shared between all or most of the virtual cameras and the cameras that don’t share very many settings fall into the “Composite Camera” category and have children cameras that DO share the settings. So let’s dive into those settings to get a better idea of what they all do and most importantly what we can then do with the Cinemachine.

All the common and shared virtual camera settings

The Status line, I find a bit odd, it shows whether the camera is Live, in Standby, or Disabled which is straightforward enough, but the “Solo” button next to the status feels like an odd fit. Clicking this button will immediately give visual feedback from that particular camera, i.e. treating this camera as if it is the only or solo camera in the scene? If you are working on a complex cutscene with multiple cameras I can see this feature being very useful.

The Follow Target is the transform for the object that the virtual camera will move with or will attempt to follow based on the algorithm chosen. This is not required for the “composite” cameras but all the virtual cameras will need a follow target.

The Look At Target is the transform for the object that the virtual camera will aim at or will try to keep in view. Often this is the same as the Follow Target, but not always.

The Standby Update determines the interval that the virtual camera will be updated. Always, will update the virtual camera every frame whether the camera is live or not. Never, will only update the camera when it is live. Round Robin, is the default setting and will update the camera occasionally depending on how many other virtual cameras are in the scene.

The Lens gives access to the lens settings on the Unity camera. This can allow you to change those settings per virtual camera. This includes a Dutch setting that rotates the camera on the z-axis.

The Transitions settings allow customization of the blending or transition from one virtual came to or from this camera.

Body

The Body controls how the camera moves and is where we really get to start customizing the behavior of the camera. The first slot on the body sets the algorithm that will be used to move the camera. The algorithm chosen will dictate what further settings are available.

It’s worth noting that each algorithm selected in the Body works alongside the algorithm selected in the Aim (coming up next). Since these two algorithms work together no one algorithm will define or create complete behavior.

The transposer moves the camera in a fixed relationship to the follow target as well as applies an offset and damping.

The framing transposer moves the camera in a fixed screen-space relationship to the Follow Target. This is commonly used for 2D cameras. This algorithm has a wide range of settings to allow you to fine-tune the feel of the camera.

The orbital transposer moves the camera in a variable relationship to the Follow Target, but attempts to align its view with the direction of motion of the Follow Target. This is used in the free-look camera and among other things can be used for a 3rd person camera. I could also imagine this being used for a RTS style camera where the Follow Target is an empty object moving around the scene.

The tracked dolly is used to follow a predefined path - the dolly track. Pretty straightforward.

Dolly track (Green) Path through a Low Poly Urban Scene

Hard lock to target simply sticks the camera at the same position as the Follow Target. The same effect as setting a camera as a child object - but with the added benefit of it being a virtual camera not an actual Unity camera component that has to be managed. Maybe you’re creating a game with vehicles and you want the player to be able to choose their perspective with one or more of those fixed to the position in the vehicle?

The “do nothing” transposer doesn’t move the camera with the Follow Target. This could be useful for a camera that shouldn’t move or should be fixed to another object but might still need to aim or look at a target. Maybe for something like a security-style camera that is fixed on the side of a building but might still rotate to follow the character.

Aim

The Aim controls where the camera is pointed and is determined by which algorithm is used.

The composer works to keep the Look At target in the camera frame. There is a wide range of settings to fine-tune the behavior. These include look-ahead time, damping, dead zone and soft zone settings.

The group composer works just like the composer unless the Look At target is a Cinemachine Target Group. In that case, the field of view and distance will adjust to keep all the targets in view.

The POV rotates the camera based on user input. This allows mouse control in an FPS style.

The “same as follow target” does exactly as a says - which is to set the rotation of the virtual camera to the rotation of the Follow target.

“Hard look at” keeps the Look At target in the center of the camera frame.

Do Nothing. Yep. This one does nothing. While this sounds like an odd design choice, this is used with the 2D camera preset as no rotation or aiming is needed.

Noise

The noise settings allow the virtual camera to simulate camera shake. There are built-in noise profiles, but if that doesn’t do the trick you can also create your own.

Extensions

Cinemachine provides several out-of-the-box extensions that can add additional functionality to your virtual cameras. All the Cinemachine extensions extend the class CinemachineExtension, leaving the door open for developers to create their own extensions if needed. In addition, all existing extensions can also be modified.

Cinemachine Camera Offset applies an offset to the camera. The offset can be applied after the body, aim, noise or after the final processing.

Cinemachine Recomposer adds a final adjustment to the composition of the camera shot. This is intended to be used with Timeline to make manual adjustments.

Cinemachine 3rd Person Aim cancels out any rotation noise and forces a hard look at the target point. This is a bit more sophisticated than a simple “hard look at” as target objects can be filtered by layer and tags can be ignored. Also if an aiming reticule is used the extension will raycast to a target and move the reticule over the object to indicate that the object is targeted or would be hit if a shot was to be fired.

Cinemachine Collider adjusts the final position of the camera to attempt to preserve the line of sight to the Look At target. This is done by moving the camera away from gameObjects that obstruct the view. The obstacles are defined by layers and tags. You can also choose a strategy for moving the camera when an obstacle is encountered.

Cinemachine Confiner prevents the camera from moving outside of a collider. This works in both 2D and 3D projects. It’s a great way to prevent the player from seeing the edge of the world or seeing something they shouldn’t see.

Polygon collider setting limits for where the camera can move

Cinemachine Follow Zoom adjusts the field of view (FOV) of the camera to keep the target the same size on the screen no matter the camera or target position.

Cinemachince Storyboard allows artists and designers to add an image over the top of the camera view. This can be useful for composing scenes and helping to visualize what a scene should look like.

Cinemachine Impulse Listener works together with an Impulse Source to shake the camera. This can be thought of as a real-world camera that is not 100% solid and has some shake. A source could be set on a character’s feet and emit an impulse when the feet hit the ground. The camera could then react to that impulse.

Cinemachine Post Processing allows a postprocessing (V2) profile to be attached to a virtual camera. Which lets each virtual camera have its own style and character.

There are probably even more… but these were the ones I found.

Conclusion?

Cinemachine is nothing short of amazing and a fantastic tool to speed up the development of your game. If you're not using it, you should be. Even if it doesn’t provide the perfect solution that ships with your project it provides a great starting point for quick prototyping.

If there’s a Cinemachine feature you’d like to see in more detail. Leave a comment down below.

A track and Dolly setup in the scene - I just think it looks neat.

C# Extension Methods

Time is one of the biggest obstacles to creating games. We spend a lot of time writing code and debugging that code. And it’s not uncommon to find ourselves writing the same code over and over which is tedious and worse it’s error-prone. The less code you have to write and the cleaner that code is the faster you can finish your game!

Extension methods can help you do just that - write less code and cleaner code with fewer bugs. Which again means you can finish your game faster.

Extension methods allow us to directly operate on an instance rather than needing to pass that instance into a method and maybe best of all we can do this with types that we don’t have access to, such as the many of the built-in types in Unity or maybe a type from an asset from the Asset Store. As the name suggests, extension methods allow us to extend and add functionality to any class or struct.

Automatic Conversion isn’t built in

Automatic Conversion isn’t built in

As a side note, in my opinion, learning game development is all about adding tools to your toolbox and extension methods should be one of those tools. So let’s take a look at how they work and why they are better than some other solutions.

Concrete Example

Local function to do the conversion

Local function to do the conversion

In a past project, I needed to arrange gameObjects on a grid. The grid lattice was 1 by 1 and set on integer values. The problem, or in reality, the pain point comes from positions in Unity being a Vector3 which is made of 3 floats, not 3 integers.

There is a type Vector3Int and I used that struct to store the position of the objects.

But!

A static helper class with a static function is better, but not the best

A static helper class with a static function is better, but not the best

Casting from Vector3 to Vector3Int isn’t built into Unity (the other direction is!). And sure, you could create a conversion operator, but that’s the topic of another post.

Helper Class Call

Helper Class Call

So, when faced with this inconvenience, my first thought, of course, was to write a function that takes in a Vector3, rounds each component and returns a Vector3Int. This works perfectly fine, but that method is inside a particular class which means if I need to do the conversion somewhere else I need to copy the function into that second class. This means I’m duplicating code which generally isn’t a good practice.

Extension method!!!

Extension method!!!

Ok, fine. The next step is to move the function into a static helper class. I do this type of thing all the time. It’s really helpful. But the result is more code than we need. It’s not A LOT more, but still, it’s more than we need.

If this was my own custom class or struc, I’d just add a public function that could handle the conversion, but I don’t have access to the Vector3 struct. Yet, I have some needed functionality that will be used repeatedly AND I want to type as little as possible while maintaining the readability of the code.

And this situation? This is exactly where extension functions shine!

Extension Method Call

Extension Method Call

To turn our static function into an extension method, all we need to do is add the keyword “this” to the first input parameter of the static function. And then we can call the extension method as if it was part of the struct. Pretty easy and pretty handy.

Important Notes

It’s important to note that with extension functions the type that you are extending needs to be the first input parameter in the function. Also, our static extension method needs to be inside a static class. Miss one of these steps and it won’t work correctly.

More Examples

So let’s look at some more examples of what you could do with extension methods. These of course are highly dependent on your game and what you need to do, but maybe these will spark some ideas and creativity.

Need to swap the Y and Z values of a Vector3. No problem!

Swap Y Z.png
Swap Y Z Call.png

Maybe you need to set the alpha of a sprite in a sprite renderer. Yep. We can do that.

Reset a transform? Locally? Globally? Piece of cake.

Transform Reset.png
Transform Reset Call.png

Extension methods also work with inheritance. For example, most Unity UGUI components inherit from UnityEngine.UI.Graphic which contains the color information. So once again it would be easy to create an extension method to change the alpha for nearly every UGUI element.

Graphic Set Alpha Call.png

Now taking another step down the tunnel of abstraction extension methods also work with generics. If you are scared of generics or have no idea what I’m talking about check out my earlier video on the topic.

Either way, let’s imagine you have a list and you want every other element in that list (or some other sorting). One way, and of course not the only way, to do that filtering would be with a generic extension method like so.

Generic Extension Method.png
Generic Extension Method Call.png

That’s it! They’re pretty simple and easy to use, but I’d argue they provide another tool to write simple, cleaner, and more readable code.

Changing Action Maps with Unity's "New" Input System

If you missed my first post (and video) on Unity’s new input system - go check that out. This post will build on what that post explored.

Why Switch Actions Maps?

Yes, I made a really horrible vehicle controller

Yes, I made a really horrible vehicle controller

Action maps define a series of actions that can be contextual.

For example, a 3rd person controller might use one action map, driving a vehicle may use another, and using the UI might use yet another.

With the new input system, it’s easy to control which set of actions (i.e. action map) is active and being used by a player. You can easily toggle off your player’s motion while navigating the UI or prevent the player from casting a spell while riding a horse…

Whatever.

You have more control and the code that gives you that control, while more abstract, is generally far cleaner than it would be with the old input system.

But First, A Problem To Fix

As mentioned in the last post, the simplest implementation of the new input system has each object create an instance of an Input Action Asset. This works great if there is only one object that is reacting to input, but if there is more than one object listening to input (UI, SFX, vehicles, etc) this gets messy. Exponentially more so if you intend on switching action maps as all those objects will need to know which action map is currently in use. Forget one object, and something strange or goofy might start happening - like shooting sound effects while driving a tractor (not that that happened to me - nope, not all).

To be honest, I’m not sure what the best solution for this is. Maybe there is some clever programming pattern - and if there is PLEASE LET ME KNOW - but for now my solution is to fall back and use an input manager.

Why? This allows a single and static instance of the Input Action Asset to be created and accessed by any other class that needs to be aware of player input.

I don’t love this dependence on a manager script, but I think it’s far tidier than trying to keep a bunch of scripts in the scene up to date. The manager stays in charge of enabling and disabling action maps. And! When a map is disabled it won’t invoke events so the scripts that are subscribed to those events will simply have nothing to respond to.

Input Manager

Input Manager Complete Script.png

The input manager is pretty simple and straightforward. It has a public static instance of the Input Action Asset and an action that will get called when the action map is changed.

The real magic happens in the last function.

The ToggleActionMap function is again public and static and will be called by scripts that need to toggle the action map (duh!).

Inside the function, we first check to see if the requested action map is already enabled. If it is we don’t need to do anything. However, if it’s not active, we toggle off all action maps by calling Disable on the Input Action Asset itself. This has the same effect as calling Disable on each and every action in the action map.

Next, we invoke the Action Map Changed event. This allows things like the UI to be aware of changes and give the player a visual indication of the change. This could also be used to toggle cameras or SFX depending on the action map activated. This step is optional, but I think will generally prove to be pretty useful.

The final step is to enable the desired action map. And that’s it. We now have the ability to change action maps! Say what you will about the new input system, but that’s mighty clean!

Examples of Implementation

For my use case, the player can change between a normal 3rd person controller and driving a very janky tractor (the jank is in my control code, not the tractor itself). The change to controlling the tractor happens when the player walks near the tractor and enters a trigger surrounding the tractor. The player can then “exit” the tractor by pressing the escape key or the “north” button on a gamepad.

You can see the player and tractor actions maps.

3rd Person “Player” Action Map

3rd Person “Player” Action Map

Tractor Action Map

Tractor Action Map

Tractor Controller Class.png

Then in the tractor controller class, there are a handful of movement-related variables, but most important is the Input Action variable that will hold a reference to the movement action that is on the tractor action. We get a reference to this Input Action in the OnEnable function by referencing the static instance of the Input Action Asset in the Input Manager class then going through the tractor action map and lastly to the movement action itself.

Also in the OnEnable, we subscribe the ExitTractor function to the “Exit” action. This allows the player to press a button and switch back to the 3rd person controller.

In the OnDisable function, we unsubscribe to prevent any redundancy of calls or errors in the case of the object being turned off or destroyed.

The Exit Tractor function then calls the public static ToggleActionMap function on the Input Manager to change the active action map to the player action map.

Likewise, in the OnTriggerEnter function, the ToggleActionMap is called to activate the tractor action map.

It’s actually pretty simple. Of course, the exact implementation of how and when action maps are changed depends on your game.

Final Thoughts

I don’t love that any class in the game can switch the active action map, but I’m honestly not sure how to get around. The input manager could easily have some filters in the Toggle Action Map function, but that will absolutely depend on the implementation and needs of your game. Or you might be able to come up with some wrapper class that wraps the Input Action Asset and only gives access to the features (likely just the events) that you want to have widely available.

Also, this approach doesn’t directly work for having multiple players since there is only one instance of the Input Action Asset. There would need to be some additional cleverness and that… that I’ll save for another tutorial (maybe).

Unity's New Input System

Version 1.0.2 of the input system was used along with Unity 2020.3

Warning! If you are looking for a quick 5-minute explanation of Unity’s new input system - this isn’t going to be it - and you aren’t going to find one! The new system is more complex than the old system. Especially when it comes to simple things like knowing when the spacebar has been released.

I’m going to do my best to be concise and get folks up and running, but it will take some effort on your part! You will likely need to dive into the admittedly opaque Unity documentation if you have a special use case. It’s just the way it is. Input is a complex topic and Unity has put together a system that can nicely handle that complexity.

So Why Use Unity’s New Input System?

Using Unity’s “NEW” Input system to move, jump, rotate the camera, play SFX, shoot and charge up a power Shot

Using Unity’s “NEW” Input system to move, jump, rotate the camera, play SFX, shoot and charge up a power Shot

I’ve got three reasons. Three reasons I’ve stolen, but they are good reasons to use the new Input System.

If you want players to be able to use multiple devices OR you are developing for multiple platforms the new system makes it very very easy to do so. Frankly, I was shocked how easily I could add a gamepad and easily switch back and forth between it and a keyboard.

It’s Event-Based! When an action is started, completed (performed), or canceled an event can be called. While you will still need to “poll” values every frame for things like player or camera motion, button presses for other bits such as jumping or shooting no longer need to clog an update function! While this adds some perceived complexity - especially if you don’t feel comfortable with events - but it is an awesome feature.

Input debug system! Unity provides an input debugger so you can see the exact values, in real-time, of your system’s input. This makes it so much easier to see if a device is recognized and functioning properly. AND! In the case that you do need to do some polling of an input value (think similar to the old system in an update function), it’s much easier to see what buttons are being pressed and what those input values look like.

So yeah! Those are pretty fantastic reasons. The new input system does take some time and patience to learn - doubly so if you are used to the old system, but hopefully, you’ll agree the effort is worth it.

Setting It Up

Input System Package Manager.png

To get started, you’ll need Unity version 2019.1 or newer and the system is added via the package manager. When importing the system you will likely get a popup with a warning to change a setting. This setting is all about which system Unity will use to get input data from. You can make further changes in Project Settings > Player > Active Input Handling. From there, you can choose to use either the new system, the old system, or both.

Input Warning Trimmed.png

If you can’t get the new system to function, this setting would be worth checking.

Next, we need to create a new “Input Actions” asset. This is done like any other asset, by right-clicking in a project folder or using the asset menu. Make sure to give the asset a good name as you’ll be using this name quite often.

With the asset created you can select it and then in the inspector press “edit asset.” This will open a window specific to THIS input action asset.

So if you have more than one input action asset, you will need to open additional windows - there is no way to toggle this window to another asset. Personally, I found this a bit confusing when first getting started as it feels different than other Unity windows and functionality.

Inside the Input Action Window

This is where all the setup happens and there’s a lot going on! There are way more options in this window than could possibly be covered in this video or even several more videos. But! The basics aren’t too complex and I’m going to try and look at some of the more common use cases.

Input Action Asset Window - Including added Actions for Movement and JUmp

Input Action Asset Window - Including added Actions for Movement and JUmp

On the left, you’ll see a column for “Action Maps.” These are essentially a set of inputs that can be grouped together. Each Input Action asset can have multiple action maps. This can be useful for different control schemes for example if your player can hop in a car or maybe on a horse and the controls will be different. This can also be used for UI controls - so that when a menu is opened the player object stops responding and the controls for a gamepad now navigate through a menu.

To be honest, I haven’t yet figured out a nice clean way to swap action maps but it might be the topic of a future post/video so let me know (comment below) if you are interested in seeing that.

To create a new action map simply press the plus at the top right of the column and give the action map a good name. I’ve called mine “Player.”

The middle column is where our actions get defined. These are not the buttons or keys that will be pressed - those are the bindings - but these are the larger actions that we want the player to be able to do such as move, jump, or shoot.

To get started I’m going to create two actions one for movement and one for jumping.

Each action has an “action type” and a “control type” - you can see these to the right in the image above. These options can easily feel ambiguous or even meaningless as they can seemly have little to no impact on how your game plays - but when you want to really dial in the controls they can be very useful

Action Types.png

Actions types come in three flavors value, button and passthrough. The main difference between these three is when they call events and which events get called.

Link: Unity Action Type Documentation

Value Action

The Value action type will call events whenever a value is changed and it will call the events started, performed, and canceled (more on these events later).

The “started” event will get called when the control moves away from the default value - for example, if a gamepad stick moves away from (0,0).

The “performed” event will then get called each time the value changes.

The “canceled” event will get called when the control moves back to the default value - i.e. the gamepad stick going back to (0,0).

This would seem like a good choice for movement. However, the events are only called when the values change, so it won’t get called if the player holds down the W key or keeps the gamepad stick in the same position. That’s not to say it’s not useful, but there are potentially other problems that need to be solved for creating player motion if this action type is used.

Button Action

The button action type will call events based on the state of the button and the interactions assigned to the action itself. The interactions, which we will get to, will define when the performed and canceled events are called. In the end, the Button action type is what you want when events should be called when a button is pressed, released, or held. So far in my experience, this covers the majority of my use cases and is what I’ll be using throughout this tutorial.

PassThrough

The PassThrough action type is very similar to the value action type. It will call the performed event any time the control changes value. BUT! It will not call started or canceled.

The passthrough action also does not do what Unity calls disambiguation - meaning that if two controls are assigned Unity won’t be smart and try to figure out which one to use. If this sounds like something you might need to know about, check out the Unity documentation.

If your head is starting to spin and your getting lost in the details. That’s fair. This system is far more powerful than the old system, but as a trade-off, there are way more bits and pieces to it.

Interactions

Interaction Types

Interaction Types

I’m not going to go too deep into the weeds on interactions, but this is where we can refine the behavior a bit more. This is where we can control when the events get invoked. We have options to hold, press (which includes release options), tap, slow tap, and multi-tap. All of these interactions were possible with the old system, but in some cases, they were a bit challenging to realize.

For the most part, I found that interactions are fairly self-explanatory with some potentially confusing nuance between tap and slow tap. The documentation while a bit long does a great job of clarifying some of that nuance.

Link: Unity Documentation on Interactions

Processor Types


Processor Types

Processors

Sometimes you need or want to make some adjustments to the input values such as scaling or normalizing vectors. Essentially processors allow you to do some math with the input values before events are called and values are sent out. These aren’t terribly complex and are going to be very use case specific.

Link: Unity Documentation on Processors

Adding Bindings

Still with me? Now that we have our actions set up we need to add bindings - these are the actual inputs from the player! Think key presses or gamepad stick movements. I’m going to create bindings for both the keyboard and a gamepad for all the controls. This is a tiny bit more work, but once we get to the code, the inputs will be handled the same which is really powerful!

Movement

The first binding will be for the keyboard to use the WASD keys for movement. We need to add a 2D Vector Composite. To find this option you’ll need to right-click on the movement action. This will automatically add in four new bindings for the four directions.

Composite bindings essentially allow us to combine multiple inputs to mimic a different input device, i.e. using the WASD in the same way as a gamepad stick. You may notice that there is a mode option, but for our use case either digital option will work.

Notice also, that interactions and processors can be assigned to individual bindings allowing more customization! These interaction and processors work the same for bindings as for actions.

Link: Composite Mode Documentation (scroll down just a bit)

Add 2D vector Composite Binding by right Clicking on the Movement Action

Add 2D vector Composite Binding by right Clicking on the Movement Action

With the WASD binding created we then need to assign keys or the input path. We can do this by clicking on what looks like a dropdown next to “path.” If this dropdown is not present click the T button which toggles between the dropdown and typing.

Then you can select the correct key from the list. OR! Press the listen button and then press the button you want for the binding. It couldn’t be much easier.

Add bindings by search or using the “Listen" functionality

Add bindings by search or using the “Listen" functionality

The second binding will be for the gamepad. You can simply click on the plus for the movement action and choose “Add Binding.” Selecting this binding you will see options to the right. Once again you can use the “listen” option and move the gamepad stick, but it only allows one direction on the stick. Maybe there’s a way around this but I haven’t found it! So select any direction and we’ll edit the path manually to take in all values from the stick.

Once you have a path, click the T button to manually edit the path. From there we’ll remove the direction-specific part. In my case this will look like <Gamepad>/leftStick with this done you can click the T button again and the path should be just the left stick.

Adding the Left Stick Binding

Adding the Left Stick Binding

Jump

I’ll repeat the process of adding bindings for the jump action. Adding in a binding for the spacebar and the “south” button on my gamepad. Unity has been pretty clever here with the gamepad buttons. Rather than give control specific names they have cardinal directions so that the “south” button will work regardless of whether it is an Xbox or Playstation controller.

Now that we have the basic actions and binding implemented. We’re almost ready to get into the code. But first! We need to make sure the asset is saved. At the top right there is a save asset button. This has caught me out a few times, make sure you press it to save changes.

There is also an auto-save feature, which is great until you generate C# code (which will talk about in a minute). In that case, the autosave tends to make the interface laggy and a bit harder to use.

Adding the Jump Binding

Adding the Jump Binding

Implementation

There is a default player controller that comes with the input system. It has its place, but in my opinion, if you’ve come this far it’s worth digging deeper and learning how to use the input system with your own code. It’s also important to know that the input system can communicate by broadcasting messages, drag and drop Unity Events, or my preferred method C# events.

Video Tutorial: Events, Delegates, and Actions!!!

If you aren’t familiar with events, check out my earlier tutorial. Events aren’t easy to wrap your head around at first but are hugely powerful and frankly are at the core of implementing the new input system.

To get access to the C# events we first need to generate a C# code for the actions we just created.

Thankfully, Unity will do that work for us!

In the project folders, select the Input Action Asset that we created at the beginning. In the inspector, you should see a toggle labeled “Generate C# Class”. Toggle this on and press “apply.”

This should create a new C# script in the same location as the input action asset and with the same name - unless you changed the default settings. You can open it up, but there’s no need to edit it or do any work on it so I’m just going to leave it be.

Custom Class

The “Simplest” Implementation of a the New Input System for Player Controller

The “Simplest” Implementation of a the New Input System for Player Controller

Next, we’ll need a custom player controller class.

This class will need access to the namespace UnityEngine.InputSystem.

Then we’ll need two new variables. The first is of the type of our newly created Input Action Asset, in my case this is “Farmer Input Actions.” And the second is of type Input Action and will hold a reference to our movement input action.

You can create a variable for each input action and cache a reference to it - I’ve seen many videos choose to do it this way. I have chosen not to do this with most of the input actions to keep the code compact for the purposes of this tutorial - it’s up to you.

Also, for most event trigger actions you don’t need to reference the input action outside of the OnEnable and OnDisable functions. Which for me lessens the need for a cached reference.

Before we start working with the input actions and events. We need to create a new instance of the Input Action Asset.

I’ve chosen to do this in the Awake function. The fact that this player controller class will have its own instance is important! The Input Action Asset is not static or global!

With the instance created, we need to wire up the events and enable the input actions and this is best done in the OnEnable function.

For the movement input action, I’ll cache a reference and you can see that this is accessed through the instance of the Input Action Asset, then the Player action map, and finally the movement action itself. I am choosing to cache this reference because we will need access to it in the fixed update function.

With the reference cached, we need to enable the input action with the “Enable” function. Do note that there is an "enabled” property that is not the same as the “Enable” function. If you forget to call this function, the input action will not work. Like a few other steps, this one caught me out a few times too.

The steps for the jump input action are similar, but in this case, I won’t be caching a reference. Instead, I will be subscribing a function to the performed event on the jump input action. This subscribed function will get called each time the jump key or button is pressed.

There is NO need to constantly check whether the jump button is pressed in an update function! This is one of the great improvements and advantages of the new system. Cleaner code albeit at the cost of a bit more complexity.

To create the jump function you can do it manually, or in Visual Studio, you can right-click and choose “Quick Actions and Refactoring” and then choose “Generate Method.” This will ensure that the input parameter is of the correct type. Then inside the function, we can simply add a debug message to be able to test it.

The next step to the setup is to disable both the movement and jump input actions. This should be done in the OnDisable function. This may not be 100% needed but ensures that the events won’t get called and thus throw errors if the object is disabled. Also note, that I did not unsubscribe. While in most cases this won’t be a problem or throw an error, but if the object is turned on and off the jump function will get called multiple times. This was spotted by a YT viewer (THANKS DAVE).

The final step for testing is to read the movement values in the fixed update function. I’m using fixed update because I’ll use the physics engine to move and control the player the object. Reading the values is pretty straightforward. To keep things simple, I’ll use another debug statement, and to get the values we simply call “Read Value” on the movement input action, give it a generic parameter of the type Vector2 since we have both X and Y values for movement.

Testing

Testing Input with Debug.png

At this point, we can test out our solution to make sure everything is wired up correctly. To do this we simply need to put our new player controller class on a gameObject and go into play mode.

Pressing the WASD keys or moving the gamepad stick should show values in the console. While pressing the spacebar or the south button on the gamepad should display our jump message.

Whew!

If you’re thinking that was a lot of work to display some debug messages your right. It was. But! We have a system that works for both a keyboard and a gamepad AND the code is really quite simple and clean. While the old system was quick to use the keyboard or mouse, adding in a gamepad was a huge pain, not to mention we would need to code both inputs individually.

With the new system, the work is mostly at the front end creating (and understanding) the Input Action Asset. Leaving the implementation in the code much simpler. Which in my opinion is a worthy trade-off.

So What’s Next?

I still want to look at a few more implementations of the new input system, but frankly, this is getting long already. In the intro GIF you may have noticed a lot more functionality than the project currently has. ALL of the extra functionality is based on what I’ve shown already, but I think is worth covering - in another tutorial.

For now, if you want to see my full implementation of the 3rd person controller (minus the camera) you can find it here on PasteBin. I will transition all the project code to GitHub once the series is complete.

Topics I’d still like to look at:

  • Creating the 3rd Person Controller

  • Controlling a Cinemachine Camera

  • Triggering UI and SFX with the new System

    • Shooting!!

  • “Charging Up” for a power shot

  • Player rebinding during playmode

  • Swapping action maps

    • UI? Boat? Car?

If you’d like to see one or all of those topics, leave a comment below. They’re only worth doing if folks are interested.

Bolt vs. C# - Thoughts with a dash of rant

Bolt vs C Sharp.png

It’s not uncommon for me to get asked my thoughts on Bolt (or visual scripting in general) versus using C# in the Unity game engine. It’s a topic that can be very polarizing, leaving some feeling the need to defend their choice or state that their choice is the right one and someone else’s choice is clearly wrong.

Which is better Bolt or C#?

I wouldn’t be writing this if I didn’t have an opinion, but it’s not the same answer for every person. Like most everything, this question has a spectrum of answers and there is no one right answer for everyone at every point in their game development journey. Because that’s what this is no matter whether you are just downloading Unity for the first time, completing your first game, or a senior engineer at a major studio. It’s a journey.

A Little History

Eight years ago I was leaving one teaching job for another and starting to wonder how much longer I would or could stay as a classroom teacher. While doing a little online soul searching, I found an article about learning to code, which had been on my to-do list for a long time, I bookmarked it and came back to the article after starting the new job.

One of the suggestions was to learn to program by learning to use Unity. And I was in love from the moment I made my first terrain and was able to run around on that terrain. I was in love and I continued to play and learn.

It didn’t take long before I needed to do some programming. So I started with Javascript (Unityscript) as it was easy to read and I found a great series of videos walking me through the basics. I didn’t get very far. Coding took a long time and a lot of the code I wrote was a not-so-distant relative to guessing and checking.

Then I saw Playmaker! It looked amazing! Making games without code? Yes. Please! I spend a few months working with Playmaker and I was getting things to work. Very quickly and very easily. Amazing!

But as my projects got more complicated I started to find the limit of the actions built into Playmaker and I got frustrated. Sure I could make a “game” but it’s not a game I wanted to play. As a result, I’d come to the end of my journey with Playmaker.

So I decided to dive into learning C#. I knew it would be hard. I knew it would take time. But I was pretty sure it was what I needed to do next. I struggled like everyone else to piece together tutorials from so many different voices and channels scattered all over YouTube. After a few more months of struggle, I gave in and spent some money.

As a side note that’s a big turning point! That’s when exploring something new starts to turn into a hobby!

I bought a book. And then another and another. I now have thousands of pages of books on Unity, Blender, and C# on my shelves. Each book pushed me further and taught me something new. Years later and I still have books that I need to read.

After a year of starting and restarting new Unity projects, one of those projects started to take shape as an actual game - Fracture the Flag was in the works. But let’s not talk about that piece of shit. I’m very proud to have finished and published it, but it’s wasn’t a good game - no first game ever is. For those who did enjoy the game - thank you for your support!

With an upcoming release on Steam, I felt confident enough to teach a high school course using Unity. Ironically it would be the first of many new courses for me! I choose to use Playmaker over C# for simplicity and to parallel my own journey. No surprise, my students were up and running quickly and having a great time.

But my students eventually found the same limits I did. I would inevitably end up writing custom C# code for my students so they could finish their projects. This is actually how Playmaker is designed to be used, but as a teacher, it’s really hard to see your students limited by the tools you chose for them to use.

That’s when Bolt popped up on my radar! The learning curve was steeper, but it used reflection and that meant almost any 3rd party tool could be integrated AND the majority of the C# commands were ready to use out of the box. Amazing!

I took a chance and committed the class to use Bolt for the upcoming year. As final projects were getting finished most groups didn’t run into the limits of Bolt, but some did. Some groups still needed C# code to make their project work. But that was okay because Bolt 2 was on the horizon and it was going to fix the most major of Bolt’s shortcomings. I still wasn’t using Bolt in my personal projects, but I very much believed that Bolt (and Bolt 2) was the right direction for my class.

Bolt 2 was getting closer and it looked SO GOOD! As a community, we started to get alpha builds to play with and it was, in fact, good - albeit nowhere near ready for production. I started making Bolt 2 videos and was preparing to use Bolt 2 with my students.

And then! Unity bought Bolt and a few weeks later made it free. This meant more users AND more engineers working to improve the tool and finish Bolt 2 faster.

A Fork in the Road

Bolt2RIP.png

Then higher-ups in Unity decided to cancel Bolt 2. FUCK ME! What?

To be honest, I still can’t believe they did it, but they did. Sometimes I still dream that they’ll reverse course, but I also know that will never happen.

Unity choose accessibility over functionality. Unity choose to onboard more users rather than give current users the tools they were expecting, the tools they had been promised, and the tools they had been asking for.

So what do I mean by that?

For many visual scripting is an easy on-ramp to game development, it’s less intimidating than text-based code and it’s faster to get started with. Plus for some of those without much programming experience, visual scripting may be the easiest or only way to get started with game design.

Now, here’s where I may piss off a bunch of people. That’s not the goal. I’m just trying to honest.

Game development is a journey. We learn as we go. Our skills build and for the first couple of years we simply don’t have the skills to make a complete and polished game that can be solid for profit. In those early days, visual scripting is useful maybe even crucial, but as our projects get more complex current visual scripting tools start to fall apart under the weight of our designs. If you haven’t experienced this yet, that’s okay, but if you keep at game development long enough you will eventually see the shortcomings of visual scripting.

It’s not that visual scripting is bad. It’s not. It’s great for what it is. It just doesn’t have all the tools to build, maintain and expand a project much beyond the prototype stage.

My current project “Where’s My Lunch” is simple, but I wouldn’t dream of creating it with Bolt or any other visual scripting tool.

Bolt 2 was going to bring us classes, scriptable objects, functions, and events - all native to Bolt. While that wasn’t going to bring it on par with C# (still no inheritance or interfaces for starters) it did shore it up enough that (in my opinion) small solo commercial games could be made with it and I could even imagine small indie studios using it in final builds. It was faster, easier to use, and more powerful.

So rather than give the Bolt community the tools to COMPLETE games we have been given a tool to help us learn to use Unity and a tool to help us take those first few steps in our journey of making games.

So What Do I Really Think About Bolt?

Bolt is fantastic. It really is. But it is what it is and not more than that. It is a great tool to get started with game design in Unity. It is, however, not a great tool to build a highly polished game. There are just too many missing pieces and important functionality that doesn’t exist. I don’t even think that adding those features is really Unity’s goal.

Bolt is an onboarding tool. It’s a way to expand the reach and the size of the community using Unity. Unity is a for-profit company and Bolt is a way to increase those profits. That’s not a criticism - it’s just the truth.

Unity has the goal of democratizing game development and while working toward that goal they have been constantly lowering the barrier for entry. They’ve made Unity free and are continuously adding features so that we all can make prettier and more feature-rich games. And Bolt is one more step in that direction.

By lowering the barrier in terms of programming more people will start using Unity. Some of those people will go on to complete a game jam or create an interesting prototype. Some of those people may go on to learn to use Blender, Magica Voxel and C#. And some of those people will go on to make a game that you might one day play.

So yeah, Bolt isn’t the tool that lets you make a game, and it certainly doesn’t allow creating games without code - because that’s just total bullshit - but Bolt is the tool that can help you start on that long journey of making games.

To the Beginner

You should proudly use Bolt. You are learning so much each time you open up Unity. So don’t be embarrassed about using Bolt or other visual scripting tools. Don’t make excuses for it, but do be ready for the day when you need to move on.

You may never make it to that point. You may stay in the stage of making prototypes or doing small game jams and that’s awesome! This journey is really fucking hard. But there may come a day where you have to make the jump to text-based coding. It’s a hard thing to do, but it’s pretty exciting all the same. If and when that day does come don’t forget that Bolt helped you get there and was probably a necessary step in your journey.

To the C# Programmer

If you say visual scripting isn’t coding, then I’m pretty sure by that logic digital art isn’t art because it’s not done “by hand.” Text doesn’t make it coding. Just like using assembly language isn’t required to be a programmer.

Even if you don’t use visual scripting you can probably read it and help others. It’s okay to nudge folks in the direction of text-based coding. It is after all a more complete tool, but don’t be a jerk about it or make people feel like they are wasting their time. You aren’t superior just because you started coding earlier, had a parent that taught you to program, or were lucky enough to study computer science in college. Instead, I think you have a duty to support those who are getting started just like you did many years ago.

To the Bolt Engineers

Ha! Imagine that you are actually reading this.

I know you work hard. I know you are doing your best. I know you are doing good things. Keep it up. You are helping to get more people into game development and that is a good thing for all of us.

One small request? Please put your weekly work log in a separate discord channel so we can see them all together or catch up if we miss a few. The Chat channel seems like one of the worst places to put those posts.

To Unity Management

I’m glad you’ve realized that Unity was a poop show and you are doing your best to fix it. It’s a long process and we expect good things in the future.

BUT! I think you made a mistake with Bolt 2 and you let the larger Bolt community down. It was that same community that helped build Bolt into an asset you wanted to buy. You told us one thing and you did another. You made a promise and you broke it. Just look at the Bolt discord a year ago vs. now. It’s a very different community and those who built it have largely disappeared.

Stop selling Bolt as a complete programming tool. And seriously! There is no video game development without coding. That’s a fucking lie and you know it. If you don’t? That’s a bigger problem.

I am sure that you will make more money with Bolt integrated into Unity than if Bolt 2 had continued. That’s okay. Just don’t pretend that wasn’t a huge piece of the motivation. Be honest with your community. Bolt and other visual scripting tools are stepping stones. It’s part of a larger journey. It’s not complicated. It’s not demeaning. It’s just the truth. We can handle the truth. Can you?

To the YouTuber

If your title or thumbnail for a Bolt video contains the words “without Code” you are doing that for clicks and views. It’s not serving your audience and it’s not helping them make games. You are playing a game (the YT game). So please stop.

Coroutines - Unity & C#

Counting.gif

Do you need to change a value over a few frames? Do you have code that you’d like to run over a set period of time? Or maybe you have a time-consuming process that if run over several frames would make for a better player experience?

Like almost all things there is more than one way to do it, but one of the best and easiest ways to run code or change a value over several frames is to use a coroutine!

But What Is A Coroutine?

Coroutines in many ways can be thought of as a regular function but with a return type of “IEnumerator.” While coroutines can be called just like a normal function, to get the most out of them, we need to use “StartCoroutine” to invoke them.

But what is really different and new with coroutines (and what also allows us to leverage the power of coroutines) is that they require at least one “yield” statement in the body of the coroutine. These yield statements are what give us control of timing and allow the code to be run asynchronously.

It’s worth noting that coroutines are unique to Unity and are not available outside of the game engine. The yield keyword, IEnumerable interface, and the IEnumerator type are however native to C#.

But before we dig in too deep, let’s get one misconception out of the way. Coroutines are not multi-threaded! They are asynchronous multi-tasking but not multi-threaded. C#does offer async functions, which can be multi-threaded, but those are more complex and I’m hopeful it will be the topic of a future video and blog post. If async functions aren’t enough you can go to full-fledged multi-threading, but Unity is not thread-safe and this gets even more complex to implement.

Changing a Numeric Value - Update or Coroutine?

Update method… Not so awesome

Update method… Not so awesome

So let’s start with a simple example of changing a numeric value over time. To make it easier to see the results, let’s display that value in a UI text element.

We can of course do this with the standard update function and some type of timer, but the implementation isn’t particularly pretty. I’ve got three fields, an if statement, and an update that is going to run every frame that this object is turned on.

While this works, there is a better and cleaner way. Which of course is a coroutine.

Corountines are much Cleaner

Corountines are much Cleaner

So let’s look at a coroutine that has the same result as the update function. We can see the return type of the coroutine is an IEnumerator. Notice that we can include input parameters and default values for those parameters - just like a regular function. Then inside the coroutine, we can define the count which will be displayed in the text. This variable will live as long as the coroutine is running, so we don’t need a class-wide variable making things a bit cleaner.

And despite personally being scared of using while statements this is a good use of one. Inside the while loop, we encounter our first yield statement. Here we are simply asking the computer to yield and wait for a given number of seconds. This means that the computer will return to the code block that started the coroutine as if the coroutine had been completed and continue running the rest of the program. This is an important detail as some users may expect the calling function to also pause or wait.

THEN! When wait time is up the thread will return to the coroutine and run until it terminates or in this case loops through and encounters another yield statement.

The result, I would argue while not shorter is much cleaner than an update function. Plus the coroutine only runs once per second vs. once per frame and as a result, it will be more performant.

In my personal projects, I’ve replaced update functions with coroutines for functionality that needed to run consistently but not every frame - and it made a dramatic improvement in the performance of the game.

As mentioned earlier, to invoke the coroutine we need to use the command “StartCoroutine.” This function has 2 main overloads. One that takes in a string and the second which takes in the coroutine itself. The string-based method can not take in input parameters and I generally avoid the use of strings, if possible, so I’d recommend the strongly typed overload.

Stopping a Coroutine

If you have a coroutine, especially one that doesn’t automatically terminate, you might also want to stop that coroutine when it’s no longer needed or if some other event occurs and you want to stop the process of the coroutine.

Unlike an update function if the component is turned off the coroutine will not automatically stop. But! If the gameObject with the coroutine is turned off or destroyed the coroutine will stop.

So that’s one way and can certainly work for some applications. But what if you want more control?

You can bring down the hammer and use “StopAllCoroutines” which stops all the coroutines associated with the given component.

Stop a particular coroutine by reference

Stop a particular coroutine by reference

Personally, I’ve often found this sufficient, but you can also stop individual coroutines with the function “StopCoroutine” and give it a reference to the particular coroutine that you want to stop. This is done by telling it explicitly which coroutine by name OR I recently learned you can cache a reference to a coroutine and use that reference in the stop coroutine function. This method is useful if there is more than one coroutine running at a time - we’ll look at an example of that later.

ChangingValue+Coroutine.jpg

If you want to ensure that a coroutine stops when a component is disabled, you can call either call stop coroutine or stop all coroutines from an “OnDisable” function.

It’s also worth noting that you can get more than one instance of a coroutine running at a time. This could happen if a coroutine is started in an update function or a while loop. This can cause problems especially if that coroutine, like the one above, never terminates and could quickly kill performance.

A Few Other Examples

GameBoardFillin.gif

Other uses of coroutines could be simple animations. Such as laying down the tiles of a game board. Using a coroutine may be easier to implement and quicker to adjust than a traditional animation.

The game board effect, shown to the right, actually makes use of two coroutines. The first instantiates a tile in a grid and waits a small amount of time before instantiating the next tile.

The second coroutine is run from a component on each tile. This component caches the start location then moves the object a set amount directly upward and then over several frames lerps the object’s position back to the original or intended position. The result is a floating down-like effect.

Another advantage of using a coroutine over a traditional animation is the reusability of the code. The coroutine can easily be added to any other game object with the parameters of the effect easily modified by adjusting the values in the inspector.

Instantiate the Board Tiles

Instantiate the Board Tiles

Make those Tiles float down into position

Make those Tiles float down into position

Notice that in the float down code it doesn’t wait for the position to get back to the original location since a lerp will never get to the final value. So if the coroutine ran the while loop until it got to the exact original position the coroutine would never terminate. If the exact position is important the position can be set after exiting the while loop.

Moving Game Piece.gif

Caching and Stopping Coroutines

Coroutines can also be used to easily create smooth movement such as a game piece moving around the board.

Moving Game Piece Coroutine.png

But there is a potential snag with this approach. In my case, I’m using a lerp function to calculate where the game piece should move to for the next frame. The problem comes when using a lerp function that operates over several frames. This creates the smooth motion - but in that time the player could click on a different location, which would start another instance of the coroutine, and then both coroutines would be trying to move the game piece to different locations and neither would ever be successful or ever terminate.

This is a waste of resources, but worse than that the player will lose control and not be able to move the game piece.

A simple way to avoid this issue is to cache a reference to the coroutine. This is made easy, as the start coroutine function returns a reference to the started coroutine!

Then all we need to do, before starting a new coroutine is to check if the coroutine variable is null, if it’s not we can stop the previous coroutine before starting the next coroutine.

It’s easy to lose control or lose track of coroutines and caching references is a great way to maintain that control.

Yield Instructions!

The yield instructions are the key addition to coroutines vs. regular functions and there are several options built into Unity. It is possible to create your own custom yield instructions and Unity provides some documentation on how to do that if your project needs a custom implementation.

Maybe the most common yield instruction is “wait for seconds” which pauses the coroutine for a set number of seconds before returning to execute the code. If you are concerned about garbage collection and are using “wait for seconds” frequently with the same amount of time you can create an instance of it in your class. This is useful if you’ve replaced some of your update functions with coroutines and that coroutine will be called frequently while the game is running.

Another common yield statement is to return “null.” This causes Unity to wait until the next frame to continue the corountine which is particularly useful if you want an action to take place overall several frames - such as a simple animation. I’ve used this for computationally heavy tasks that could cause a lag spike if done in one frame. In those cases, I simply converted the function to a coroutine and sprinkled in a few yield return null statements to break it up over several frames.

An equally useful, but I think often forgotten yield statement is “break” which simply ends the execution of a coroutine much like the “return” command does in a traditional function.

“Wait Until” and “Wait While” are similar in function in that they will pause the coroutine until a delegate evaluates as true or while a delegate is true. These could be used to wait a specific number of frames, wait for the player score to equal a given value, or maybe show some dialogue when a player has died three times.

“Wait For End of Frame” is a great way to ensure that the rest of the game code for that frame has completed as well as after cameras and GUI have rendered. Since it is often hard, or impossible, to control what code executes before other code this can be very useful if you need specific code to run after other code is complete.

“Wait for Fixed Update” is pretty self-explanatory and waits for “fixed update” to be called. Unity doesn’t specify if this triggers before, after, or somewhere in the in-between when fixed update functions are getting called.

Wait for “Seconds Real-Time” is very similar to “wait for seconds” but as the name suggests it is done in real-time and is not affected by the scaling of time whereas “wait for seconds” is affected by scaled time.

Other Bits and Details

Many when they get started with Unity and coroutines think that coroutines are multi-threaded but they aren’t. Coroutines are a simple way to multi-task but all the work is still done on the main thread. Mult-threading in Unity is possible with async function or manually managing threads but those are more complex approaches. Multi-tasking with coroutines means the thread can bounce back and forth between tasks before those tasks are complete, but can’t truly do more than one task at once.

Tasks vs Time.png

The diagram to the right is stolen from the video Best Practices: Coroutines vs. Async and is is a great visual of real multi-threading on the left and what multi-tasking with coroutines actually does.

While pretty dry, the video does offer some very good information and some more detailed specifics on coroutines.

It’s also worth noting that coroutines do not support return values. If you need to get a value out of the coroutine you’ll need a class-wide variable or some other data structure to save and access the value.

Where's My Lunch? - January Devlog Update

Six months ago the game “Where’s My Lunch?” was born out of the Game Makers Toolkit GameJam. The original game idea was to use bombs to move the player object around the scene to some sort of goal - trying to play on the jam’s theme of “Out of Control.” Nothing too clever, but physics and explosions are generally good fun and it seemed like a good starting point.

Every game or project I’d ever made in Unity was 3D and WML was no different. It started as a 3D game with the simple colored cubes and spheres standing pretending to be game art. It was clumsy and basic but still, it felt like it had some potential.

That first evening, I started to work on the art style. I needed something simple, quick, and hopefully not too hard to look at… After bumping around with a few ideas, I downloaded FireAlpaca and starting drawing stick figures. For the life of me, I can’t remember why… I just did. I tossed on a hat to add a little character and Hank was born and I was on my way to making my first ever 2D game!

Early 3d Prototype

Early 3d Prototype

With great input from viewers as I streamed the game’s progress, I added gravity wells and portals to the project to add even more physics-based chaos to the game. With the help of a clumsy but effective save system, I created a dozen playable levels. I was even able to add a sandbox level which was another suggestion from a viewer.

Results out of over 5000 submissions

Results out of over 5000 submissions

With time running out on the 48 hour game jam, I did my best to fix a few bugs, pushed a build to Itch, and submitted my efforts to the game jam. I’d spent somewhere in the neighborhood of 20 hours working on the game and I was pretty content with the results.

The game finished in the top 10% of over 5000 games submitted, which while we always dream higher, I have to admit felt pretty darn good. With the results posted, I mentally closed up the project and didn’t intend to come back to it. I’d learned a lot and had some fun. What more was there to do with the game?

Where’s My Lunch?

I still dream of Making this game

I still dream of Making this game

Like so many others I’ve had projects come and go. With most not getting finished due to over scoped game ideas and lack of time to make those ideas a reality. This is a lesson I continue to struggle to learn…

A few months after the game jam, the idea came along to polish and publish a small game while making video content along the way. I loved it! It seemed like a perfect project.

I spent much of October and November planning out the project with an eye to keeping the scope small but still adding ideas and topics that might make useful videos and hopefully a more engaging game. I started work on a notion page (which I much prefer to Trello) trying to find the balance between tasks that were too big or too small. And to be honest, I’ve never forced myself to fully plan out a game to this level of detail.

The planning wasn’t particularly fun, I had to actively fight the urge to open Unity and just get to work… I didn’t list absolutely everything that needed to be done, but I got most of it and I think the result was more than worth the effort.

I knew the scope of the game. I knew what I needed to do next. And in some way, I had a contract with myself as to what I was making with clear limits on the project.

All of this had me hopeful that the project will have a different ending than so many of my past projects.

Progress?

With the planning was done it was time for the fun part. Digging into the code!

Most of the early hours spent with the code didn’t make a big difference in the appearance or even the player experience. Much of that early time was spent shoring up the underlying framework, making code more generic and more robust. I wanted to be able to add mechanics and features without breaking the game with each addition. Yes, we’ve all been there. While maybe not the highest standard, I’ve come to judge my own work by what needs to happen to add a new feature, how long that takes, and how much else breaks in the process.

Does adding a new level to the game require rewriting game manager code? Or manually adding a new UI button? Or can I simply add a game level object to a list and the game handles the rest?

What about adding the ability to change the color of an object when the player selects it? Does that break the placement system? Does that result in messy code that will need to be modified for each new game item? Or can it be done by creating a simple, clean and easy to use component that can be added to any and all selectable objects?

Holding myself to this standard and working in a small scoped game has felt really good. It hasn’t always been easy AND importantly I don’t think I could have held myself to that standard during the game jam. There simply wasn’t time.

For example, during the game jam I wanted players to be able to place the portals to solve a level but in order for a portal to work it needs to have a connection to another portal… The simplest solution was to create a prefab that was a parent object with two children portals. This meant when they were added they could already be connected. And while this worked it also created all kinds of messy code to handle this structure. Which meant I had all these “if the object is a portal then do this” statements throughout the code. For me, those lines were red flags that the code wasn’t clean and it was going to need some work.

Fixing that was no small task. Every other game item was a single independent object. Plus, I knew that I wanted to have other objects that could connect like a lever and a gate or a lever and a fan and the last thing I wanted to do was add a bunch more one-off if statements to handle all those special cases.

Player made connections in Orange

Player made connections in Orange

My solution was to break the portals down into single unconnected objects and to allow the player to make connections by “drawing” the connection from one portal to another portal. I really like the results, especially in a hand-drawn game, but man, did it cause headaches and break a poop ton of code in the process.

Connecting portals functionally was pretty easy, drawing the lines wasn’t too hard, but updating the lines when one portal is moved or saving and then loading that hand-drawn line… Big ugh!

But! It works.

AND!

The framework doesn’t just work for portals it works for any object. Simply change the number of allowed connections in the inspector for a given prefab and it works! Adding the lever and gate objects required ZERO extra code in the connection system! The fan? Yep. No problem. Piece of cake.

Simply. Fucking. Amazing.

Vertical Slice?

To be honest, I’ve never fully understood the idea of a vertical slice of a game. Maybe that was because my games were too complex and I never got there? I don’t know, but a couple of months ago, it clicked. I understood the idea and why you would make a vertical slice.

Then I heard someone else describe it… And I was back to not being so sure.

So here’s my definition. Maybe it’s right. Maybe it’s not. I’m not sure I actually care because what I did made sense to me, it worked and I’d do it again. To me, a vertical slice means getting all the systems working. Making them general. Making them ready to handle more content. Making them robust and flexible.

For Where’s My Lunch that meant getting the save and load system working, debugging the placement system, making the UI adapt to new game elements without manual work, implementing Steamworks, adding Steam workshop functionality, and a bunch of other bits that I’ve probably forgotten about.

To me, a vertical slice means I can add mechanics and features without breaking the game and those additions are handled gracefully and as automated as possible.

Adding Content

My to-Do List with game content towards the bottom

My to-Do List with game content towards the bottom

Maybe it’s surprising, but adding new mechanics is pretty low on my to-do list. As I start to reflect on this project as a whole, this may be one of the bigger things I’ve learned. About the only items lower are tasks such as finalizing the Steam Store, creating a trailer and adding trading cards. Things that rely on adding more content to the game.

So, with the “vertical slice” looking good, I quickly added several new game items that weren’t part of the game jam version. Speed zones, levers, gates, fans, spikes, and balloons with a handful more still on the to-do list. Each game item took two or three hours including the art, building the prefab, and writing the mechanics specific code. Each item gets added to the game by simply dropping in the prefab to a list on a game manager and making sure there is a corresponding value or type of an enum that is used to identify and handle the objects by other classes.

And that is so satisfying!

100% I will revisit and tweak these new objects, but they work! And they didn’t break anything when I added them.

Simply. Fucking. Amazing.

What’s Next?

Analog Level Planning

Analog Level Planning

The hardest part! Designing new levels.

The plan from here on out is to use the level designer that’s built into the game - that level that started as a sandbox playground.

To help make that process easier I’ve added box selection, copy and paste, (very) basic undo functionality, and a handful of other quality of life improvements. My hope is that players will be inspired to create and share levels and the easier those levels are to create the more levels they’ll create.

I also want to add enough levels to keep players busy for a good while. How long? I don’t know. It’s scary to think about how many levels I might need for an hour or two hours or five hours of gameplay…

While the framework is in place and gets more and more bug-free each day, there is still a lot of work to do and a lot that needs to be created.

C# Generics and Unity

Using Generics.png

Generics are something that can sound scary, look scary, but you are probably already using them - even if your don’t know it.

So let’s talk about them. Let’s try to make them a little less scary and hopefully add another tool to your programmer toolbox.

If you’ve used Unity for any amount of time you’ve likely used the Get Component function. I know when I first saw this I simply accepted the fact that this function required some extra info inside of angle brackets. I didn’t think much about it.

Later I learned to use lists that had a similar requirement. I didn’t question why the type that was being stored in the list needed to be added so differently compared to when creating other objects. It just worked and I went with it.

It turns out that those objects are taking in what’s called a generic argument - that’s what’s inside the angle brackets. This argument is a type and it helps the object know what to do. In terms of the GetComponent function, it tells it which type to look for and with the list, it tells the list what type of thing will be stored inside that list.

Generics are just placeholder types that can be any type or they can also be constrained in various ways. It turns out this is pretty useful.

Why?

Ok. Great. But why would you want to use generics?

Well essentially, they allow us to create code that is more general (even generic) so that it can be used and reused. Generics can help prevent the need for duplicate code - which for me is always a good thing. The less code I have to write, the less code I have to debug, and the faster my project gets finished.

We can see this with the GetComponent function in that it works for ANY and ALL types of monobehaviours. This one function can be used to find all built-in types or types created by a programmer. It would be a real pain if with each new monobehaviour you had to write a custom GetComponent function!

The same is true with lists. They can hold ANY type of object and when you create a new type you don’t have to create a new version of the list class to contain it.

So yeah. Generics can reduce how much code needs to get written and that’s why we use them!

Ok. So Give Me An Example!

Scene Setup.png

I’ve created a simple scene of various shapes. I’ve created some code that will generate a grid of random shapes… but that’s not the important part.

The important part is that I have four classes defined. The first is a basic shape class that the cube, sphere, and capsule class inherit from. Then each of the prefab shapes has the correspondingly named class attached to them.

Shape Class.png
Not much going on here!

Not much going on here!

All of these classes are empty and are primarily used to add a type to the prefab. I do this fairly often in my projects as it’s a way to effectively create tagged objects without using the weakly typed tag system built into Unity. I find that it’s an easy and convenient way to get a handle on scene objects in code.

But more to the point! It allows us to leverage generics in C# and Unity.

When the shape objects are instantiated they are all added to a list that holds the type “shape" as a way of keeping track of what’s currently in the scene. Instead of just shapes sitting in a grid, these could be objects in a player’s inventory or maybe a bunch of NPCs that populate a given scene or whatever.

You can imagine 2 more exactly like this… Just with “Capsule” or “Sphere” instead of “Cube”

You can imagine 2 more exactly like this… Just with “Capsule” or “Sphere” instead of “Cube”

So let’s imagine you need to find all the cubes in the scene. That’s not too hard you could write a function like the one to the right. We can simply iterate through the list of scene objects and add all the cubes to a new list and then return that list of cubes.

And then if you need to find all the spheres. We can just copy the find cube function and change the type of list we are returning and the type we are trying to match. Done!

And again we can do the same thing with the capsules.

But now we have three functions that do almost the exact same thing and this should be a red flag! We have three chunks of code doing nearly the exact same thing. There must be a better way?

Turns out there is!

Create A Generic Function

The only difference between the three functions we’ve created is the type! The type in the list and the type that we are trying to match when we iterate through the list.

Multiple Generic Arguments.png

We are doing the same steps for every type. Which is the exact problem that generics solve!

Find Al Shapes of Type.png

So let’s make a generic function that will work for any type of shape. We do this by adding a generic argument to the function in the form of an identifier between angle brackets after the function name and before any input parameters.

Traditionally the capital letter T has been used for the generic argument, but you can use anything. It’s even possible to add additional generic arguments. They just need to be separated by commas. Some sources will suggest using T, U, and V which will work but doesn’t necessarily allow for easily readable code. Instead, another convention is to start with a capital T and follow it with a descriptor. For example TValue or TKey. Whatever makes sense for your use case.

This generic argument is the type of thing we are using in our function. Which for our case is also the type stored in the list and is the type we are trying to match. So we can simply replace the particular types with the generic type of T.

Do note that we still have the type of “shape” in our function. This is because the list with all the scene objects is storing types of shape so in this case, that type is not generic.

In my example project, I have UI buttons wired up to call this generic function so that cubes, spheres, and capsules can be highlighted in the scene. Each button calls the same function, but with a different generic argument.

Shape Select Buttons.png

The result? We have less code, the same functionality AND the ability to find new shapes if new types are added to our project without having to create significant code for each type of shape.

Generics Constraints

You may have noticed that I snuck in a little extra unexplained code at the top of our generic function. This extra bit is a constraint. By using the keyword “where” we are telling the compiler that there are some limits to the types that T can be. In this case, we are constraining T to be the type Shape or a type that inherits from Shape. We need to do this otherwise the casting of the object to type T would throw an error as the compiler doesn’t know if the types can be converted.

Destory Objects of Type.png

Constraints can be very wide or very narrow. In my experience, constraints to a parent class, monobehaviour, or component are very common and useful.

Without a constraint, the compiler assumes the type is object which while general there are limits to what can be done with a base object.

For example, maybe you need to destroy objects of a given type throughout your scene. This isn’t too hard to do, but a generic function does this really well.

The function “find all objects of type” returns a Unity Engine Object which is too general. If we constrain T to be a component or a monobehaviour we can then get access to the attached gameObject and destroy it.

(Link) You can find more about constraints here.

Another Example

Shape of Type Under Mouse.png

In my personal game project, I often need to check and see if the player clicks on a particular type of object. There are certainly many ways to do this, but for my project, I often just need a true or false value returned if the cursor is hovering over a particular object type.

Check for Object Under Mouse.png

This is again a perfect use for a generic function. A raycast from the camera to the mouse can return a raycast hit. If that hit isn’t null we can then check to see if the object has a component. Rather than check for a particular component, we can check for a generic type. Note once again we need a constraint and that the generic type needs to be constrained to be a component.

Then to use this function we simply call it like any other function but tell it what type to look for by giving it a generic argument. Not too complex and definitely re-usable.

Static Helper Class

Additionally, many generic functions can also operate as static functions. So to maximize their usefulness, I often place my generic functions in a static class so that they can easily be used throughout the project. This often means even less code duplication!

Generic Classes

Generic Class Example.png

So far we’ve looked at generic functions, which I think are by far the most common and most likely use of generics. But we can also make generic classes and even generic interfaces. These operate much the same way that a generic function does.

The image to the right shows a generic class with a single generic argument. It also has a variable of the type T and a function that has an input parameter and a return value of type T. Notice that the type T is defined when the class is created and not with each function. The functions make use of the generic type but do not require a generic argument themselves!

Do note that this class is a monobehaviour and as is Unity will not be able to attach this to a gameObject since the type T is not defined.

However, if an additional class is created that inherits from this generic class and defines the type T then this new additional monobehaviour can be attached to a gameObject and used as a normal monobehaviour.

The uses for generic classes and interfaces highly depend on the project and are not super common. Frankly, it’s difficult to come up with good examples that are reasonably universal.

Object Pool.png

An imperfect example of a generic class might be an object pooling solution where there is a separate pool per type. Inside the pool, there is a queue of type T, a prefab that will get instantiated if there are no objects in the queue plus functions to return objects to the pool as well as get objects from the pool.

The clumsy part here comes from the assigning of the prefab which must be done manually, but this isn’t too high of a price to pay as each pool can be set up in an OnEnable function on some sort of Pool Manager type of object.

Pool Manager.png

This class is static and is per type which makes it easy to get an instance of a given prefab. In this case, we are equating the type with a prefab which could cause problems or confusion, so just something to be aware of.

Generics vs. Inheritance

It turns out that a lot of what can be done with generics can also be done with inheritance and often a bunch of casting. And it might turn out that generics are not the best solution and using inheritance and casting is a better or simpler solution.

But in general, using generics tends to require less casting, tends to be more type-safe, and in some cases (that you are unlikely to see in Unity) can actually perform better.

(Link) To quote a post from Stack Overflow:

You should use generics when you want only the same functionality applied to various types (Add, Remove, Count) and it will be implemented the same way. Inheritance is when you need the same functionality (GetResponse) but want it to be implemented different ways.

Steam Workshop with Unity and Facepunch Steamworks

Adding workshop functionality to a game is something I’ve wanted to learn to do for a long while. I dreamt of doing it with my first game and every project since then. There seemed like there were so many sticking points and potential problems. As I see it there are two main problems.

  1. Not only do you have to create the tools to make that content you have to create the framework to handle that content… While that may sound easy, I don’t think it is. At least for most games.

  2. The documentation on how to implement workshop functionality is scarce. Really scarce. At least from my searches. I’ve found almost NOTHING.

screenshot ac17b53e-8d59-45a3-8e54-410b276034a7.png

With Where’s My Lunch it was easy to figure out the type of content. Levels!

I already had a sandbox level built into the game, so turning that into a level editor really shouldn’t be too much of a stretch. In my earlier post, I explained how I’m using “Easy Save” to save all the data from levels and store it as an external file. It’s surprisingly simple… even easy. ;)

With the type of content and a simple (singular) external file the first problem is largely solved.

The second problem that of the lack of documentation… Was seemly solved by using Facepunch Steamworks. Well, sort of.

Facepunch, provides some code snippets of how to upload and update a workshop item. It looks pretty simple. And it is, sort of. As always the problems lie in the details. And those details can often depend on your projects needs and structure.

Disclaimer & Goals

The main goal of this post is to give an example of how I implemented the Steam Workshop and not to give a step by step process for you to follow exactly - I actually don’t think it’s even possible since every game is so different.

I’m going to try to talk about big ideas and point out the problems I had along the way. I’ll look at how to upload, download and update your workshop items.

These are things that any and all implementation of the Steam Workshop will need to do - at least I think so.

Now, I’m not going to look at how to handle the data and files that are uploading and downloading inside of your project as that’s almost 100% dependent on the type of files and how they’re being used in the individual project

I’m also sure there are some better ways to do what I’ve done. That’s just the way it is and I’m okay with that. If you know of a better or easier way, leave me a comment, I always love to learn something new!

One last thought. When it comes to topics like this… well… there is only so much hand holding that can be done. If you are just getting started with Unity and C#, to be honest, this probably isn’t something that you should be trying to do until you get more experience.

Setting Up the Backend

There’s a not that NEEDS to get set up in Steamworks, but there are a few things. And! They are not covered in the Facepunch Documentation.

Workshop.png
Enable UGC.png

First, we need to enable UGC file transfer, which is done with a single toggle.

Easy.

Workshop Visibility.png

Next, we need to set the visibility state. The default setting will be enough for you, the developer, to upload files, but if you want your audience to be able to test the workshop your going to need to do more work. For early testing I choose the second option, which requires a custom Steam group for your testers. Anyone in that group will automatically have access to the workshop. Which option you choose is, of course, up to you and your project’s needs.

THEN! There is one more important step.

If you are uploading images or larger files you need to enable Steam Cloud and increase the byte quota and number of files per user. In the Steam Developer forums the Valve employees seemed to be in favor of raising the limits far high than expected - which I imagine is to avoid errors and player frustration. I have no idea why the default is so low.

If you don’t change these settings your uploads will fail and there will be no indication that this is the problem. I didn’t hit this snag originally while uploading small save files, but once I added preview images the uploads started failing.

SteamCloudSettings.png

And I spent hours! Hours! Trying to figure out the problem. So yeah. Go change those settings before you go too far.

There are of course other settings but these are the basics that are required.

Uploading!

This is an exciting step. And not a hard one… If it works.

Facepunch and of Steamwork gives almost no indication for the cause of problems if there are any. So yeah. Find some patience and be prepared to spend some time searching for solutions.

The example given by Facepunch is a pretty good start. It’s easy, but with minimal feedback there are a few pitfalls.

Below you can see the upload function that I’m using. I’ve minimized lines that are overly specific to my project.

Workshop Upload.png

To upload you will need a path to the folder containing all of the files and assets. For the file preview image you will need a path to the actual file that will be uploaded.

ProgressClass.png

After that the code snippet from Facepunch shows what you want you need to do. There are several parameters or options for the upload, that while not well documented are named well enough to figure out most of them. For my purposes I added a description, a few tags and set the visibility to public. If you don’t set the visibility to public, the upload will succeed, but the it will be set to private by default.

You may also notice that I’ve created a new instance of the Progress Class. For the most part my version was taken straight from Facepunch, with the addition of a few clumsy bits that will provide some visual feedback to the user while their files are uploading.

The uploading process is asynchronous, so after the upload process has been attempted I send a message to the console based on the results. The results, don’t tell you much, beyond whether the upload was a success or not.

I really wish there were more clues to why an upload may have failed…

If the upload did fail, I display a message to the user and then invoke an event to make sure all the systems that might care about a failed upload know it happened.

It takes a few minutes, but assuming the upload is successful, your workshop item will appear on the game’s workshop page.

Pretty sweet and not too hard.

Downloading

The idea behind downloading is to do a search, then based on the results of that search individual workshop items can be queried or downloaded.

Once again, the Facepunch documentation is pretty good and the process of doing a search is fairly straightforward. In my code, I search by tag and then have other optional searches that can be added by the player.

The search also requires a page number. By default I get the first page, but it’s likely you will want additional pages and you will need to handle this in your implementation. In mine I repeat the search and increment the page number when the player scrolls to the bottom of the list.

Get Workshop Level List.png
Workshop Search Options.png

I choose to wrap the search options in a class for convenienceand to reduce the number of input parameters in the class. While I included many of the possible search parameters, I didn’t include all of them but this custom class will allow me to easily add new parameters without breaking the search functions.

Just like the upload process the search process is asynchronousand the results will come back in a short period of time so it must be done in an “async” function and wrapped in a try/catch.

It’s possible that the results are empty and Facepunch provides a “hasValues” property that can be used to ensure or check that the search was successful.

Do Search Function.png
Iterate Through Search Results.png

Then the results, if there are any, can be looped through with a foreach loop like so.

Displaying Workshop Item info

Displaying Workshop Item info

How exactly you handle those results is of course up to you. Steamworks.Ugc.Item type gives you access to the title, description, votes by the community, a url to the preview image and a whole lot more. Accessing these properties is straight forward, but once again the handling of those values is very much dependent on your project.

To the right (ish) you can see my user interface for each workshop level. The buttons on the bottom right are contextual and change visibility depending on the status of the item. There are also download and delete buttons that are currently hidden and will appear when they can be used.

The actual downloading of an item is quite simple and easy. Items are downloaded by Steam ID which is readily accessible from the workshop item. The files are downloaded to folder in a Steam library. There location can be found with the “directory” property of the Steamworks UGC Item.

Download Workshop Item .png

Do note that you are not downloading a Steamworks UGC Item type! You are downloading the same files you uploaded.

This caused some struggles on my end. It was easy for me to think I no longer needed reference to the Steamworks UGC Item and just work with the downloaded files. Once you lose reference to the item there is no (easy) way to find it again from the downloaded files. By losing reference to the item you lose access to lots of metadata that you’re probably going to want.

So tracking or keeping reference to an item is important and many of my functions pass references to items not the saved files. It’s okay if that doesn’t make sense… I think it will once you start implementing your own solution.

To Subscribe or Not To Subscribe?

So maybe I’ll show my ignorance with the Steam Workshop, but I was under the impression that I didn’t need or want to subscribe to each and every level that a user might want to try out. In the API downloading and subscribing are different actions. I couldn’t find anything that said you should do both…

So here’s me saying I think you should do both!

It keeps things simple and is one less “thing” that needs to get checked. There was some snag I hit… to be honest I can’t remember what exactly it was now, but it was going to take a lot of work engineer around not subscribing. So yeah. Just do it. It’s easy and personally I don’t see a downside for the player.

Updating Workshop Items

The last big hurdle with the workshop was updating items... Once again, the actual updating is pretty straight forward and is very similar to the uploading. The biggest difference here is that rather than create a new community file we are passing in the Steam ID of the item which allows Steamworks to update the files.

Update Workshop Item.png

The one big snag I hit was that the update will fail IF the file has not changed. There’s no indication that this is the problem, the files just won’t upload or update. Which makes sense but leads me to the next issue…

In WML players can locally save a level and don’t have to upload it. This makes sense to me on a lot of levels and I’d venture a guess it’s how most games do it too. But this means that there could be a local version and the downloaded workshop version in different folders… On top of that there’s no easy way to compare those files or know if one exists and the other doesn’t. It seemed to get messy in a hurry.

So if a player makes changes to a level, which version should it save to?

Hmm. Maybe this is obvious, but I definitely needed to think about it for a good while.

I came to the conclusion that changes should always be made to the local versions. And those local versions would need to get pushed to the workshop. This means if a user downloads someone else’s item then before they can edit it a local version is saved.

Check Ownership.png

It’s also unclear to me whether Steam itself checks ownership, so I created an internal check of the item ownership before updating. If the original item is not owned by the current user the files are uploaded to the workshop as a new item. If the original is owned by the player the files update. This leaves out the edge case of the owner wanting to upload the files as a new item, but I’m okay with that.

Deleting Items

Delete Workshop Item.png

It’s quite possible that users will want to delete an item that they’ve uploaded - this is especially true if you are doing some testing with the workshop. And it’s once again very easy. One function call with the Steam ID and it’ll get removed.

The process does take some time and could cause some issues if the user refreshes the search as the item seems to be partially still there for up to a minute or two. For WML, I have the imperfect solution of turning off the UI object when a level is deleted. This gives the user some indication that the deletion is happening, but if they refresh the search I don’t have a system in place (yet) to not show the partial and confusing results.

Conclusion

In the big scheme of things that’s really not that complicated. The amount of code needed to upload, download and update files is actually quite small. The bulk of my code is handling the UI or controlling the input and output of these functions - I’m happy to share those bits, but they are highly dependenton the game and I’m not sure they are particularly useful. But I could be wrong.